Quick answer
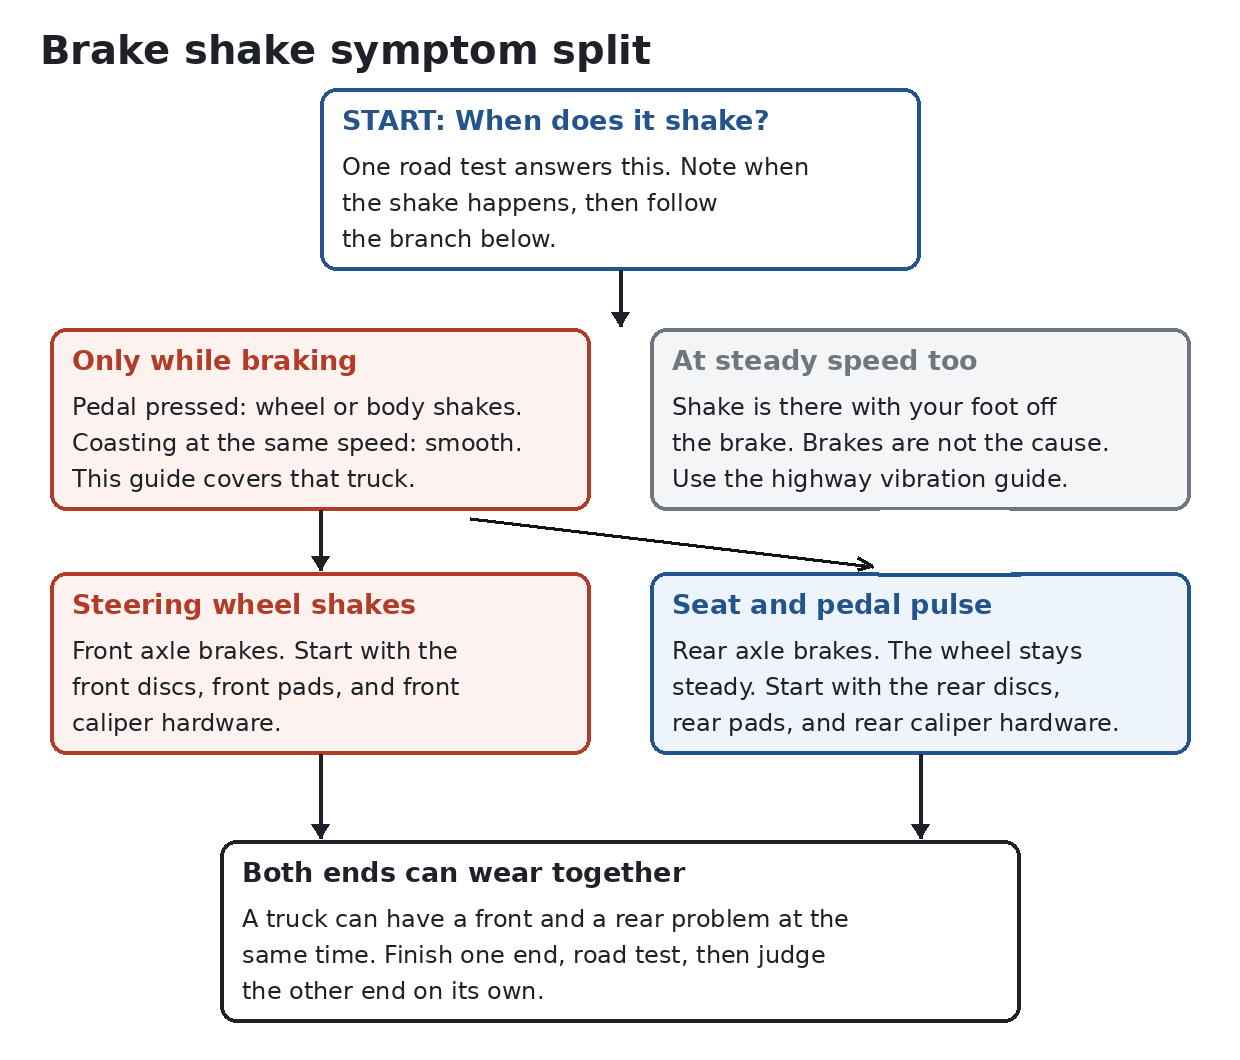
Shake only under braking points at the brakes. A GX that shakes through the steering wheel or the pedal while braking, and runs smooth at the same speed with your foot off the pedal, has a brake problem. Tires, balance, and bearings shake at steady speed too, and this guide leaves that truck to the vibration guide linked below.
Steering wheel shake means the front axle. A shake you feel in the seat and the pedal, with a calm steering wheel, means the rear axle. Diagnose the end the symptom names first.
Uneven pad deposits and disc thickness variation cause most GX brake pulsation. A smaller share comes from lateral runout that wears the disc uneven over time, and a small share comes from sticking caliper hardware. Cast iron discs almost never bend into a warp in street use. The measurements in this guide take about an hour with a dial indicator and a micrometer, and they tell you which fix applies before you buy parts.
Brake Shake Symptom Split
The first split
Drive at the speed where the shake is worst, usually 45 to 65 mph. Note the shake. Brake firmly from that speed and note what changes. Then coast at the same speed with your foot off the brake.
Braking only. The shake starts when you press the pedal and stops when you release it. Stay in this guide.
Steady speed too. The shake is present while coasting, and braking changes it little. The brakes are off the suspect list. Work through our highway vibration diagnosis guide, which covers balance, tires, bearings, and driveline checks in order.
Both patterns on one truck. A truck can carry a tire problem and a brake problem at the same time. Finish the steady speed diagnosis first, because a shaking tire makes brake feel hard to judge. Then repeat the braking test on the repaired truck.
Front or rear
Steering wheel shake. The front discs do most of the stopping on a GX, and front pulsation travels up the steering linkage to your hands. Start at the front axle.
Seat and pedal pulse with a steady wheel. Rear pulsation travels through the body. You feel it in the seat and as a slow surge in the pedal. Start at the rear axle.
A pull to one side under braking. A pull adds a second fact. One caliper is clamping harder or weaker than its partner. Read the caliper hardware section below before you condemn a disc, because a sticking piston or a seized slide pin overheats one side and creates the deposits and wear that pulse.
What makes a GX pulse
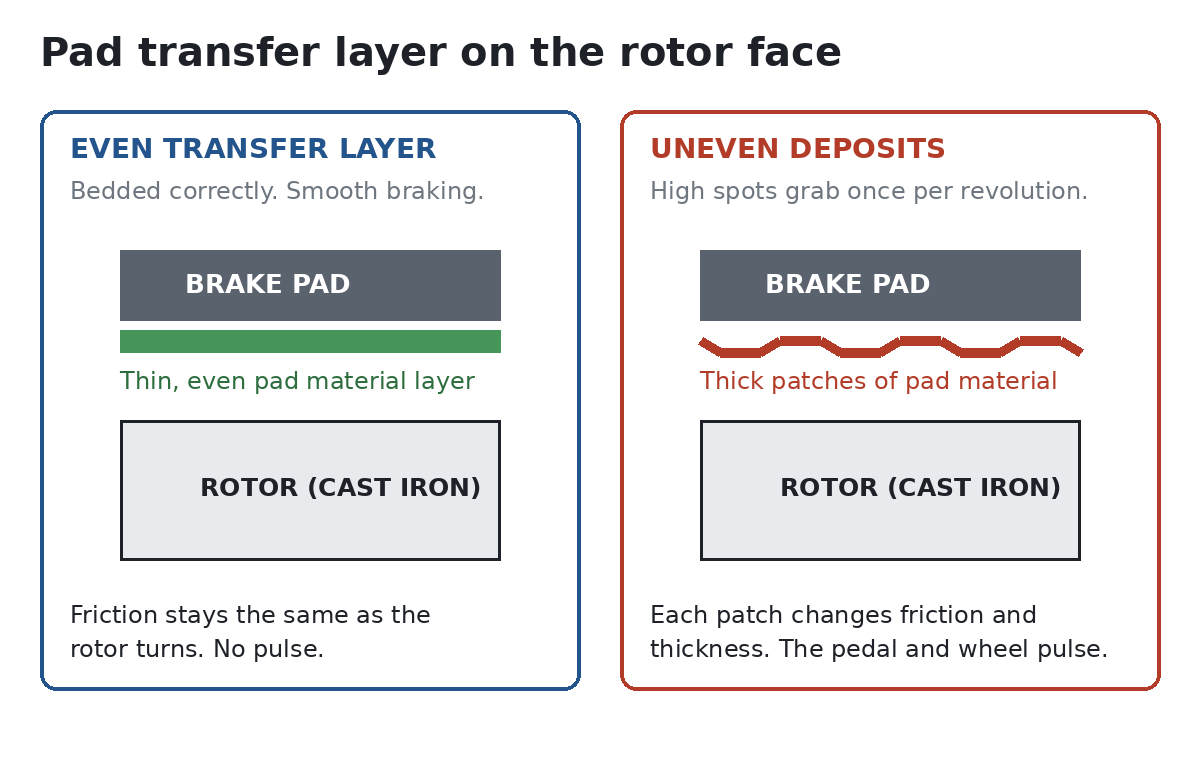
Brake pads stop the truck by smearing a thin layer of pad material onto the disc face. Engineers call it the transfer layer. The pad grips its own layer on the disc, and that grip is a large part of normal braking friction. Pulsation starts when that layer, or the disc under it, stops being even.
Pad Transfer Layer on the Rotor Face
Uneven pad deposits. Hard braking heats the pads. A stop that holds hot pads clamped against a hot disc prints a pad shaped patch of extra material onto the face. Long descents ridden on the brake pedal do the same thing in streaks. Each patch grips harder than the clean face beside it, so braking force rises and falls once per wheel revolution. Owners feel that as a shake that grows with pedal pressure and with heat.
Disc thickness variation. A disc that measures thicker at one point on its circle and thinner at another squeezes the pads unevenly on every revolution. Thickness variation grows out of lateral runout. A disc that wobbles side to side as it turns contacts the pad at one spot per revolution, and that spot wears faster for thousands of miles until the disc is measurably uneven. Rust or dirt trapped between the disc and the hub face starts the same process on the day the disc is installed.
Hard spots. Severe overheating changes the cast iron itself under a deposit. StopTech documents cementite forming in the disc at local temperatures around 1200 to 1300 degrees F, and cementite is harder than the surrounding iron. A hard spot resists a lathe cut and keeps pulsing after machining. Blued patches, dark spots that stay visible after cleaning, and a pulse that returns within weeks of a rotor turn all point at hard spots.
True warping. A cast iron disc can distort under extreme and uneven heat. A street driven GX at legal speeds almost never reaches that point. When a shop tells you the rotors are warped, the useful translation is that the discs pulse, and the cause still needs a measurement. The three causes above cover nearly every GX that arrives with this complaint.
Why downhill and towing make it show up
Deposits and thin spots exist at parking lot speeds too, and light braking barely reveals them. A long descent stacks stop after stop into the same discs. The patches and the clean face expand and grip differently as temperature climbs, so a mild pulse at the top of a grade becomes a hard shake at the bottom.
A GX weighs about 5,300 pounds before passengers and cargo. Holding that weight back with the service brakes alone for miles keeps the pads at deposit forming temperature the whole way down. Shift the transmission down and let the engine hold speed. Brake in firm applications to scrub speed, then release and let the discs cool between applications.
Rolling off a descent and sitting at a light with your foot on the brake clamps hot pads onto a hot disc at one spot. After a hard stop or a long descent, ease forward a few inches at the light if traffic allows, or use the parking brake on flat ground while you wait. The habit prevents the most common repeat of this repair.
Free checks before you order parts
Re-torque the wheels first. Uneven lug torque clamps the disc hat unevenly and adds runout that the disc did not have on the bench. Shops that run lug nuts down with an impact gun and no torque step create this problem during a tire rotation, and the pulse often starts within days of that visit. Loosen each nut a quarter turn, then torque in a star pattern in two passes to the spec for your truck in the lug torque table below. Road test before you spend anything.
Check the recent work history. Pulsation that started right after a pad swap usually means new pads went onto discs with an old transfer layer and old wear pattern. Pulsation that started right after a tire rotation points at lug torque. Pulsation that crept in over 10,000 miles points at wear, deposits, or hardware.
Confirm pressures match the door sticker, and look for a bent wheel lip or a missing balance weight. A tire problem shakes at steady speed too, so the road test in the first section already covers most of this. Our tire fitment guide covers the sizes and pressures these trucks run.
Parts and tools
Measuring tools. Dial indicator with a magnetic base, reading to 0.001 in. or 0.01 mm. Outside micrometer that covers your disc thickness, or a dedicated brake disc micrometer with pointed anvils that reach past the rust ridge at the edge of the swept area.
Hand tools. A floor jack and jack stands, a lug wrench, a 1/2-inch drive torque wrench covering 40 to 200 ft·lbf, which spans every lug and caliper value in the tables below, a socket set, and a C-clamp or caliper piston tool for pad service. The front calipers on both V8 generations are fixed units with opposed pistons. The rear calipers slide on two pins each, and those pins need inspection and fresh high temperature brake grease at every pad service.
Cleaning supplies. Brake cleaner, a wire brush, and hub cleaning discs or abrasive pads for the hub face and the disc hat mating surface. Rust scale on the hub face is a runout cause you can remove with ten minutes of cleaning.
Parts, bought after measuring. Pads and discs are sold by axle set. Order by year and model, and confirm the disc diameter and thickness against your old disc before the truck goes on stands. GX470 front discs and GX460 front discs differ in thickness, and the generations do not interchange as a mixed set. The published GX brake guide covers pad compound choice and the GX470 to GX460 front caliper swap in full.
Factory pad and disc numbers, pulled by application. Confirm by VIN before ordering, because pad and disc numbers split by year and brake option inside each generation.
| Part | Truck | Lexus part number | Listing |
|---|---|---|---|
| Front pad set | GX470, 2003 to 2009 | 04465-35290 | Genuine Lexus set on eBay |
| Front discs, pair | GX470, 2003 to 2009 | 43512-60151 | Genuine Lexus pair on eBay |
| Rear pad set | GX470, 2003 to 2009 | 04466-60090 | Genuine Lexus set on eBay |
| Front pad set | GX460, 2010 to 2023 | Confirm by VIN | Genuine Lexus set on eBay |
| Front disc | GX460, 2010 to 2023 | 43512-60191 | Genuine Lexus disc on eBay |
| Rear discs, pair, with rear pad set | GX460, 2010 to 2023 | 42431-60311 and 04466-60090 | Genuine Lexus kit on eBay |
| Front disc and front pad set | GX550, 2024 and newer | Confirm by VIN | Lexus GX550 brake disc page and Genuine Lexus front pad set on eBay |
| Rear disc | GX550, 2024 and newer | 42431-60350 | Lexus GX550 rear brakes page |
| Rear pad set | GX550, 2024 and newer | 04466-57010 | Lexus GX550 rear brakes page |
Shop tools you can rent or borrow. An on-car brake lathe lives at a shop. A bench lathe at a parts store cuts a removed disc and cannot correct runout that comes from the hub. Use an on-car lathe for runout correction, and the measurement section below explains when that distinction matters.
Measure before you replace
The GX has two brake disc checks, and the checks use the same tools a home shop can own. Work through them in this order on the axle the symptom named. Measure both sides of the axle, because the good side is your comparison.
Rotor Measurement Map
Step 1. Read the pads first. Pull the wheel and read pad thickness on both pads at that corner. The factory minimum lining thickness is 1.0 mm (0.039 in.) on both generations and both axles. Uneven thickness between the inner and outer pad, or between the two sides of the truck, is evidence. Record it before you disturb anything, and read the caliper section below before you order discs.
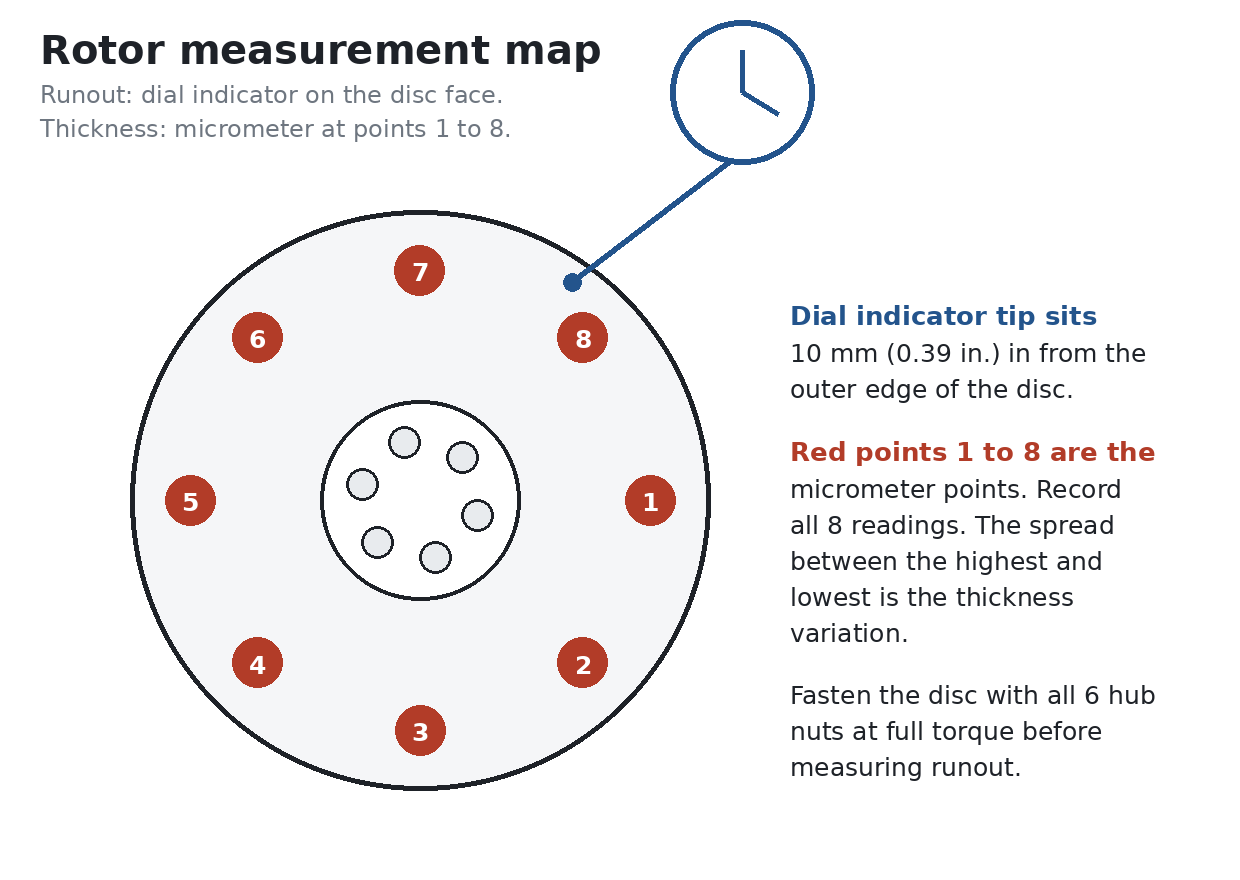
Step 2. Fasten the disc with the hub nuts. The runout check only means something with the disc clamped flat. Install the disc with all 6 hub nuts torqued to the wheel spec for the truck.
Step 3. Measure lateral runout. Set the dial indicator tip on the disc face 10 mm (0.39 in.) in from the outer edge, zero it, and turn the disc one full revolution by hand. The factory maximum is 0.0020 in. (0.05 mm) at the front discs and 0.0079 in. (0.20 mm) at the rear discs, on both the GX470 and the GX460. The GX550 front maximum matches at 0.0020 in. (0.05 mm), and the GX550 rear maximum is tighter at 0.0059 in. (0.15 mm).
Step 4. Chase a high runout reading before blaming the disc. Check bearing play and axle hub runout when disc runout is over the maximum. Clean the hub face and the disc hat, re-index the disc one hub position at a time, and measure again after each move. On the GX460, rotate the disc one fifth of a turn through the hub positions and keep the position with the lowest reading. A new disc installed on a dirty hub or a hub with its own runout pulses again within months, and owners report exactly that cycle in forum threads.
Step 5. Measure thickness at 8 points. Run the micrometer around the disc at the points on the diagram, at the same radius, and write all 8 numbers down. Compare the thinnest reading with the factory minimum for your axle in the spec table below. The spread between the highest and lowest reading is the thickness variation your pedal feels. That spread has no separate pass or fail number, so use it as a comparison: a disc with a wide spread and a matching pulse points to thickness variation as the cause, and a disc with a tight spread sends you back to deposits and hardware.
Step 6. Read the disc face. Look for pad shaped outlines, dark patches, blue heat tint, scoring, and a rust ridge at the edge of the swept area. Photograph each face before cleaning. Deposits you can see pair with the re-bed fix. Blued and spotted faces pair with replacement.
Inspect the caliper hardware while the wheel is off
Front calipers are fixed units. Each front caliper carries opposed pistons that squeeze both pads at once. A piston that moves slowly or stays out cooks its pad, wears that pad faster, and overheats one face of the disc. Compare pad thickness inner to outer and side to side. A single thin pad on a front corner names that caliper for a rebuild or replacement.
Rear calipers slide on pins. Each rear caliper floats on two slide pins. A dry or corroded pin lets the caliper drag one pad and release late. Owner threads on IH8MUD read uneven rear pad wear as a pin or caliper problem, and the fix starts with the pins: pull them, clean them, replace torn boots, and grease them with high temperature brake grease. A pin that stays seized in its bracket after cleaning calls for the pin and boot kit or a caliper.
After a normal drive, compare rotor temperature side to side with an infrared thermometer, or compare how freely each wheel spins by hand on stands. A corner that runs far hotter than its partner is dragging, and a dragging corner deposits pad material and wears its disc uneven until it pulses. New discs on a dragging caliper repeat the failure.
Torn piston boots and cracked slide pin boots admit the water and grit that seize the parts behind them. Replace torn boots during any pad job on a high mileage truck. The parts cost little and the labor overlaps the work already open.
Match the fix to the finding
| Finding | Fix |
|---|---|
| Visible deposits, thickness spread tight, runout in spec | Re-bed the brakes with the procedure in the next section. No parts. |
| Runout over the factory maximum, hub clean and true after re-indexing | Machine the disc on an on-car lathe, or replace the disc. Decide with the thickness rule below. |
| Wide thickness spread, thinnest point still above the minimum with room to machine | Machine on an on-car lathe and fit new pads. |
| Thinnest point at or near the factory minimum | Replace the discs and pads as an axle set. Machining would finish below the minimum. |
| Blued face, dark hard spots, pulse returned soon after a previous rotor turn | Replace the discs and pads. Hard spots survive machining and pulse again. |
| Uneven pad wear, pull under braking, one hot corner | Service or replace the caliper hardware first, then re-measure the discs. |
| Runout high at every index position, hub face clean | Measure hub runout and bearing play. The hub or bearing is the fault, and a new disc cannot correct it. |
Re-bedding
Re-bedding scrubs an uneven transfer layer back to even by working the brakes through controlled heat cycles. It applies to the first row of the table above: deposits with a mechanically sound disc. It cannot correct a disc that measures uneven, and it cannot remove hard spots.
The pattern. The bedding pattern already published in our GX brake guide is the starting point, and a pad manufacturer’s own instructions for your pads replace it where they differ. Find a safe, empty stretch of road. Make 5 or 6 moderate stops from about 35 mph down to about 5 mph, rolling between stops and leaving about 30 seconds of cooling between each one. Make 2 or 3 firmer stops from about 55 mph down to about 5 mph the same way. Drive 5 to 10 minutes with minimal braking to cool the system.
Roll through every stop. Coming to a full halt during bedding clamps hot pads onto one spot and prints the deposit you are removing. Keep the truck creeping at the end of each stop, and choose a road where traffic never forces a full stop with hot brakes.
Judge it over the next hundred miles. Mild cases feel better on the cool down drive. Stubborn cases improve over several drives as the layer evens out. A pulse that stays identical after a correct re-bed has a measured cause waiting in the steps above, so go back and measure instead of repeating the bedding.
Machine or replace
Every GX disc carries a factory minimum, listed in the spec table below, and the value is also stamped on the disc itself. Machining removes metal. A disc that finishes a cut below its minimum has too little thermal mass, overheats sooner, and deposits pads faster. Measure first, add the cut the lathe needs, and replace any disc that lands at or below the minimum.
GX discs often arrive at the decision already thin. Rotor wear and pulsation tend to arrive together on these trucks. In an IH8MUD discussion of GX470 brake service, an owner measured his front rotors within about 1 mm of the minimum specification when pulsation started, which left no room to machine, and replacement was the outcome. Expect that result on a high mileage truck and price discs before you book lathe time.
A bench lathe trues a disc to itself. An on-car lathe cuts the disc as mounted, so it corrects disc and hub runout together. Choose the on-car cut when runout was the finding. Choose a bench cut only when the hub measured true and thickness variation was the finding.
New pads go with any cut or any new disc. An old pad carries the old wear pattern and the old transfer habits. Fitting old pads to a fresh face prints the problem back onto the disc in the first week.
Bedding new pads and rotors, and the first week after
Bed every fresh setup. New pads on new or machined discs need the same controlled stops from the re-bedding section to lay down an even transfer layer. Skipping bedding is a common cause of shudder complaints on brand new brakes, and ClubLexus owners make the same point to owners who skipped the burnish step after a brake job.
Keep the first week gentle. Avoid long descents and repeated hard stops for the first few hundred miles where your routes allow it. The transfer layer is still stabilizing, and one overheated descent can print a deposit onto a fresh face.
Re-torque the wheels after the first drive cycle. Confirm lug torque again after 25 to 50 miles on any wheel that came off. A wheel that settles unevenly undoes the runout work you just paid for.
Torque specifications
Torque values lead with ft·lbf, with N·m in parentheses. Star pattern, in two passes, on clean and dry threads. Keep oil and grease off the wheel studs and nuts.
Wheel lug nuts
| Truck | Lug nut torque |
|---|---|
| GX470, 2003 to 2009 | 82 ft·lbf (112 N·m) |
| GX460, 2010 to 2015 | 82 ft·lbf (112 N·m) |
| GX460, 2016 to 2023 | 76 ft·lbf (103 N·m) |
| GX550, 2024 and newer | 97 ft·lbf (131 N·m) |
Caliper mounting bolts
| Joint | Torque |
|---|---|
| GX470 front caliper to steering knuckle | 91 ft·lbf (123 N·m) |
| GX470 rear caliper mounting to axle hub | 77 ft·lbf (105 N·m) |
| GX470 rear caliper to its mounting | 65 ft·lbf (88 N·m) |
| GX460 front caliper bolt, 2010 to 2015 | 91 ft·lbf (123 N·m) |
| GX460 front caliper bolt, 2016 to 2023 | 136 ft·lbf (185 N·m) |
| GX460 rear caliper to its mounting, 2010 to 2023 | 65 ft·lbf (88 N·m) |
| GX460 rear caliper mounting bolt, 2010 to 2015 | 77 ft·lbf (105 N·m) |
| GX460 rear caliper mounting bolt, 2016 to 2023 | 74 ft·lbf (100 N·m) |
| GX550 front caliper (disc brake cylinder assembly) | 151 ft·lbf (205 N·m) |
| GX550 rear caliper (disc brake cylinder assembly) | 151 ft·lbf (205 N·m) |
The GX460 front caliper bolt value changes inside the generation run. Match the value to your model year in the table above before the wrench turns. A bolt torqued to the early value on a late truck is under-clamped by a wide margin.
Brake service specifications
Standard and minimum disc thickness, maximum disc runout, and pad lining limits. Disc and pad values are in inches with millimeters in parentheses.
| Spec | GX470 front | GX470 rear | GX460 front | GX460 rear | GX550 front | GX550 rear |
|---|---|---|---|---|---|---|
| Disc thickness, standard | 1.102 in. (28.0 mm) | 0.709 in. (18.0 mm) | 1.26 in. (32.0 mm) | 0.709 in. (18.0 mm) | 1.260 in. (32.0 mm) | 0.787 in. (20.0 mm) |
| Disc thickness, minimum | 1.024 in. (26.0 mm) | 0.630 in. (16.0 mm) | 1.15 in. (29.0 mm) | 0.630 in. (16.0 mm) | 1.142 in. (29.0 mm) | 0.728 in. (18.5 mm) |
| Disc runout, maximum | 0.0020 in. (0.05 mm) | 0.0079 in. (0.20 mm) | 0.0020 in. (0.05 mm) | 0.0079 in. (0.20 mm) | 0.0020 in. (0.05 mm) | 0.0059 in. (0.15 mm) |
| Pad lining, standard | 0.453 in. (11.5 mm) | 0.394 in. (10.0 mm) | 0.445 in. (11.3 mm) | 0.394 in. (10.0 mm) | 0.492 in. (12.5 mm) | 0.394 in. (10.0 mm) |
| Pad lining, minimum | 0.039 in. (1.0 mm) | 0.039 in. (1.0 mm) | 0.039 in. (1.0 mm) | 0.039 in. (1.0 mm) | 0.039 in. (1.0 mm) | 0.039 in. (1.0 mm) |
The minimum thickness is also stamped on each disc, and the stamped value governs when it differs from any table.
Model notes
GX470, 2003 to 2009. The front discs are the thinnest in this guide at 1.102 in. (28.0 mm) standard, and the generation earns its reputation for repeat front brake service. The GX460 and 2010 to 2015 4Runner front caliper and disc swap bolts on and adds disc thickness at the same 338 mm diameter, which is thermal mass the GX470 front brakes lack on long descents. Our GX brake guide covers that swap and its trade-offs in full. For a pulsation diagnosis, the swap changes only the spec column you measure against. Diagnose the stock setup first, and let a worn out stock setup be the reason to swap, on a truck you plan to keep.
GX460, 2010 to 2023. The front discs start thicker at 1.26 in. (32.0 mm), and the brake hardware carries two traps for this diagnosis. Wheel torque drops inside the generation, from 82 ft·lbf (112 N·m) to 76 ft·lbf (103 N·m), and a shop working from memory can over-torque a late truck or under-torque an early one. The front caliper bolt torque also rises sharply on the later trucks. Match every torque to your year using the tables above.
GX550, 2024 and newer. The road test splits, the deposit mechanism, and the measurement method in this guide apply to the GX550 the same way, and its disc and pad limits are in the spec table. Two GX550 numbers differ from the earlier trucks and both matter here. The rear disc runout maximum is 0.0059 in. (0.15 mm), tighter than the 0.0079 in. (0.20 mm) rear limit on the GX470 and GX460. The wheel nut torque is 97 ft·lbf (131 N·m), well above both earlier generations. Front and rear caliper mounting bolts both torque to 151 ft·lbf (205 N·m), and both rows are in the caliper table above. A GX550 under warranty with a brake pulse belongs at the dealer first, with your road test notes in hand: the speed, the descent, and whether the wheel or the seat carries the shake.
Common mistakes
Buying rotors on the word warped. The parts arrive, the old discs were never measured, and a dragging caliper or a dirty hub installs the same pulse onto the new parts. The tools cost less than one axle set of discs and pads.
Machining a disc that is already at the minimum. A turned disc below its minimum overheats faster and pulses again sooner. The thickness reading decides, and it takes two minutes per disc.
Skipping the hub cleaning. Rust scale between the hub and the disc hat is runout you install by hand. Clean both faces every time a disc comes off.
Running lug nuts down with an impact gun and calling it done. Uneven clamp load is a runout cause and a deposit cause. Torque wrench, star pattern, two passes, every time.
Holding the brake at the bottom of a descent. The habit prints deposits onto hot discs at every long light. Ease forward, or set the parking brake on flat ground while you wait.
Bedding skipped, then blamed on the parts. New brakes that never got a bedding cycle carry a patchy transfer layer from the first week. The shake that follows gets blamed on the rotors.
FAQ
Can I keep driving with a brake pulse? A mild pulse with full stopping power is a repair to schedule, and it deserves prompt attention because the causes progress. A strong shake, a pull under braking, a grinding noise, or a pedal that sinks changes the answer: park the truck and diagnose it before the next trip.
My rotors were turned 6 months ago and the shake is back. Why? Three causes lead the list. The discs finished the cut near the minimum and overheated sooner. Hard spots survived the cut and kept pulsing. Or the real cause was upstream: a dragging caliper, a dirty hub, or uneven lug torque reinstalled the problem. Measure the discs and read the pad wear pattern before paying for a second cut.
Do drilled or slotted rotors fix pulsation? No rotor face pattern corrects deposits, thickness variation, or a dragging caliper. Pad compound, correct bedding, and sound hardware decide whether a pulse returns. Our brake guide covers rotor style choice for trucks that tow and run trails.
The shake only happens on one long downhill near my house. Is that still brakes? Yes, and that pattern matches deposit pulsation closely. Heat on the descent raises the grip difference between the patches and the clean face until you can feel it. The re-bedding section and the descent habits in this guide address that case directly.
Should I replace pads and rotors on both sides? Yes. Brake parts are serviced as an axle set: both sides, same parts, same day. A new disc on one side and a worn disc on the other brakes unevenly and wears unevenly from the first stop.
How much of this can a Home Mechanic do? The road tests, the lug torque check, the pad reading, and the runout and thickness measurements are driveway work with the tools in the Parts and tools section. The on-car lathe cut is shop work. Caliper replacement opens the hydraulic system and adds bleeding, and our brake guide covers the bleeding procedures by generation before you decide to open it.
Sources
- GX470 factory manuals
- GX460 factory manuals
- GX550 owner’s manuals
- GX550 repair manuals
- Lexus parts and torque confirmation by VIN: parts.lexus.com
- ClubLexus, GX 2nd gen vibration and shake issues: clublexus.com
- ClubLexus, braking shake at highway speeds: clublexus.com
- IH8MUD, brake pads are worn, thinking of how much to replace: forum.ih8mud.com
- IH8MUD, seized caliper: forum.ih8mud.com
- StopTech, The “Warped” Brake Disc and Other Myths of the Braking System, mirrored at IPD USA: ipdusa.com
- The Truck Garage, GX460 brake guide: thetruckgarage.com
- The Truck Garage, GX highway vibration diagnosis: thetruckgarage.com
Leave a Reply