For GX470 (2003–2009) and GX460 (2010–2023) owners, beginner to intermediate DIY. (GX550 (2024+): brake procedures not yet verified. Do not assume 460-generation parts or procedures carry over.)
If you spend any time in GX circles, you’ll hear two recurring stories: someone bragging about the GX460 front brake “upgrade,” and someone else complaining their GX460 has a soft, spongy pedal that needs a double-pump. This guide puts both conversations in one place. What the hardware swap actually changes, how to diagnose mushy pedal feel, how to bleed the system the right way (eBay) (including which jobs actually need the scan-tool actuator step), and how to choose pads and rotors that suit a heavy SUV.
1. What the GX460 front brakes actually are (and what the swap changes)
The GX470-to-GX460 front brake swap is one of the most discussed bolt-on projects in the community. Mainly for GX470s, 4th/5th-gen 4Runners, and FJ Cruisers. The idea: take the front calipers and rotors from a GX460 and mount them on the older truck.
Here’s what physically changes:
- Thicker rotors, same diameter. Front rotor diameter stayed 338 mm, so 17-inch wheels still clear. What grew was rotor thickness: 28 mm on the GX470 to 32 mm on the GX460, per the factory manuals. That extra 4 mm is thermal mass to soak up heat on long descents or repeated hard stops.
- Calipers reported to be less seizure-prone. The GX470’s front calipers have a well-known reputation for pistons seizing with age and corrosion. Forum owners who made the swap frequently cite the GX460 calipers as less prone to this, alongside the thicker rotors, as the main reason to do it.
- Compatibility notes. You need 2010-2015 GX460 front calipers. The 2016 refresh changed the caliper mounting bolts from M12 to M14, so 2016+ calipers will not bolt to a GX470 knuckle. Get matching GX460 rotors, pads, shims, and hardware. Gotcha to watch: some aftermarket pads sit slightly off on the backing plate and can overhang the rotor edge. One owner compared four brands of the same pad part number and found two overhung while two did not. Compare pad-to-rotor fit before you commit.
The honest debate: is it an upgrade?
Yes. Thicker rotors and calipers that seem less eager to seize with age. That is a real improvement. But here is the part nobody posts photos of.
Most trucks get the swap before their existing brakes are actually healthy. Fresh premium pads, freely moving caliper pistons, fresh DOT 3 fluid, and sound rubber lines will transform a GX’s braking. Long-time owners report old fluid alone made a staggering difference, and stainless braided lines noticeably reduce pedal travel. If your 470’s calipers are dragging and your fluid is old enough to vote, a swap will feel amazing. So would simply restoring the factory system. For less money and less work. One of those options also leaves you with enough cash for tires.
The swap doesn’t cure pedal feel on its own. Pedal feel is mostly a hydraulic problem (air, old fluid, line compliance, knockback), not a rotor-thickness problem. Owners have reported the same plush soft pedal developing on swapped trucks. Thicker rotors do not remove air bubbles. They just give the air bubbles a nicer neighborhood to live in. One more thing the swap changes: the GX460 front pistons are 48 mm versus 45 mm on the GX470, about 14% more piston area. That means more clamping force, but the master cylinder has to move more fluid, which is one reason some owners report a softer pedal after the swap until the system is bled thoroughly.
Bottom line: if your calipers are seized or your rotors are chronically overheated, the GX460 setup is a sensible upgrade. If your brakes are just soft, service what you have first. Flush the fluid. Check the calipers. Check the lines. Then decide.
2. Why the pedal feels spongy (or why you’re double-pumping)
A soft pedal and a pedal that needs a second pump are the same family of problem: somewhere between your foot and the pads, force is being lost to compression, flex, or a leak. On these trucks, the usual suspects, roughly in order of likelihood:
- Old, moisture-contaminated fluid. Brake fluid is hygroscopic. It absorbs water over years. Contaminated fluid darkens and boils at lower temperatures; vapor bubbles in the lines compress, and compression is the literal definition of a spongy pedal. The Lexus maintenance schedule calls for brake fluid replacement every 36 months or 30,000 miles for exactly this reason.
- Air trapped in the ABS actuator. A normal bleed moves fluid through the calipers and lines, but air trapped in the actuator’s solenoid passages often survives it. If the pedal improved after a bleed but never got right, suspect the actuator.
- The reservoir went dry during bleeding or a repair. Let the reservoir run low and the pump can pull air into the actuator, where it becomes very difficult to remove.
- Calipers and slide hardware. Seized pistons (the GX470’s specialty) and dry, corroded slide pins mean pads don’t apply or release evenly. Inconsistent bite and weird pedal travel.
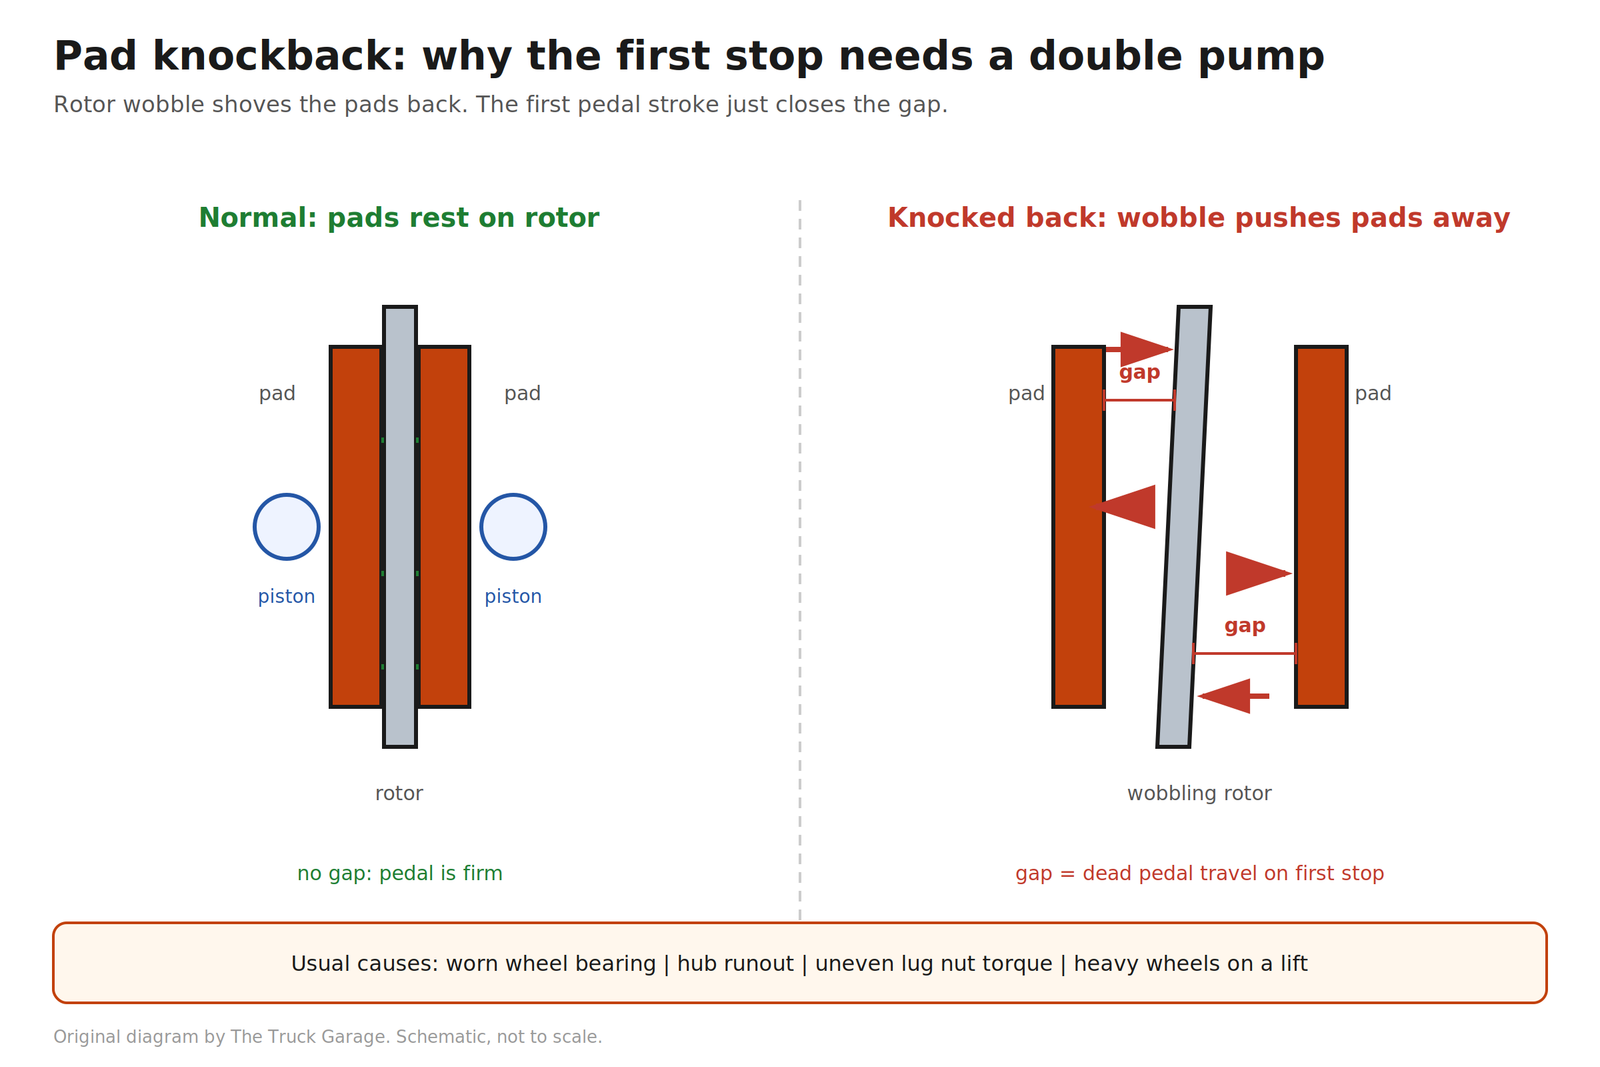
- Pad knockback, especially on lifted trucks. Knockback happens when rotor wobble (worn wheel bearings, hub runout, or the extra leverage of big heavy tires) physically pushes the pads back into the calipers. The first press has to travel further to push the pads back out. So you double-pump and the second press feels normal. If the soft pedal appeared after a lift and big tires, check wheel bearings and hub play before touching the hydraulics.
- Failing master cylinder. If the pedal slowly sinks toward the floor under steady pressure, the master cylinder’s internal seals are bypassing fluid. That’s a replace-the-master problem, not a bleed problem.
- Booster / accumulator issues. The GX uses a hydraulic booster with an electric pump and accumulator. If the pump runs excessively long at key-on or cycles constantly, the accumulator or pump side may be failing. That usually produces a hard or inconsistent pedal, a different repair path (see section 6).
3. If X, then Y. Decision guide
Use this to aim your effort before buying parts:
- If the pedal is soft but pumping it firms it up temporarily → Air or moisture in the hydraulics. Do a full flush using the line-bleed procedure for your generation (section 4). The scan-tool actuator step is only needed if air got into the actuator itself: the reservoir ran dry, or the booster, master cylinder, or reservoir was replaced.
- If the pedal slowly sinks while held → Master cylinder internal leak. Replace the master cylinder (or have it rebuilt), then bleed the whole system. Bleeding alone will not fix this.
- If the first stop of the day needs a double-pump but later stops are fine → Classic pad knockback. Check wheel bearings, hub runout, and retorque lug nuts evenly. Common on lifted trucks with heavy wheels.
- If the pedal got soft right after pad/rotor/caliper work → Air introduced during the job. Re-bleed, confirm the reservoir never went low, and verify caliper pistons and slide pins move freely. Stainless lines are worth considering if you’re already in there.
- If the truck pulls, shudders when hot, or pads wear unevenly → Hardware problem: seized caliper pistons, corroded slide pins, cheap or overheated rotors. Service or replace the calipers; check rotor runout.
- If the pump runs a long time at key-on or cycles constantly, or the pedal is hard/inconsistent → Booster/accumulator side. Diagnose the pump and accumulator before touching pads or fluid.
- If fluid in the reservoir is dark brown or black → It’s overdue. Full flush.
4. Proper bleeding by generation (they differ, which is how a 20 minute job becomes a weekend)
This is where most DIY brake jobs on these trucks fall short. Getting the generations mixed up causes real trouble. The GX470 and GX460 do not bleed the same way. Check your year before touching a wrench.
GX470 (2003–2009): pump-assisted bleed
- Park on level ground, shift to P, set the parking brake.
- Turn the ignition ON, engine off. The electric booster pump pressurizes the accumulator. You’ll hear it run briefly, then stop.
- Front calipers: depress the brake pedal several times, then hold it down and loosen the bleeder. Tighten the bleeder before releasing the pedal. Repeat until fluid runs clear and bubble-free. Bleeder plug torque: 8 ft lb (11 N·m).
- Rear calipers: with the pedal depressed and held, loosen the bleeder. The booster pump pushes fluid through continuously. Tighten before releasing. Repeat per wheel until clear.
- Keep the reservoir between MIN and MAX the entire time. Letting it run dry is how air gets into the actuator.
- No scan-tool solenoid cycling is needed for a routine GX470 bleed. The manual’s only extra step (“BLEED MASTER CYLINDER SOLENOID”) applies when the master cylinder solenoid itself was removed or replaced: with a hand-held tester in ACTIVE TEST mode, select the solenoid test and bleed from the rear caliper with the pedal not depressed. Skip it otherwise.
GX470 torque specs. Verified against the factory manual.
| Fastener | Torque |
|---|---|
| Front caliper bolts | 91 ft lb (123 N·m) |
| Rear bracket bolts | 77 ft lb (105 N·m) |
| Lug nuts | 82 ft lb (112 N·m) |
| Bleeder plugs | 8 ft lb (11 N·m) |
| Front brake tube flare nut | 11 ft lb (15 N·m) |
| Rear slide pin bolts | 65 ft lb (88 N·m) |
| Rear hose union bolt | 23 ft lb (31 N·m) |

GX460 (2010–2023): pick the procedure that matches the job
The factory manual has two bleeding procedures, and most DIY confusion comes from using the wrong one. Verified against the 2013 and 2016–2021 GX460 factory manuals. The procedure is the same for both.
Bleed brake line. This is the one you want for a routine fluid change or after replacing a flexible hose or caliper. No scan tool needed.
- Park on level ground, shift to P, set the parking brake.
- Turn the engine switch to IG (ON). Do not start the engine.
- Keep the reservoir between MIN and MAX the entire time. Don’t leave the fluid bottle sitting in the filler neck; fluid can overflow when it returns from the actuator.
- Front calipers: repeatedly depress the brake pedal and bleed from the front RH bleeder, then the front LH. Tighten each bleeder while the pedal is depressed. Bleeder plug torque: 8 ft lb (11 N·m).
- Rear calipers: with the brake pedal depressed and held, loosen the rear RH bleeder. The pump motor runs and pushes fluid through continuously, so there’s no need to pump the pedal. Release the pedal to stop the motor; don’t run it more than about 100 seconds continuously. Tighten the bleeder, then release the pedal. Repeat on the rear LH.
- Turn the engine switch off. Check for leaks, adjust the fluid level, and clear any stored DTCs. The manual notes DTCs may be stored during bleeding.
Bleed brake system. Only needed if the brake booster with accumulator pump, the master cylinder, or the reservoir was replaced. The factory manual requires Techstream for this one and warns against attempting it without the scan tool. After the line bleed above: connect Techstream, open Chassis / ABS/VSC/TRAC / Utility / Air Bleeding, and follow its prompts. For the front lines you hold the pedal and cycle the solenoids without opening the bleeders (repeat 10 times; the solenoid pauses automatically to protect itself). For the rear lines you open the bleeders and let the pump drain fluid with the pedal not depressed. Clear DTCs when done.
If you don’t have a scan tool: the line-bleed procedure above is the factory method for routine fluid changes and caliper or hose work, and it needs no scan tool. The Techstream step only applies when the booster, master cylinder, or reservoir was opened. Some owners report that triggering ABS on a loose surface (hard stops that cycle the ABS) after a careful manual bleed helps purge air from the actuator. That is owner-reported, not the factory method. If the pedal is still soft after a careful manual bleed, the actuator is the prime suspect and a shop with Techstream is money well spent.
Torque specs differ by year. The 2016 refresh changed three specs, so check your truck before torquing.
| Fastener | 2010-2015 | 2016-2021 |
|---|---|---|
| Front caliper bolts | 91 ft lb (123 N·m) | 136 ft lb (185 N·m) |
| Rear bracket bolts | 77 ft lb (105 N·m) | 74 ft lb (100 N·m) |
| Lug nuts | 82 ft lb (112 N·m) | 76 ft lb (103 N·m) |
| Bleeder plugs | 8 ft lb (11 N·m) | 8 ft lb (11 N·m) |
| Front brake tube flare nut | 11 ft lb (15 N·m) | 11 ft lb (15 N·m) |
| Rear slide pin bolts | 65 ft lb (88 N·m) | 65 ft lb (88 N·m) |
| Rear hose union bolt | 23 ft lb (31 N·m) | 23 ft lb (31 N·m) |
2022-2023 torque values were not verified. Check the factory manual for your year.
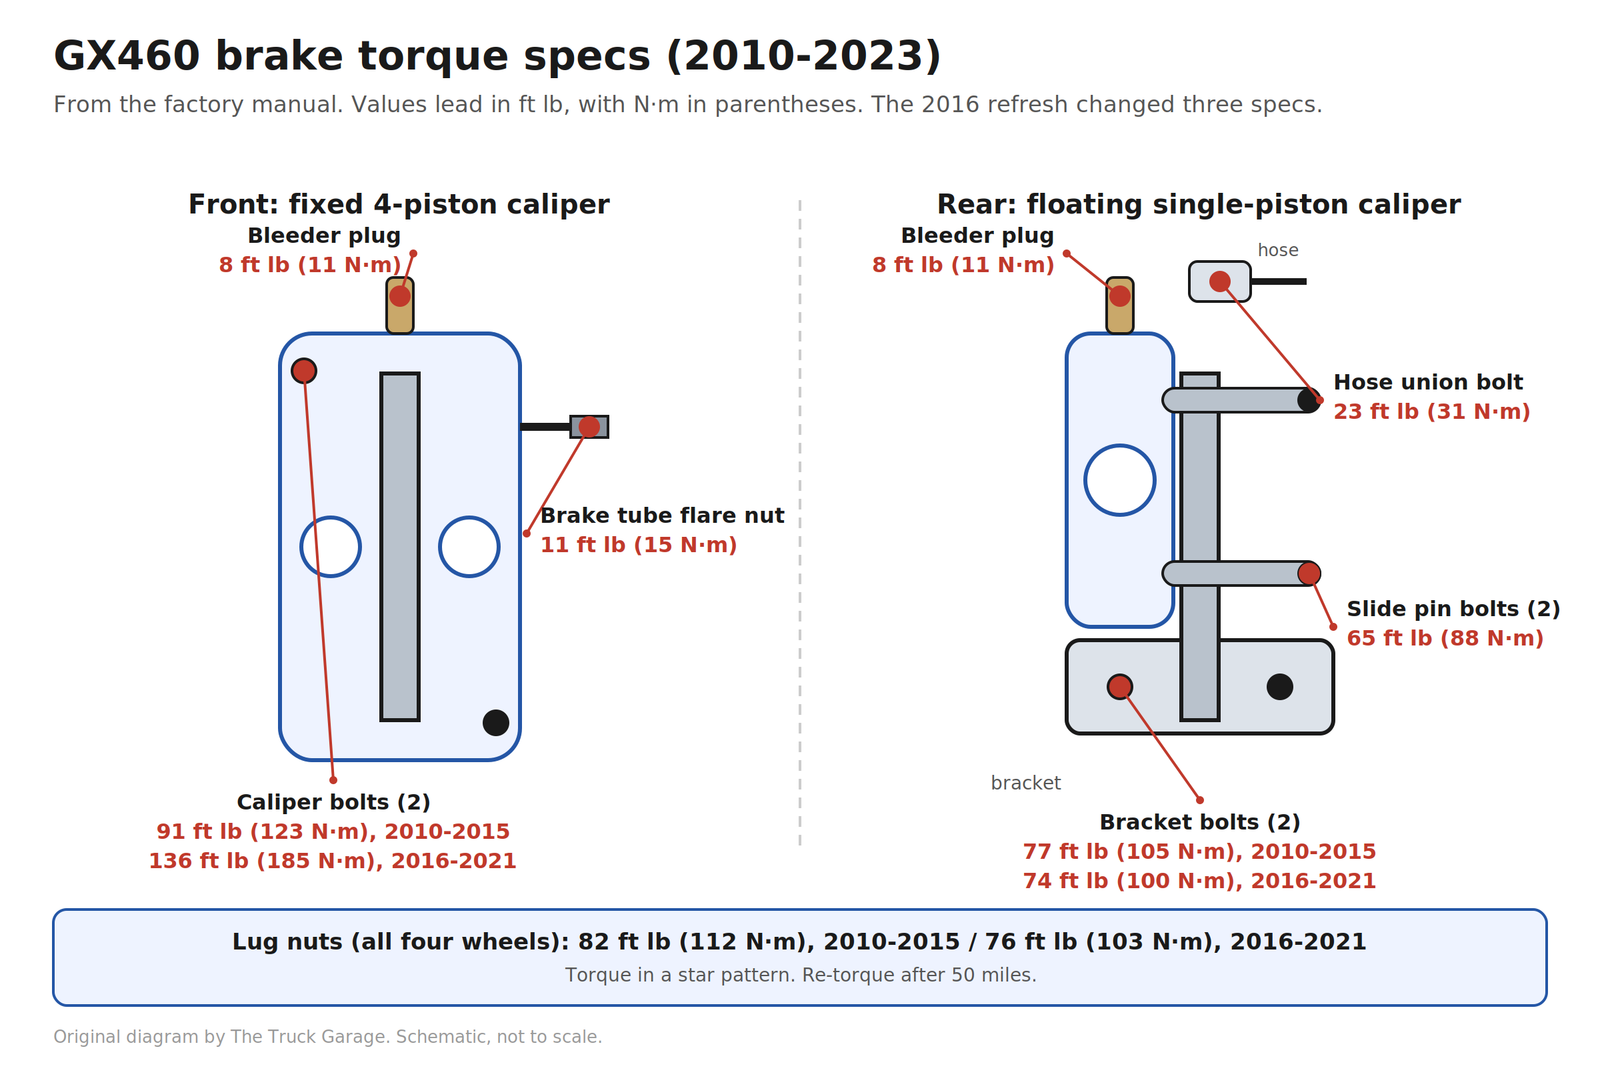
One-person tip from the community: a pressure bleeder on the reservoir plus the factory sequence above makes a true one-person full bleed. The warning bears repeating: watch the reservoir level constantly. A dry reservoir converts a simple flush into an actuator nightmare.
5. Pads and rotors: what to choose
Your pads and rotors should match how the truck is actually used. A 5,000+ lb SUV with armor, a lift, and 35s asks more of its brakes than a stock mall-crawler.
- OEM / OE-equivalent blanks. The safe, quiet default. Good pedal feel, good rotor life, minimal noise and dust. The weakness is thermal capacity on a heavy, modified truck doing mountain descents. That’s what the thicker GX460 rotors address.
- Quality blanks + upgraded pads (e.g., Akebono, EBC). The community’s most-recommended middle path: keep plain vented rotors (Brembo blanks are a forum favorite for owners who’ve fought shudder) and spend the money on a good pad compound. More bite and better heat tolerance without drilled/slotted downsides. Drilled and slotted truck-and-tow kits (e.g., PowerStop Z36 style) are defensible for heavy, lifted, or towing rigs. They are designed to resist fade better, but bring more noise, faster pad wear, and drilled rotors can crack under severe heat cycling.
- Stainless braided lines. A frequently recommended supporting mod. Rubber lines swell under pressure. Braided lines do not, so the pedal firms up. If your rubber lines are old or you are already doing a full flush, this is the time. Two brands with GX specific kits: Goodridge G-Stop kit 21195 (listed for 2003-2009 GX470, 2010-2015 GX460, and FJ Cruiser) and StopTech 950.44007 front stainless line kit (listed for 2003-2009 GX470 and 2010-2017 GX460). Verify fitment for your year before ordering.
- Fluid. The factory spec is DOT 3 (SAE J1703 or FMVSS No. 116 DOT 3). Use fresh fluid from a sealed container. Never use silicone DOT 5. It is not compatible with these systems.
Bedding matters. Whatever you install, follow the pad manufacturer’s bed-in procedure first. Skipping bedding is a common cause of new-pad shudder and complaints about “warped” rotors that are actually uneven pad deposits. A typical procedure, when the manufacturer gives no specific one, looks like this. Find a safe, empty stretch of road. Make 5 or 6 moderate stops from about 35 mph down to about 5 mph without coming to a full halt, leaving 30 seconds or so between stops for cooling. Then make 2 or 3 firmer stops from about 55 mph down to about 5 mph, again without fully stopping. Then drive for 5 to 10 minutes with minimal braking to let everything cool. Do not sit at a stoplight with hot pads clamped on hot rotors right after bedding. That imprints pad material in one spot and starts the shudder you were trying to prevent.
6. When it’s actually the booster or master cylinder
- Master cylinder: the telltale is a pedal that sinks slowly under steady pressure, or one that needs pumping because pressure bleeds past worn internal seals. If the fluid level is fine, there are no external leaks, and proper bleeding (including the Techstream actuator step, if air got that far) doesn’t fix it, replace the master cylinder. Rebuild kits exist, but for a safety-critical part, most owners are better served by a quality new or reman unit.
- Booster / accumulator: at key-on, the electric pump should run briefly and stop. If it runs long, cycles constantly, or the pedal is hard/grabby, the accumulator or pump is suspect. Get it diagnosed professionally rather than parts-guessing.
- External leaks: fluid weeping at calipers, line fittings, or the master cylinder is non-negotiable. Find and fix the leak, then bleed. A leak plus a soft pedal is not a “bleed it and see” situation.
7. Common mistakes
- Letting the reservoir go dry while bleeding. The most common DIY error on these trucks. It introduces air into the ABS actuator, which a normal bleed can’t easily remove.
- Assuming every soft pedal needs the scan-tool actuator bleed. Routine fluid changes, hose replacement, and caliper replacement all use the line-bleed procedure, which needs no scan tool. The Techstream actuator step is only for when air got into the actuator itself: the reservoir ran dry, or the booster, master cylinder, or reservoir was replaced.
- Pumping the pedal during the Techstream solenoid-cycling step. The front line-bleed portions do use repeated pedal presses, but for the solenoid-cycling step the factory procedure says to depress the pedal fully and hold it while the solenoids cycle. Match the technique to the step.
- Starting the engine during bleeding. The procedure calls for IG-on, engine off.
- Reusing old fluid or skipping the flush. “My pads are fine” is not a reason to keep seven-year-old contaminated fluid.
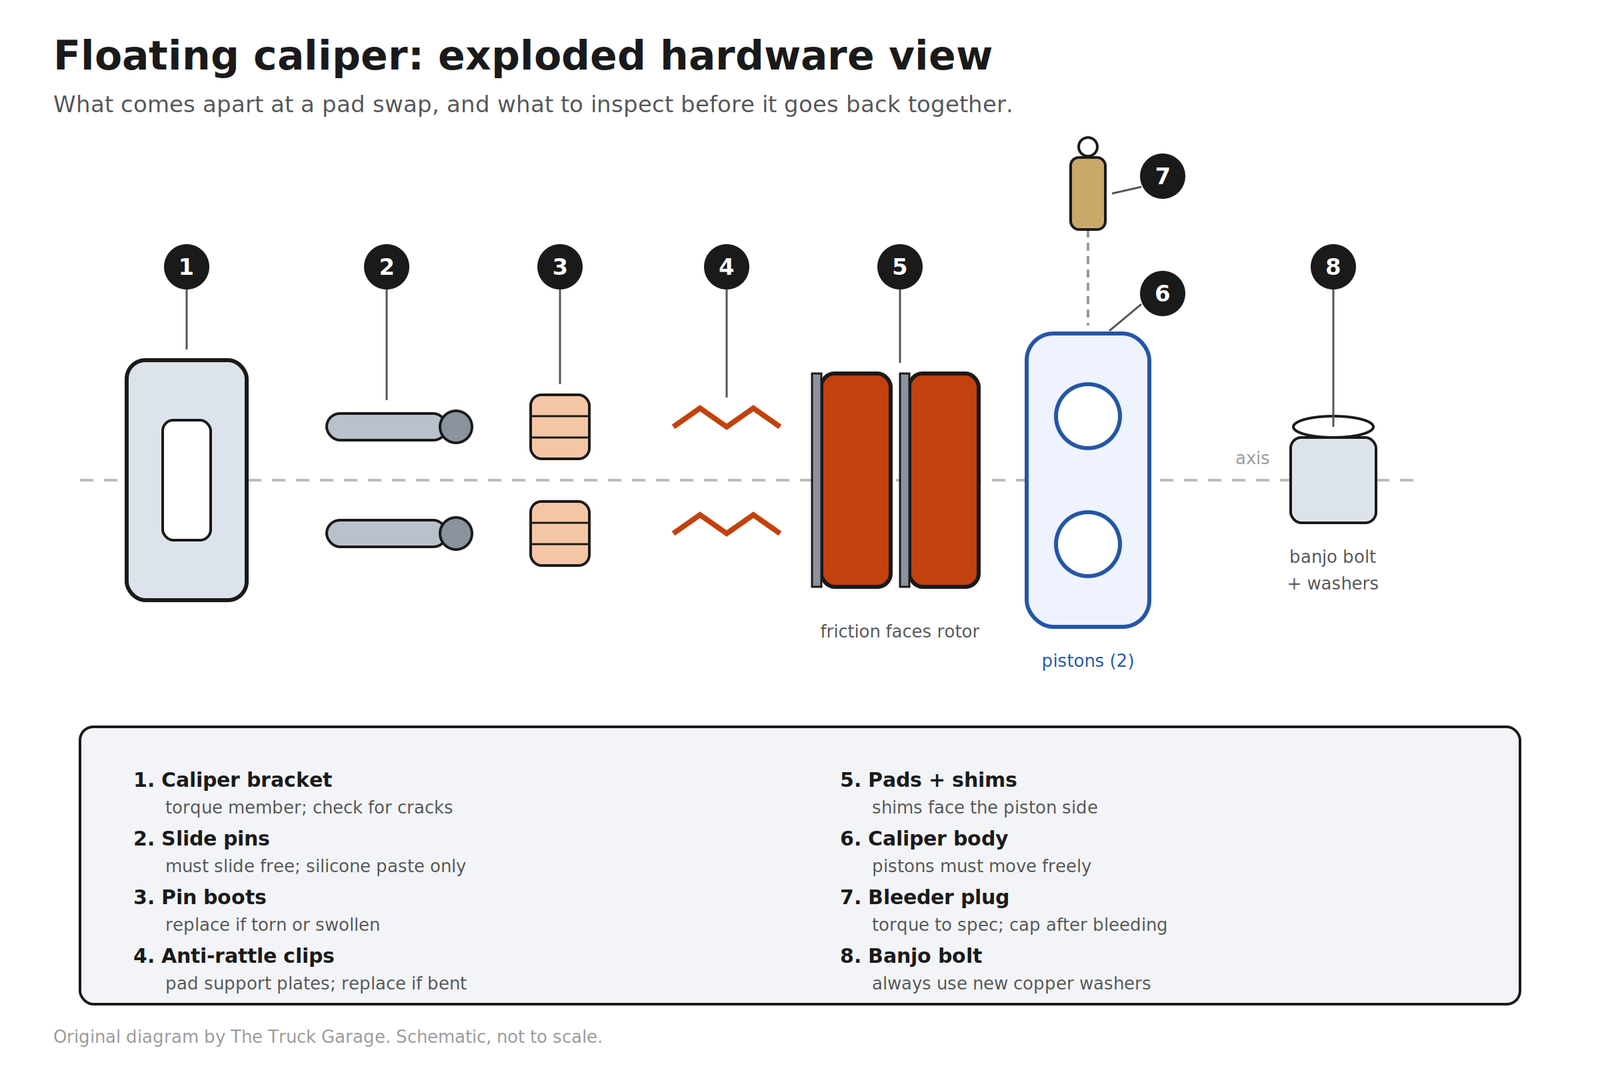
- Ignoring slide pins and hardware. New pads on seized pins is a short-lived repair. Clean, inspect, and lubricate slide pins; replace torn boots and corroded pins.
- Over-torquing lug nuts. Uneven or excessive lug torque distorts rotors and contributes to the shudder blamed on “warped rotors.” Use a torque wrench. Verify the spec against the factory manual for your year. (See the torque diagrams in section 4. Note the GX460 year split: 2010-2015 and 2016-2021 take different values.)
- Assuming the swap fixes softness. Bigger rotors don’t remove air. Diagnose the hydraulics first.
8. FAQ
Q: Will GX460 front brakes bolt onto my GX470?
Yes. With GX460 calipers, rotors, pads, and hardware. It’s a well-documented swap (also done on 4Runners and FJs). Source pre-2016 calipers and double-check pad-to-rotor fit, since some aftermarket pads overhang the rotor edge.
Q: My GX460 pedal is soft but the truck still stops. Is that normal?
Some softness is characteristic of these trucks, but a pedal that needs a double-pump or keeps getting softer isn’t “normal”. It’s air, old fluid, knockback, or a master cylinder problem. Work through the decision guide in section 3.
Q: Can I bleed the brakes without Techstream?
For routine fluid changes, hose replacement, or caliper replacement, yes. The factory line-bleed procedure needs no scan tool. Techstream is only required if the brake booster with accumulator pump, the master cylinder, or the reservoir was replaced. Persistent softness after a careful manual bleed still points at the actuator, which is when the scan-tool step (or a shop that has one) earns its keep.
Q: Drilled and slotted or plain rotors?
Plain high-quality rotors with good pads for stock or lightly modified trucks; drilled/slotted truck-and-tow kits are defensible for heavy, lifted, or towing rigs. Match the setup to the truck’s actual weight and use.
Q: How often should I flush the brake fluid?
The Lexus maintenance schedule calls for brake fluid replacement every 36 months or 30,000 miles. Sooner if the fluid looks dark. Moisture contamination is the cheapest problem to prevent.
Q: The pump runs a long time every time I turn the key. Is that bad?
It should run briefly and stop. Long or constant operation points to the accumulator/pump side. Get it diagnosed rather than bleeding the brakes again.
Sources consulted: the factory manuals for the 2003-2009 GX470 and the 2010-2021 GX460 (bleeding procedures, torque specs, rotor thickness, fluid spec), the sources below, and community owner reports. All guidance is synthesized and paraphrased; verify specs and part numbers against the factory service manual for your year.
Sources
- Lexus GX460 Warranty and Services Guide (2010), via Lexus GX Off-Road (GXOR): Brake fluid replacement schedule
- IH8MUD forum: GX460/2010-2013 4R brake upgrade (pre-2016 caliper fitment, 14WA vs 14WB mounting bolts)
- IH8MUD forum: 470 to 460 brake conversion issue on 2006 GX470 (aftermarket pad overhang on the rotor edge)
- IH8MUD forum: GX 460 front brake swap and pedal feel (48 mm vs 45 mm pistons, soft pedal reports after the swap)
- IH8MUD forum: GX470 brake upgrade options (Brembo blanks, caliper seizure reports, fluid and line upgrades)
- TacomaWorld: DIY big brake swap: 14WB (2016+ 4Runner and GX460) (M12 to M14 caliper bolt change at the 2016 refresh)
- O’Reilly Auto Parts: GX460 front rotor specs (338 mm diameter, 32 mm nominal thickness, 29 mm discard)
- Goodridge: G-Stop kit 21195 fitment (listed for 2003-2009 GX470, 2010-2015 GX460, FJ Cruiser)
- StopTech: 950.44007 stainless line kit fitment (listed for 2003-2009 GX470 and 2010-2017 GX460)
Leave a Reply