Quick answer
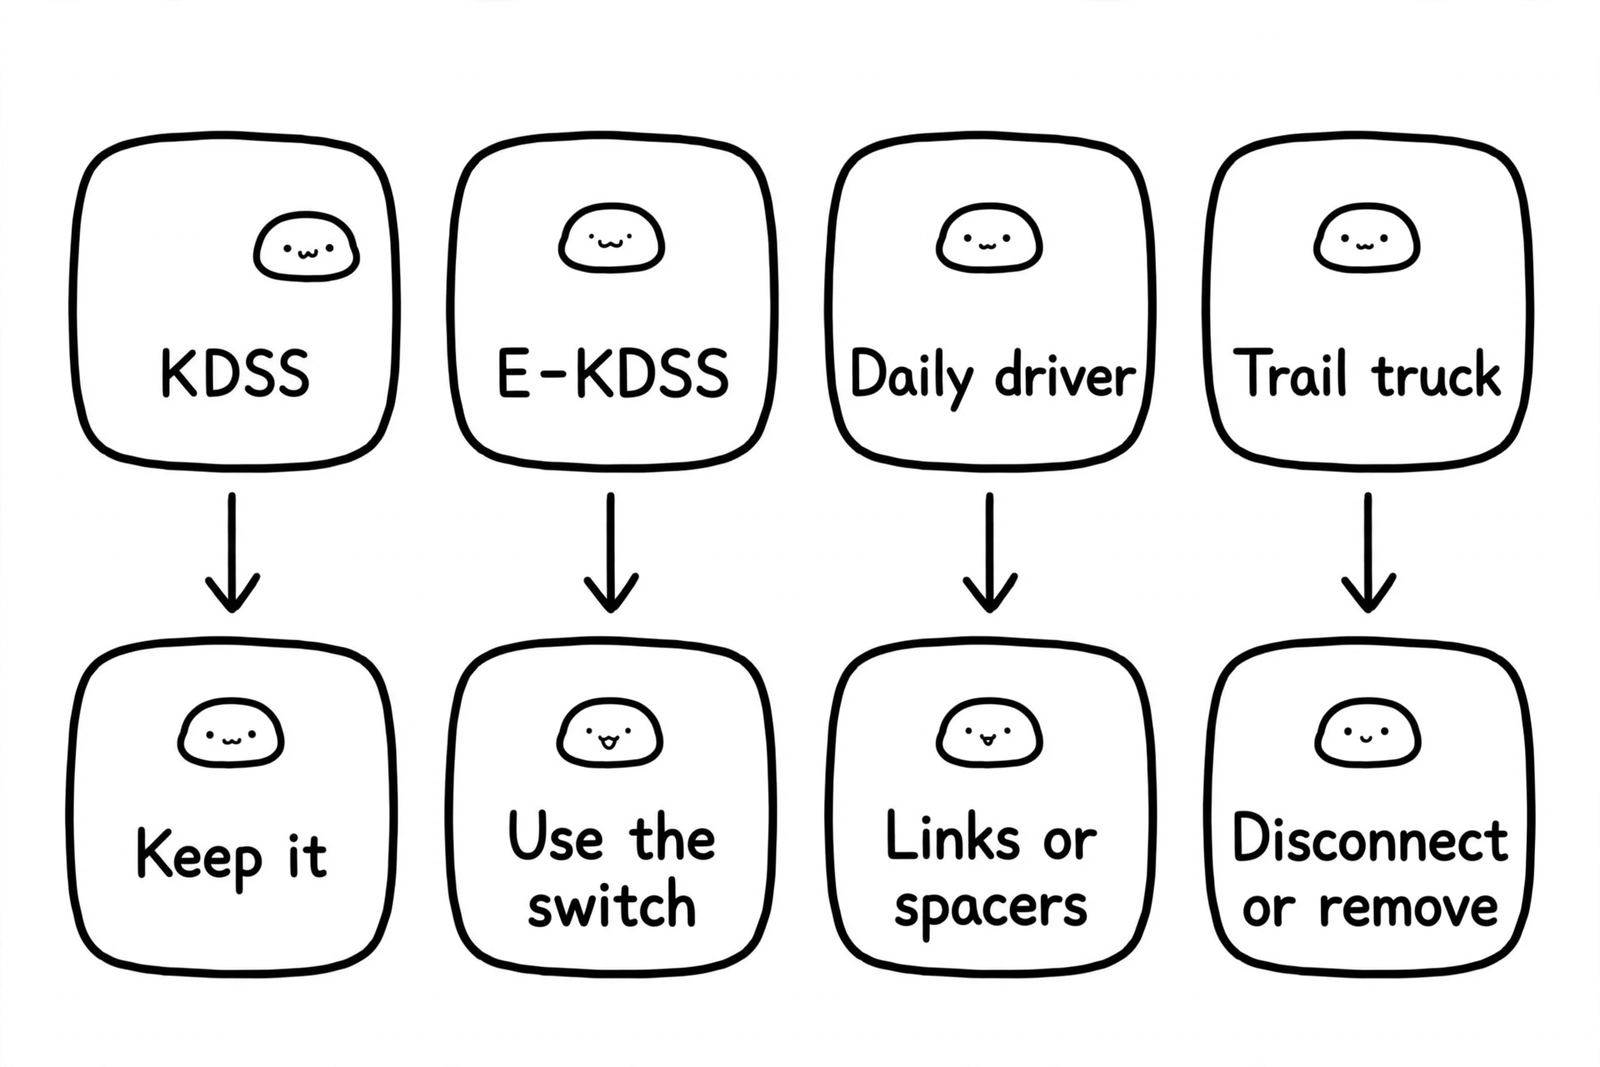
The right choice depends on which stabilizer system your truck has.
GX470 without KDSS: you have a conventional front bar with end links. You can unbolt one link in your driveway, tie the bar up, and test the idea for free. Quick disconnect links are sold for your truck, and the bar also comes off completely with hand tools. Whether you should depends on how the truck gets used. A daily driver that tows should stay connected. A dedicated trail truck can run disconnected or removed, with the handling costs below.
GX470 with KDSS, and every GX460: your bars are hydraulic, and none of the unbolting in this guide applies to your truck. The fix for a lifted KDSS truck is geometry correction: a rebalance, spacers, and drop kits. Our KDSS guide covers the system.
GX550 Overtrail and Overtrail+: E-KDSS unlocks the bars electronically. There is nothing to unbolt.
| Truck | Stabilizer system | Your move |
|---|---|---|
| GX470 without KDSS | Conventional bar and end links | Run the free one-link test first, then decide on quick disconnect links or full removal |
| GX470 with KDSS, every GX460 | Hydraulic KDSS | Do not unbolt; rebalance and correct geometry with spacers or drop kits |
| GX550 Overtrail and Overtrail+ | E-KDSS | Nothing to unbolt; the system disconnects electronically |
| GX550 other trims | Conventional bar | Use the procedure and torques for your exact truck; GX470 numbers do not carry over |
How the front bar works
A front stabilizer bar, also called a sway bar or anti-roll bar, is a U shaped steel bar tying the left and right front suspension together. The middle mounts to the frame in two rubber bushings. Each end connects to the suspension with a short vertical end link. On the non-KDSS GX470, the factory procedure connects the front links at the steering knuckle.
When both front wheels move up together, the bar rotates in its bushings and does almost nothing. When one wheel moves and the other does not, the bar must twist. That twist is spring force. It keeps the body flatter in a turn and over uneven ground.
The same twist that levels the body on a freeway on-ramp also fights the front suspension on a trail, dragging one side with the other. Disconnect the bar and the front wheels move independently. Keep it connected and they stay coupled.

What disconnecting or removing gains on the trail
The gain is front wheel independence, in three places.
Droop. A front tire can drop farther into a rut or off a ledge without the bar holding it up, and a tire on the ground is the only one making traction.
Climbing. When one tire climbs, the bar no longer transfers as much lift to the other side, so the climbing tire keeps its weight.
Comfort. Owners on IH8MUD and TacomaWorld who run disconnected describe a softer front end on rocks and washboard, because the suspension stops fighting itself over one-wheel bumps.
On mild trails, forest roads, and sand, most drivers notice little benefit. The gain matters in slow, technical terrain where wheels actually lift. No verified GX specific measurement of the gain in inches was found, so be skeptical of exact numbers anyone quotes you. Disconnecting also adds no shock or spring travel. If travel is limited by the shock or bump stop, the bar is not your bottleneck. Our lift kit guide covers what sets front travel.
How it drives on the road
Body roll increases. The truck leans more in every turn and on-ramp. Owners who daily drive with no front bar call the lean manageable at normal speeds, and the first thing passengers notice. A lifted truck already sits higher than stock. Removing roll stiffness stacks a second change in the same direction.
Braking feel changes. The brakes are unchanged, but the nose dives more and the body moves more under hard braking and brake-and-turn moments.
Emergency maneuvers. A fast lane change or swerve at highway speed loads the truck side to side twice in about a second, and that side-to-side load is what the bar works against. Without the bar, roll is larger, slower to settle, and easier to overcorrect. Owners in the IH8MUD lift thread give the same warning: no sudden large steering inputs, especially at higher speeds. If other people drive your truck, tell them before they take it on a freeway.
Towing. Do not tow with the front bar disconnected or removed. A trailer pushes and pulls on the back of the truck, and crosswinds add side loads. If you tow regularly, keep the bar connected and spend your money on correct link geometry instead.
Worn parts. Tired shocks, soft springs, or worn bushings that feel acceptable with the bar connected can feel loose without it. The bar masks worn suspension. Fix worn shocks and springs first, then judge the bar. One more cost: some owners report bars are treated as required safety equipment at inspection in some places. Rules vary. Check yours before running removed full time.
Front bar versus rear bar
The front and rear bars call for different decisions. The front bar does most of the roll control work and is the one limiting front articulation, which is why nearly every disconnect product and removal story is about the front.
The rear bar works on a solid axle, where articulation is usually limited more by shocks, springs, and the panhard bar. Removing it frees less travel. Owner reports split sharply. Some run without a rear bar for years on a well sorted suspension with no problems. Others call a coil sprung Toyota rear end without a bar unstable, and one IH8MUD poster advises against running a front bar with no rear bar, calling the result an understeering truck that gets unstable on climbs and off-camber sections.
Keep the rear bar, and disconnect or remove the front. Never change both at once. And secure any disconnected bar. A loose bar can rotate into a CV boot and tear it, turning a free mod into a CV job. Vendor instructions also require the bar to be tied back before you drive.
KDSS trucks: do not unbolt the bar
This section covers every GX460 and the KDSS equipped GX470.
KDSS replaces the fixed link on one side of each bar with a hydraulic cylinder and connects the front and rear bars in one pressurized circuit. On the road it locks the bars down for flat cornering. Off road it opens the circuit and lets the bars move, giving you much of the articulation of a disconnected bar with nothing to unbolt.
KDSS service is not conventional bar service. In the GX470 factory service manual, the conventional front bar is a short overhaul procedure with link nuts and bracket bolts. The KDSS front stabilizer is a separate procedure in the suspension control section. It calls for special service tools, warns against loosening the flare nuts on the cylinder tubes, and requires bleeding the suspension fluid and a leak check after reassembly. The GX460 manual’s torque tables list KDSS cylinder hardware for the front stabilizer in place of conventional end links.[1]
Do not unbolt a KDSS bar for trail articulation. Do not loosen hydraulic fittings to swing a bar out of the way.
What about deleting KDSS and fitting a conventional bar? It is a full conversion project. Owners note the KDSS frame lacks the threaded holes a conventional front bar needs, so mounts must be added, and the rear axle lacks the conventional rear bracket, so one must be fabricated or welded. APEX Designs states the same from the product side: its quick disconnect system is not compatible with KDSS, and fitting it to a GX460 requires removing KDSS and sourcing a regular sway bar. For most owners, leaving KDSS alone is right. A healthy KDSS truck already articulates well and corners better than a conventional truck with its bar removed.
GX550: E-KDSS does the disconnecting for you
The GX550 Overtrail and Overtrail+ use E-KDSS, the electronic version. Lexus states that E-KDSS locks and unlocks the front and rear stabilizer bars independently, based on driving conditions, speed, steering input, and the Multi-Terrain Select setting.[2] The GX550 owners manual describes the system as electronically controlling the stabilizer by road and driving conditions, optimized for each Multi-Terrain Select mode, with control changed to suit off-road driving when the four-wheel drive switch is set to L4.[3]
The disconnect happens by itself, per bar, while you drive. There is no link to pull. If the truck leans and does not recover after being parked on a slope, the owners manual treats that as a possible malfunction and calls for a dealer inspection. Treat it as warranty work.
GX550 Premium, Premium+, Luxury, and Luxury+ trims do not have E-KDSS and use conventional stabilizers. The 2024 GX550 factory repair manual covers that bar with its own removal and installation procedure, and the hardware differs from the GX470. The link assembly fastens with a bolt at 110 ft·lbf (149 N·m) and a nut at 159 ft·lbf (215 N·m), the stud is held with an 8 mm hex wrench, and the bar installs at 66 ft·lbf (90 N·m). Use the GX550 procedure and numbers for a GX550.
The free test: unbolt one link and drive it
Before you buy anything, run the free test. It works on conventional bar trucks: the non-KDSS GX470 and the shared platform trucks. It costs one nut and fifteen minutes.
- Park on flat ground with the wheels straight. A link under side load fights you coming off and going back on.
- Pick one front link. Hold the stud with a 6 mm hex key so it cannot spin, and remove the upper link nut. The factory procedure uses the same trick when the ball joint turns with the nut.
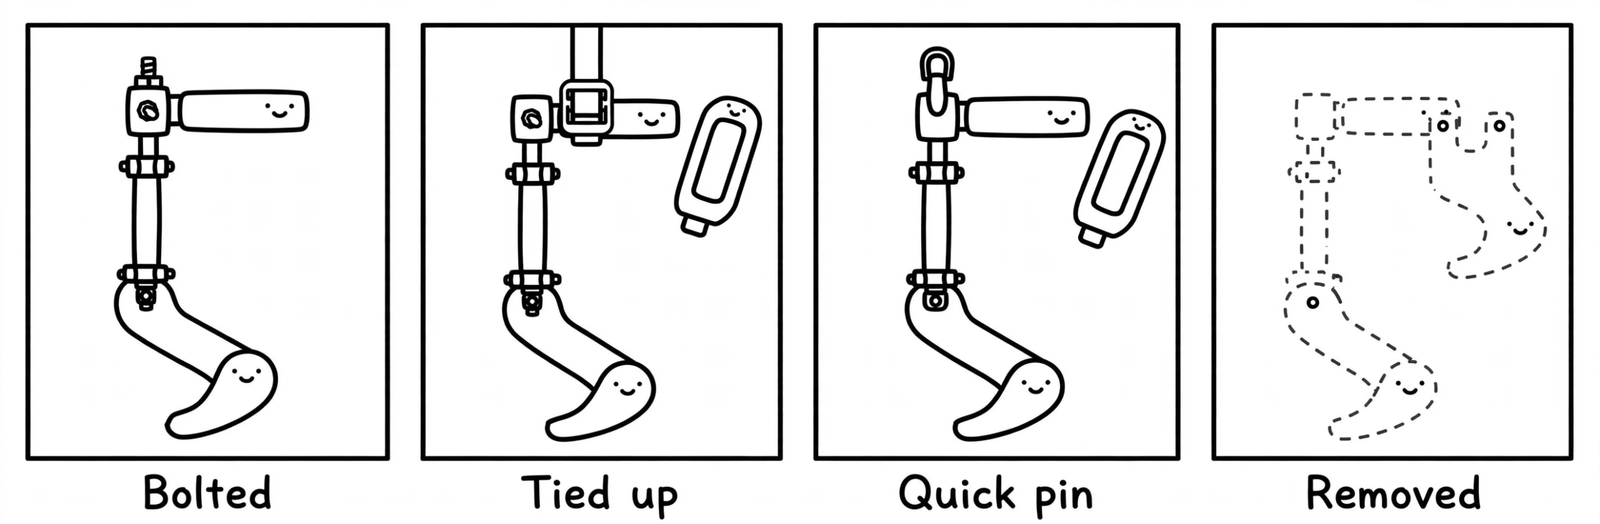
- Swing the link clear. One disconnected link is enough. With one end free, the bar cannot transfer twist between the sides, so it is functionally disconnected.
- Secure the bar and the loose link. Rotate the bar up and tie it to the frame with a ratchet strap, heavy duty zip ties, or a bungee cord. Strap the link so it cannot flop into the CV boot or tire. Nothing hangs loose.
- Drive roads you know at low speed first: your street, a roundabout, a gentle on-ramp. Feel the roll, the brake dive, and how the truck settles. Only if it feels predictable, try one moderate speed run. Skip any highway test if anything feels vague.
- Cross one uneven spot at an angle, a driveway apron or dirt shoulder, and feel the front end move independently.
- Reconnect on flat ground, torque the nut to spec below, and recheck it after a short drive.
Home mechanic notes. A floor jack under one front tire can unload a fighting link. Penetrating oil the night before saves knuckles on rust belt trucks. If the stud hex is rounded, vice grips on the stud flats will hold it, at the cost of the finish. Replace a link you had to grip that way.
If you like the trail feel and hate the road feel, you are the target customer for quick disconnects. If you barely notice a difference on your trails, reconnect it and forget the idea. If you hate both, look at your shocks or springs next.
Quick disconnect links and extended links
Quick disconnect links replace the stock front links with links that separate at a pin or joint, so you can disconnect at the trailhead in about a minute and reconnect for the drive home. Confirmed front fitments from Red Runner Designs, sold through Opt Offroad, include the 2003 to 2009 GX470, 4th and 5th gen 4Runner without KDSS, and the FJ Cruiser. APEX Designs sells a competing system for the same family. Both makers repeat the KDSS warning: no fitment for KDSS trucks. Confirm your exact year before you order.
Disconnect and reconnect on flat ground. Side load makes pins fight you. Owners repeat the advice from the old IH8MUD disconnect write-ups: do it on pavement, carry spare pins and clips, and store removed pins in the truck, not on the bar.
Extended and adjustable links are for lifted trucks. A lift raises the frame away from the suspension, so a stock length link pulls the bar ends down at a steep angle. The bar sits rotated out of its working range, bushings bind, and ball joints run near the end of their travel. An adjustable link sets the bar back to level at the new ride height. Apache Offroad gives the setup rule: with the truck on the ground at ride height, adjust so the rod end points straight out at 90 degrees, and recheck torque after 50 to 100 miles.
Home mechanic alternative: sway bar relocation or drop brackets move the frame side bushings down, restoring bar angle with the stock links. They are cheap and common on mild lifts. Links and brackets do the same geometry job from opposite ends. Use one method unless the kit was designed as a matched set.
Lifted trucks eat stock end links. A clunk over driveway aprons at low speed with the wheels turned is the classic worn link sound. Replace clunking links before you judge disconnects. A link that fails on the trail can swing into the CV boot, which is how one IH8MUD poster’s broken driver side link tore up an outer CV axle.
Lifted trucks: link geometry is the third option
Most lifted GX owners asking about removal actually have a geometry problem. Here is how to tell. With the truck on flat ground, look at the front bar from the side. The bar ends should sit roughly level. If the ends point steeply down, or the links sit at a hard angle with bushings visibly twisted at rest, the bar is preloaded and binding. Symptoms: harsh one-wheel bump response, link clunks, fast bushing wear, and a busier front end than the lift alone explains.
Fix order for a conventional bar truck:
- Set bar angle back to level with adjustable links or relocation brackets.
- Replace worn bushings and links while the bar is loose. Bushings are cheap, and replacing them now avoids a second teardown later.
- Recheck after the springs settle. New lifts settle, and day one bar angle can be visibly off a month later.
- If the truck still feels tied down on your trails after the geometry is fixed, run the free test.
Fix order for a KDSS truck is different. Open both shutter valves before suspension work, set the truck at finished ride height on level ground, close the valves, and rebalance. Then correct geometry with KDSS hardware. Treaty Oak Offroad spacer kits add a spacer at the front fixed mount and both rear mounts to return bar angle toward stock and address lifted KDSS lean. SRQ Fabrications drop kits do a similar job, and their rear kit also clears the known contact between the rear bar and the track bar at full droop on extended travel trucks. Dr. KDSS brackets and adapters are the other established route. Match the kit to your generation and lift. GX470 and GX460 kits are not interchangeable, and front skid plate trimming may be needed.
Two supporting mods interact here. Aftermarket upper control arms add droop travel, and more droop is exactly where a connected bar starts to limit movement, so UCA trucks feel the disconnect benefit sooner. A differential drop changes driveline angles, not bar angles. Do not buy one to fix a bar problem.
Step outline: disconnect, remove, and reinstall a conventional front bar
This outline is for the non-KDSS GX470 front bar only. KDSS trucks and GX550 trucks: do not use it. Torques below are GX470 factory values.[4][5]
Disconnect one link for a trail day:
- Park flat, wheels straight, parking brake set.
- Hold the link stud with a 6 mm hex key. Remove the upper link nut.
- Swing the link clear. Tie the bar up and strap the link so nothing can reach the CV boot or tire.
- Reconnect on flat ground. Torque the link nuts to 52 ft·lbf (70 N·m).[4]
Full removal:
- Remove the front wheels. Support the truck properly if you lift it. Never work under a truck held only by a jack.
- Remove both front links, two nuts per link, holding the studs with the hex key when they spin.
- Remove the two front brackets, two bolts per bracket. Lower the free bar carefully and walk it out without dragging it across the CV boots.
- Bag and label the hardware. A removed bar that loses its brackets and bushings becomes an expensive bar.
- There is nothing to plug. A conventional bar has no fluids and no electronics. That is why this job is easy on this truck and off the table on a KDSS truck.
Reinstall in reverse, with these specifics from the factory procedure:
- Fit the bushings to the bar first, inside the bushing stoppers, with the bushing protrusion facing the inside of the truck.
- Install the brackets. Torque the bracket bolts to 30 ft·lbf (40 N·m).[5]
- Install the links. Torque the link nuts to 52 ft·lbf (70 N·m).[4]
- Reinstall the wheels. Torque the lug nuts to 82 ft·lbf (112 N·m).[6]
- Settle the truck on flat ground and recheck the link nuts after a short drive. Recheck again at the next oil change if the links were new.
The GX470 rear bar uses the same style of hardware, with these factory torques.[7]
| Rear bar joint | Torque |
|---|---|
| Stabilizer bar to stabilizer link | 52 ft·lbf (70 N·m) |
| Stabilizer bar to rear axle housing | 22 ft·lbf (30 N·m) |
| Stabilizer link to frame | 11 ft·lbf (15 N·m) |
Read the front versus rear section before deciding the rear bar needs to come off at all.
Parts and tools
Prices below were read off the live product pages on October 23, 2026. They move around, so treat them as a snapshot.
| Part | Details | Price |
|---|---|---|
| Quick disconnect front links, Red Runner Designs Type 2 | Opt Offroad, non-KDSS GX470 front, sold as a pair | $225.00 ($309.80 with the relocation kit) |
| Quick disconnect front links, APEX Designs kwikLYNX | APEX Designs, GX470 front, not compatible with KDSS | $750.00 |
| Adjustable front links, Apache Offroad HD chromoly | Apache Offroad, non-KDSS, sold as a pair | $161.50 |
| Front sway bar bushings, Energy Suspension | 8.5135G, 29 mm bar, GX470 fitment per Energy Suspension’s data | $21.29 |
| Replacement front end links, stock, Moog | K750105 right, K750104 left (Toyota 48820-60060) | — |
| KDSS spacer kit, Treaty Oak Offroad full kit, GX460 | Exit Offroad, front and both rear mounts | $215.00 |
| KDSS sway bar drop kits, SRQ Fabrications | SRQ Fabrications, GX460 and 5th gen 4Runner, not compatible with GX470 | from $70.00 |
Tools:
- TEKTON TRQ51402 torque wrench, 3/8 inch drive, 10 to 100 ft·lbf, $110.00. That range covers every torque in this job, 11 ft·lbf (15 N·m) to 82 ft·lbf (112 N·m).
- Bondhus 20199 hex key double pack, $31.19, or the Eklind 13609 9-piece metric set, $19.99. Either covers the 6 mm key for link studs.
- B’laster PB Blaster penetrating oil, 11 oz, $11.29.
- Loctite 242 blue threadlocker, 50 ml, $13.62.
- AUGO ratchet straps, 4 pack, 15 ft, $36.99, and XINGO 24 inch heavy duty zip ties, 100 pack, $16.19, for securing a disconnected bar.
- Socket set and ratchet covering the link nuts and bracket bolts.
- Floor jack and jack stands if the wheels come off, plus wheel chocks.
Home mechanic alternatives. No torque wrench? Borrow one, or use a parts store loaner program. No disconnect budget? The one-link test above gives the same disconnect effect, slower, at zero cost. No strap? Rope or a belt will secure a bar for a slow trail section in a pinch, but check it at every stop. A stretched rope lets the bar wander toward the CV boot.
FAQ
Can I drive on the highway with the front sway bar removed?
You can, and owners do, but the truck rolls more, settles slower after lane changes, and punishes a fast swerve. Leave extra following distance and avoid sudden large steering inputs at speed. Tell anyone else who drives the truck. For daily highway use, quick disconnects you reconnect for the drive home are the safer pattern.
Should I disconnect the front bar, the rear bar, or both?
Front only, for almost everyone. The front bar limits front articulation. The rear bar costs more stability than it returns in travel on a GX. Never change both at once.
Does disconnecting one link really disconnect the bar?
Yes. The bar only resists when both ends are connected. With one link off, it rotates freely in its bushings and transfers nothing between the sides. Secure the bar and the loose link so neither can contact the CV boot.
I have KDSS. Can I just unbolt the front bar for a trail weekend?
No. KDSS bars are part of a pressurized hydraulic system shared with the rear bar. Factory service involves special tools and bleeding the fluid. The system already frees the bars off road by design. If a lifted KDSS truck binds or leans, fix it with a rebalance and spacer or drop kits.
My GX460 does not have KDSS. Which section applies to me?
Every GX460 has KDSS standard. Verify under the truck: look for the hydraulic cylinder on the front bar and the accumulator housing on the driver side frame rail. Plan on the KDSS section.
Will removing the front bar fix my clunk?
No. A clunk usually means worn end links or bushings, and removing the bar hides it by removing the parts. Replace them first. They are cheap, and a failed link can damage a CV boot.
Can I tow with the front bar disconnected or removed?
No. Reconnect it first. Trailer sway, crosswinds, and passing trucks all load the truck side to side, and front roll stiffness is part of staying composed under those loads.
What should a GX550 Overtrail owner do?
Nothing with a wrench. E-KDSS unlocks the front and rear bars independently and automatically. Use your drive modes. If the truck leans and does not recover, treat it as a malfunction and use the warranty.
Sources
- GX470 factory service manual, front stabilizer bar overhaul, rear stabilizer service data, and KDSS front stabilizer procedure.
- GX460 factory service manual, front suspension torque specifications.
- GX550 owners manual, Electronic Kinetic Dynamic Suspension System description and precautions.
- GX550 factory repair manual, front stabilizer bar without E-KDSS, removal and installation.
- Lexus Pressroom: Adventure, Elevated — the 2025 GX release
- IH8MUD: Anyone running quick disconnect sway bar links?
- IH8MUD: KDSS front sway bar off kilter
- IH8MUD: Trouble getting lift on due to sway bar and KDSS
- TacomaWorld: Sway bar removal or quick disconnect
- TacomaWorld: Sway bar info, good or bad?
- Opt Offroad: Quick Disconnect Sway Bar Links Type 2, Red Runner Designs
- APEX Designs: kwikLYNX Toyota sway bar disconnect
- Apache Offroad: HD chromoly front adjustable sway bar links
- Exit Offroad: Treaty Oak Offroad full KDSS spacer kit, GX460
- SRQ Fabrications: KDSS sway bar drop kits
- The Truck Garage: KDSS Explained
- The Truck Garage: Lift Kits and Suspension for the Lexus GX
Footnotes
[1] GX460 factory service manual, front suspension torque specifications: front stabilizer cylinder to chassis frame is 96 ft·lbf (130 N·m). KDSS hardware values differ from conventional link values and must not be interchanged.
[2] Lexus pressroom claim for E-KDSS: the system locks and unlocks the front and rear stabilizer bars independently, based on driving conditions, speed, steering input, and Multi-Terrain Select setting.
[3] GX550 owners manual claim: Electronic Kinetic Dynamic Suspension System, if equipped, electronically controls the stabilizer according to road and driving conditions, is optimized for each Multi-Terrain Select mode, and its control can be changed to suit off-road driving by setting the four-wheel drive control switch to L4.
[4] GX470 factory service manual, conventional front stabilizer bar: stabilizer link nuts, 52 ft·lbf (70 N·m).
[5] GX470 factory service manual, conventional front stabilizer bar: stabilizer bar front bracket bolts, 30 ft·lbf (40 N·m).
[6] GX470 factory service manual, service specifications: front wheel lug nuts, 82 ft·lbf (112 N·m).
[7] GX470 factory service manual, rear suspension service data: stabilizer bar to stabilizer link 52 ft·lbf (70 N·m), stabilizer bar to rear axle housing 22 ft·lbf (30 N·m), stabilizer link to frame 11 ft·lbf (15 N·m).
Leave a Reply