Why the 1UR-FE water pump matters
The GX460 has a reputation for boring reliability, and most of it is earned. The cooling system is the exception. Owners report water pump failures as early as 38,000 miles, and the pump is a recurring line item in “common GX460 problems” threads alongside the coolant valley plate leak. One owner logged a pump at 108k and a valley plate reseal at 112k. Another had a pump fail on a 2018 at 46,000 miles. The 1UR-FE is chain driven, and Lexus sets no replacement interval for the pump. GX470 owners meet their pump on a schedule, at the timing belt service. You will meet yours when it starts to weep.
The pump sits at the front of the engine and is driven by the serpentine belt. The timing cover stays on, and there are no timing marks to set. A careful first-timer can do this job in a driveway.
The procedure and torque values below hold for the full 2010 to 2023 run, facelift included, and the factory installation pages for 2013, 2014, 2020, and 2023 print the same pump, the same bolt layout, and the same torque values.
How to tell the pump is failing
The 1UR-FE has two famous coolant leaks and they live at opposite ends of the engine.
| Front of the engine: water pump | Back of the engine: valley plate |
|---|---|
| Pink crust or fresh pink drips around the pump housing. Toyota Super Long Life coolant dries pink and leaves chalky residue. | Low coolant with no visible leak at the front. |
| Coolant pooling on the skid plate or dripping off the front of the engine. | Coolant running down the back of the engine and down the transmission bellhousing. Crawl under the truck behind a front wheel and look up at the bellhousing. Pink residue there points to the valley plate leak. |
| A bearing whine or grinding from the front of the accessory drive that changes with engine speed. | |
| The temperature gauge running higher than normal, or climbing under load. |
The pump also has a weep hole. When the internal seal starts to go, coolant exits through it. A slow weep becomes a steady drip and then a stream. Do not wait on a confirmed pump leak. An overheated 1UR-FE is a far more expensive problem than a pump.
What the job costs
YourMechanic puts the national average for a GX460 water pump replacement at $662, about $242 in parts and $420 in labor, with dealer prices ranging from roughly $1,080 to $1,956 depending on model year. Owner-reported numbers land in the same bands. Independent shops come in around $600 on the friendly end. Dealers quote $680 on the friendly end and push past $1,500 at the high end.
| Route | Typical cost |
|---|---|
| DIY, parts only | $200 to $300 |
| Independent shop | $600 to $950 |
| Dealer | $1,080 to $1,956 |
DIY parts run about $200 to $300 for an Aisin pump, thermostat, gasket, and coolant. Add a serpentine belt if yours shows any cracking. The pump has to come off anyway to reach it, and the belt is a wear item you are already paying the labor to touch.
Parts and tools
Buy the pump before you start. The truck is down until the job is done.
| Part | GX460 2010-2023 (1UR-FE) | Tundra 4.6 2010-2019 | Sequoia 4.6 2010-2012 |
|---|---|---|---|
| Water pump, Toyota genuine | 16100-09525 | 16100-09525 | 16100-09525 |
| Water pump, Aisin (OE supplier) | Aisin WPT-188 | Same pump | Same pump |
| Water pump gasket | Buy separately as insurance | Buy separately as insurance | Buy separately as insurance |
| Thermostat with housing gasket | 16031-0S010, or Aisin THT-005 (replace while in there) | 16031-0S010 | 16031-0S010 |
| Serpentine belt | Toyota 90916-A2023 / Gates K080948 / Dayco 5080950 (inspect, replace if cracked) | Toyota 90916-A2023 / Gates K080948 / Dayco 5080950 | Toyota 90916-A2023 / Gates K080948 / Dayco 5080950 |
| Coolant, Toyota Super Long Life pink premix | ~2 gallons of Toyota Super Long Life coolant | ~2 gallons | ~2 gallons |
Tundra and Sequoia share the same pump, bolt layout, and torque values per their factory manuals. Their procedures add oil cooler water by-pass pipe steps that the GX460 job does not include.
Tools: socket set (10, 12, 14 mm), ratchet and extensions, torque wrench, drain pan, a spill-free funnel, a 5 mm bar or pin for the belt tensioner, and something to hold the water pump pulley. The factory tool is a pulley holder. A strap wrench or a belt wrapped around the pulley works in a driveway. Keep a paint marker handy to mark torqued bolts.
The job, step by step
Plan on 5 to 8 hours for a first attempt. Shop book time is 3 to 4 hours. Work on a cold engine.
Get access. Remove the engine cover, the upper radiator support seal, the lower front bumper cover, and the engine under cover. Drain the coolant through the radiator petcock. For a full coolant change, open the two cylinder block drain cocks as well. They reseal at 9 ft·lbf (13 N·m).[2] Pull the upper radiator hose off.
Remove the fan and shroud. The GX460 runs a mechanical fan on a fluid coupling. Remove the four nuts holding the fan blade, then the two shroud bolts. The coolant reservoir bolts to the shroud with three bolts of its own. Lift the shroud and fan out together as one unit. Disconnect the overflow tube from the radiator as it comes out.
Remove the serpentine belt. Turn the belt tensioner counterclockwise to release tension, pin it in place with a 5 mm bar through the service hole, and slip the belt off. Note the routing before it comes off. A phone photo takes ten seconds and saves twenty minutes.
Remove the water pump pulley. Hold the pulley with the holder tool or your shadetree equivalent, and remove the four pulley bolts.
Clear the hoses. Disconnect the intake air tube enough to move it aside. Disconnect the lower radiator hose from the thermostat housing. Remove the three thermostat housing nuts and the housing. Disconnect the three water bypass hoses (numbered 1, 5, and 8 in the factory procedure). Remove the three water inlet housing bolts.
Remove the pump. Take out the eight pump bolts and the pump with its gasket. This is the step that needs care. The factory procedure calls out three different bolt positions, A, B, and C, with three different torque values, and each position takes its own bolt. Lay them out in order or mark their positions as they come out. A long bolt in a short hole bottoms out and cracks the housing. Scrape the mating surface clean. Do not gouge it.
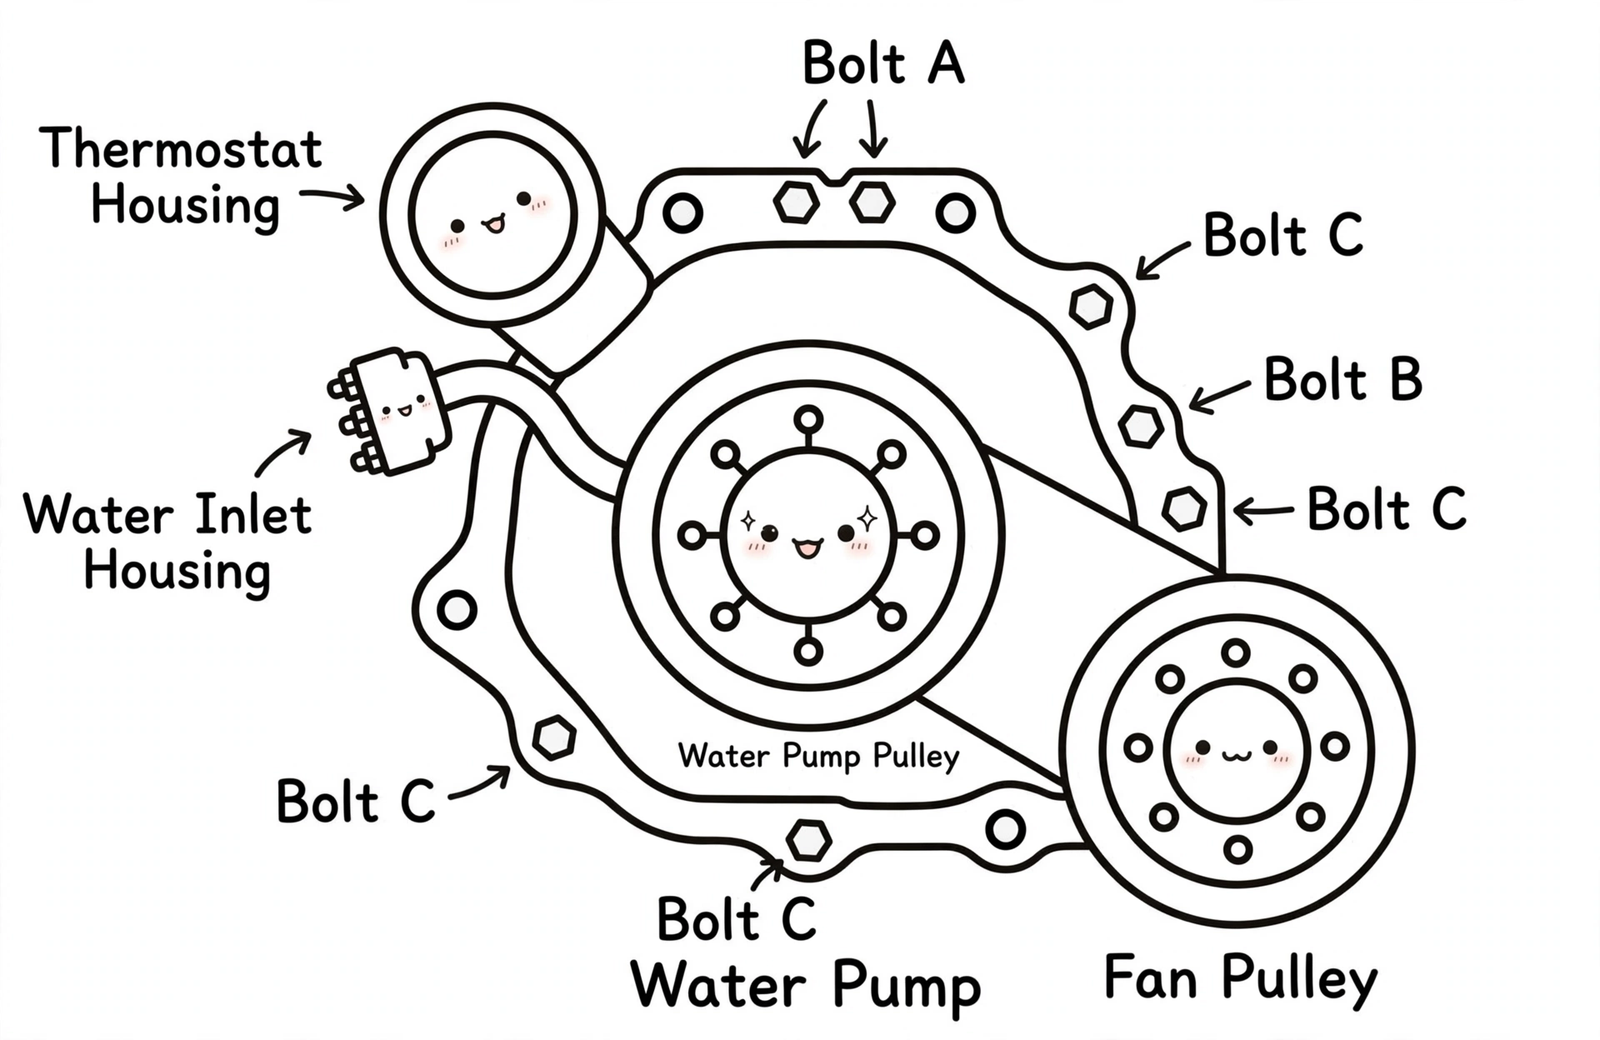
Install the new pump. Fit a new gasket and the new pump with the eight bolts in their original positions. Inspect the gasket before it goes on, especially if it shipped loose in the pump box. Owners have reported gaskets bent by poor packing, and a bent gasket leaks from the first start. Torque to the factory values: bolt A 35 ft·lbf (47 N·m), bolt B 17 ft·lbf (23 N·m), bolt C 15 ft·lbf (20 N·m).[1]
Reinstall the stack. Water pump pulley with four bolts, 15 ft·lbf (21 N·m), holding the pulley while you tighten. Water inlet housing with a new gasket, three bolts at 15 ft·lbf (21 N·m). Reconnect the bypass hoses. Thermostat housing with a new gasket, three nuts at 7 ft·lbf (10 N·m).[1] Reconnect the lower hose and the air tube.
Belt, fan, covers. Route the serpentine belt, release the tensioner, and check that the belt sits squarely in every ribbed groove. Set the fan and shroud back in. Tighten the four fan nuts to 15 ft·lbf (21 N·m), the two shroud bolts to 44 in·lbf (5 N·m), and the three reservoir bolts to 44 in·lbf (5 N·m).[3] Reinstall the radiator hose, the engine under cover, the bumper cover, the support seal, and the engine cover. The under cover bolts torque to 21 ft·lbf (29 N·m).[3]
Refill and burp. Total capacity is 14.5 US quarts without the rear heater and 16.3 US quarts with it.[2] Fill the radiator and the reservoir to the full line with Toyota pink premix. Squeeze the radiator hoses by hand to push air out. Cap the radiator, start the engine, and shut it down after a few seconds. Check the level, top off, and repeat until the level stops dropping. Then warm the engine fully with the heater on so the thermostat opens and circulates. Squeeze the hoses again while it warms. Let it cool completely and recheck the level. Recheck for leaks after the first full heat cycle and again after a week of driving.
Shadetree alternatives
The factory pulley holder is a special tool. A strap wrench around the pulley, or an old serpentine belt wrapped around it and held with vice grips, does the same job for the four pulley bolts. Later factory books for this engine spec the same kind of improvisation. They call for a screwdriver with its tip wrapped in protective tape as the pulley hold. The 5 mm tensioner pin can be any 5 mm rod, bolt, or sturdy drill bit. For the burp step, a spill-free funnel makes the job cleaner, but patience and hose squeezing get the same result. Do not use stop-leak products as a substitute for replacing a weeping pump. They clog the heater core and the radiator on their way to doing nothing for the seal.
While you are in there
The thermostat is the obvious add. It sits in the same stack of parts and the gasket is cheap. The serpentine belt and the tensioner pulley are worth a look. Coolant has a service life, so a full drain and refill with fresh Toyota pink is good practice rather than just topping off. Fresh coolant is one of the factory fluids owners let go too long. Our GX transmission fluid service guide covers the other one. And while the front of the engine is open, glance at the radiator side tanks for the pink crust that signals the next cooling system job. Our GX470 radiator replacement guide shows how that failure starts on the earlier truck.
FAQ
How long does a GX460 water pump last? Owner reports range from 38,000 miles to well past 110,000. There is no factory replacement interval. Inspect for pink crust at the front of the engine at every oil change once the truck passes 80k.
Can I drive with a weeping water pump? Short distances to get home or to a shop, with the temperature gauge watched constantly. A weep becomes a leak without warning, and overheating an aluminum V8 can turn a pump job into an engine replacement. Do not plan a road trip on it.
Is the GX460 water pump the same job as the GX470? The jobs are completely different. The GX470 2UZ-FE pump is driven by the timing belt behind the timing cover and is usually replaced with the 90k timing belt service. The GX460 1UR-FE pump is driven by the serpentine belt at the front of the engine. Different engine, different job.
Should I use a genuine Toyota pump or Aisin? Aisin is the OE supplier and the aftermarket Aisin pump is the consensus pick among owners. Genuine Toyota costs more for the same part in a Toyota box.
Do I need to replace the thermostat too? It is cheap insurance. The thermostat housing comes off during the pump job, and a thermostat that sticks closed after a cooling system disturbance is a classic comeback. Replace it.
What coolant does the GX460 take? Toyota Super Long Life pink premix. Do not mix coolant chemistries. If the system has green or universal coolant in it from a previous owner, that is a sign the system was serviced by someone who cuts corners, and a full flush back to pink is worth doing.
Does this apply to the Tundra 4.6 and Sequoia 4.6? Yes, for the core job. Their factory manuals print the same pump, the same bolt classes, and the same torque values. Their procedures add steps for an oil cooler water by-pass pipe that the GX460 does not have, so expect extra hoses and two extra bolts on the trucks.
Sources
- Lexus GX460 factory service manual, water pump and thermostat installation sections.
- Toyota Tundra and Sequoia factory service manuals, water pump installation sections (4.6L 1UR-FE).
- Vance Willis, water pump replacement procedure for the GX460 (community rewrite of the factory procedure): http://vancewillis.net/files/2009-2020_gx460_water_pump.pdf
- IH8MUD, DIY coolant valley leak repair, GX460: https://forum.ih8mud.com/threads/diy-coolant-valley-leak-repair.1240395/
- IH8MUD, GX460 buying guide discussion with owner repair logs: https://forum.ih8mud.com/threads/the-car-care-nut-should-you-buy-a-lexus-gx460-the-ultimate-buying-guide.1359370/
- IH8MUD, valley plate reseal and alternator cost discussion: https://forum.ih8mud.com/threads/reseal-valley-plate-leak-alternator-replacement-costs.1339195/
- IH8MUD, water pump leak cost discussion: https://forum.ih8mud.com/threads/water-pump-leak-common.866970/page-2
- TorqueNews, GX460 valley plate leak owner reports: https://www.torquenews.com/1084/i-got-great-deal-lexus-gx-460-now-lexus-tells-me-theres-valley-plate-leak-thats-going-cost
- YourMechanic, GX460 water pump replacement cost: https://www.yourmechanic.com/estimates/lexus/gx460/water-pump-replacement
- RepairPal, GX460 water pump replacement cost estimator: https://repairpal.com/estimator/lexus/gx460/water-pump-replacement-cost
- Sixity Auto, Aisin water pump for the GX460 4.6L: https://www.sixityauto.com/aisin-water-pump-2010-2017-lexus-gx460-4-6l-v8-engine-coolant-antifreeze-2092001599.html
- Go-Parts, water pump fitment table (GX460, Sequoia, Tundra 4.6L): https://www.go-parts.com/ps-product-new.php?make=Lexus&model=&sku=354E557
Footnotes
[1] GX460 factory service manual, water pump installation: bolt A 35 ft·lbf (47 N·m), bolt B 17 ft·lbf (23 N·m), bolt C 15 ft·lbf (20 N·m), water pump pulley 15 ft·lbf (21 N·m), water inlet housing 15 ft·lbf (21 N·m). Thermostat installation: housing nuts 7 ft·lbf (10 N·m).
[2] GX460 factory service manual, coolant replacement: total capacity 13.7 liters (14.5 US qt) without rear heater, 15.4 liters (16.3 US qt) with rear heater. Cylinder block drain cocks 9 ft·lbf (13 N·m).
[3] GX460 factory service manual, radiator installation: fan shroud bolts and radiator reservoir bolts 44 in·lbf (5 N·m), fan nuts 15 ft·lbf (21 N·m). Engine assembly installation: No. 1 engine under cover bolts 21 ft·lbf (29 N·m).
Leave a Reply