Quick answer
Prove the battery and the charging system first. A battery that rests below its standard voltage after the surface charge is removed, or a charging system that runs outside its range, explains a dead truck with no drain at all. The drain test starts after both pass.
Measure the draw with a meter in series on the negative cable. The meter needs a 10 A current range. A GX draws enough current in the first seconds after shutdown to blow the fuse in a small meter, and owners have done that during this test.
Compare the settled reading with the limit for your truck.
| Truck | Key-off draw limit | Where the limit comes from |
|---|---|---|
| GX470, 2003 to 2009 | 50 mA or less | Working limit cited by owners and Lexus experts |
| GX460, 2010 to 2023 | 50 mA or less | Working limit cited by owners and Lexus experts |
| GX550, 2024 and up | 120 mA or less | Factory dark current standard |
Isolate by circuit, then by part. Pull fuses one at a time and watch for the drop, or read millivolt drop across each fuse and leave every fuse in place. On a GX, the circuits owners actually find are the dome light assemblies, the audio amplifier, and aftermarket equipment wired to constant power.
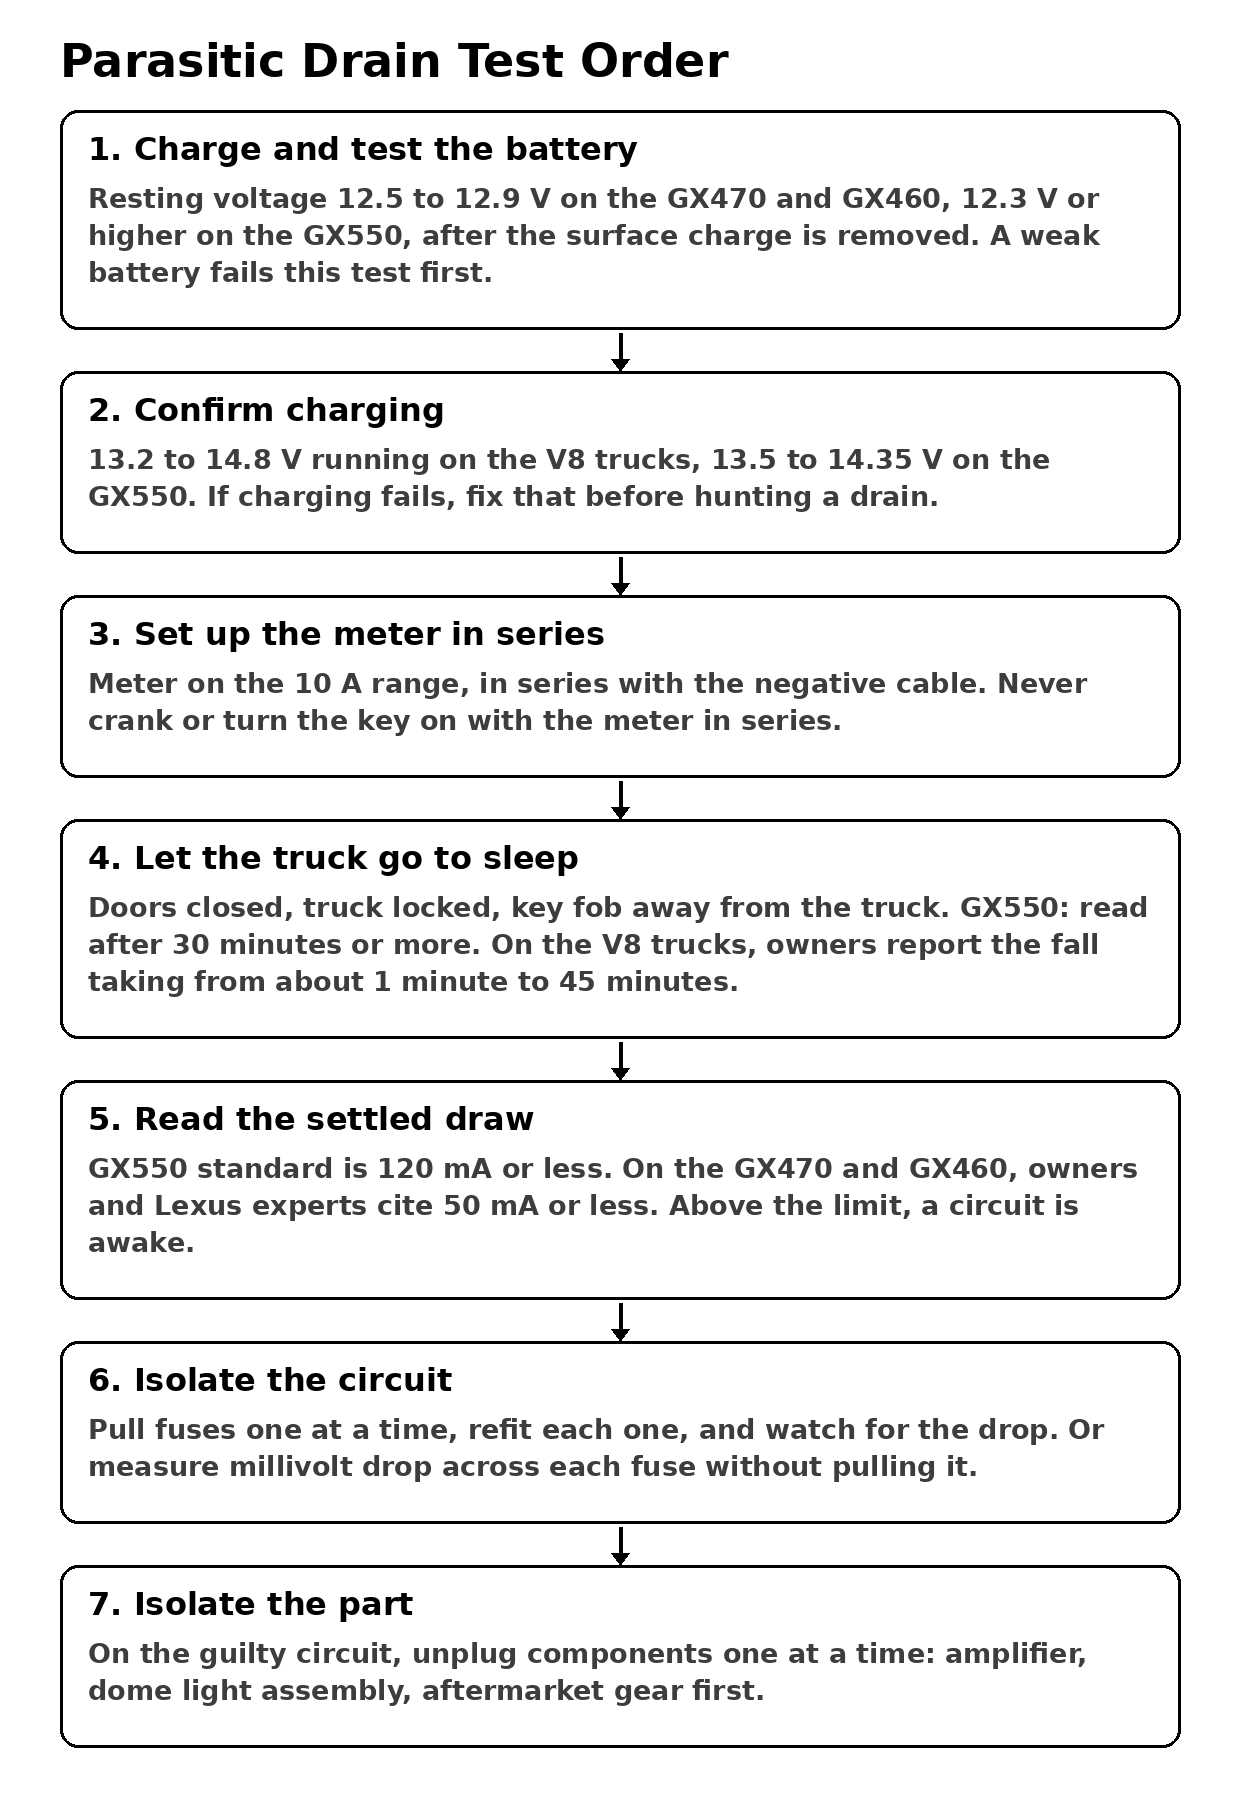
Parasitic Drain Test Order
Read the parked pattern first
How long the truck sits before it dies is diagnostic information. Record it before you test anything.
| Parked pattern | What it points to | First move |
|---|---|---|
| Dead overnight, every night | A large draw, usually over 1 A, or a battery with almost no capacity left | Battery test, then the series draw test the same day |
| Dead after 2 to 4 parked days | A moderate draw in the 100 to 200 mA range, or a weak battery plus a small draw | Battery test, then the series draw test |
| Dead after 1 to 2 weeks | A small draw near the limit, a module that wakes up at intervals, or short trips that never refill the battery | Battery and charging tests, then a long recording draw test |
| Dead only after rain or a car wash | Water in a connector, lamp assembly, or door switch keeping a circuit awake | Inspect lamp assemblies and door switches on the side that got wet |
| Fine for months, then dead twice in a row | A part that has started sticking, such as a lamp switch, a relay, or an amplifier | Series draw test while the fault is present |
Owners report the whole range on GX trucks. The GX460 thread that anchors this guide opens with a brand new battery draining overnight in a 2011 truck. A GX460 owner case in the sources has a truck that drove fine on weekly use and died after two weeks in an airport garage, with a measured draw of 47 mA. Both patterns belong to the same test, and the second pattern needs the long version of it.
Battery and charging standards
| Check | GX470 | GX460 | GX550 |
|---|---|---|---|
| Battery resting voltage at 20 °C (68 °F) | 12.5 to 12.9 V | 12.5 to 12.9 V | 12.3 V or higher |
| Specific gravity at 20 °C (68 °F) | Built-in indicator check: blue is OK | 1.25 to 1.29 | 1.25 or more |
| Charging voltage, no load | 13.2 to 14.8 V | 13.2 to 14.8 V | 13.5 to 14.35 V |
| Charging current, no load | 10 A or less | 10 A or less | 10 A or higher |
| Charging current, loaded at 2,000 rpm | 30 A or more | 30 A or more | 30 A or more |
| Key-off draw limit | 50 mA working limit | 50 mA working limit | 120 mA or less |
| Wait before reading the draw | Watch the reading settle | Watch the reading settle | 30 minutes or more, then read once stable |
Step 1: Charge the battery and test it
The battery check starts with removing the surface charge, because a battery read right after a drive reads high and passes trucks it should fail.
- Charge the battery fully with a charger. A jump start and a short drive do not refill a battery that went flat, and a half-charged battery makes every later reading hard to interpret.
- Remove the surface charge. On the GX470, turn the ignition ON and run the headlights, the blower motor, and the rear defogger for 60 seconds. On the GX460 and the GX550, turn the headlights on for 20 to 30 seconds with the engine switch off.
- Turn everything off and measure the voltage across the battery terminals with a multimeter.
- Compare the reading with the resting standard for your truck in the table above. Below that range, charge the battery and retest it. A battery that will not hold that range after a full charge gets load tested or replaced before any drain work.
- Check that the terminals are tight and free of corrosion, and check the fusible link and the main fuses. Fuse resistance on the GX460 and the GX550 measures below 1 Ω. A terminal cleaning kit handles the corrosion half of this step.
Check the electrolyte and the indicator where the battery has them. The inspection covers electrolyte level in each cell and the built-in indicator on batteries that carry one. A battery low on water in one cell has a battery problem.
Terminal and hold-down torques, for when the cables go back on.
| Torque | GX470 | GX460 | GX550 |
|---|---|---|---|
| Battery terminal nut | Tighten each terminal nut until the clamp cannot twist on the post | 48 in·lbf (5.4 N·m) for 2014 to 2023. No torque is published for 2010 to 2013 | 48 in·lbf (5.4 N·m) |
| Battery hold-down clamp nut | No factory torque is published | 53 in·lbf (6.0 N·m) for 2010 to 2023 | 14 ft·lbf (18.5 N·m) |
Step 2: Confirm the charging system
A charging system that undercharges leaves the battery partly charged every night. A normal key-off draw then takes the battery lower each day it sits. Run the two charging checks before the drain test.
Without load: with the engine running from idle to 2,000 rpm, charging voltage and current sit in the no-load rows of the standards table.
With load: with the engine at 2,000 rpm, the high beam headlights on, and the heater blower on HI, charging current meets the loaded row of the standards table.
If either check fails, work through charging diagnosis first. The Truck Garage alternator guide covers that test order with the values for each generation.
Count your drive pattern as part of this step. A truck driven 10 minutes twice a day, with heated seats, a rear defogger, and a blower running, can spend more charge than it replaces in winter. That pattern produces a dead battery with a normal draw and a healthy alternator. One question rules it out: ask how long the truck’s daily trips are.
Step 3: Set up the series draw test
The series test measures everything the battery is feeding with the truck off. Follow the setup steps in order. A lead that slips or a door left open restarts the modules and changes the reading.
Tools for this step:
| Tool | What to check before you start |
|---|---|
| Digital multimeter | A fused 10 A DC current range, with the test lead moved to the 10 A jack, and min/max recording for the overnight test |
| Fused in-line test lead | Puts a replaceable fuse between the meter and the circuit during series work, so a surge blows the lead fuse instead of the meter fuse |
| Alligator clips or clamp leads | The meter must stay connected hands-free while you work at the fuse boxes |
| Small clamp or tape | For holding a door jamb switch closed while a door stands open. Not needed if you unbolt the switch and disconnect it instead |
| Battery charger or maintainer | For keeping the battery up during a long search and for the retest |
| Notebook | Record the settled draw and the draw after each fuse, in order |
Setup:
- Turn off every load. Lights off, key out, accessories unplugged from the power outlets. Leave the dome light switch in the position you normally park the truck in. A draw can exist only with that switch set to DOOR or AUTO and disappear with the switch off, so testing with the switch off can miss the fault.
- Close the hood or hold the hood switch closed if your truck has one, and close every door. On a GX550 with a power back door, close the back door, because the system will not sleep with it open.
- Set the meter to its 10 A DC range and move the red lead to the 10 A jack before you break the battery connection. Starting on a milliamp range is how meter fuses blow, because the truck draws a surge when power reconnects and again during the first seconds of shutdown.
- Disconnect the negative battery cable. Connect one meter lead to the negative battery terminal and the other lead to the disconnected negative cable. Use alligator clips for both meter leads. A lead that slips off mid-test resets every module and restarts the sleep wait.
- Lock the truck with the fob as you normally would, then wait.
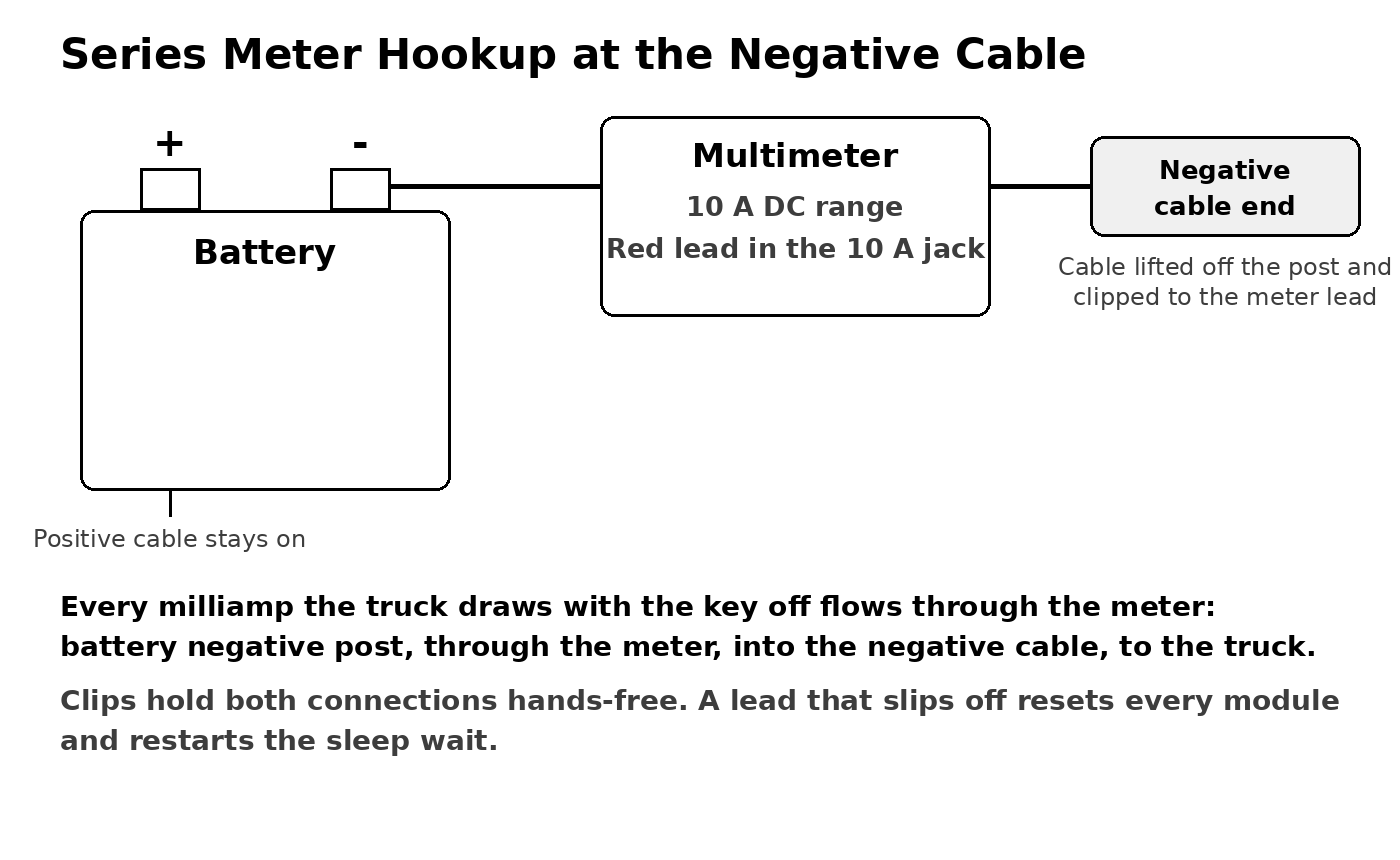
Series Meter Hookup at the Negative Cable
Never start the engine or turn the key on with the meter in series. Cranking current destroys the meter fuse and can damage the meter. If you need to open a door or wake the truck during the search, note that the wait starts over.
Keep the dome light setting honest. The best-documented GX case in the sources is a draw that only appeared with the dome light set to AUTO or DOOR. The owner’s first test with the dome switched off found nothing. Test the truck in the switch positions you actually park it in, and if the first test passes, repeat it with the dome lights on DOOR before you call the truck clean.
Step 4: Let the truck go to sleep and read the settled draw
Modules shut down in stages after locking, and the draw falls in steps as they do. Owner reports disagree on how long the full fall takes on the V8 trucks, and the disagreement is worth knowing before you judge a reading.
- One detailed GX walkthrough in the sources reports the draw below 50 mA within about 1 minute of locking the doors.
- The GX460 thread reports about 0.1 A (100 mA) of draw for a good 30 minutes after the door shuts, with interior lights staying on for about 30 seconds after locking.
- A GX460 owner case reports the draw settling to 47 mA after about 30 to 45 minutes, and a Tacoma owner thread reports the same 30 to 45 minute window, with 100 to 200 mA before sleep and 15 to 30 mA after.
- On the GX550, wait 30 minutes or more with the meter connected in series after any disconnect, then read the dark current once the current is stable.
Work rule from those reports: watch the reading for at least 30 minutes, or until it has held one stable low value for several minutes, whichever takes longer. A reading taken at 2 minutes condemns trucks that were still shutting down. A reading that is still high after 45 minutes of closed doors and no fob activity means a circuit is still drawing current.
Keep the key fob away from the truck during the wait. Walking up to check the meter with the fob in your pocket can wake the truck and restart the wait. On the GX550, keep the key away from the truck and keep your feet clear of the kick sensor, because a detected foot raises the reading for a moment. Read the meter from where it sits, and leave the fob in the house for the long test.
Compare the settled value:
| Settled draw | Reading |
|---|---|
| At or under the limit for your truck | Within the limit. Look at battery health, charging, and drive pattern if the truck still dies |
| 50 to 100 mA on a V8 truck | A small draw. It flattens a healthy battery over weeks and a tired battery over days |
| 100 to 300 mA | A lamp circuit or a module staying awake. This range kills weakened batteries overnight in the GX owner reports |
| 300 mA to 1 A | A larger load staying on, such as an amplifier, a seat or window module, or aftermarket equipment |
| Over 1 A | A major load. Expect the truck dead overnight and check the unfused paths early if fuses do not explain it |
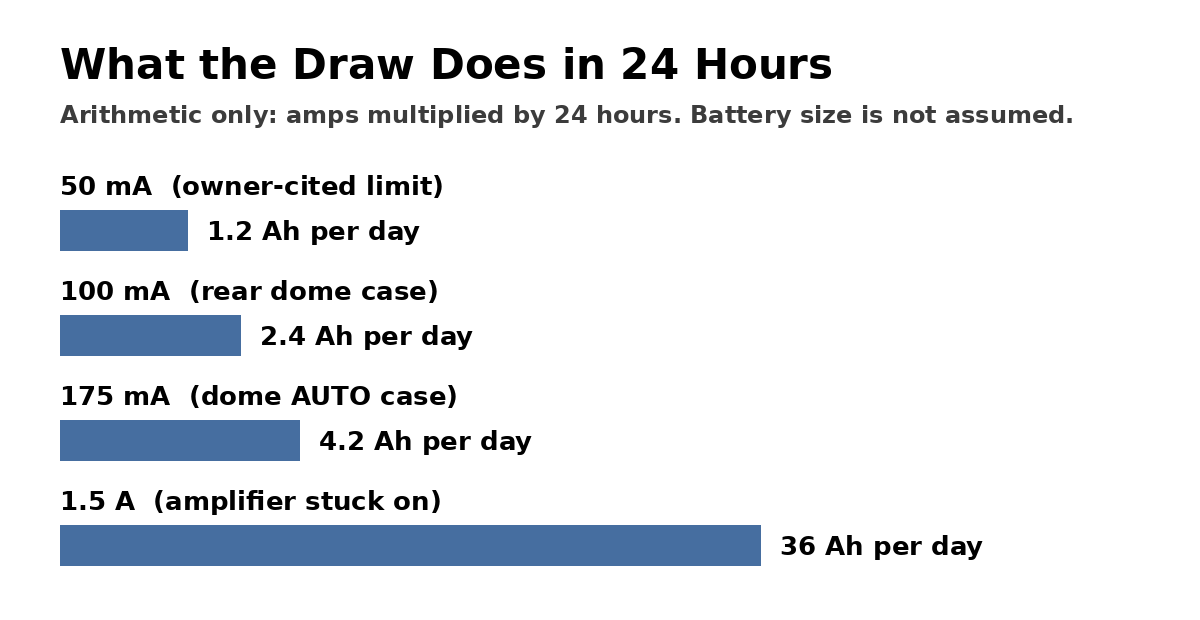
What Each Draw Level Costs Per Day
Multiply the draw by 24 hours to get the daily cost. A 175 mA draw, the documented GX dome light case, uses about 4.2 amp-hours a day. A 1.5 A draw, the documented GX470 amplifier case, uses about 36 amp-hours a day, which takes most of a starting battery in little more than a day of sitting.
Step 5: Isolate the circuit, two methods
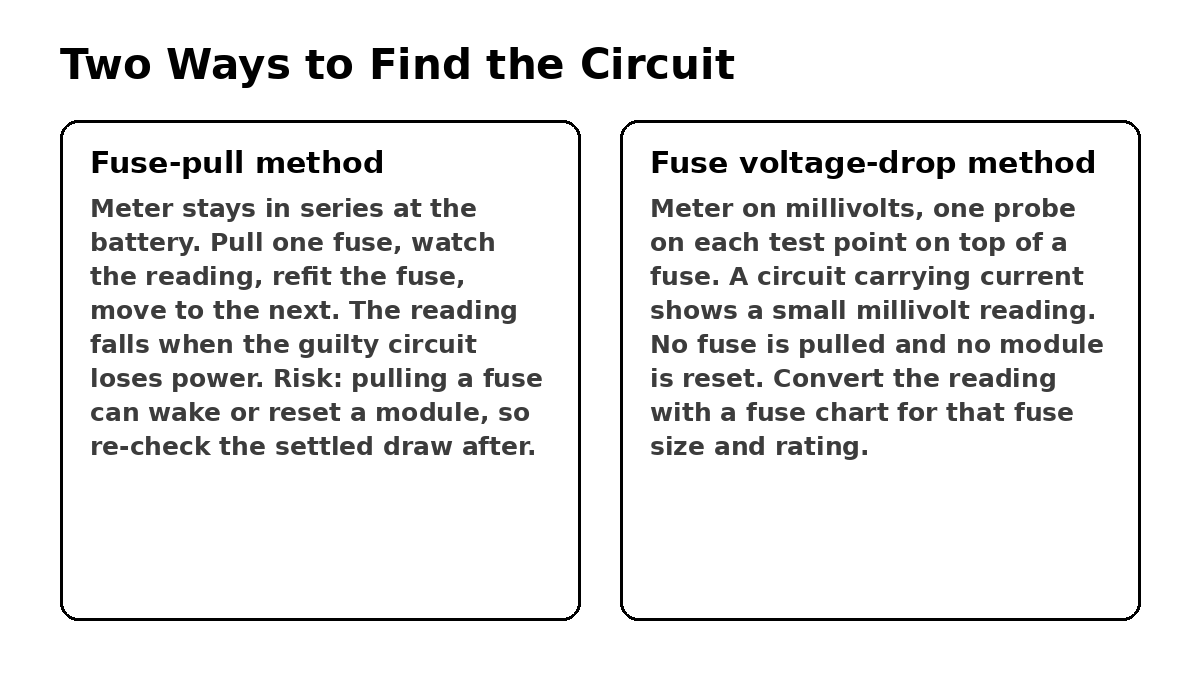
Method A: Pull fuses one at a time
- With the meter still in series and the truck asleep, pull one fuse and watch the meter. Pull one fuse at a time, and never pull two at once.
- If the draw does not change, refit that fuse in its exact slot before you pull the next one. Refit every fuse, because a circuit left dead can hide a second draw and because the search ends with the truck whole.
- When a pulled fuse drops the draw sharply, write down the fuse name, its rating, and both readings. That circuit carries the draw. A mini fuse assortment covers a fuse that breaks during the search.
- Start with the underhood fuse box, then move to the cabin fuse box. For cabin fuses, the truck has to read the open door as closed. One way is to hold the door jamb switch closed with a small clamp. The other way is to unbolt the door courtesy switch and disconnect its connector, which takes the switch out of the circuit and leaves the door free to stand open. Either way, the truck stays in its locked, lights-off state with your door open. The GX walkthrough in the sources used a small wood clamp for this and reports 2 to 3 hours for a full search with a helper reading the meter.
Watch for the reset trap. Pulling a fuse cuts power to its modules, and a stuck module can behave when power returns. If the draw stays gone after you refit the guilty fuse, the fault has reset itself for now. Note the circuit anyway, then repeat the test the next time the truck dies, and start at that circuit.
Method B: Measure voltage drop across each fuse
Current flowing through a fuse creates a small voltage drop across that fuse. A fuse with no current flowing through it shows no drop. This method finds live circuits without pulling anything, so no module gets reset during the search.
- Set the meter to millivolts DC.
- Touch one probe to each of the two small test points on top of a fuse. Leave the fuse in place.
- A reading of 0.0 mV means that circuit is carrying no current at that moment. A steady millivolt reading means current is flowing through that fuse while the truck should be asleep.
- Convert the millivolt reading to current with a fuse chart matched to that fuse type and rating, because the same millivolt reading means different current on a 7.5 A mini fuse and a 30 A cartridge fuse.
- Work every fuse in both boxes and write down every fuse that shows a reading. The list of live circuits is usually short, and it names the suspects without disturbing any of them.
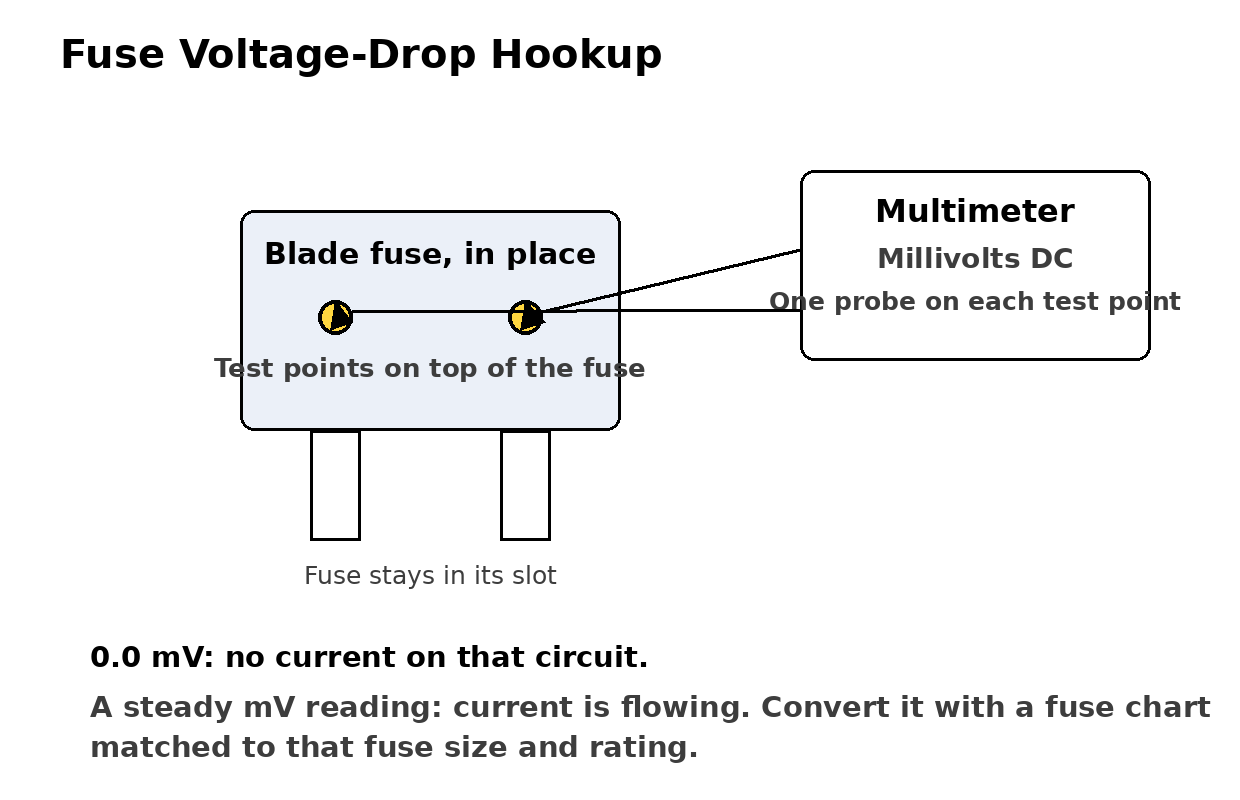
Fuse Voltage-Drop Hookup
Two Ways to Find the Circuit
Home Mechanic order: use Method B to build the suspect list, then use Method A on the suspects only to confirm. That order keeps the search shorter and avoids resetting the fault before you have a list.
Fuse charts. Step 6 works from the parts on the guilty fuse. The charts below list each fuse, its rating, and the parts on its circuit for the GX470 and the GX460. On the GX550, the fuses and their ratings are listed on the underside of each fuse box lid.
GX470 engine compartment fuse box
| Fuse | Rating | Circuit |
|---|---|---|
| SPARE | 10 A | Spare fuse |
| ALT | 140 A | Charging system and all components in “AM1”, “HEATER”, “CDS FAN”, “FR FOG”, “DEFOG”, “AIR SUS”, “AC INV”, “SEAT HEATER”, “OBD”, “STOP”, “J/B”, “RR A/C”, “MIR HEATER”, “BATT CHG”, “TOWING BRK” and “TOWING” fuses |
| SPARE | 15 A | Spare fuse |
| HEATER | 50 A | Air conditioning system |
| AIR SUS | 50 A | Rear height control air suspension |
| AM1 | 50 A | All components in “ACC”, “CIG”, “IG1”, “FR WIP-WSH”, “RR WIP”, “RR WSH”, “DIFF”, “ECU-IG”, “TEMS” and “STA” fuses |
| TOWING BRK | 30 A | Trailer brake controller |
| J/B | 50 A | All components in “P FR P/W”, “P RR P/W”, “D RR P/W”, “D P/SEAT”, “P P/SEAT”, “TAIL”, “PANEL” and “POWER OR TI&TE” fuses |
| BATT CHG | 30 A | Trailer sub battery |
| TOWING | 40 A | Trailer lights |
| CDS FAN | 20 A | Electric cooling fan |
| RR A/C | 30 A | Rear air conditioning system |
| MIR HEATER | 10 A | Outside rear view mirror defogger |
| STOP | 10 A | Stop lights, high mounted stoplight, shift lock control system, vehicle stability control system, electronic modulated suspension, rear height control air suspension, multiport fuel injection system/sequential multiport fuel injection system |
| AC INV | 15 A | Power outlet (115 VAC) |
| FR FOG | 15 A | Front fog lights |
| OBD | 7.5 A | On-board diagnosis system |
| HEAD (LO RH) | 10 A | Right-hand headlight (low beam) |
| HEAD (LO LH) | 10 A | Left-hand headlight (low beam) |
| HEAD (HI RH) | 10 A | Right-hand headlight (high beam) |
| HEAD (HI LH) | 10 A | Left-hand headlight (high beam) |
| EFI NO.2 | 10 A | Multiport fuel injection system/sequential multiport fuel injection system |
| HEATER NO.2 | 7.5 A | Air conditioning system |
| DEFOG | 30 A | Rear window defogger |
| AIRSUS NO.2 | 10 A | Rear height control air suspension |
| SEAT HEATER | 20 A | Seat heaters |
| DOME | 10 A | Ignition switch light, interior lights, personal lights, foot lights, running board lights, door courtesy lights, inside door handle lights, multi-information display |
| RADIO NO.1 | 20 A | Audio system, navigation system |
| ECU-B | 10 A | Multiplex communication system, vehicle stability control system, wireless remote control system, inside rear view mirror, air conditioning system, electronic modulated suspension, driving position memory system, power windows, moon roof, rear view monitor system |
| ECU-B NO.2 | 10 A | Theft deterrent system |
| ABS MTR | 40 A | Anti-lock brake system, vehicle stability control system, active traction control system, brake assist system |
| AM2 | 30 A | Starting system, all components in “IGN”, “SRS”, “GAUGE” and “ST2” fuses |
| ABS SOL | 30 A | Anti-lock brake system, vehicle stability control system, active traction control system, brake assist system |
| ALT-S | 7.5 A | Charging system |
| MAYDAY | 7.5 A | LEXUS Link System (Mayday System) |
| HORN | 10 A | Horns |
| A/F HEATER | 15 A | A/F sensor |
| TRN-HAZ | 15 A | Turn signal lights |
| ETCS | 10 A | Electronic throttle control system |
| EFI | 20 A | Multiport fuel injection system/sequential multiport fuel injection system |
| D FR P/W | 20 A | Power window |
| DR/LCK | 25 A | Power door lock |
| TOWING | 30 A | Towing converter |
| RADIO NO.2 | 30 A | Audio system, navigation system |
| A/PUMP | 50 A | Multiport fuel injection system/sequential multiport fuel injection system |
GX470 cabin fuse box
| Fuse | Rating | Circuit |
|---|---|---|
| IGN | 10 A | Multiport fuel injection system/sequential multiport fuel injection system, vehicle stability control system |
| SRS | 10 A | SRS airbag system, front passenger occupant classification system |
| GAUGE | 7.5 A | Gauges and meters |
| ST2 | 7.5 A | Multiport fuel injection system/sequential multiport fuel injection system |
| FR WIP-WSH | 30 A | Windshield wipers, windshield washer |
| TEMS | 20 A | Electronic modulated suspension |
| DIFF | 20 A | Four-wheel drive system |
| RR WIP | 15 A | Rear window wiper |
| D P/SEAT | 30 A | Driver’s power seat |
| P P/SEAT | 30 A | Front passenger’s power seat |
| PWR OUTLET | 15 A | Power outlet (12 VDC) |
| IG1 NO.2 | 10 A | Rear air conditioning system, inside rear view mirror, kinetic dynamic suspension system |
| RR WSH | 15 A | Rear window washer |
| ECU-IG | 10 A | Shift lock control system, power windows, outside rear view mirror defogger, anti-lock brake system, active traction control system, vehicle stability control system, air conditioning system, navigation system, power windows, moon roof, tilt and telescopic steering, multi-information display, driving position memory system, rear view monitor system, tire pressure warning system |
| IG1 | 10 A | Air conditioning system, back-up lights, rear window defogger, seat heaters, vehicle stability control system |
| STA | 7.5 A | Multiport fuel injection system/sequential multiport fuel injection system |
| P FR P/W | 20 A | Front passenger’s power window |
| P RR P/W | 20 A | Rear right side power window |
| D RR P/W | 20 A | Rear left side power window |
| PANEL | 10 A | Instrument panel lights |
| TAIL | 10 A | Parking lights, tail lights, license plate lights, front fog lights |
| ACC | 7.5 A | Shift lock control system, power outlets, outside rear view mirrors, audio system, navigation system, power rear view mirrors, multi-information display, rear view monitor system |
| CIG | 10 A | Cigarette lighter |
| POWER OR TI&TE | 30 A | Power windows, moon roof, tilt and telescopic steering |
On 2003 and 2004 GX470s, the ABS SOL fuse is 50 A, there is no A/F HEATER fuse, there is no A/PUMP fuse, and the 30 A cabin fuse is named POWER. On 2003 trucks, the trailer brake controller fuse is named BRAKE CTRL.
The GX460 charts show the 2013 fuse layout.
GX460 engine compartment fuse box
| No. | Fuse | Rating | Circuit |
|---|---|---|---|
| 1 | A/C RR | 40 A | Rear air conditioning system |
| 2 | AIR SUS | 50 A | Air suspension system, AIR SUS NO.2 |
| 3 | INV | 15 A | Inverter |
| 4 | DEF | 30 A | Rear window defogger |
| 5 | DEICER | 20 A | Windshield wiper deicer |
| 6 | SUB BATT | 30 A | Towing |
| 7 | IG2 | 20 A | Injector, ignition, meter |
| 8 | HORN | 10 A | Horn |
| 9 | EFI | 25 A | EFI ECU, A/F heater relay, fuel pump relay, EFI NO.2 |
| 10 | A/F | 20 A | A/F SSR |
| 11 | FUEL OPN | 10 A | Fuel lid opener |
| 12 | S/HTR RR | 20 A | Rear seat heater |
| 13 | FOLD SEAT LH | 30 A | Folding seat (left) |
| 14 | FOLD SEAT RH | 30 A | Folding seat (right) |
| 15 | TOWING TAIL | 30 A | Towing |
| 16 | A/C COMP | 10 A | Air conditioning system |
| 17 | STRG HTR | 10 A | Steering heater |
| 18 | CDS FAN | 20 A | Condenser fan |
| 19 | STOP | 10 A | Stop lights, high mount stop light, stop light switch, VSC ECU, towing, Smart access system with push button start |
| 20 | AIR SUS NO.2 | 7.5 A | AIR SUS ECU |
| 21 | H-LP RH-HI | 15 A | Headlight high beam (right) |
| 22 | H-LP LH-HI | 15 A | Headlight high beam (left) |
| 23 | HTR | 50 A | Air conditioning system |
| 24 | WIP WSH RR | 30 A | Rear window wipers and washer |
| 25 | H-LP CLN | 30 A | Headlight cleaner |
| 26 | ST | 30 A | STARTER MTR |
| 27 | H-LP HI | 25 A | DIM relay, headlights, daytime running light system |
| 28 | ALT-S | 7.5 A | ALT |
| 29 | TURN & HAZ | 15 A | Front turn signal light, rear turn signal light, side turn signal light, meter turn signal light |
| 30 | D/L NO.1 | 25 A | Door lock motor, glass hatch opener |
| 31 | ETCS | 10 A | EFI ECU |
| 32 | FUEL PMP | 15 A | FPC |
| 33 | TOWING | 30 A | Towing |
| 34 | ALT | 140 A | Air conditioning system, AIR SUS, headlight cleaner, towing, folding seat, STOP, rear window defogger, MIR HTR, CDS FAN, RR FOG, DEICER, MG-CLT, RR SEAT HTR, STRG HTR, J/B, INV, RR WIP, RR WSH |
| 35 | P/I-B | 80 A | Injector, ignition, meter, EFI, A/F heater, horn |
| 36 | RAD NO.1 | 15 A | Audio system, navigation system, rear seat entertainment system |
| 37 | AM2 | 7.5 A | Starter system |
| 38 | RAD NO.2 | 10 A | Navigation system |
| 39 | MAYDAY | 7.5 A | MAYDAY |
| 40 | AMP | 30 A | Audio system |
| 41 | ABS NO.1 | 50 A | ABS, VSC |
| 42 | ABS NO.2 | 30 A | ABS, VSC |
| 43 | AIR PMP | 50 A | Air pump |
| 44 | SECURITY | 10 A | SECURITY |
| 45 | SMART | 7.5 A | Smart access system with push button start |
| 46 | STRG LOCK | 20 A | Steering lock system |
| 47 | TOWING BRK | 30 A | Towing |
| 48 | WIP RR | 15 A | Rear window wiper |
| 49 | DOME | 10 A | Interior lights, personal lights, vanity lights, door courtesy lights, footwell lights, outer foot lights, overhead module |
| 50 | ECU-B | 10 A | BODY ECU, meter, heater, steering sensor, wireless remote control, seat position memory, tilt and telescopic steering, multi display, Smart access system with push button start, folding seat, cool box, DSS#2 ECU, steering switch, D-module switch, overhead module |
| 51 | WSH FR NO.2 | 7.5 A | DSS#1 ECU |
| 52 | H-LP RH-LO | 15 A | Headlight low beam (right), headlight leveling system |
| 53 | H-LP LH-LO | 15 A | Headlight low beam (left), headlight leveling system |
| 54 | INJ | 10 A | Coil, injector, ignition, noise filter |
| 55 | EFI NO.2 | 10 A | O2 SSR, AFM, ACIS VSV, AI COMB, KEY OFF PUMP, EYP VSV, EGR VALVE, CANISTER VSV, AI VSV RLY, AI PUMP HTR RLY |
| 56 | WIP FR NO.2 | 7.5 A | DSS#1 ECU |
| 57 | WSH RR | 15 A | Rear window washer |
GX460 driver’s side instrument panel fuse box
| No. | Fuse | Rating | Circuit |
|---|---|---|---|
| 1 | P/OUTLET | 15 A | Power outlet |
| 2 | ACC | 7.5 A | Outside rear view mirror motor, BODY ECU, air conditioning system, audio system, navigation system, parking assist system, back up relay, DSS#2 ECU, AT indicator, EFI ECU, shift lock ECU, DCM, MAYDAY ECU |
| 3 | BKUP LP | 10 A | Back-up lights, audio system, multi information display, DSS#2 ECU, parking assist sensor |
| 4 | TOWING BKLP | 10 A | Towing |
| 5 | AVS | 20 A | Air suspension system |
| 6 | KDSS | 10 A | KDSS ECU |
| 7 | 4WD | 20 A | 4WD system, rear differential lock |
| 8 | P/SEAT FL | 30 A | Front power seat (left) |
| 9 | D/L NO.2 | 25 A | Door lock motor, glass hatch opener, BODY ECU |
| 10 | PSB | 30 A | PSB ECU |
| 11 | TI & TE | 15 A | Tilt and telescopic steering |
| 12 | FOG FR | 15 A | Front fog lights |
| 13 | OBD | 7.5 A | DLC 3 |
| 14 | A/C | 7.5 A | Air conditioning system |
| 15 | AM1 | 7.5 A | Starting system |
| 16 | DOOR RL | 25 A | Rear power window (left) |
| 17 | ECU-IG NO.1 | 10 A | Shift lock ECU, VSC ECU, steering sensor, yaw rate sensor, sequential switch, auto wiper ECU, back up relay, tilt & telescopic steering, PSB ECU, DSS#1 ECU, front radar sensor, AFS ECU, TIRE PRESS ECU, DRIVER MON ECU |
| 18 | IG1 | 7.5 A | Front turn signal light, rear turn signal light, side turn signal light, meter turn signal light, trailer light, ALT, VSC, C/C switch |
| 19 | ECU-IG NO.2 | 10 A | Rear window defogger, outside rear view mirror memory, seat heater/ventilator switch, inverter relay, air conditioning system, EC mirror, BODY ECU, exhaust gas sensor, parking assist sensor, navigation system, DSS#2 ECU, meter switch, accessory meter, folding seat ECU, O/H IG, head light cleaner, rear air conditioning system, deicer, D-module, rain sensor, air suspension, RR VLV ECU, steering heater, LKA, P/SEAT IND |
| 20 | S/HTR FR | 20 A | Seat heater and ventilator |
| 21 | P/SEAT FR | 30 A | Front power seat (right) |
| 22 | DOOR P | 30 A | Front power window (passenger’s side), outside rear view mirror memory |
| 23 | DOOR | 10 A | Power window |
| 24 | DOOR D | 25 A | Front power window (driver’s side) |
| 25 | DOOR RR | 25 A | Rear power window (right) |
| 26 | S/ROOF | 25 A | Moon roof |
| 27 | WIP | 30 A | Windshield wipers and washer |
| 28 | WASHER | 20 A | Windshield wipers and washer, rear window wipers and washer |
| 29 | COOLING | 10 A | Cool box |
| 30 | IGN | 10 A | EFI ECU, C/OPN RLY, VSC ECU, air bag ECU, smart entry & start system, steering lock ECU, CAN gateway ECU |
| 31 | GAUGE | 7.5 A | Meter |
| 32 | PANEL | 7.5 A | Switch illumination, glove box light, cup holder lights, auxiliary box light, navigation system, audio system, air conditioning system, outside rear view mirror switch, folding seat switch, multi-information display, P/SEAT IND, SHIFT, COOL BOX |
| 33 | TAIL | 10 A | Front position lights, tail lights, license plate lights, EFI ECU, rear fog lights, towing, front fog lights |
Step 6: Isolate the part on the guilty circuit
A fuse usually feeds several parts. The circuit is a starting point, and the part hunt happens on that circuit.
- Get the list of parts on that fuse from the fuse charts at the end of Step 5, the fuse box cover, or a wiring diagram for your model year.
- Unplug the parts on that circuit one at a time, watching the series meter after each one. The draw falls when the guilty part comes unplugged.
- Start with the parts the GX owner evidence points to on that circuit: lamp assemblies and their switches, audio amplifiers and head units, power seat and window modules, and any aftermarket equipment spliced into the harness.
- Inspect before you replace. On lamp circuits, look at the lamp assembly and its switch for heat damage, a switch that feels loose, or a lamp that glows faintly. On audio circuits, feel the amplifier case after the truck has sat. A warm amplifier on a cold truck was still working, and still drawing.
Run the stuck-switch check before parts come off. Operate each switch on the truck, locks, windows, seats, lamps, and watch the draw after each operation. A healthy truck returns to its settled draw after every switch. A switch that leaves the draw high has a sticking contact or a module that stays awake behind it.
The dome light assemblies are the GX repeat offenders. Three separate GX accounts in the sources end at a dome light. The GX460 thread names the rear dome light assembly. The GX walkthrough traces about 175 mA to a bad rear dome light switch, with the draw present only when the light was set to AUTO. The long GX460 and GXOR thread traces about 100 mA to the rear cargo area dome light, only when set to DOOR, and reports the slow damage pattern clearly: the truck started fine for a long time while the draw degraded battery after battery. If your draw lands on a lamp circuit, test with the switch in every position before you condemn the assembly, because two of the three cases only drew in one switch position.
On the GX470, the rear dome lamp assembly is 81250-60010-B0 in Stone and 81250-60010-A0 in Ivory. Used assemblies also turn up, such as this GX470 rear dome lamp listing, and a used assembly carries the same switch wear the test is hunting, so test any used lamp the same way before it goes in.
The amplifier case. In the documented GX470 case in the sources, a draw of about 1.5 A was isolated to the 30 A navigation and Mark Levinson stereo fuse, and the expert answer in that case describes an amplifier internal switch that sticks and leaves the amplifier powered while the rest of the system works normally. That is one documented case, presented here because the pattern matters: a truck can have a working stereo and a stuck amplifier. If your draw lands on the audio fuse, unplug the amplifier and watch the meter before you price a head unit.
Aftermarket equipment gets checked on every circuit it touches. Owners in the GX460 thread attribute a borderline draw of about 55 mA to aftermarket stereo equipment, and a CarPlay retrofit unit was the first suspect in that thread’s truck. Dash cameras with parking mode, trailer brake controllers, remote start systems, and chargers left in power outlets all draw by design or by fault. Unplug them first. Each one unplugs in seconds, and removing it either drops the draw or clears it as a suspect. Wire keep-alive accessories to ignition-switched power when you refit them, with an add-a-circuit fuse tap for a clean switched feed. On the GX550, remove the aftermarket components and measure again: a drop to 120 mA or less with the equipment out puts the draw on the removed equipment.
Step 7: Check the paths that no fuse covers
If every fuse is pulled and the draw stays, the load sits outside the fuse boxes. Work this short list before you assume the meter is wrong.
- Alternator and regulator. Disconnect the alternator output cable and the alternator connector, then re-read the draw. A failed diode or regulator can draw through the output cable with the key off. In the 100-series case in the sources, a 2.5 A draw survived pulling every fuse in both boxes, and replies in that thread point at the alternator and regulator path, noting that about 2.5 A is close to what a rotor draws. Wrap the disconnected output cable end so it cannot touch ground while it is off the stud.
- Fusible link circuits. The large bolted fusible links feed whole sections of the truck and do not come out like blade fuses. If the draw survives the blade fuses, isolate sections at the fusible link block with the same series meter watching.
- Starter cable and aftermarket cables. Inspect added cables for chafing where they pass brackets and body edges. A chafed cable that leaks to ground through dirt and moisture draws a small, weather-dependent current and fits the dies-after-rain pattern.
- The meter setup itself. Re-check that the leads are in the current jacks, that the meter fuse is good, and that the clips are on the terminal and the cable and nothing else. One older owner thread in the wider search traced a wandering reading to an accessory gauge that restarted when power reconnected. Verify the setup before you condemn a harness.
The intermittent draw: record it overnight
Some trucks pass a one-hour test and die a week later because a module wakes up hours into the park and stays awake, or wakes in cycles. The GX460 case in the sources is the template: a measured 47 mA draw, inside the limit, on a truck that died reliably after about two weeks.
- Set the series meter to its current range and use its min/max record function if it has one.
- Connect the meter, lock the truck, and leave it connected for the longest practical window, ideally overnight.
- Read the recorded maximum in the morning. A maximum well above the settled value proves a wake event happened while you were gone.
- Note what could wake the truck: a key fob stored near the truck, a phone paired to an aftermarket head unit, a door or hood switch that changes state with temperature, or a lamp switch going intermittent as it cools.
- Repeat the fuse work during a wake event if you can catch one, because the guilty circuit only shows itself while it is awake.
A clamp meter on the negative cable is the Home Mechanic alternative for this step. It reads without breaking the connection, so the truck never resets. The UNI-T UT210E resolves 1 mA on its 2 A DC range, and low-cost clamp meters still lose accuracy at milliamp levels, so treat a clamp reading as a wake detector rather than a precise draw figure, and confirm any finding with the series meter.
Verify the fix
- Refit every fuse and reconnect every part you unplugged, except the part you replaced or repaired.
- Repeat the series test from Step 3 and record the settled draw with the dome lights in the positions you park with. The settled figure should sit at or under the limit for your truck.
- Park the truck for the same number of days that used to kill it, then measure resting battery voltage before starting. If the battery still reads in its standard range after the problem interval, it is holding its charge and the drain is fixed.
- If you left a suspect circuit disconnected as a holding measure, write down which fuse or connector is out and what it disables. A truck running with its audio fuse pulled is diagnosed and waiting on a part. The fix counts when the draw test passes with everything connected.
What this test costs in time
Owners in the sources report 2 to 3 hours for a careful fuse-pull search with a helper, and the fuse voltage-drop method shortens the fuse box portion because nothing gets pulled or refitted. The overnight recording test costs no working time and answers the intermittent cases that a single afternoon cannot. Budget one afternoon for the test order in this guide, including the sleep wait.
Parts and tools in this guide
| Item | Used for | Link |
|---|---|---|
| Fluke 17B+ digital multimeter | Series draw test, voltage checks, min/max overnight recording | Amazon |
| UNI-T UT210E clamp meter | Wake detection on the negative cable without breaking the connection | Amazon |
| Electronic Specialties 134 fused test lead | Surge protection for the meter during series work | Amazon |
| NOCO GENIUS5 charger and maintainer | Step 1 charge and retest, and keeping the battery up during a long search | Amazon |
| LotFancy terminal cleaning kit | Terminal and clamp cleaning in Step 1 | Amazon |
| Nilight add-a-circuit fuse tap kit, mini blade | Wiring accessories to ignition-switched power | Amazon |
| Mini blade fuse assortment, 120 piece | Replacements during the fuse search | Amazon |
| Rear dome lamp assembly, GX470, 81250-60010-B0 | The repeat offender part on the GX470 | LexusPartsNow |
| Toyota TrueStart battery, 00544-24F60-575 | GX470 replacement battery, group 24F, 575 CCA, 130 minute reserve capacity | Toyota parts |
Replacement battery sizes. The GX470 and the GX460 take a group 24F battery, and the GX460 battery number is confirmed by VIN at the dealer. The GX550 takes an LN4 case, the H7 family, at 80 Ah or more and 689 A CCA or more.
FAQ
What parasitic draw is normal on a GX?
On a GX470 or GX460, owners and Lexus experts cite 50 mA or less with everything off and the truck locked, and readings in the sources cluster lower on plain trucks. Owners report about 55 mA on a GX460 with aftermarket stereo equipment. The GX550 dark current standard is 120 mA or less.
How long do I wait before trusting the reading?
On the GX550, wait 30 minutes or more with the meter connected in series and read once the current holds stable. On the V8 trucks, owner reports conflict, from about 1 minute on one GX to 30 to 45 minutes on GX460 and Tacoma trucks. Watch the reading for at least 30 minutes, or until it holds one stable value for several minutes. A reading taken during the first minutes includes modules that were still shutting down.
Can I do this test with a test light?
A test light shows that a draw exists and roughly how large it is, and it was the standard tool for years. It gives no number, so it cannot separate a 40 mA normal draw from a 175 mA lamp draw. Use it as a first screen if a meter is not available, and borrow or buy a meter with a 10 A range for the real test.
Why did my cheap multimeter blow its fuse during the test?
The truck draws a surge when power reconnects and a high draw during the first seconds of shutdown. One GX owner in the sources blew a 1 A meter this way and bought an $80 meter with a 10 A range to finish the test. Set the meter to its 10 A range and move the lead to the 10 A jack before you disconnect the battery cable, and run a fused test lead in series for surge protection.
My draw test passes and the battery still dies. What is left?
Four things, in order. The battery fails under load despite a fair resting voltage. The charging system fails one of the two charging checks. The drive pattern never refills the battery. Or the draw is intermittent and needs the overnight recording test, because a module wakes after your test window ends.
Which fuse do I pull first if I want a shortcut?
There is no universal first fuse, because fuse layouts vary by year and equipment. On GX trucks the documented finds sit on lamp circuits and the audio circuit, so if your truck has a dome light that behaves oddly or an audio system, start with those circuits and then work the boxes in order.
Is it safe to drive with a fuse pulled to stop the drain?
Pulling the guilty fuse is a sound holding measure while a part is on order, and owners use it. Know what else that fuse feeds before you drive, and treat the truck as diagnosed rather than fixed until the draw test passes with every fuse in place.
Sources
- GX470 factory manuals
- GX460 factory manuals
- GX550 repair manuals
- IH8MUD, Parasitic Battery Drain help, forum.ih8mud.com
- IH8MUD, Strange issue – no power, forum.ih8mud.com
- IH8MUD, GX460 and GXOR B.S. thread, page 164, forum.ih8mud.com
- IH8MUD, 2.5 amp parasitic draw on battery, forum.ih8mud.com
- JustAnswer, 2003 Lexus GX470 Navigation Stereo Causing Battery Drain, justanswer.com
- JustAnswer, 2010 Lexus GX460 Dead Battery After a Week and a Half, justanswer.com
- ALLDATA DIY, Parasitic Draw Test, alldata.com
- TacomaWorld, Battery drain, tacomaworld.com
Leave a Reply