The GX470 runs the 2UZ-FE 4.7 liter V8, and high mile examples often announce themselves on the first start of the day. You turn the key on a cold engine and hear a sharp ticking from one side of the engine bay. The tick follows engine speed, grows louder under load, and fades as the truck warms up. On most of these trucks that pattern traces to an exhaust leak at one of the two manifolds, and the leak usually comes from a crack in the casting, a flange that no longer clamps flat, or a broken stud.
This guide walks through the diagnosis in the order a careful owner would work it. It separates the manifold tick from the other noises this engine makes, shows how to confirm the leak point before any parts come off, compares the repair options with their tradeoffs stated plainly, and then covers the manifold job itself with the factory fastener counts and torque values. It closes with a summary of what to do first on your own truck.
Quick answer
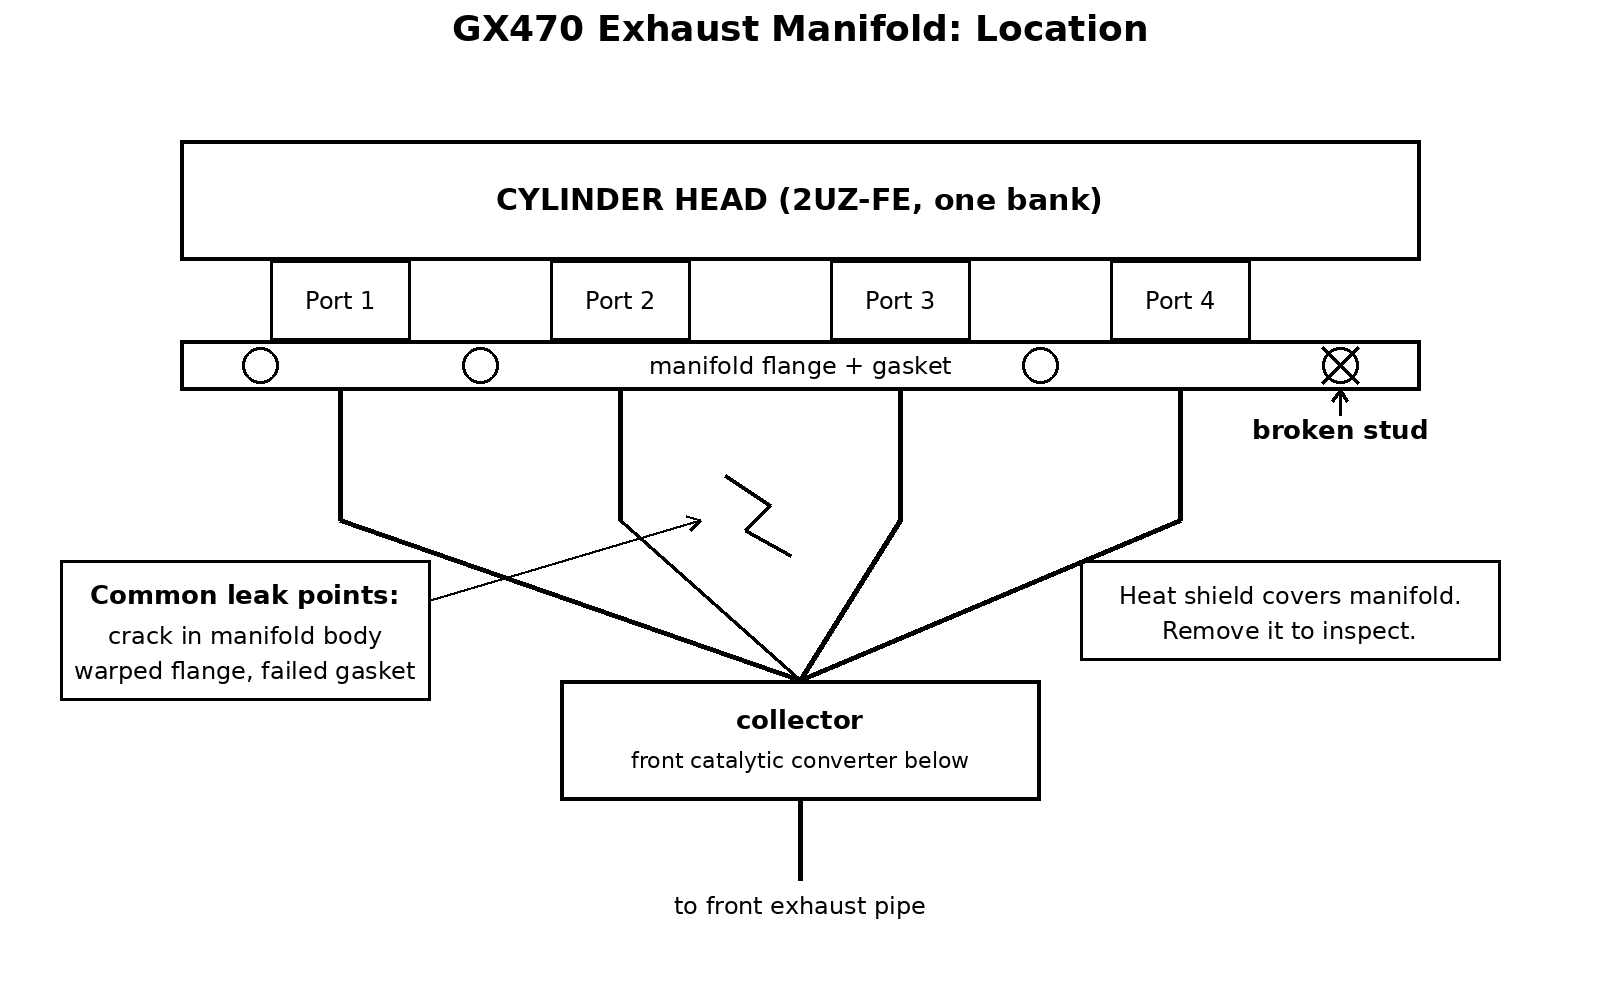
Start the truck cold and listen at each front wheel well, then under the open hood. A sharp tick from one side that tracks engine speed, gets louder under load, and fades or stops at full operating temperature points to an exhaust leak at that side’s manifold. The usual causes on the GX470 are a cracked manifold, a warped flange or failed gasket, and a broken manifold stud that leaves one section of the flange unclamped.
Record the cold start, pinpoint the loudest spot with a stethoscope or a length of hose, look for black soot at the flange, and count the studs and nuts on that side.
Our ultimate GX buying guide tells shoppers to listen for this tick on a cold test drive, and it quotes roughly $1,400 per side at a dealer. That figure comes from the buying guide and from owner reporting. Treat it as a planning number and get a current quote for your own truck before you budget the job.
What is actually ticking
Each exhaust pulse leaves a cylinder as a short burst of pressure. When part of that burst escapes through a crack or a flange gap ahead of the pipe, you hear it as a tick or a sharp puff, one pulse at a time. That is why the noise tracks engine speed so closely and why it grows louder under load, when exhaust pressure rises. Owners describe the sound as a sewing machine at the wheel well, a sharp tapping low on one side, or a loud chuffing in a bad case.
A cracked manifold gives exhaust gas a direct path out of the casting. Heat cycles work the casting for years, and a crack can stay hairline for a long time before it opens enough to hear. Owners on IH8MUD report cracks found after removal, including one GX470 that turned loud suddenly and went quiet again after the removed manifold was welded.
A warped flange or a failed gasket leaks at the joint between the manifold and the head. The manifold body stays sound, and gas escapes where the flange no longer clamps flat or where the gasket has given up. A leak at the joint often leaves the clearest soot track, because the gas exits at the flange face and paints the metal beside it.
A broken stud removes clamping force from one section of the flange. The GX470 manifold bolts to the head with 8 nuts per side on studs set into the head.[1] When a stud snaps or a nut goes missing, that section of flange lifts just enough to leak, and the leak is usually worst cold. A broken stud can be the whole problem, or it can be the reason a marginal gasket started leaking.
One more check belongs ahead of all three. A loose spark plug can tick in a way that mimics an exhaust leak, and owners and technicians raise this possibility often in manifold tick discussions. Checking plug tightness costs little. If the tick appeared soon after plug work, check the plugs before you price a manifold.
Why it fades as the engine warms up
Metal expands as it heats. On a small crack or a small flange gap, expansion can narrow the opening until the leak quiets down or seals for the rest of the drive. The parts contract again as they cool, the gap returns, and the next cold start ticks again. Owners report this pattern consistently, with the noise quieting as the truck warms and often going away after 5 to 10 minutes of driving.
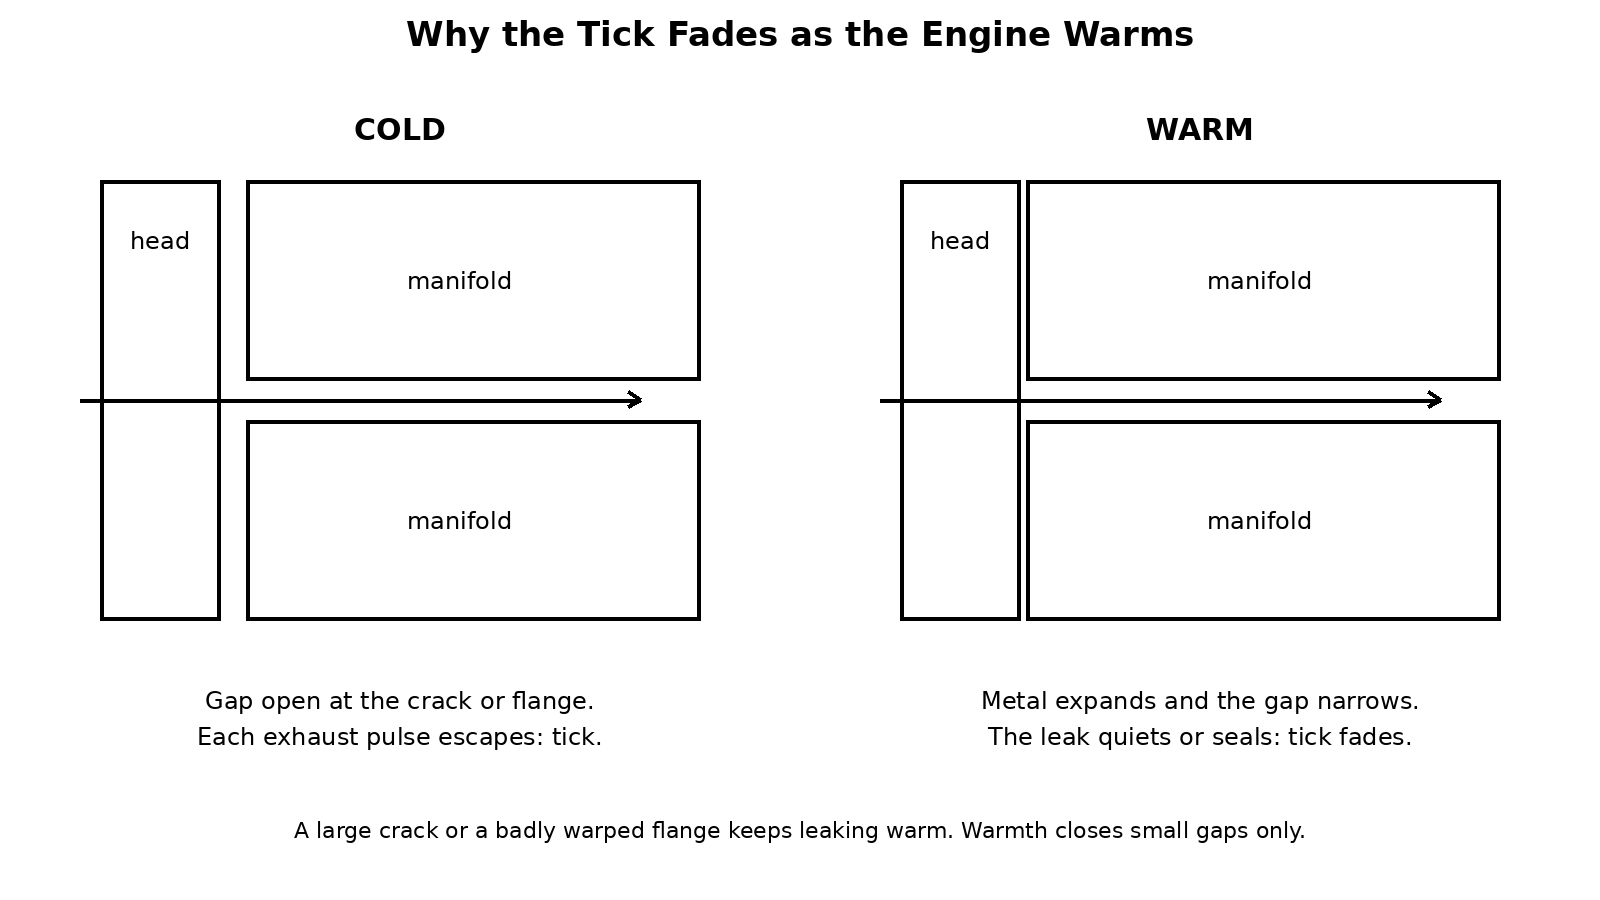
The warm fade supports the manifold theory, and it has limits worth keeping in view.
- A small leak may nearly disappear warm, while a large crack or a badly warped flange keeps ticking hot, only quieter.
- A leak that progresses from cold only ticking to ticking all the time follows a known pattern in owner reports. The opening grew, and warmth no longer closes it.
- Other noises also change with temperature and oil warm up. A warm fade on its own does not close the case. The inspection steps below close it.
Manifold tick versus the other ticks
Lifter and valvetrain noise
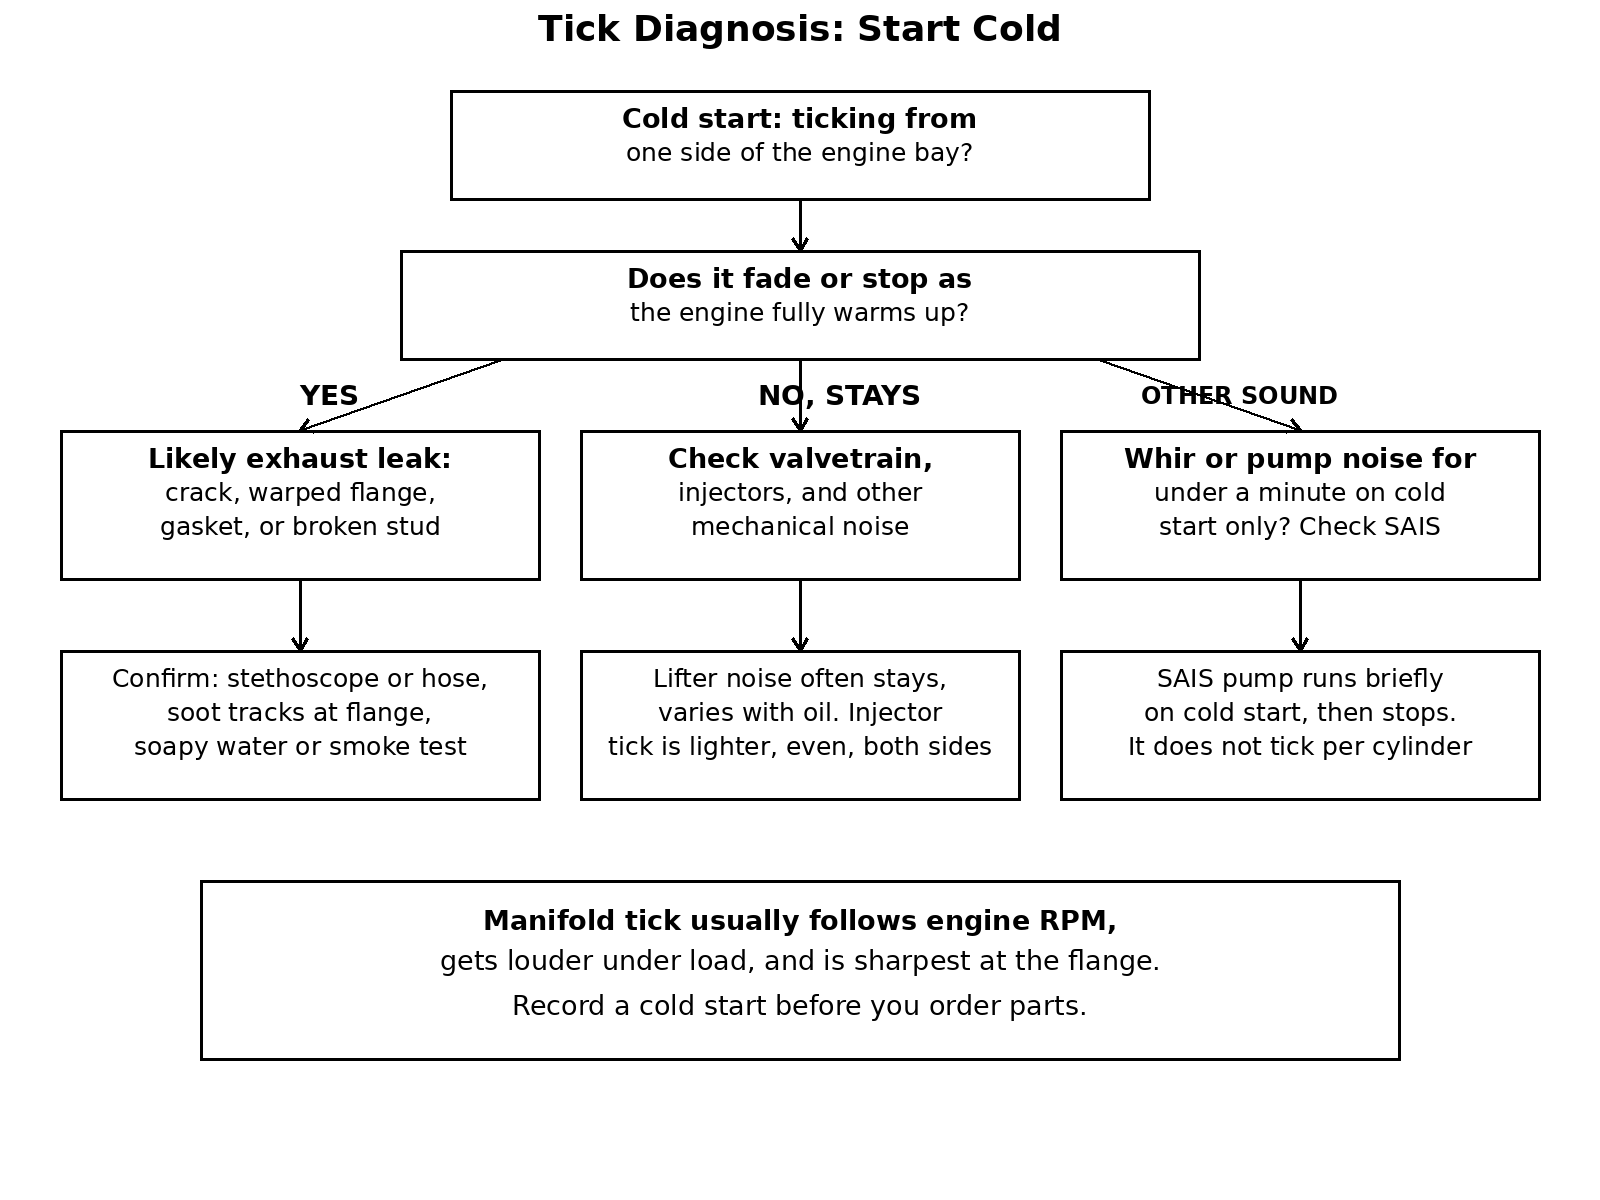
Valvetrain noise tends to come from the top of the engine around the valve covers, rather than low at the side near the wheel well. It often stays present when warm, though it can change as oil warms and circulates, and it may vary with oil level, oil condition, and how long the truck sat. A manifold tick sits low on one side, sounds sharpest at the flange, and follows exhaust pulses under load. When the noise centers on top of the engine and keeps going at full warm up, work the valvetrain and oil side before you price manifolds.
Injector tick
Fuel injectors tick as they fire, and that sound is normal on many trucks. Injector tick is lighter and more even than a manifold leak, it tends to show on both sides, and it does not grow dramatically louder under load or beside a wall with the window down. A stethoscope probe on an injector body makes injector noise jump out at that point. A manifold leak gets loudest at the flange or the crack, away from the injector rail.
SAIS pump noise
The secondary air injection system pumps air to the exhaust ports on a cold start so the catalyst reaches working temperature sooner.[2] Its pump makes a steady whir or vacuum like noise for a short period after a cold start, and then it stops. That timing fools people, because the pump noise and a manifold tick both appear on cold start. The pump whirs evenly and shuts off. A manifold leak ticks in rhythm with the engine, cylinder by cylinder, and usually runs until the manifold heats up, which can take longer than the pump run. If your truck also shows SAIS fault codes or a failing pump, read our SAIS guide and diagnose that system on its own evidence.
Cold start smoke is a separate diagnosis with its own guide. Our GX470 startup smoke guide covers smoke color on startup. A manifold tick with no smoke still gets confirmed on sound and soot.
How to confirm the leak before you spend money
A leak that seals warm hides from a warm inspection, so every check below starts on a cold engine.
- Record a cold start. Take phone video at the driver wheel well, then the passenger wheel well, then under the hood. Note which side sounds louder and how many minutes pass before the tick fades. That recording becomes your before and after proof.
- Listen with a hose or a stethoscope. Hold a mechanic stethoscope probe near the flange, or place one end of a length of vacuum or heater hose at your ear and move the other end along the flange. The loudest point is your leak point or the edge nearest it. Keep hands, hose, and clothing clear of belts and fans.
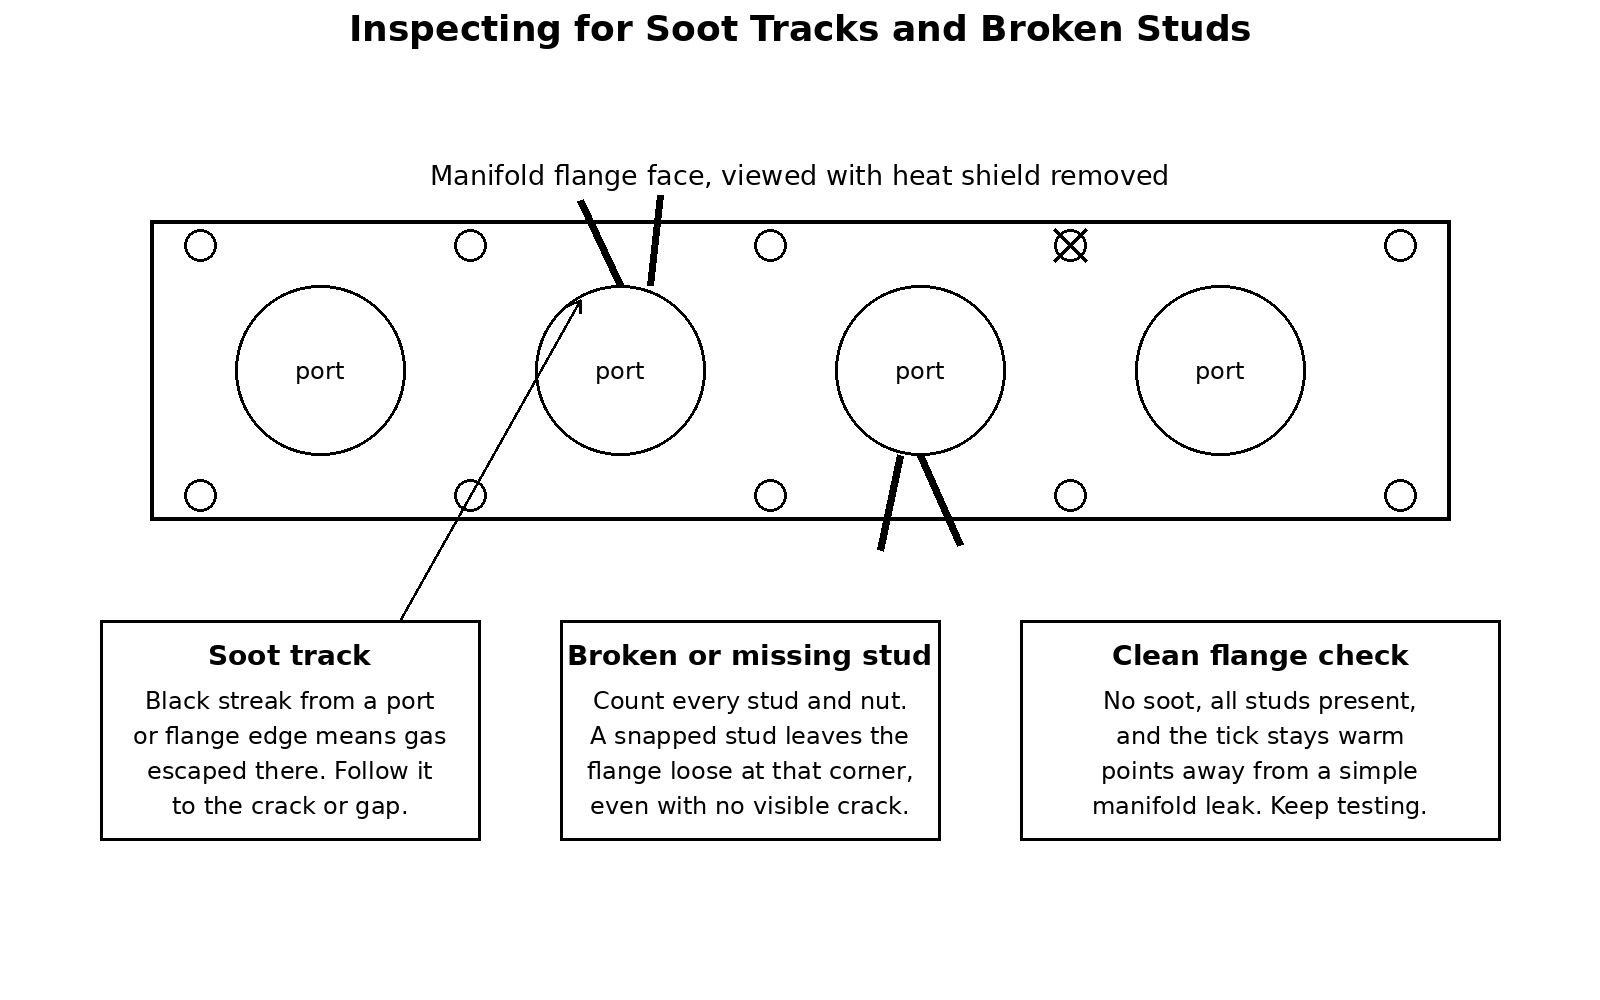
- Look for soot. With the engine cold and off, inspect around the flange and the heat shield edges for black streaks. Soot means gas escaped at that spot. Follow the streak back to its start.
- Count studs and nuts. Each side carries 8 manifold nuts.[1] A missing nut, a visibly snapped stud, or one loose corner explains a flange leak with no crack involved.
- Try soapy water, cold only and briefly. With the engine just started cold, a light mist of soapy water at a suspect flange joint may bubble at the leak. Keep the mist away from electrical connectors and stop before the parts get hot. Never spray a hot manifold.
- Use smoke when the point will not show itself. A smoke machine feeding the exhaust, or a smoke test at an exhaust shop, can show a wisp at a crack or flange that sound and soot did not locate.
When all six checks point to one flange corner with a broken stud and no soot anywhere else, your job may be a stud and gasket job. When soot starts mid manifold, plan on a crack.
Home mechanic alternatives. A long screwdriver with its handle at your ear works as a contact probe on solid parts when no stethoscope is on hand, and a hose still beats it for an air leak at a joint. A parts store or an exhaust shop smoke test costs less than one wrong manifold, so price that test before you price parts.
Inspecting the manifold itself
The heat shield hides most of the manifold. The factory procedure removes the heat insulator first, on 4 bolts per side, before the manifold nuts come off.[3] With the shield off and the engine cold, inspect in this order.
- Flange face and gasket line. Look for black tracks crossing the gasket line, a blown out gasket section, or rust staining that follows one port.
- Manifold body. Look for a hairline crack, often darkened by soot along its length. Run a fingertip or a rag along suspect areas on a cold manifold only, because soot collects in and beside a crack.
- Every stud. Each stud should stand present and straight with its nut in place. Note any stud that spins, sits lower than its neighbors, or shows a fresh bright break.
- The collector joint below. The front exhaust pipe bolts to the manifold under the collector, and a leak at that joint ticks too. Soot at the lower joint means the fix may be a gasket and hardware at that joint instead of a manifold.
Take photos before removal. If a shop does the work, those photos and your cold start recording keep the conversation specific: side, port, and leak point, rather than a tick in the abstract.
Your fix options, compared honestly
| Fix | Best when | Watch out for |
|---|---|---|
| Drive it and monitor | Small cold only leak, no fault codes, inspection passed | The leak usually grows over time; some states fail an audible exhaust leak |
| Weld the crack | Manifold is off, crack is accessible, budget matters most | Owner opinions on durability split; success depends on the welder and the casting |
| New stock manifold | You want the factory fit, the included catalyst, and quiet operation | Highest parts cost; the same design goes back on |
| Used manifold | Budget repair with a known good casting | Inspect for cracks and flange flatness before you pay; age and heat cycles come with it |
| Aftermarket shorty header | You want a stronger design that still bolts to the stock pipes | Emissions approval varies by brand and certificate |
| Long tube headers | Off road build with tuning planned | Deletes the front catalysts; not emissions legal for road use |
Driving on a small cold only leak is a reasonable choice for a while, with limits. An exhaust leak ahead of the oxygen sensors can skew fueling and sets fault codes on some trucks, and a leak near wiring and hoses adds heat where the factory never planned it. Owners report a range of results from living with one, from unchanged for years to a slow progression into a warm tick. Re check the truck every few months and move to a repair when the noise runs warm, a code appears, or an inspection comes due.
Welding a crack can work, and owner opinion divides on how long the repair lasts. Cast manifold welding needs preheat and a welder who knows cast material, and owners in manifold threads disagree on durability, with some reporting lasting repairs and others reporting cracks that returned. Price the weld against the cost of a manifold, and remember that the removal labor is already spent either way.
A new stock manifold restores the factory setup. Toyota lists the manifold as a sub assembly that includes the front catalytic converter for that bank, with a separate part number for each side and for each production period.[4] Owners often report the highest total cost here and the quietest, longest lasting result, and those reports describe owner experience rather than any measured failure rate.
A used manifold lowers the parts bill. The checks from the inspection section apply before money changes hands: flange flatness with a straightedge, no visible cracks, no broken studs left in it, and clean sealing surfaces. A used part with the same heat cycle history as yours can develop the same crack, so buy on condition and keep the price low enough that the gamble makes sense.
Aftermarket shorty headers bolt to the factory downstream pipes and keep the front catalysts. Doug Thorley lists shorty headers for the 2UZ application, and XAT Racing lists shorty headers for the 2005 to 2009 GX470 with a CARB executive order exemption for California.[5] Shorties are the aftermarket path that can stay emissions legal on the road, provided the part carries approval for your state and your model year.
Long tube headers replace the manifolds with longer primary tubes and delete the front catalysts. URD sells long tube headers for the 2005 to 2009 GX470 marked for off road use only.[6] On a street truck they bring check engine lights and inspection problems, because the front catalysts are gone. Treat long tubes as an off road decision and confirm your state’s rules before you spend anything.
2003 to 2009 GX470: the manifold job, step by step
Owners and shops both describe the manifold nuts and studs as the hard part of this work, and the factory procedure plans for it: every manifold nut, the gasket, and the front pipe hardware go back on new.[1][7] Order the gaskets, studs, and nuts before you touch the truck, and give the hardware days of penetrating oil while you wait.
Torque specifications for the job:
| Fastener | Torque |
|---|---|
| Manifold nuts, 8 per side, new | 33 ft·lbf (44 N·m) |
| Heat insulator bolts, 4 per side | 66 in·lbf (7.5 N·m) |
| Front exhaust pipe nuts at the manifold | 40 ft·lbf (54 N·m) |
| Front pipe No. 2 bolts | 35 ft·lbf (48 N·m) |
| Heated oxygen sensor | 33 ft·lbf (44 N·m) |
- Soak the hardware. Spray penetrating oil on all 8 manifold nuts, the heat insulator bolts, and the front pipe joint hardware for several days before the job. Short drives between applications help the oil work in. Owners who skip this step report the most broken studs.
- Set up on a cold engine. Disconnect the battery. Plan to work from the wheel well with the wheel and liner out of the way, and from above with the engine cover off. Owners describe this access route as the practical one on the GX470.
- Remove the heat insulator. Four bolts hold the insulator on each side.[3] Expect at least one to resist. Work them back and forth with oil rather than forcing them.
- Disconnect the oxygen sensor connector for that bank’s upstream sensor. If the sensor itself has to come out, it torques to 33 ft·lbf (44 N·m) on the way back.
- Separate the front pipe joint. The front exhaust pipe leaves the manifold on 2 nuts, and the No. 2 front pipe adds its own bolts and nuts. The procedure calls for a new gasket and new nuts at the main joint.[7] Support the pipe so its weight never hangs on the joint you are opening.
- On 2005 to 2009 trucks, open the secondary air tube joint where your side carries one. Owners’ parts lists for this job include the air tube gasket, and a disturbed joint deserves a fresh one.
- Remove the 8 manifold nuts in a crisscross pattern, a little at a time, so the flange unloads evenly. Lift the manifold off the studs.
- Inspect on the bench using the checks in the inspection section. Decide weld, reuse, or replace with the part in your hands and a straightedge on the flange.
- Clean the head face and chase every stud hole. Replace any stud that snapped, stretched, or came out with its nut. Doing this now is far cheaper than doing it after a new gasket leaks.
- Fit the new gasket in the factory installation direction, set the manifold on the studs, and start all 8 new nuts by hand.
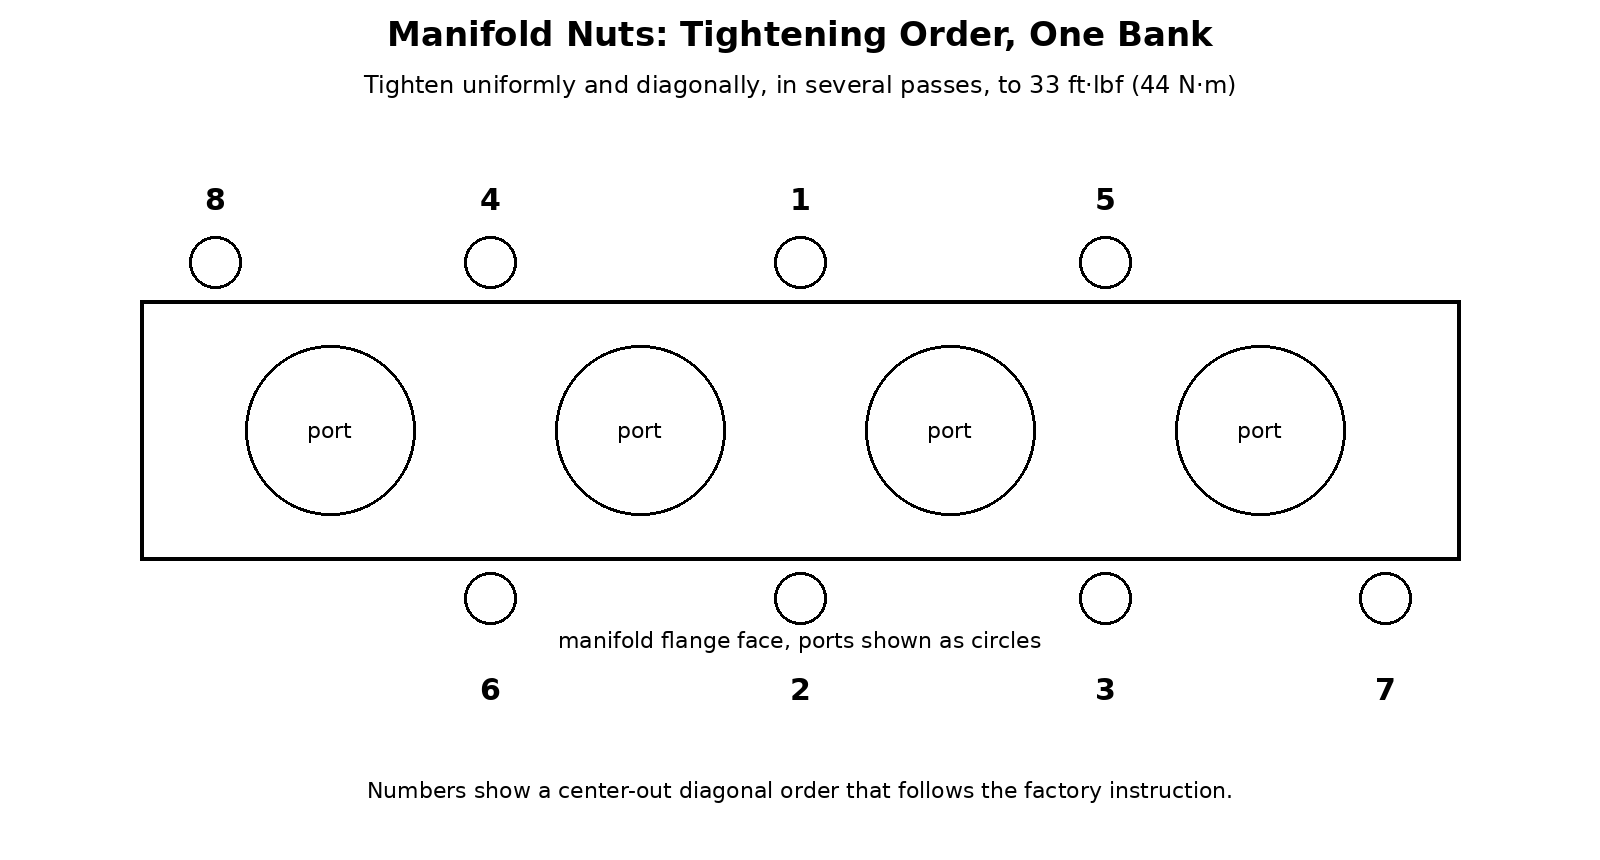
- Tighten the nuts uniformly and diagonally, in several passes, to 33 ft·lbf (44 N·m). Working from the center outward keeps the flange seated evenly.
- Refit the front pipe with its new gasket and new nuts to 40 ft·lbf (54 N·m). The No. 2 front pipe bolts go to 35 ft·lbf (48 N·m).
- Refit the heat insulator to 66 in·lbf (7.5 N·m) and reconnect the sensor connector. Keep that torque gentle, because the insulator bolts are small and the value is in inch pounds.
- Check for exhaust gas leaks, the final step of the factory procedure. Start the truck cold, listen at the flange with a hose, and watch for fresh soot after the first few drives. A joint that ticks now is far easier to correct than one found a month later.
When a stud breaks
Work the extraction ladder in order and stop at the step that frees the stud.
- Soak with penetrating oil and work the stud with locking pliers if enough of it stands proud.
- Weld a nut to the broken stud when you have the welder and the skill. The heat and the new grip free many studs, and owners rank this method well.
- Center punch, drill with a left hand bit, and use a spiral extractor. Owners rate the straight flute style poorly compared with spiral and multi spline extractors, and a snapped extractor becomes a hardened problem inside the hole.
- Drill the stud out fully and repair the thread, or hand the job to a machine shop or a mobile extraction specialist. On a work truck that must run Monday, paying for that step costs less than a week of escalation.
Home mechanic alternatives. One quality extractor set covers the drill and extract steps for less than a single shop hour. The IRWIN Hanson set in the tools list pairs spiral extractors with left hand cobalt drill bits, and many studs back out on the drill bit alone, before any extractor goes in.
Emissions and inspection
Some states fail an audible exhaust leak at the manifold during inspection, and owners in GX groups report both passes and failures on that point, so ask a local inspector before you assume a small leak passes. California trucks need parts that carry a CARB executive order for the application. The XAT shorty headers carry order D-540-7 for the 2005 to 2009 GX470.[5] Long tubes delete the front catalysts and stay off road parts.[6] A tune can hide a check engine light from the dash while the truck still fails a tailpipe or readiness inspection, so read your state’s rules in full before you build around one.
GX460 and GX550 notes
The GX460 runs a different V8 with a different manifold arrangement, so its diagnosis and its parts stay separate from this guide. A GX460 cold start tick deserves the same listening method, and no torque value, part number, or procedure step from this page transfers to it. We give no GX460 failure rate here, because owner reports on the two trucks do not compare on equal footing.
No GX550 procedure appears in this guide. Its twin turbo V6 uses a different exhaust layout, the truck is new enough that owner level manifold tick data stays thin, and a tick on a GX550 belongs at the dealer under warranty until owner level procedures develop.
Parts and tools
Part numbers below come from the Toyota parts catalog for the GX470. Manifold and gasket numbers changed with a production split in late 2004, so match the number to your truck’s build period: the earlier set covers trucks built through October 2004, and the later set covers November 2004 on. Your door jamb plate shows the build month.
| Part | Details | Price |
|---|---|---|
| Exhaust manifold gasket, RH | Genuine Toyota 17173-50030 (late build) or 17173-50021 (early build), one per side serviced | — |
| Exhaust manifold gasket, LH | Genuine Toyota 17198-50010 (late build) or 17173-50021 (early build), one per side serviced | — |
| Exhaust manifold sub-assembly, RH | Genuine Lexus 17140-50060 (late build) or 17104-50180 (early build), includes the front catalytic converter for that bank | — |
| Exhaust manifold sub-assembly, LH | Genuine Lexus 17150-50050 (late build) or 17105-50170 (early build), includes the front catalytic converter for that bank | — |
| Manifold studs | Genuine Toyota 90126-10015, 8 per side, replace any that snap or come out with the nut | — |
| Manifold nuts | Genuine Toyota 90179-10175, 8 new nuts per side per the factory procedure | — |
| Front exhaust pipe gasket | Genuine Toyota 90080-43036, one for each front pipe joint you open | — |
| Front pipe lock nuts | Genuine Toyota 90080-17187, new nuts for the front pipe joints | — |
| Secondary air tube gasket | Genuine Toyota 17376-50010, 2005 to 2009, for the air tube joint if you open it | — |
| ANCEL S160 smoke machine | eBay, for the smoke test in the confirmation steps | — |
Tools for the diagnosis and the job:
- Lisle 52500 mechanic stethoscope, for pinpointing the leak point along the flange
- TEKTON 24330 torque wrench, 3/8 inch drive, 10 to 80 ft·lbf, covers the manifold nuts and the front pipe hardware
- TEKTON TRQ50402 torque wrench, 1/4 inch drive, 20 to 200 in·lbf, covers the heat insulator bolts at 66 in·lbf
- IRWIN Hanson 11135ZR extractor and drill bit set, 35 piece, spiral extractors with left hand cobalt drill bits for broken studs
- Penetrating oil, applied for days before the job
- Socket set with extensions and a breaker bar, floor jack and stands, a straightedge, a flashlight, and an inspection mirror
- A spray bottle with soapy water for the cold joint test
Frequently asked questions
Is a GX470 manifold tick dangerous?
It rates as an urgency problem more than a safety emergency in most cases. A small leak can skew fueling when it sits ahead of the oxygen sensors, and it adds heat and noise where the factory planned neither. A leak that grows, sets codes, or reaches nearby wiring and hoses deserves prompt repair.
Can I drive with a manifold tick?
Many owners drive a small cold only leak for a long time. Recheck it every few months, and schedule the repair when the tick runs warm, a fault code appears, an inspection approaches, or soot starts showing at a new spot.
Does the warm fade confirm a manifold leak?
The pattern supports the diagnosis and falls short of proof by itself. Many owners report the same pattern, and other noises change with temperature too. Soot at the flange, a stethoscope pinpoint, and a stud count are the evidence that closes the case.
How long does the manifold job take?
Owners and shops describe a wide range rather than a single number, and stud condition decides most of it. Clean hardware makes it a steady one side job. Broken studs can double the time or end the day entirely, so budget the truck down for a weekend and order extraction tools with the gaskets.
Should I replace both manifolds at once?
Replace the side that leaks. Consider doing the second side while tools and experience are fresh when it shows soot, a missing nut, or its own cold tick. Sound manifolds with clean flanges can stay in service.
Is welding a cracked manifold worth it?
Owners divide on durability, and results depend on the welder and the casting. Welding can be a sound budget repair on a manifold that is already off the truck. Compare the weld price with a manifold price before you decide, because the removal labor is already spent either way.
Will a manifold leak set a check engine light?
It can. A leak ahead of the oxygen sensors can pull in outside air at some engine speeds and skew the sensor readings, which can set fuel trim codes on some trucks. Plenty of GX470s tick with no light showing, so the absence of a code clears nothing.
Is this the same job on the GX460?
The diagnosis method carries over and the parts, fasteners, and procedures stay model specific. Use GX460 sources for GX460 numbers, and treat this guide as GX470 material.
A calm place to land
A cold GX470 tick usually comes down to one leak on one side, and the checks in this guide find it with the engine cold, a phone recording, and a hose at your ear. Confirm the point, count the studs, and then choose the repair level that fits your budget and your state rules. The job itself rewards patience with penetrating oil and new hardware, and it ends the way the factory procedure ends, with a leak check on a cold start. Work through it in that order and the tick becomes a solved problem rather than a sound you live with.
Sources
- Ultimate GX Buying Guide for the cold start tick warning and the roughly $1,400 per side dealer planning figure.
- IH8MUD 200 series and 100 series forum discussions of GX470 ticking under load, a cracked manifold found on removal, weld repair reports, soot and stethoscope confirmation methods, spark plug checks, and extractor advice, collected as owner reports in the research file.
- ClubLexus GX 1st generation forum discussions of the cold start tick fading warm, SAIS confusion on startup, and manifold replacement planning, collected as owner reports in the research file.
- GXOR Facebook group member reports of cold start ticking that fades warm, broken studs, and weld versus replace outcomes, collected as owner reports in the research file.
- Doug Thorley and XAT Racing product listings for 2UZ shorty header applications, and the CARB executive order database entry D-540-7, for the aftermarket header section.
- URD product listing for 2005 to 2009 GX470 long tube headers marked for off road use only.
- Owner discussion of the secondary air injection system and cold start pump behavior, covered in depth in our SAIS guide.
Footnotes
[1] The GX470 factory procedure fits the manifold with a new gasket in a stated installation direction and 8 new nuts per side, tightened uniformly and diagonally to 33 ft·lbf (44 N·m), and it finishes with a check for exhaust gas leaks.
[2] The GX470 factory description of the secondary air injection system states that the system pumps air to the exhaust port to raise thecatalyst temperature quickly after a cold start.
[3] The GX470 factory procedure removes the exhaust manifold heat insulator on 4 bolts per side, torqued to 66 in·lbf (7.5 N·m) on installation, ahead of the manifold nuts.
[4] The Toyota parts catalog lists the manifold as an exhaust manifold sub assembly that includes the front catalytic converter for the bank: RH 17140-50060 and LH 17150-50050 for trucks built from November 2004, RH 17104-50180 and LH 17105-50170 for earlier trucks.
[5] California Air Resources Board executive order D-540-7 covers the XAT Racing shorty headers for the 2005 to 2009 GX470 application.
[6] The URD long tube header listing for the 2005 to 2009 GX470 marks the part for off road use only, and the design deletes the front catalytic converters.
[7] The GX470 factory procedure for the front exhaust pipe calls for a new gasket and 2 new nuts at the manifold joint, torqued to 40 ft·lbf (54 N·m), with the No. 2 front pipe bolts at 35 ft·lbf (48 N·m).
Leave a Reply