Lexus GX470, model years 2003 through 2009. This guide covers the refresh job only. The coil conversion itself is covered in Rear Air Suspension: Diagnose and Coil Conversion for the Lexus GX.
The Job
You are pulling the suspension apart on a GX470 with real miles on it. The truck is up on stands for a rear coil conversion, a lift, or a set of new arms, and half the labor is already spent getting everything apart. The parts that make an old GX feel loose, wander on the freeway, and clunk over bumps are right there in your hands. This guide is the order to do them in, and the brand call for each one.
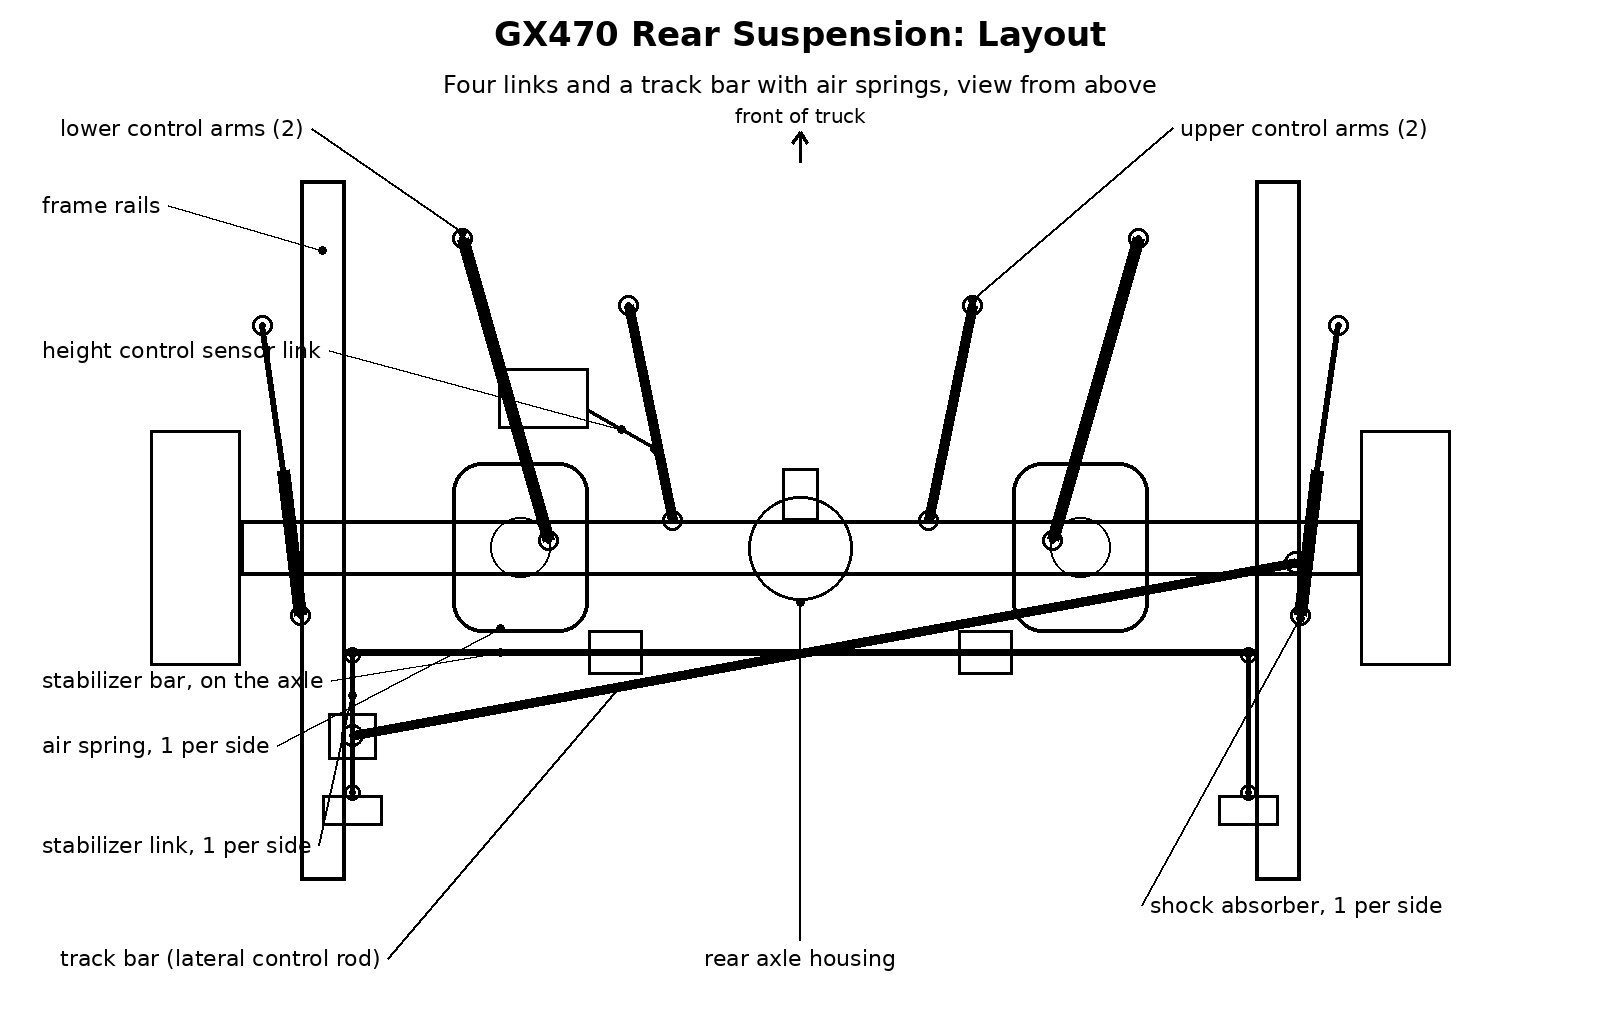
The front suspension is a double wishbone with a coilover on each side. The rear is a solid axle on four links and a track bar, with air springs from the factory. Every bushing in that layout wears at its own pace, and they do not all fail the same way, so the work runs as a set of checks first, then the replacements in order.
Check First, Before You Order
Four factory checks decide most of the parts list. They take an afternoon with the truck still assembled, and they keep you from ordering arms that are fine and missing arms that are not.
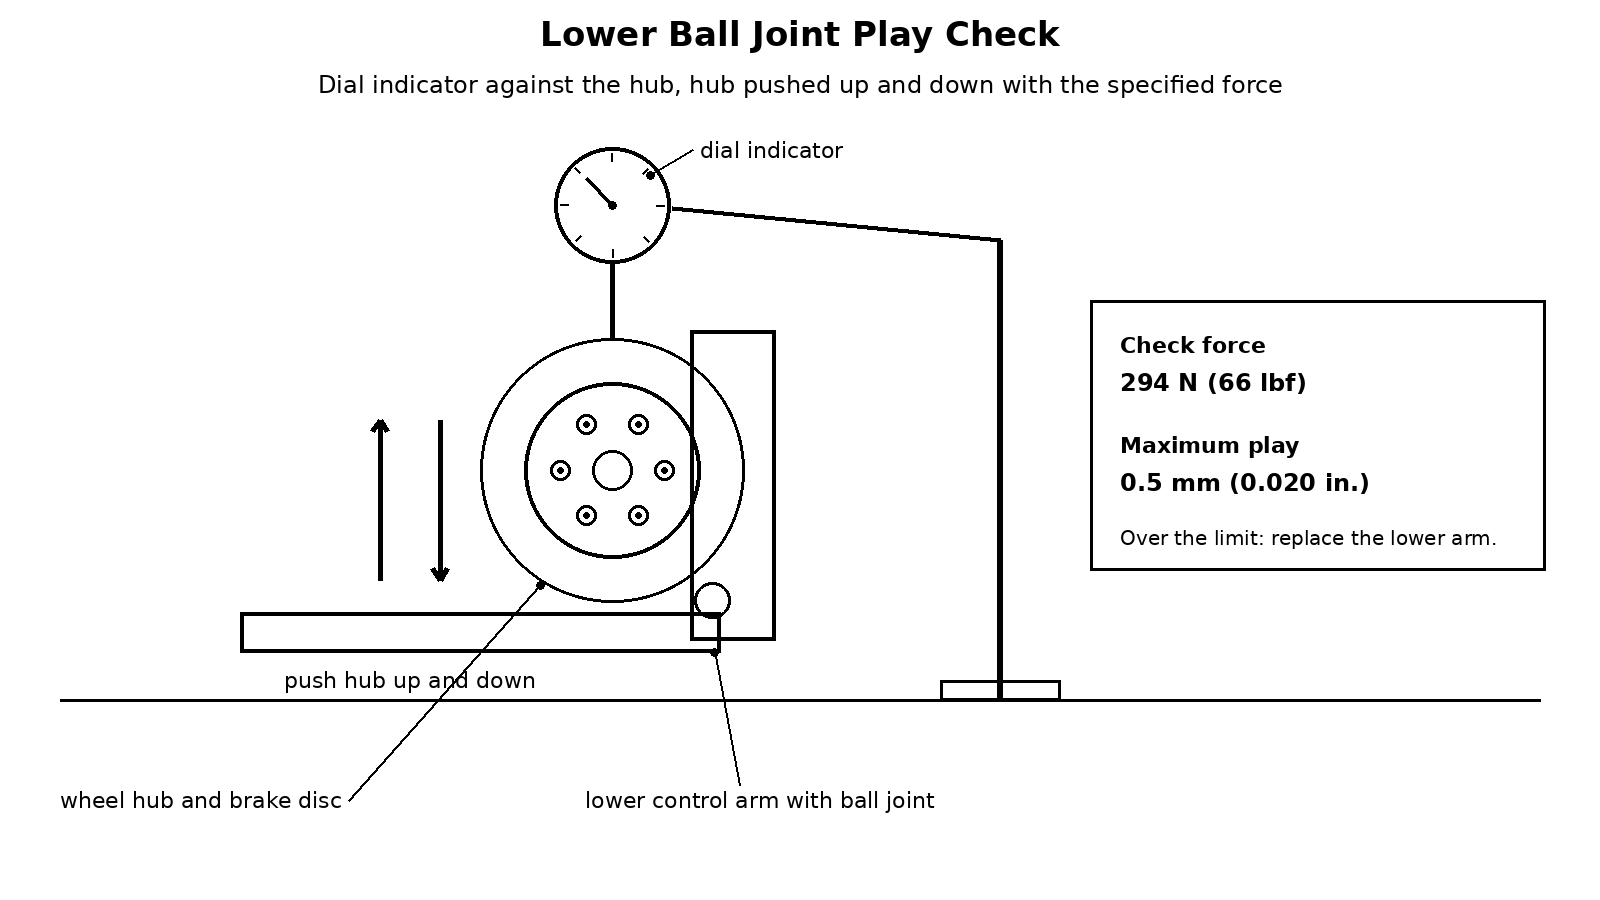
Lower ball joint play. The factory check pushes the hub up and down with 294 N (66 lbf) of force while a dial indicator reads the movement at the joint. The limit is 0.5 mm (0.020 in.) of play. Past that limit, the factory remedy is a new lower arm. The joint is built into the outboard end of the arm, and the manual carries no joint-only replacement step, so a worn joint means the arm goes. The joint connects to the knuckle through a separate bolt-on piece called the ball joint attachment, and that piece is reused with new bolts.
Upper ball joint. Shake the upper arm up and down by hand and feel for looseness, then turn the stud through its range five times and read the turning torque on the fifth turn. The limit is 4.5 N·m (40 in·lbf). A stud that turns too freely or a dust cover with cracks and grease leaks goes with the arm.
Tie rod ends. Turn the stud five times and read the turning torque on the fifth turn, the same method as the ball joints. The factory range is 0.29 to 1.96 N·m (2.57 to 17.35 in·lbf). A tie rod end outside that range, or one with a torn boot, is a replace-on-condition part.
Front hub bearing. A dial indicator reads backlash at the hub center and hub deviation, each with a limit of 0.05 mm (0.0020 in.). Past either limit, the bearing is replaced. The hub flange unbolts from the knuckle with four bolts, and the bearing presses into the flange, so the hub and the bearing are separate service parts.
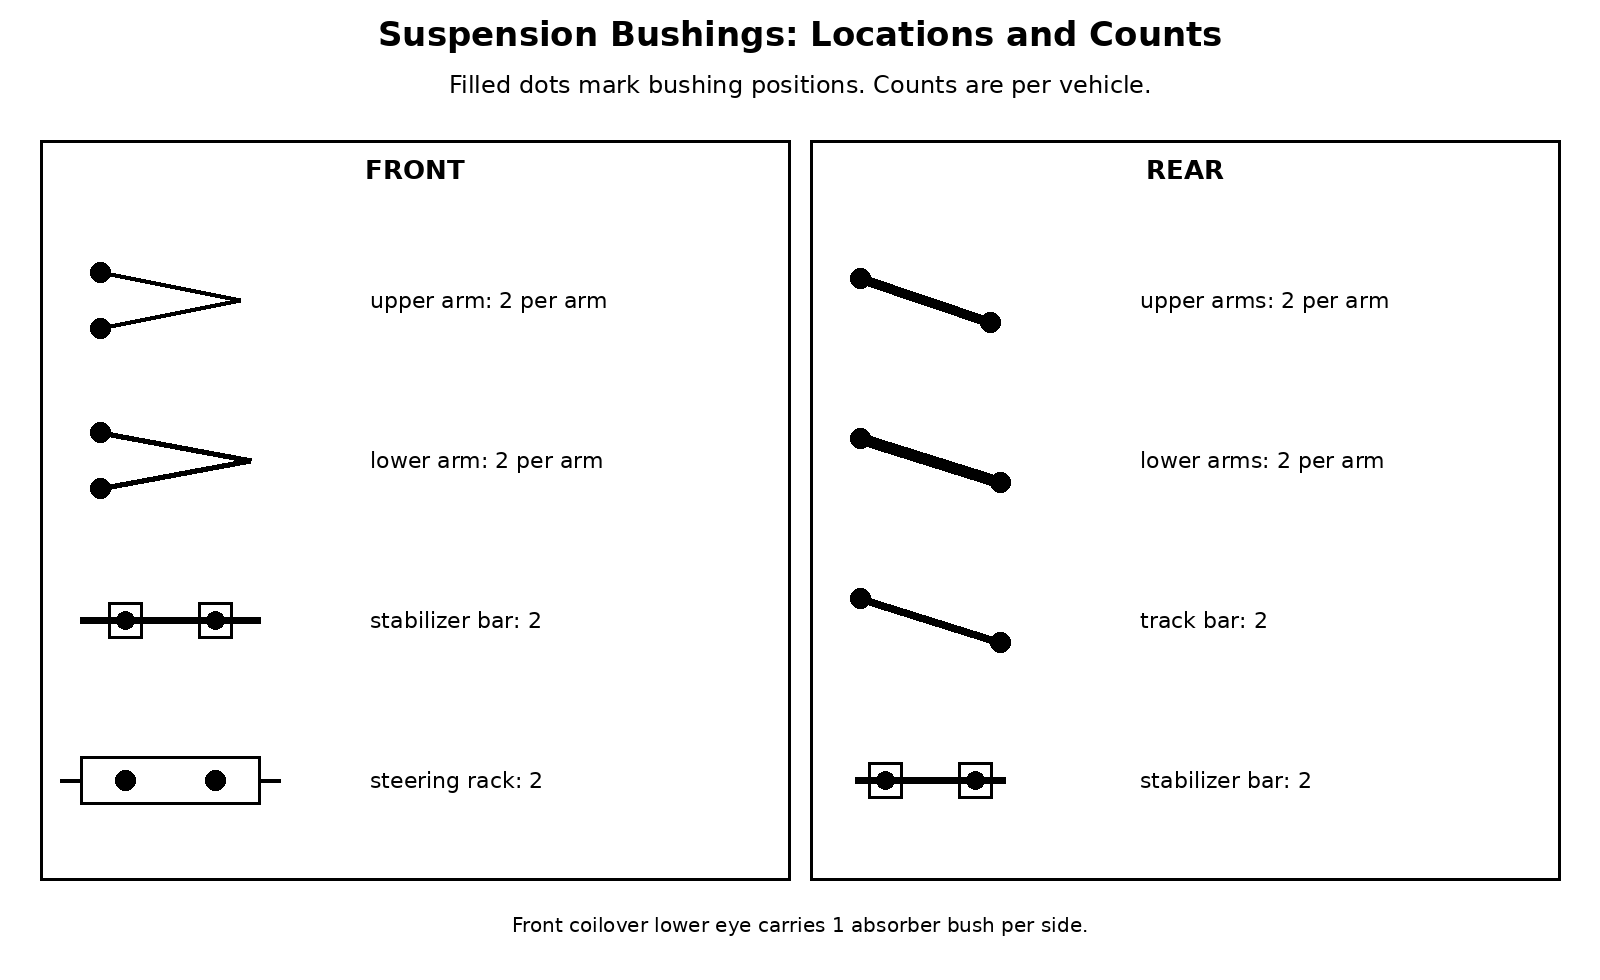
Bushings. The manual gives press-out and press-in procedures for the front arm bushings and marks the arm bushings non-reusable, but it states no numeric wear limit for any suspension bushing. Bushing condition is a visual and replace-on-condition call. Cracked rubber, rubber separating from the sleeve, and bushings that have taken a permanent set all count as worn.
The Refresh List, In Order
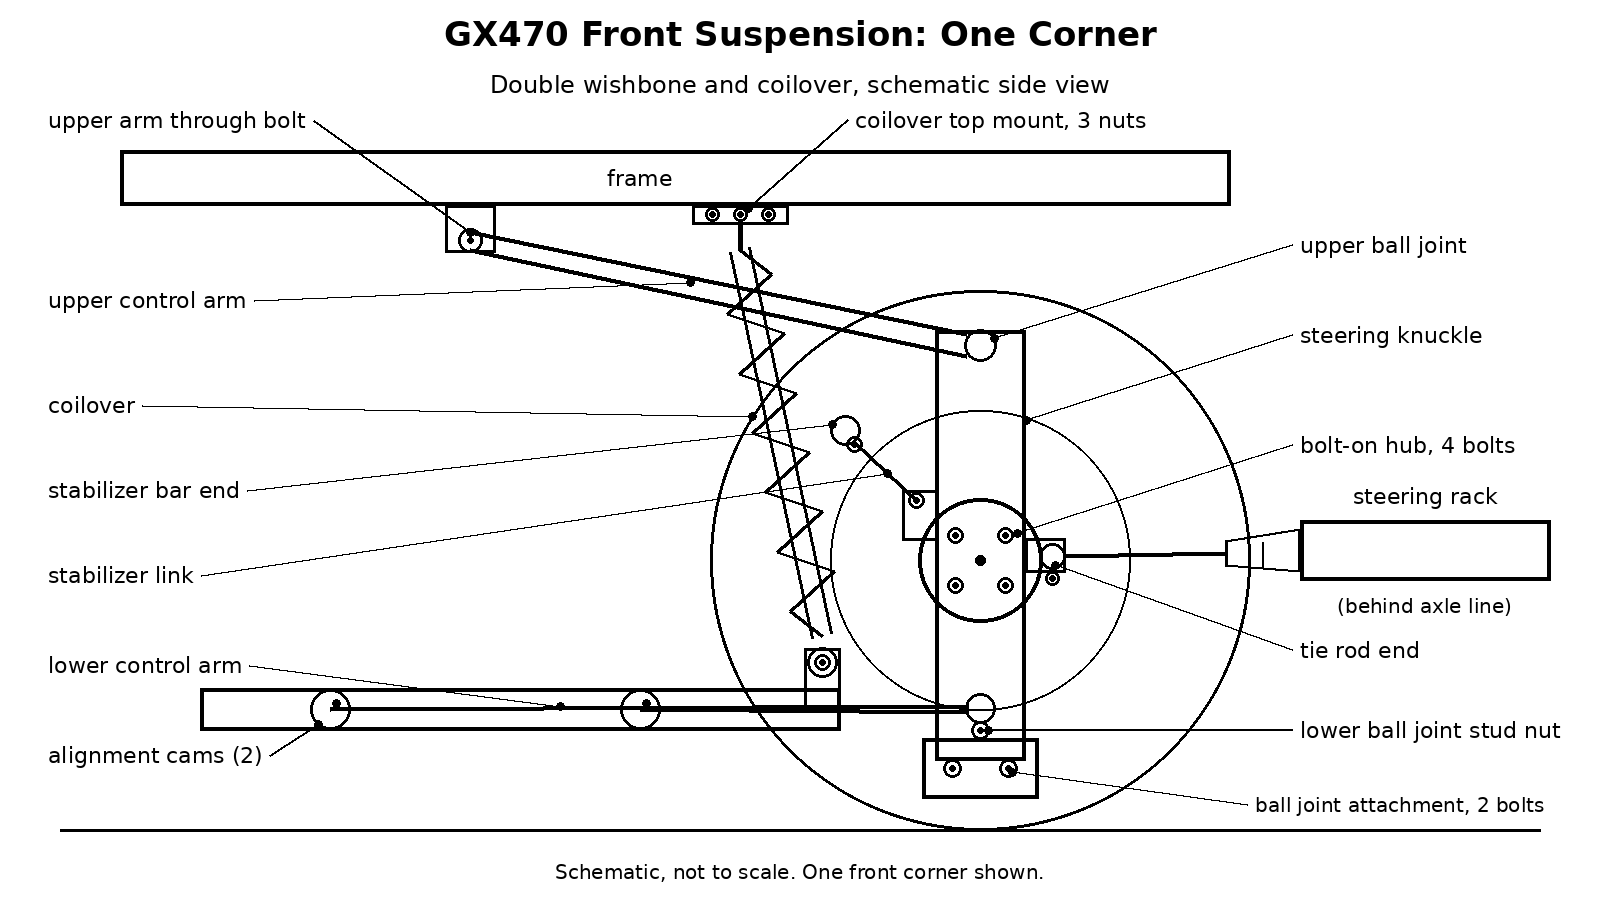
1. Front lower control arms, complete assemblies. The lower ball joint is built into the arm, and the arm bushings are worn by the time the joint is. A complete arm fixes the ball joint and both pivot bushings in one part, and it is the single biggest improvement in steering precision, wandering, and tire wear on a high-mile truck. The two frame pivots carry alignment cams, a camber adjust cam at one pivot and a toe adjust cam at the other, so front alignment adjustment happens at the lower arm. The factory numbers fit trucks without KDSS. Trucks with KDSS take a different arm, so verify the arm by VIN on a KDSS truck.
2. Front upper control arms, or their bushings. The upper arm pivots on a single long through bolt with a bushing at each leg of the arm, and its ball joint stud goes into the top of the knuckle. A complete arm is the fast path. The bushings press out and in per the factory procedure, so a bush-only refresh is factory supported work for a Home Mechanic with a press, and it costs far less than two new arms.
3. Rear control arms, uppers and lowers. The one most people skip. Worn rear bushings let the axle steer the truck, which is the sideways squirm over bumps and in crosswinds. It matters more on coils than on air, because the coil conversion removes the air springs that were masking some of it. The rear uppers and lowers are complete assemblies with their bushings included. One source conflict is on record for the rear upper arms: the side assignment of the two part numbers differs between two catalog sources, so verify the side by VIN before ordering a rear upper arm.
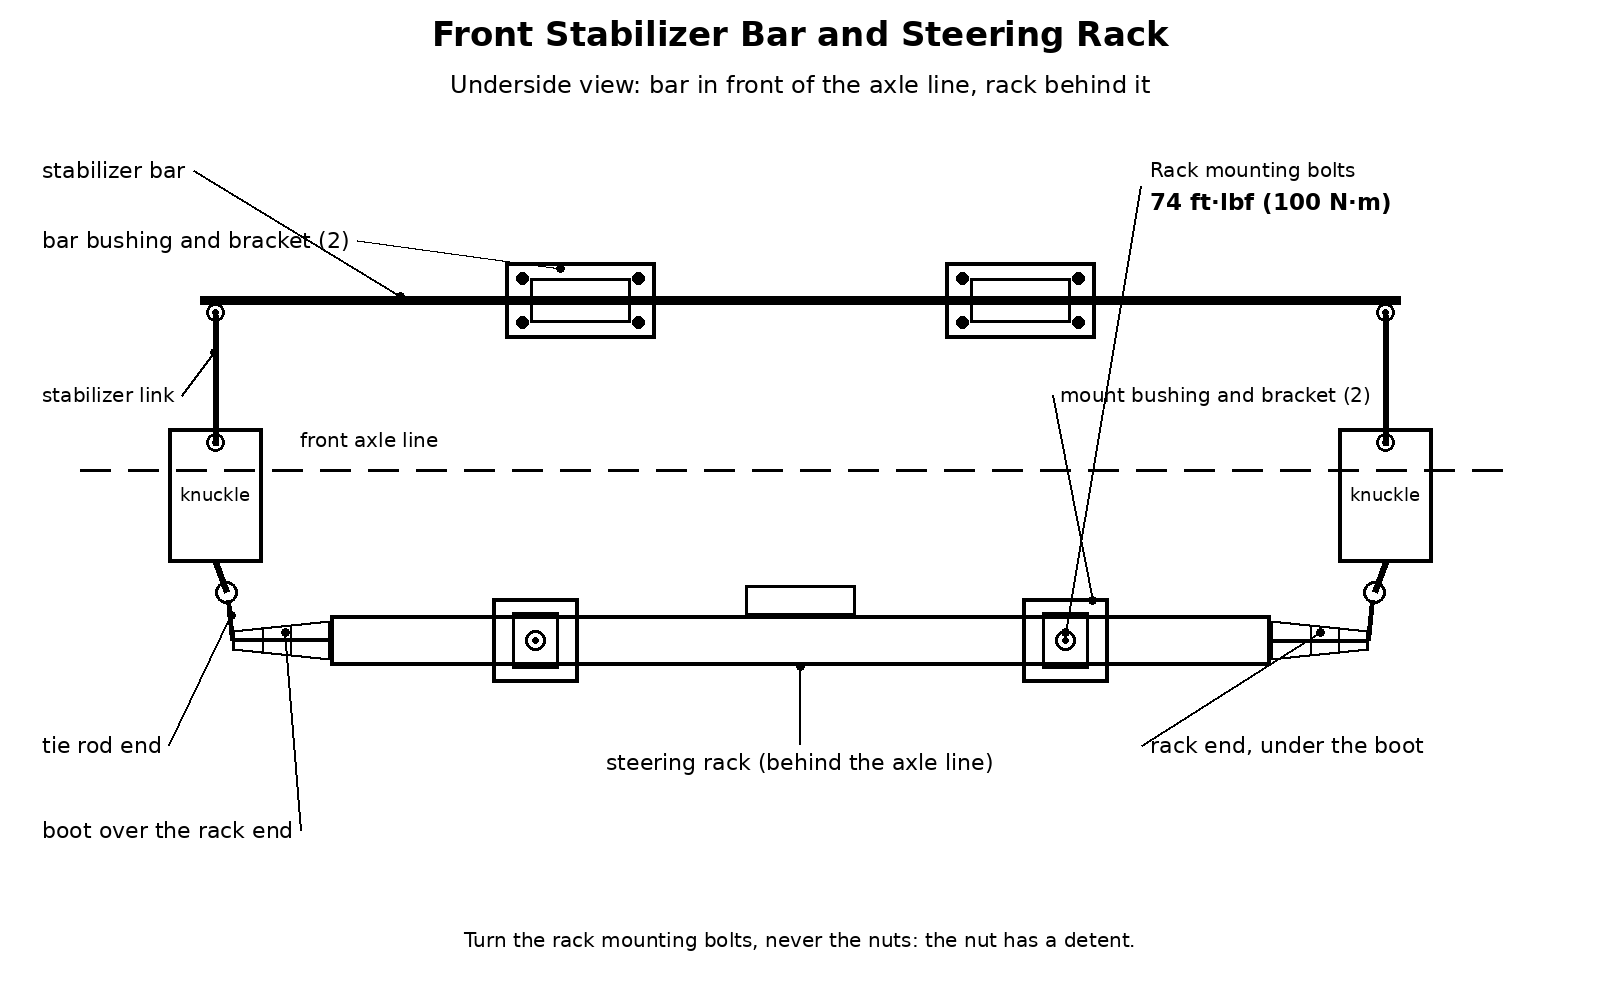
4. Steering rack bushings. Worn rack bushings are the dead spot in the center of the steering and a lot of the vibration on rutted roads. This is the place to go aftermarket on purpose. Poly bushings outlast the soft factory rubber and sharpen steering feel, and the position is commonly serviced with poly kits because the factory does not catalog the bushing on its own. The rack mounts to the frame on two rubber bushes with brackets, and the factory instruction for the mount nuts is to turn the bolt, never the nut, because the nut has a detent.
5. Sway bar links and bushings, front and rear. The cheapest parts on this list. The front links connect the bar to the steering knuckle, not to the control arm, and each link has a ball joint at both ends. The rear links have a ball joint at the bar end and a cushion and retainer stack at the other end, and the rear cushions and retainers are marked non-reusable. New links and bushings end the low-speed clunks and take out a surprising amount of body roll.
6. Rear track bar bushings. The track bar, called the lateral control rod in the factory manual, runs diagonally from the axle to the frame and is the one link that keeps the axle centered sideways. Worn track bar bushings are the tail wag over potholes and expansion joints. The bar carries one bushing at each end.
7. Tie rod ends and the front hub, on condition only. Tie rod ends get replaced when the checks above fail them. The outer tie rod end is one part number for both sides, and the inner rack end is a separate part that threads into the rack behind a rubber boot, with a claw washer staked after torquing. The front hub gets replaced when the bearing checks fail it. The hub flange unbolts from the knuckle with four bolts, and the bearing presses into the flange. Quiet and tight means leave them alone.
OEM or Aftermarket: The Summary Table
You need to decide OEM or aftermarket part by part. There is no single right answer for the whole truck.
| Part | Buy | Why |
|---|---|---|
| Front lower control arms (ball joint included) | OEM Toyota | Cheap aftermarket arms are known for sloppy ball joints and bushings that split early. This part carries the truck. |
| Front upper control arms | OEM Toyota, or OEM bushings alone | A complete arm is the fast path. The bushings press in and out per the factory procedure, so a bush-only refresh is factory supported. |
| Rear control arms | OEM Toyota | Complete assemblies with bushings included. The rear axle position is the wrong place to save money on an arm. |
| Steering rack bushings | Aftermarket poly (SuperPro, Whiteline) | Poly outlasts the soft factory rubber and sharpens steering feel. The factory does not catalog the bushing on its own. |
| Sway bar links and bushings | Quality aftermarket (555 Sankei, Moog Problem Solver, Mevotech) or OEM | Wear items where good aftermarket is proven and cheaper. |
| Rear track bar bushings | OEM rubber, or poly | Same call as the rear control arm bushings. Match the rest of the rear. |
| Tie rod ends | OEM, or 555 Sankei | Replace on condition only. |
| Front hub and bearing | Koyo, or Timken | Koyo is Toyota’s bearing supplier. Replace on condition only. |
The One Torque Rule: Stabilize First
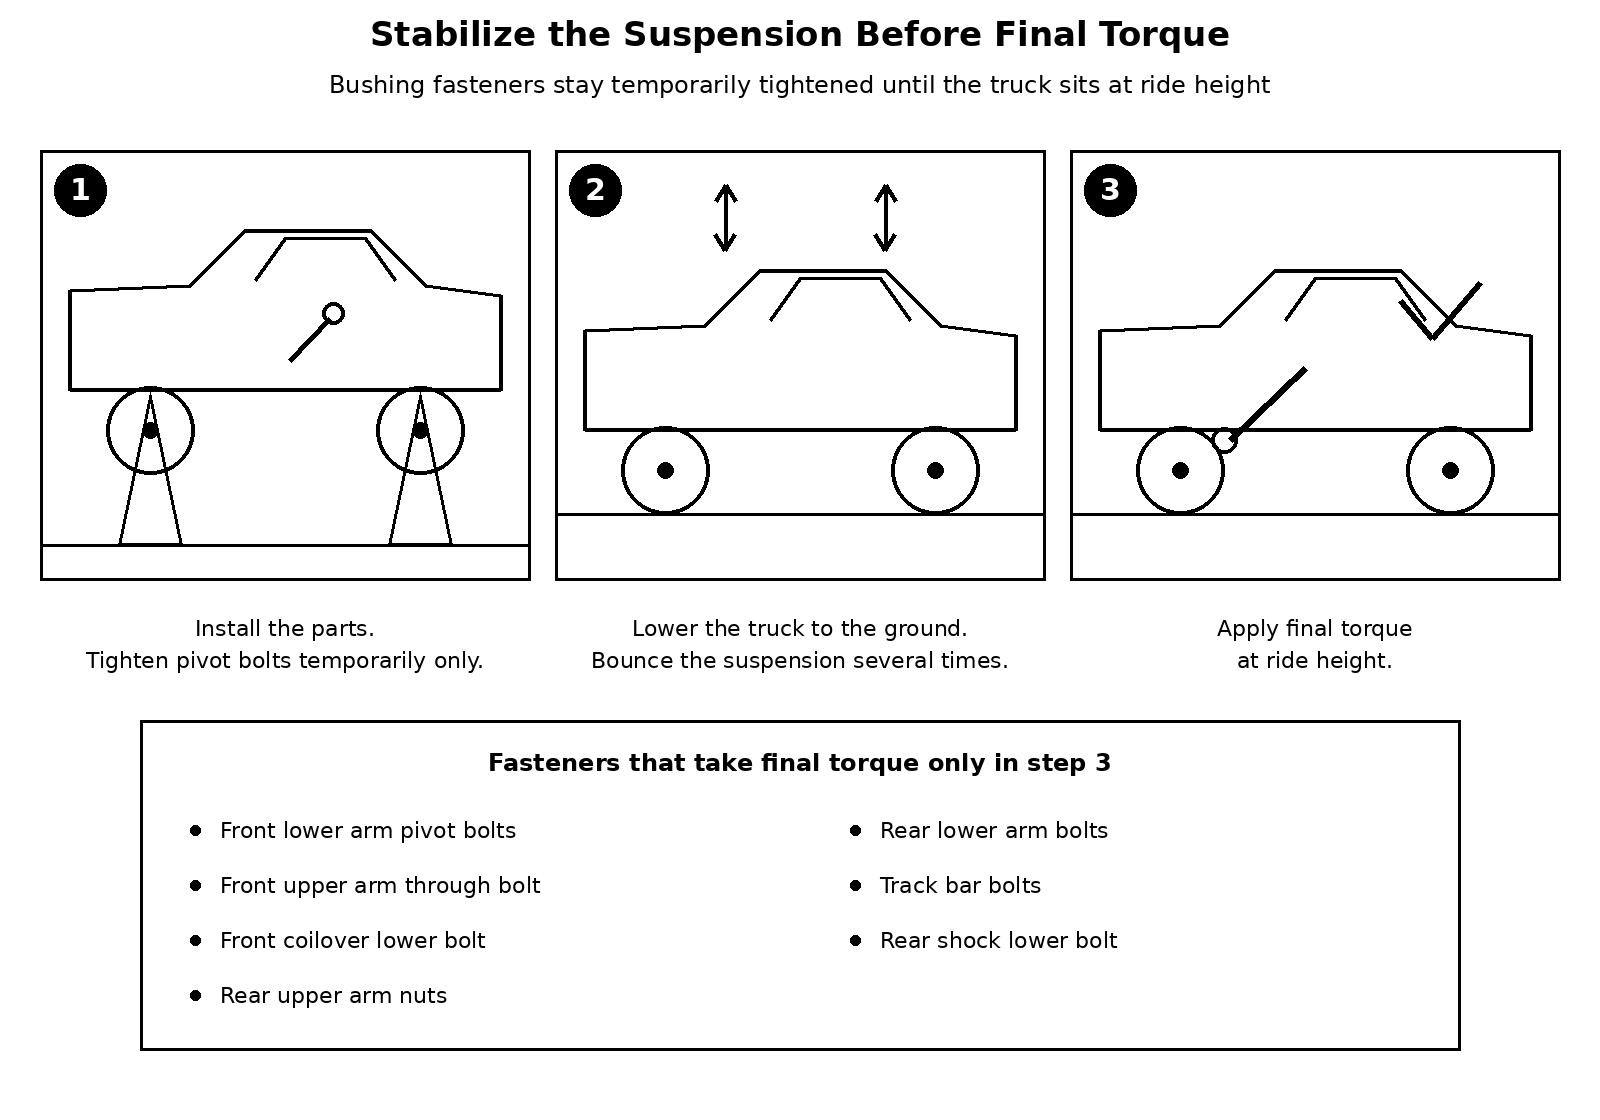
Every bushing pivot in this job gets its final torque with the truck sitting on its own weight. The factory sequence is the same at each joint: install the fastener and tighten it temporarily, lower the truck, bounce it several times so the suspension settles at ride height, then apply the final torque. A bushing that gets its final torque at full droop carries a twist in the rubber for the rest of its life, and it starts its service life preloaded toward failure.
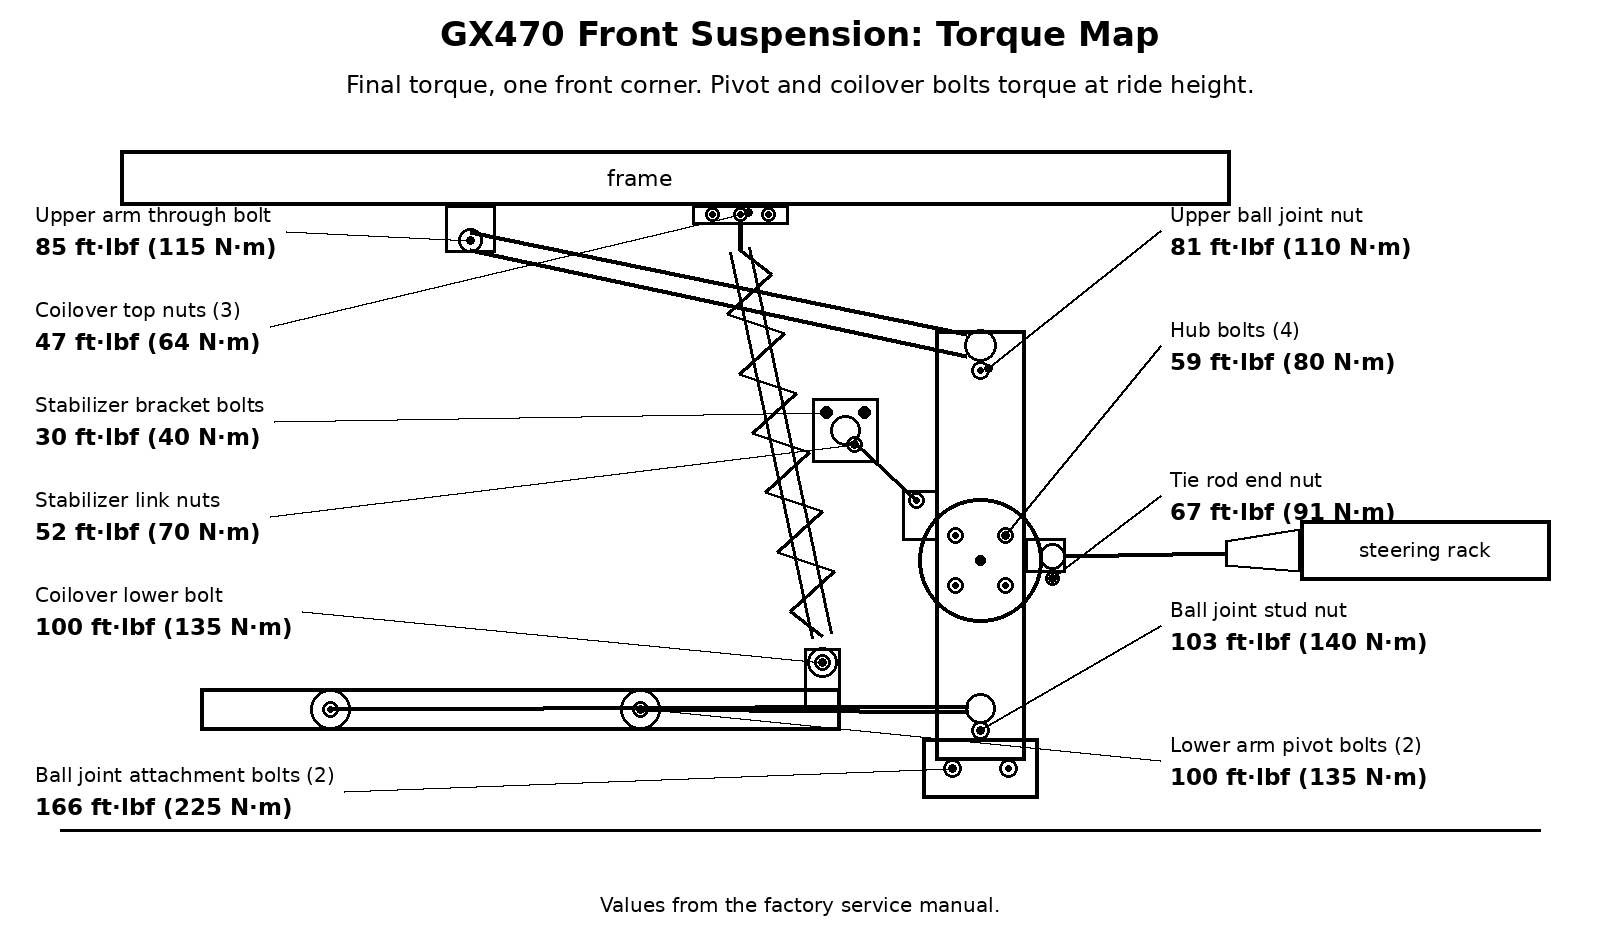
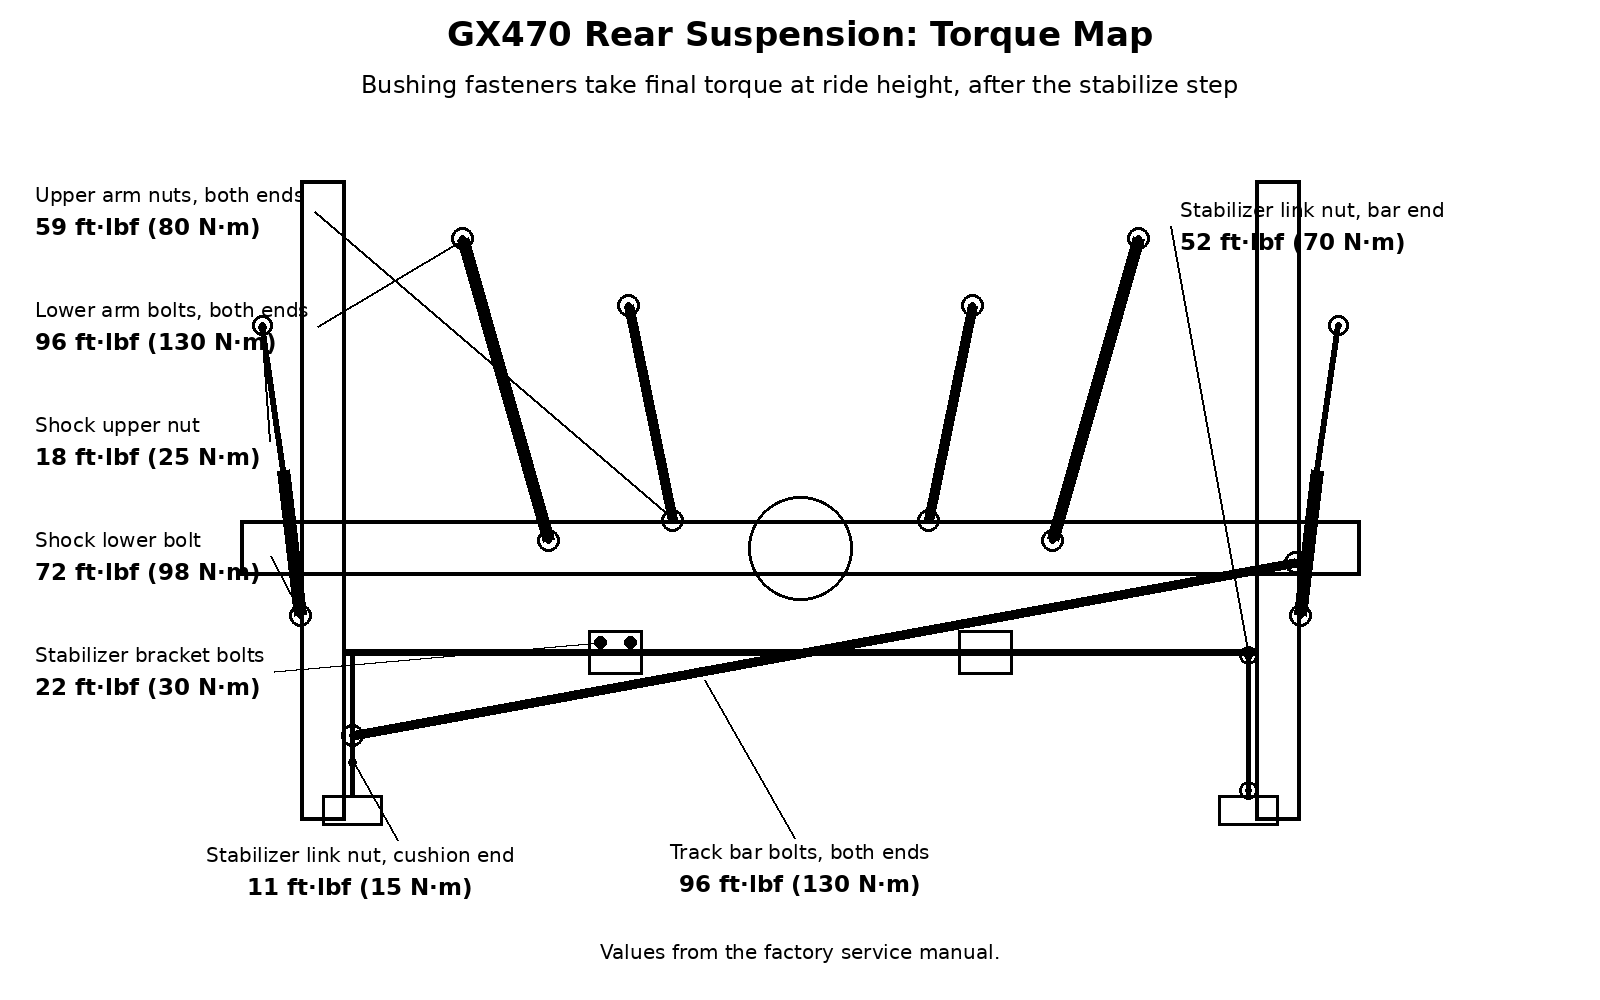
Seven fasteners take final torque only after that stabilize step: the front lower arm pivot bolts, the front upper arm through bolt, the front coilover lower bolt, the rear upper arm nuts, the rear lower arm bolts, the track bar bolts, and the rear shock lower bolt.
Torque: 2003-2009 GX470 Front Suspension
| Fastener | Torque |
|---|---|
| Lower arm pivot bolts (2 per side) | 100 ft·lbf (135 N·m) |
| Ball joint attachment bolts (2) | 166 ft·lbf (225 N·m) |
| Ball joint stud nut | 103 ft·lbf (140 N·m) |
| Upper arm through bolt | 85 ft·lbf (115 N·m) |
| Upper ball joint nut | 81 ft·lbf (110 N·m) |
| Coilover top nuts (3) | 47 ft·lbf (64 N·m) |
| Coilover lower bolt | 100 ft·lbf (135 N·m) |
| Stabilizer link nuts | 52 ft·lbf (70 N·m) |
| Stabilizer bracket bolts (2 per bracket) | 30 ft·lbf (40 N·m) |
| Tie rod end nut | 67 ft·lbf (91 N·m) |
| Tie rod end lock nut | 65 ft·lbf (88 N·m) |
| Rack end (inner tie rod) | 76 ft·lbf (103 N·m) |
| Steering rack mounting bolts | 74 ft·lbf (100 N·m) |
| Hub bolts (4) | 59 ft·lbf (80 N·m) |
| Hub nut | 173 ft·lbf (235 N·m) |
The link studs take a 6 mm hex wrench to hold the stud if the ball joint turns with the nut.
Torque: 2003-2009 GX470 Rear Suspension
| Fastener | Torque |
|---|---|
| Rear upper arm nuts (both ends) | 59 ft·lbf (80 N·m) |
| Rear lower arm bolts (both ends) | 96 ft·lbf (130 N·m) |
| Track bar bolts (both ends) | 96 ft·lbf (130 N·m) |
| Rear shock upper nut | 18 ft·lbf (25 N·m) |
| Rear shock lower bolt | 72 ft·lbf (98 N·m) |
| Rear stabilizer bracket bolts | 22 ft·lbf (30 N·m) |
| Rear stabilizer link nut, bar end | 52 ft·lbf (70 N·m) |
| Rear stabilizer link nut, cushion end | 11 ft·lbf (15 N·m) |
Several fasteners in this job are marked non-reusable in the factory manual, and they go back in new: the ball joint stud nut and its cotter pin, the upper ball joint nut and clip, the tie rod end cotter pins, the rack end claw washers, the rear shock upper nut, the rear stabilizer link retainers and cushions, and the arm bushings themselves.
Parts
Verify every number by VIN before ordering. The front lower arm numbers below fit trucks without KDSS. The links go to listings checked on November 5, 2026.
| Part | Part number | Buy |
|---|---|---|
| Front lower control arm, RH | 48068-60010 | Genuine Toyota, eBay |
| Front lower control arm, LH | 48069-60010 | Genuine Toyota, eBay |
| Front upper control arm, RH | 48610-60070 | Genuine Toyota, eBay |
| Front upper control arm, LH | 48630-60040 | Genuine Toyota, eBay |
| Front lower arm bushing No.1 | 48654-60030 | Genuine Toyota, eBay |
| Front lower arm bushing No.2 | 48655-60030 | Genuine Toyota, eBay |
| Front upper arm bushing (x4) | 48632-60040 | Genuine Toyota, eBay |
| Front stabilizer link set, LH and RH | 48810-60040 / 48820-60050 | Genuine Toyota, eBay |
| Rear lower control arm (both sides) | 48720-35061 | Lexus Parts |
| Rear upper control arm, RH | 48710-35060 | Lexus Parts |
| Rear upper control arm, LH | 48710-35070 | Lexus Parts |
| Rear stabilizer link (both sides) | 48830-60030 | Lexus Parts |
| Track bar bushing | 48706-60060 | Lexus Parts |
| Tie rod end, outer (both sides) | 45046-39505 | Toyota Parts |
| Rack end, inner tie rod | 45503-39265 | Lexus Parts |
| Front wheel bearing | 43570-60011 | Lexus Parts |
| Front hub sub-assembly | 43502-60201 | Lexus Parts |
| Steering rack bushing kit | SuperPro SPF3144K | SuperPro, Amazon |
Tools: a floor jack and jack stands, a ball joint separator, a bushing press kit for the press-in bushings, a torque wrench, and a 6 mm hex wrench for the stabilizer link studs.
Two Notes Before You Button It Up
If you converted from air to coils, pull the AIR SUS fuse so the compressor never runs again. If the factory rear shocks with the dampers are going away, pull the TEMS fuse too. Both steps are covered in the coil conversion guide.
Get the alignment after everything settles, not before. New bushings and arms change ride height slightly as they seat, and an alignment done on day one is an alignment you pay for twice.
Related Guides
Rear Air Suspension: Diagnose and Coil Conversion for the Lexus GX
Sources
Factory torque values, inspection limits, and service positions are from the Lexus GX470 factory service manual, written here in our own words. Part numbers and fitment come from the Toyota and Lexus parts catalog as published by Lexus Parts Now and parts.lexus.com, with aftermarket catalog data from SuperPro, Whiteline, Sankei 555, and Moog for the parts the factory does not catalog on their own.
Leave a Reply