Quick answer
Test the battery before you test the alternator. A battery that rests below its standard voltage after the surface charge is removed will make a healthy alternator look weak. Charge the battery, retest it, and start the alternator tests with a battery that passes.
The GX470 and GX460 share one set of charging test values, and the GX550 runs its own.
| Test | GX470 and GX460 | GX550 |
|---|---|---|
| Battery standard (resting) voltage | 12.5 to 12.9 V | 12.3 V or higher |
| Charging voltage, no load at 2,000 rpm | 13.2 to 14.8 V | 13.5 to 14.35 V |
| Charging current, no load | 10 A or less | 10 A or higher |
| Loaded charging current, 2,000 rpm with high beams on and blower on HI | 30 A or more | 30 A or more |
Access is where the generations split. The GX470 generator comes out the front after the fan and shroud come out and the power steering vane pump is hung aside. The GX460 factory procedure removes the radiator assembly first and lifts the generator out the top, and owners also report a bottom path that leaves the radiator in place. The GX550 generator comes out the side after the front wheel, the fender apron trim, the fan shroud, and the intake air tube come off, with the radiator left in place.
A whine that follows engine speed points at bearings or the pulley. Owners report the whine first, then a voltage drop, then a dead battery. A burnt electrical smell with the whine is a unit that is close to done. The test order in this guide confirms the unit before you buy one.
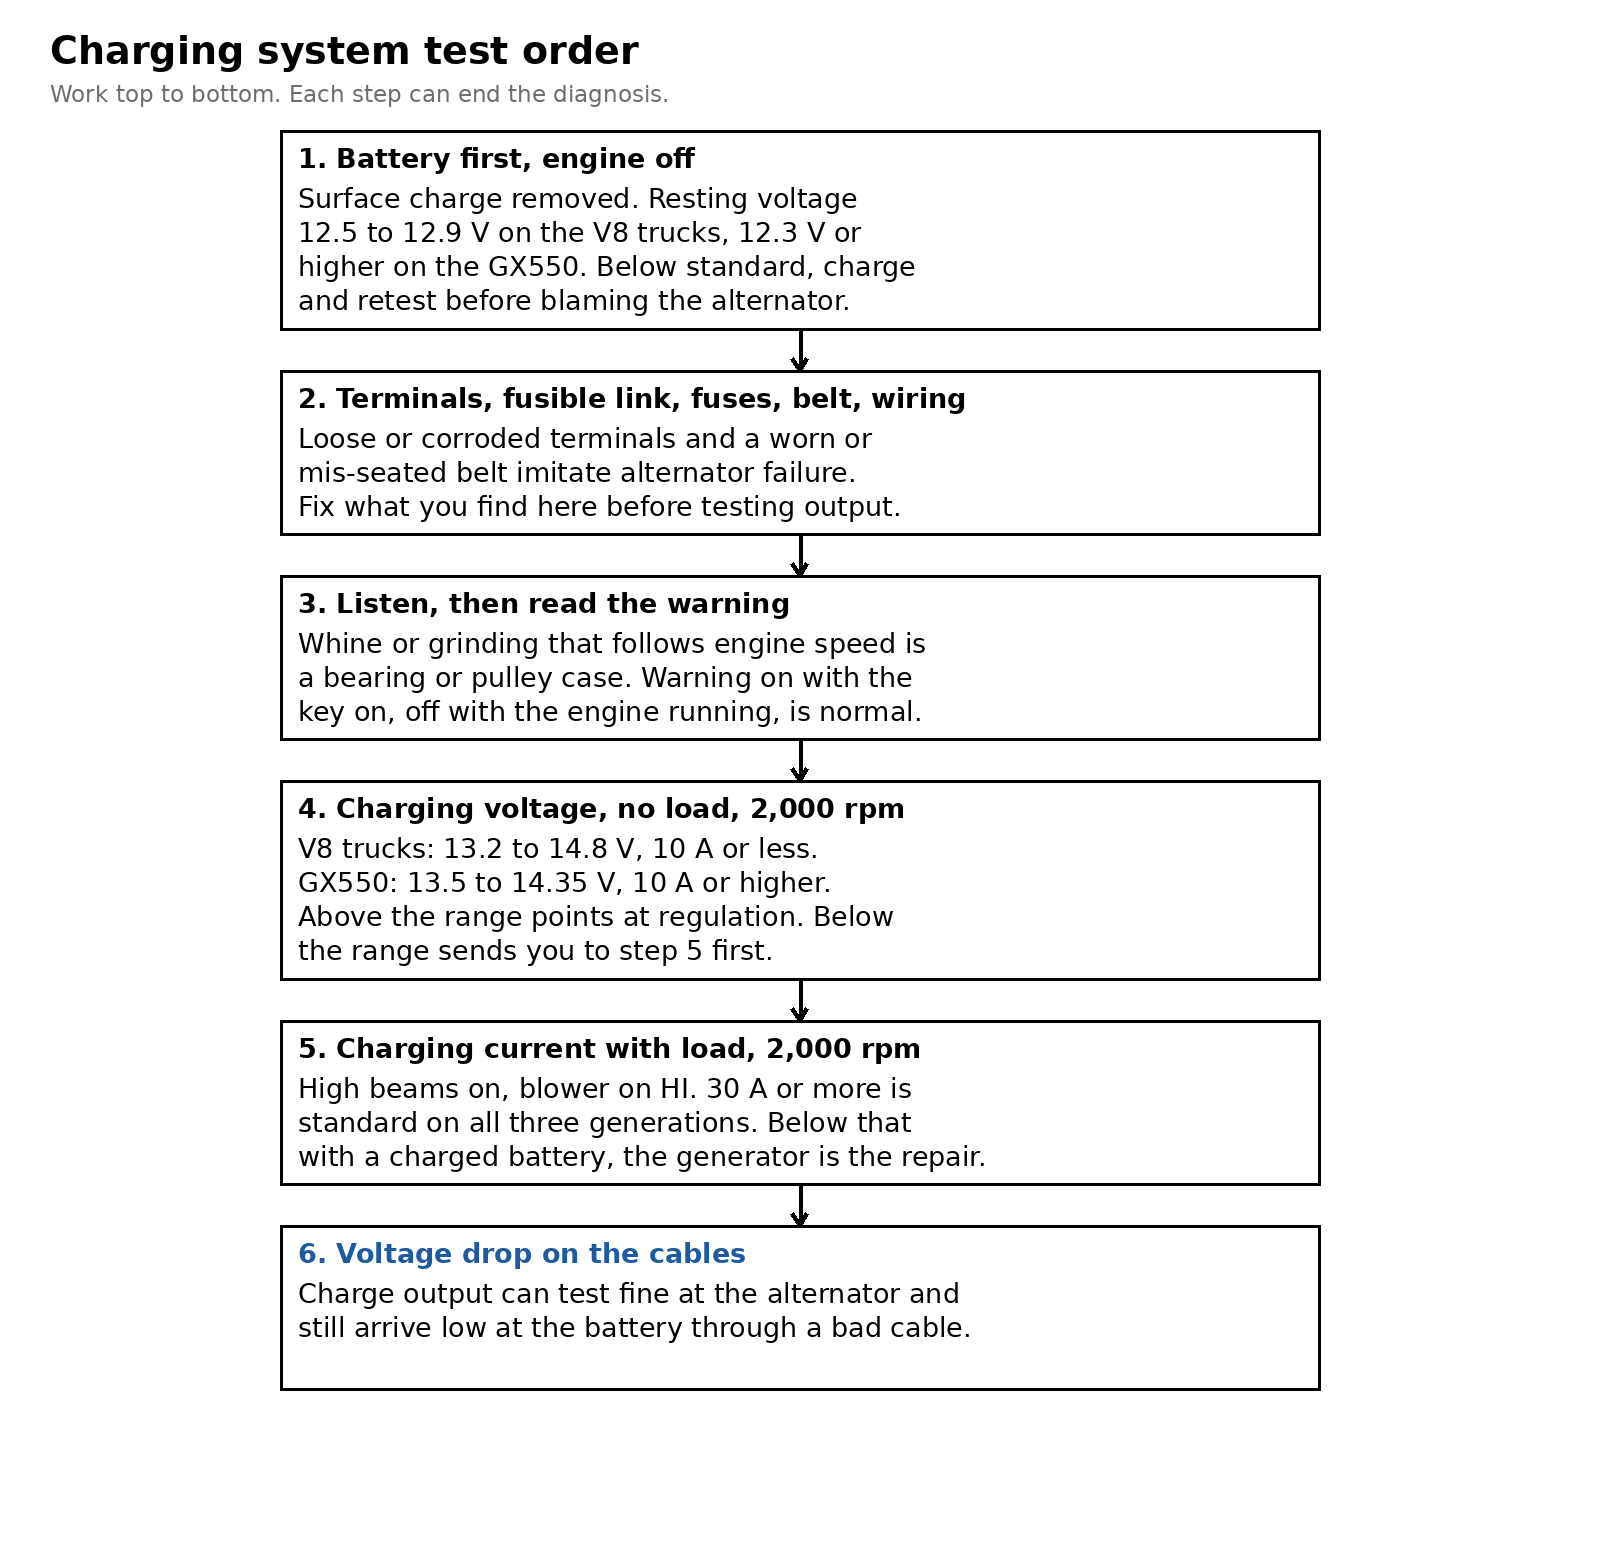
Charging System Test Order
Symptoms and what each one points to
Work the symptom you have against this table, then run the test order in the next section before you order parts.
| Symptom | First suspect | Confirm with |
|---|---|---|
| Whine that rises and falls with engine speed | Generator bearings or pulley | Noise check with the belt off for a short run, then the charging tests |
| Burnt plastic or electrical arcing smell at the front of the engine | Generator failing under load | Charging voltage and loaded current tests |
| Charge warning on while driving | Charging output low or the belt slipping | Belt inspection, then charging voltage at 2,000 rpm |
| Repeated dead batteries with a battery that tests good | Charging output low, or a parasitic drain | Loaded current test first, then a drain test if charging passes |
| Battery boiling, swelling, or losing water | Overcharging from failed regulation | Charging voltage test. Above the range confirms it |
| Dim lights and slow cranking after a long drive | Output falling as the unit heats up | Loaded current test on a fully warmed engine |
| Oil wetting the generator case on a GX460 | Timing cover oil leak dripping into the unit | Inspect the timing cover seam above the generator before condemning the unit |
Owners describe the GX failure pattern in a consistent order. The IH8MUD thread on GX470 alternator failure opens with a voltage drop and a gear whine from the pulley, and one owner in the same thread reports a horrible whine and an electrical arcing smell with no check engine light at any point. A 100-series owner with the same 2UZ-FE engine reports bearing noise he could hear and feel, with running voltage near 13 V before the swap and 14 V after it. Plan on the whine arriving before the warning does.
The GX460 adds an oil leak fork. A GX460 owner thread carries a technician photo of a timing cover leak dripping oil straight into the alternator. Oil inside a generator kills brushes and bearings. On a GX460 with an oil-wet generator, find the leak source first, because a fresh unit under the same drip fails the same way.
The GX550 reports charging faults on the display and in codes. The warning is a Battery Charge Warning message on the multi-information display. The charging system also sets codes for generator control faults, and scan data shows the alternator output duty ratio and the voltage the regulator is reporting, which separates a control fault from a worn unit.
Safety and the first rules
Disconnect the negative battery cable before you unbolt anything. The generator B terminal wire is live at all times. A wrench that bridges that terminal to ground will arc and can weld itself in place.
On the GX460, wait before you disconnect. The wait covers the navigation system recording its settings to memory after the engine switch is turned off. Wait 1 minute on a truck without Safety Connect enrollment and 6 minutes on a truck enrolled in Safety Connect. The GX550 carries the same caution in its own procedure, so give the truck a few minutes after shutdown before the cable comes off there as well.
Never disconnect the battery with the engine running. The old driveway test of pulling a cable to see if the engine keeps running can damage the electronics on these trucks. The rule is the same on every generation in this guide.
Support the truck for any work from below. The GX460 bottom path, the sway bar work, and the GX550 side access all happen with a wheel off or the truck raised. Use jack stands on a level surface and keep the floor jack as a helper tool for the KDSS step only.
The test order, with standard values
Run these tests in order. The GX470 and GX460 values agree at every step in this section. The GX550 value is stated at each step where it differs.
Step 1. Resting battery voltage. Drive the truck, then let it sit, then remove the surface charge before you measure. The GX470 method turns the ignition on and runs the headlights, blower, and rear defogger for 60 seconds after a drive. The GX460 and GX550 method turns the headlights on for 20 to 30 seconds with the engine switch off. Measure across the battery terminals with a digital multimeter. Standard voltage on the V8 trucks is 12.5 to 12.9 V at 20 °C (68 °F), and a GX460 battery also checks by specific gravity at 1.25 to 1.29 at the same temperature. The GX550 standard is 12.3 V or higher, with specific gravity at 1.25 or more. Below standard, charge the battery and retest. A battery that cannot hold its standard after a full charge is the repair, and the alternator tests wait until it is replaced.
Step 2. Cranking voltage on the V8 trucks. The GX460 inspection adds a load point during cranking. If the battery voltage falls below 9.6 V while cranking, recharge or replace the battery before you continue.
Step 3. Terminals, fusible link, fuses, and belt. Check that the battery terminals are tight and free of corrosion. Check the fusible link and the charging fuses for continuity. Fuse resistance on the GX460 and the GX550 measures below 1 Ω. Inspect the drive belt for wear, frayed cords, and missing rib chunks, and check by hand that the belt sits in the pulley grooves along its whole run. Cracks on the rib side are acceptable wear. A belt that has slipped out of a groove or lost chunks gets replaced before any output test means anything.
Step 4. Wiring and noise. Look over the generator wiring for chafing, green corrosion at the connector, and a loose B terminal nut under its rubber cap. Then run the engine and listen at the generator. The inspection step is a plain listen check for abnormal noise. A whine or grind that tracks engine speed is a bearing or pulley case. One owner account from the 100-series with the same engine describes a 3-wire connector filled with fine silt that fought removal, so expect the low-mounted connector to be dirty and be patient with it.
Step 5. Warning pattern. Turn the key or engine switch on and confirm the charge warning light comes on. Start the engine and confirm the light goes off. A light that stays on with the engine running, or a light that never comes on at key on, sends you to the warning light circuit before you condemn the generator. The GX550 shows a Battery Charge Warning on the multi-information display instead of a bulb check, and a message that stays up with the engine running carries the same meaning.
Step 6. Charging voltage with no load. Connect the meters as the hookup diagram shows, run the engine at 2,000 rpm, and read the voltage and current with the electrical loads off. Standard voltage on the V8 trucks is 13.2 to 14.8 V, and the ammeter reads 10 A or less with a charged battery. The GX550 standard is 13.5 to 14.35 V with current at 10 A or higher, and its engine computer manages the output over a data line to the regulator. Above the range, regulation has failed. Below the range, continue to the loaded test before you decide.
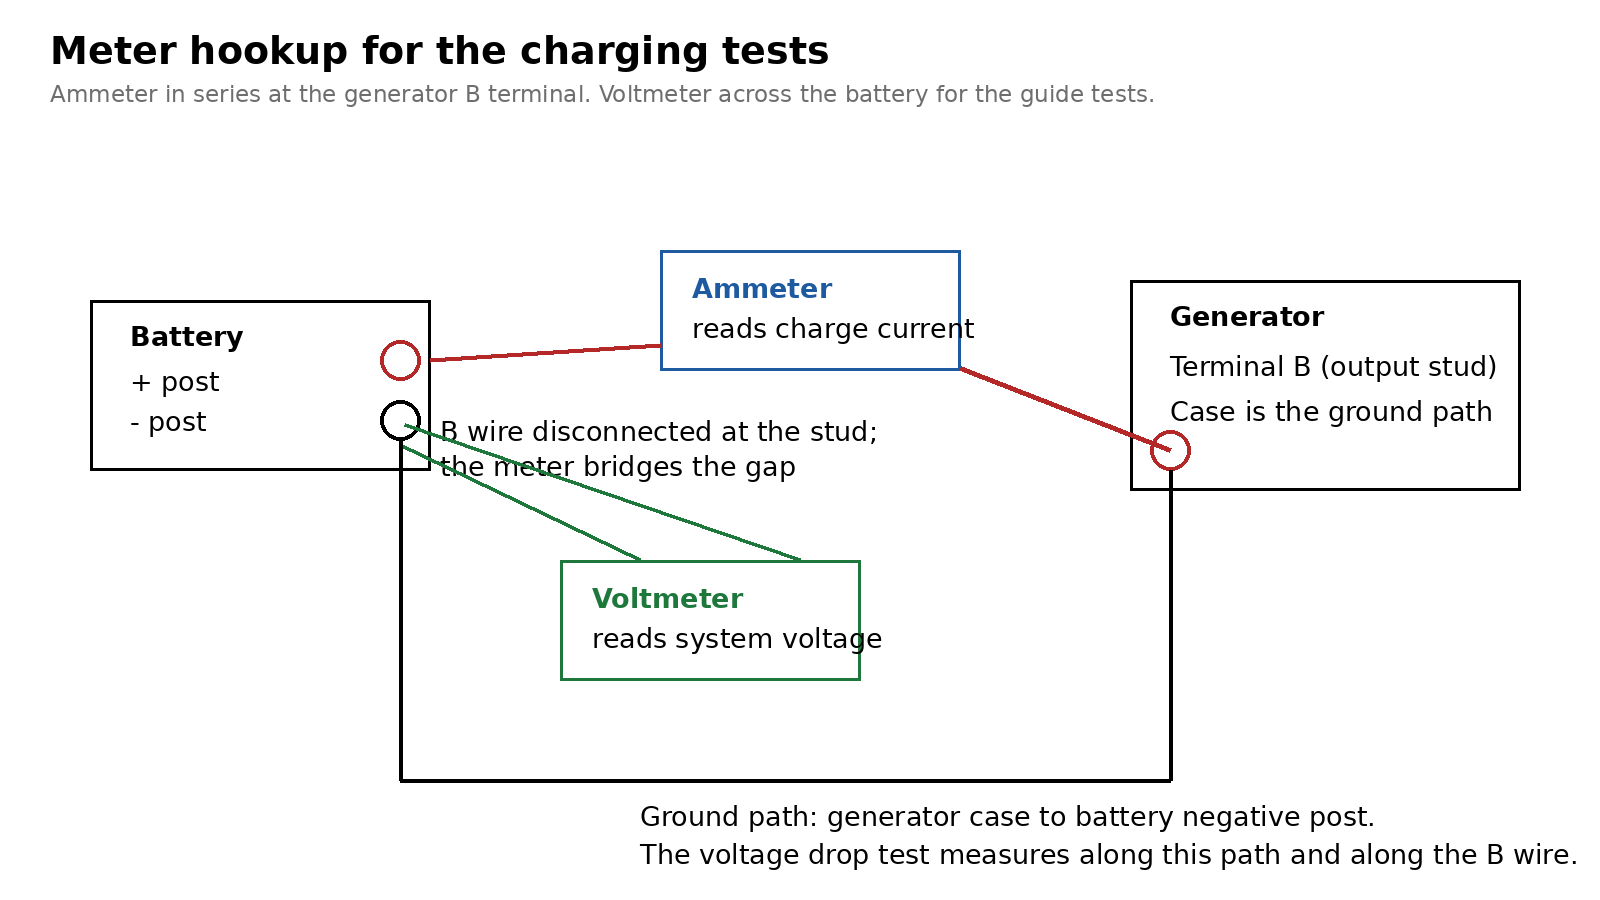
Meter Hookup for the Charging Tests
Step 7. Charging current with load. Keep the engine at 2,000 rpm, turn the high beam headlights on, and set the heater blower to HI. Standard current is 30 A or more on every generation in this guide. Add the wipers and the rear defogger if the reading looks low on a battery you know is fully charged, because a full battery draws little current and can pull the reading down on a healthy system. A reading that stays below 30 A with real load applied confirms a weak generator. A clamp meter around the B terminal cable reads the same current without opening the connection.
Step 8. Cable voltage drop. A generator can pass at its own terminal and still charge low at the battery through a corroded cable or a loose ground. Measure the voltage between the generator B terminal and the battery positive post with the engine running and loads on, then between the generator case and the battery negative post. A healthy cable drops very little. No numeric drop limit is printed for these trucks, so treat any drop you can measure clearly on a loaded circuit as a cable to clean, repair, or replace, and retest after the fix. This is a Home Mechanic field check.
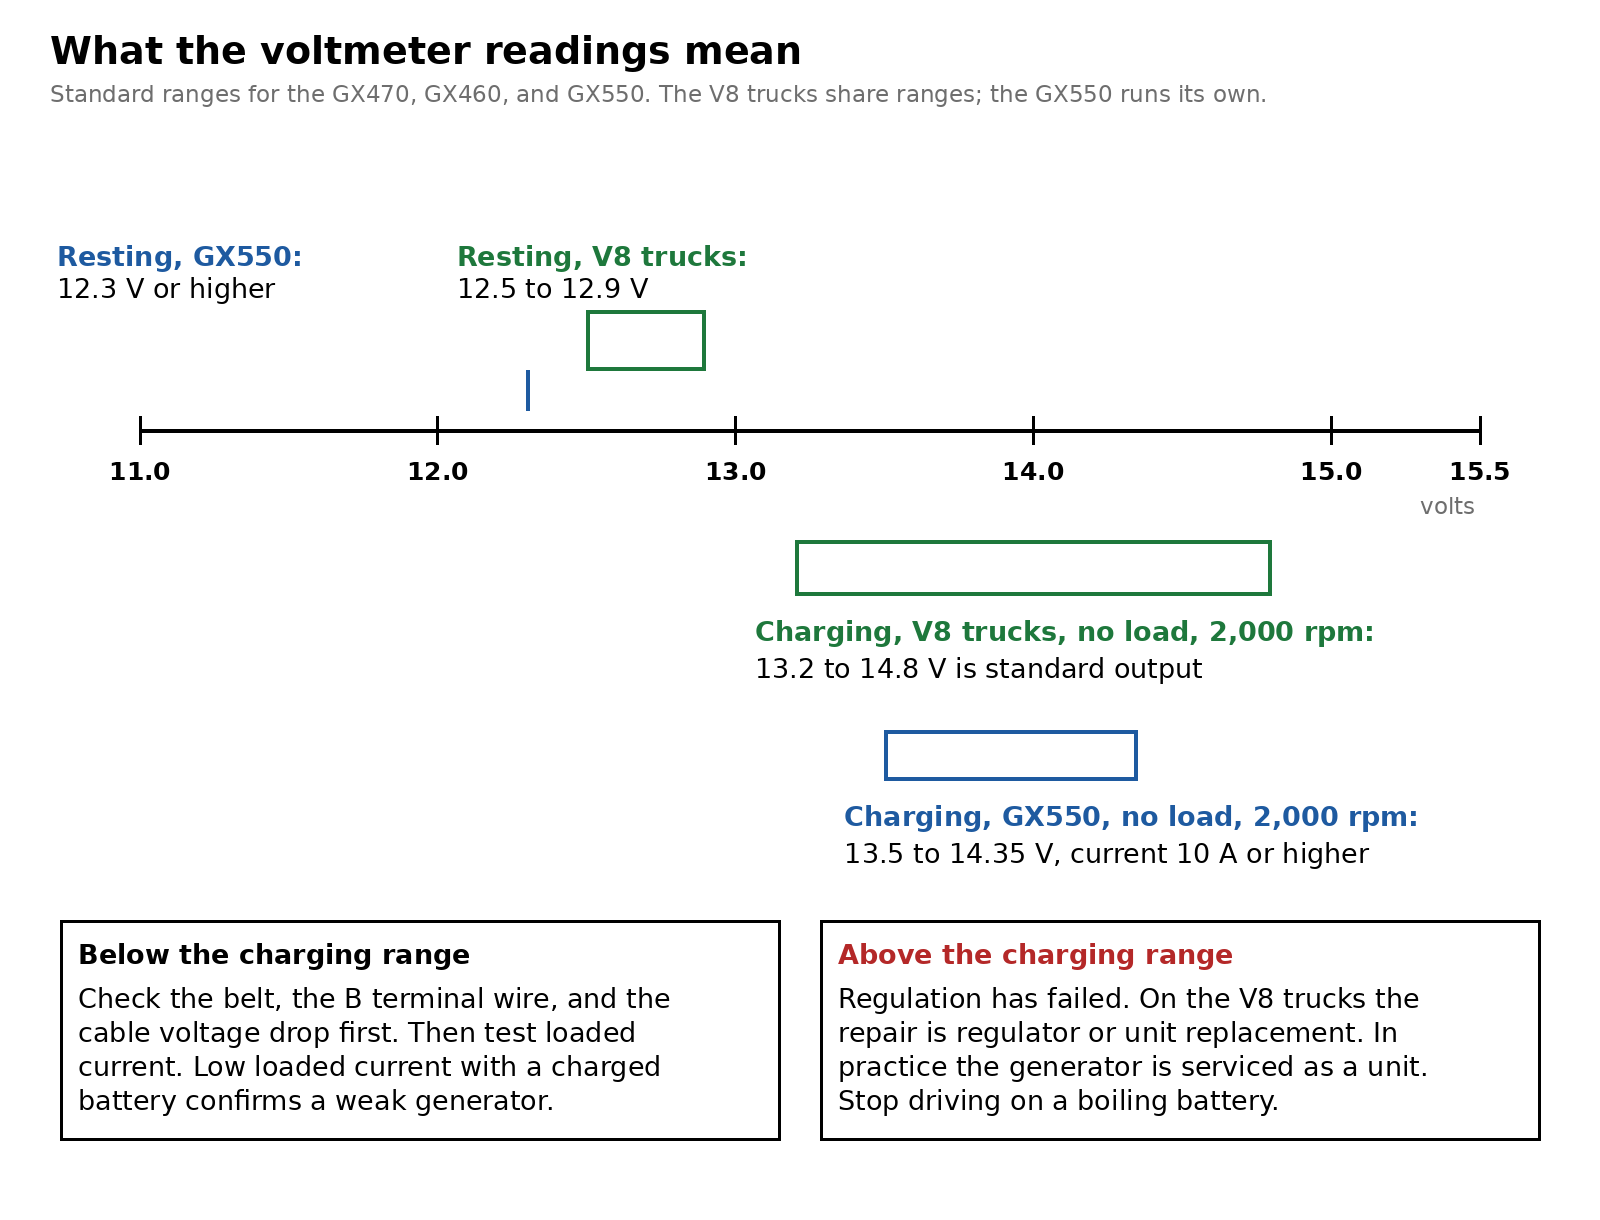
What the Voltmeter Readings Mean
Charging hardware across the three generations
| Item | GX470, 2003 to 2009 | GX460, 2010 to 2023 | GX550, 2024 and up |
|---|---|---|---|
| Engine | 2UZ-FE 4.7 V8 | 1UR-FE 4.6 V8 | V35A-FTS 3.4 V6 twin turbo |
| Generator supply | Single unit, 130 A | 130 A type and 150 A type by equipment | DENSO and VALEO units in parallel production, 200 A and 240 A output types |
| Battery standard voltage | 12.5 to 12.9 V | 12.5 to 12.9 V | 12.3 V or higher |
| Charging voltage, no load, 2,000 rpm | 13.2 to 14.8 V | 13.2 to 14.8 V | 13.5 to 14.35 V |
| Charging current, no load | 10 A or less | 10 A or less | 10 A or higher |
| Loaded charging current | 30 A or more | 30 A or more | 30 A or more |
| Rotor coil resistance at 20 °C (68 °F) | 2.3 to 2.7 Ω | 130 A type: 2.3 to 2.7 Ω. 150 A type: 1.5 to 1.9 Ω | DENSO: 1.36 to 1.76 Ω. VALEO: no rotor specification printed |
| Slip ring diameter | Standard 14.2 to 14.4 mm, minimum 14.0 mm | Standard 14.2 to 14.4 mm, minimum 14.0 mm | DENSO: standard 14.2 to 14.8 mm, minimum 14.0 mm |
| Brush exposed length, standard | 10.5 mm (0.413 in.) | 9.5 to 11.5 mm (0.374 to 0.453 in.) | DENSO: 9.5 to 11.5 mm. VALEO: 10 to 11 mm, brushes part of the regulator assembly |
| Brush exposed length, minimum | 4.5 mm (0.177 in.) | 4.5 mm (0.177 in.) | DENSO: 4.5 mm. VALEO: 1.9 mm |
| Generator mounting | 1 bolt and 2 nuts | 3 bolts and 1 nut | 2 bolts, 2 nuts, and 2 stud bolts |
| Generator mounting torque | Bolt and M10 nut: 29 ft·lbf (39 N·m). M8 nut: 11 ft·lbf (16 N·m) | 32 ft·lbf (43 N·m) | Bolts and nuts: 32 ft·lbf (43 N·m). Stud bolts: 7 ft·lbf (10 N·m) |
| Generator wire nut torque | 86 in·lbf (9.8 N·m) | 87 in·lbf (9.8 N·m) | 9 ft·lbf (12 N·m) |
| Removal path | Out the front, fan and shroud removed | Out the top, radiator assembly removed | Out the side, front wheel and fan shroud removed, radiator stays in |
The GX460 type split matters at the parts counter. The 150 A unit pairs with the dual automatic air conditioning equipment in the parts catalog data, and an owner whose alternator failed at 160,000 miles reports the 150 A unit on his three-zone truck. Order by VIN and equipment, and compare the rating printed on the old unit before the core leaves your hands. The GX550 split is by supplier. DENSO and VALEO units both fit the truck, their service data differs, and the make is read off the unit on the truck before bench numbers mean anything.
Bench checks on the removed unit
Three measurements decide whether a removed generator is a brush job or a replacement. Measure the rotor coil resistance across the two slip rings with an ohmmeter. Measure the slip ring diameter with calipers. Measure the exposed brush length against the standard and minimum for your unit. The values for every generation and type are in the comparison table above.
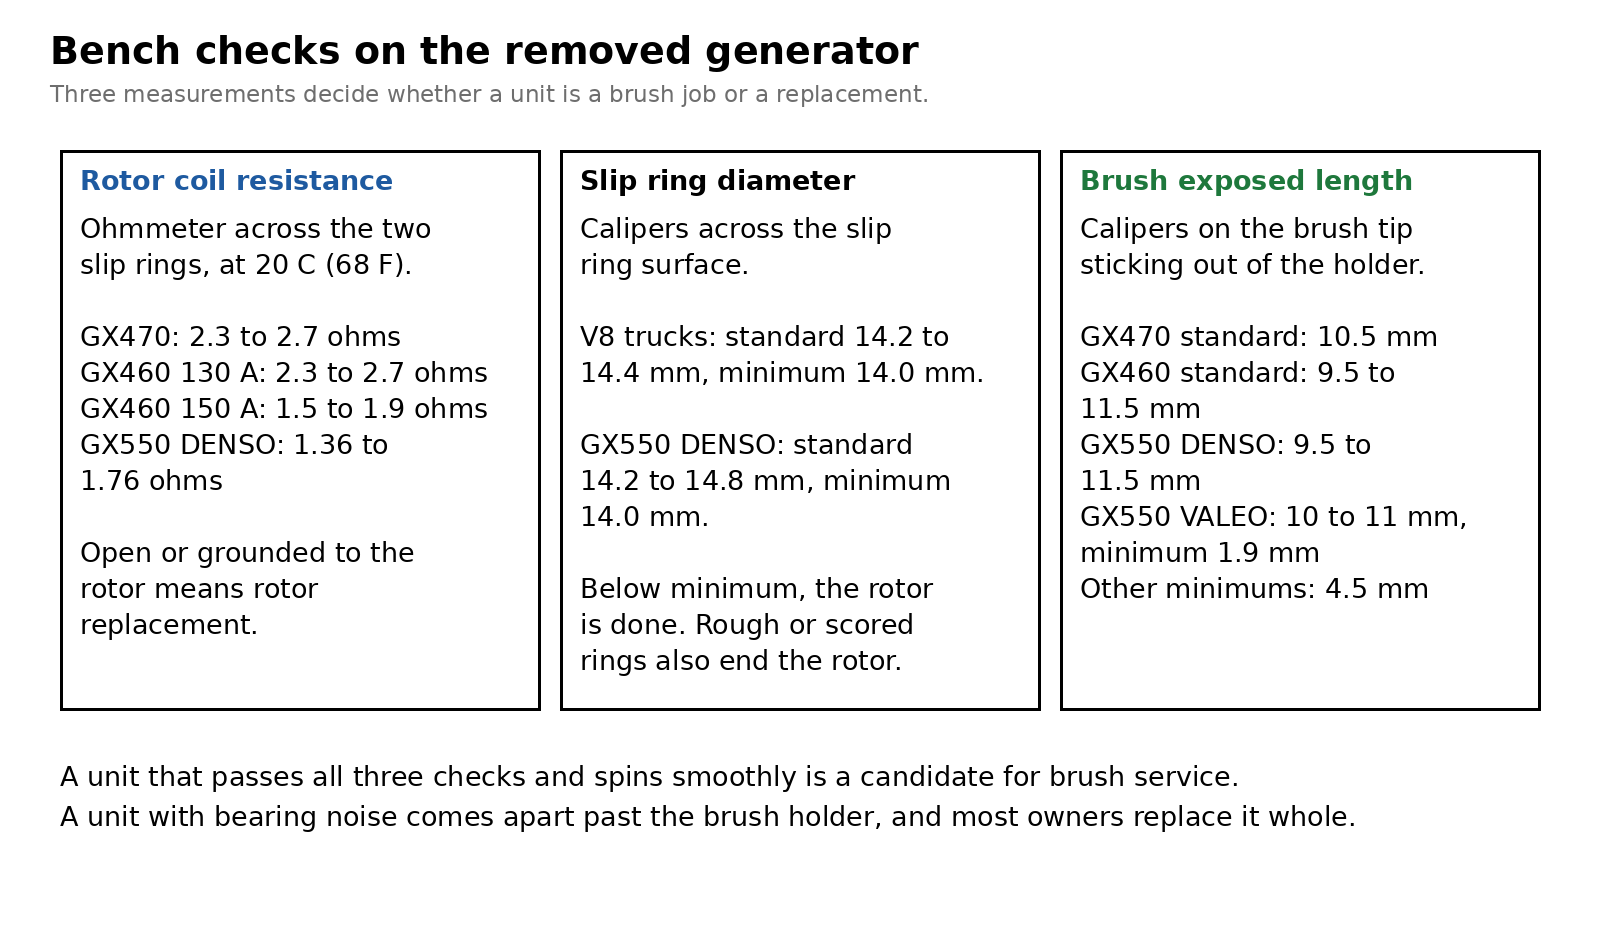
Bench Checks on the Removed Generator
A generator that fails on brushes alone, with a smooth bearing feel and slip rings at or above the minimum diameter, is a candidate for a brush holder service on the bench. The GX470 brush holder assembly is 27370-20130 for the trucks built through the middle of the run. The GX460 brush holder assembly is 27370-27060. On the GX550, the DENSO unit takes a brush holder the same way, and the VALEO unit carries its brushes inside the regulator assembly, so a worn VALEO brush set means a regulator assembly.
Most owners replace the complete unit, and the reasons are practical. Bearing noise is the most common first symptom in the owner threads, and bearings mean the unit comes apart past the brush holder. A quality remanufactured unit from the original manufacturer also resets the regulator, the rectifier, the brushes, and both bearings in one part. Owners report the middle path working well: a remanufactured Denso unit, tested on the bench at the parts store before it goes on the truck when the store offers that check.
Skip the high-output upgrade unless your truck needs the current. Fridges, lights, and a winch on a GX rarely add up past the factory rating with the engine running. Vendor output claims also need care. One vendor page found during research for this guide lists the same GX470 stock unit as 110 A in one line and 145 A in its own comparison table. The factory rating for the GX470 unit is 130 A. A larger unit also loads the fusible link and the B terminal cable harder, and a 100-series owner thread warns that owners install 150 A units on links and cables sized for less. That warning comes from a different model and is an owner caution. Treat it as a prompt to size the link and cable for any upgrade, with the ratings for your truck confirmed before the parts go on.
Owners in the GX470 failure thread split on changing a working alternator before remote travel. A unit that passes every test in this guide, spins quietly, and shows no smell has no test-based reason to come off. A unit at high mileage with a faint whine, a trip far from parts supply ahead of it, and a timing belt or water pump job already opening the front of the engine is a case for changing it ahead of the trip, because the GX470 access work overlaps. Decide from your test results and your trip, and keep the take-off unit as a spare if it passed.
2003 to 2009 GX470: replacing the generator
The generator comes out the front of the engine bay. The fan and fluid coupling come out with the shroud, and the power steering vane pump is unbolted and hung aside with its hoses attached. The radiator stays in the truck.
Step 1. Disconnect the negative battery cable. Then remove the upper radiator support seal, which comes off on its clips.
Step 2. Remove the drive belt. Turn the belt tensioner counterclockwise to release tension and slip the belt off. A long breaker bar gives the leverage the tensioner wants. The tensioner pulley bolt has a left-hand thread. Keep that in mind before you put the bar on it in the wrong direction.
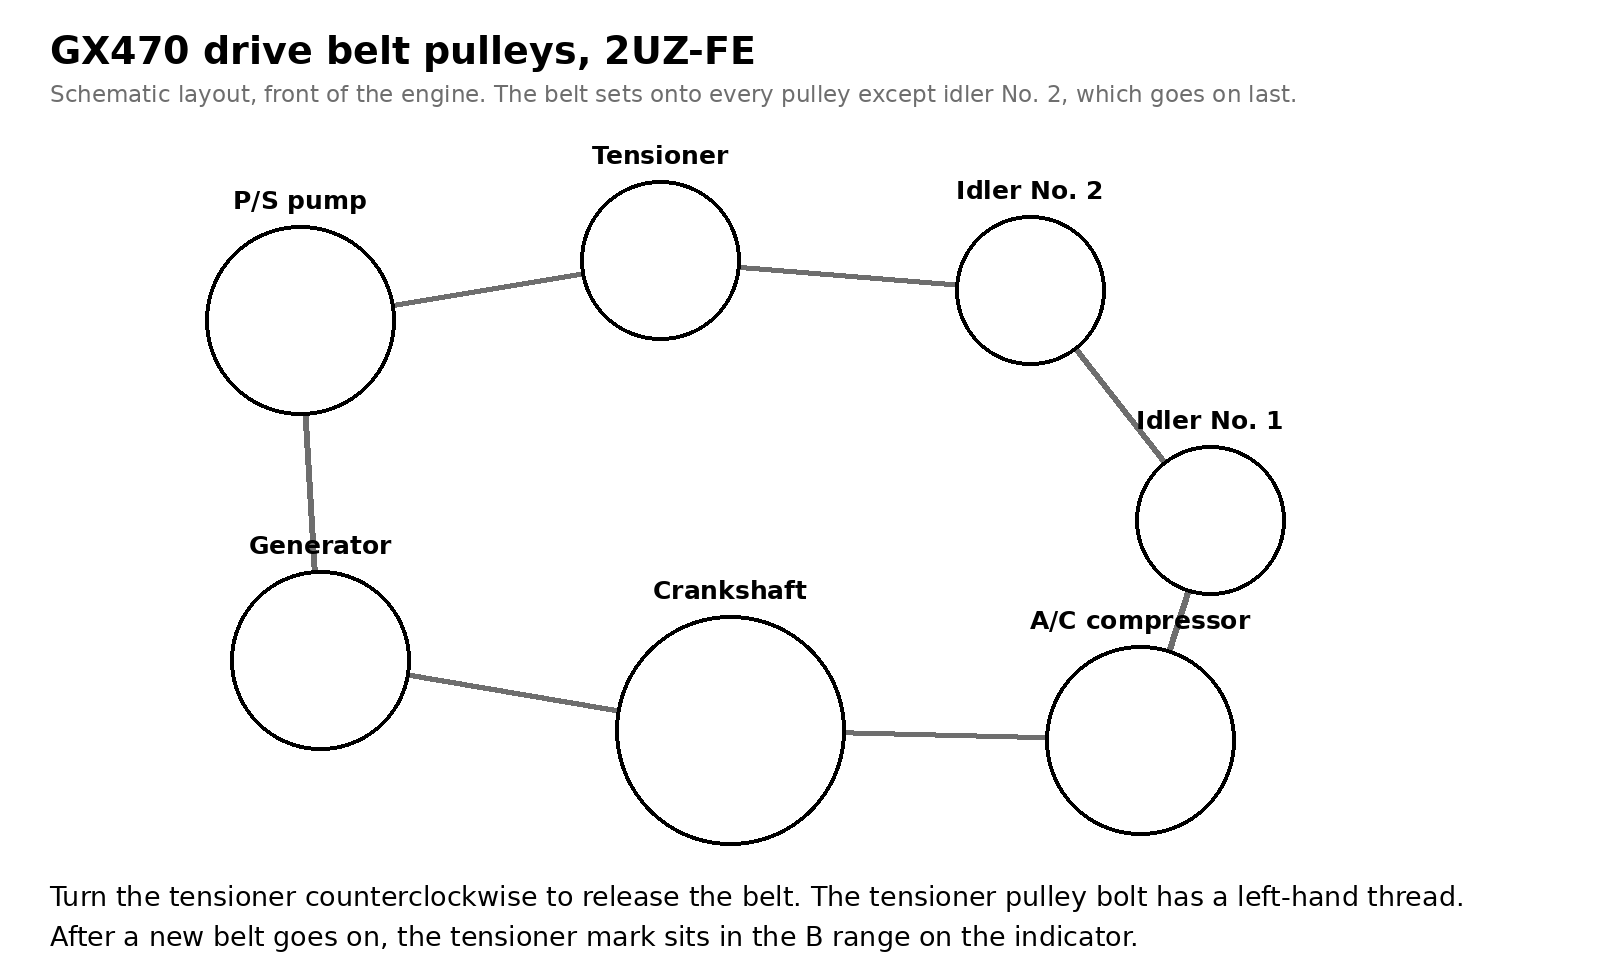
GX470 Drive Belt Pulleys
Step 3. Remove the fan with fluid coupling and the shroud together. Separate the 2 oil cooler hoses from the fan shroud. Remove the 3 shroud bolts, then remove the 4 nuts that hold the fan and fluid coupling to the engine, and lift the shroud and fan out as one assembly.
Step 4. Separate the vane pump. Disconnect the vacuum hose. Remove the nut and the 2 bolts, and move the pump aside. Hang the pump from a hook or a bungee with its hoses attached. Opening the power steering lines adds a fluid flush and a bleed to a job that does not need either.
Step 5. Remove the generator. Disconnect the generator connector. Remove the terminal cap and the nut, and disconnect the generator wire. Release the wire clamp from the cord clip on the generator. Remove the bolt and the 2 nuts, and lift the generator out.
Step 6. Install the generator. Set the generator in place and fit the bolt and the 2 nuts. Torque the bolt to 29 ft·lbf (39 N·m), the M10 nut to 29 ft·lbf (39 N·m), and the M8 nut to 11 ft·lbf (16 N·m). Connect the generator wire with its nut at 86 in·lbf (9.8 N·m) and fit the rubber cap. Clip the wire clamp back onto the cord clip and connect the generator connector.
Step 7. Refit the vane pump. Fit the pump with its nut and 2 bolts at 32 ft·lbf (43 N·m) each. Connect the vacuum hose.
Step 8. Refit the fan, shroud, and belt. Set the fan and shroud in together. Fit the shroud bolts at 44 in·lbf (5.0 N·m) and the fan coupling nuts at 21 ft·lbf (29 N·m). Route the belt over every pulley except the No. 2 idler, release the tensioner, and set the belt onto the No. 2 idler last. Check with your hand that the belt sits in the bottom grooves of every pulley. After a new belt goes on, the tensioner mark should sit in the B range on the indicator.
Step 9. Reconnect the battery and retest. Fit the upper radiator support seal. Reconnect the negative cable. Run the full test order from this guide, including the loaded current test, and confirm the warning light pattern is normal.
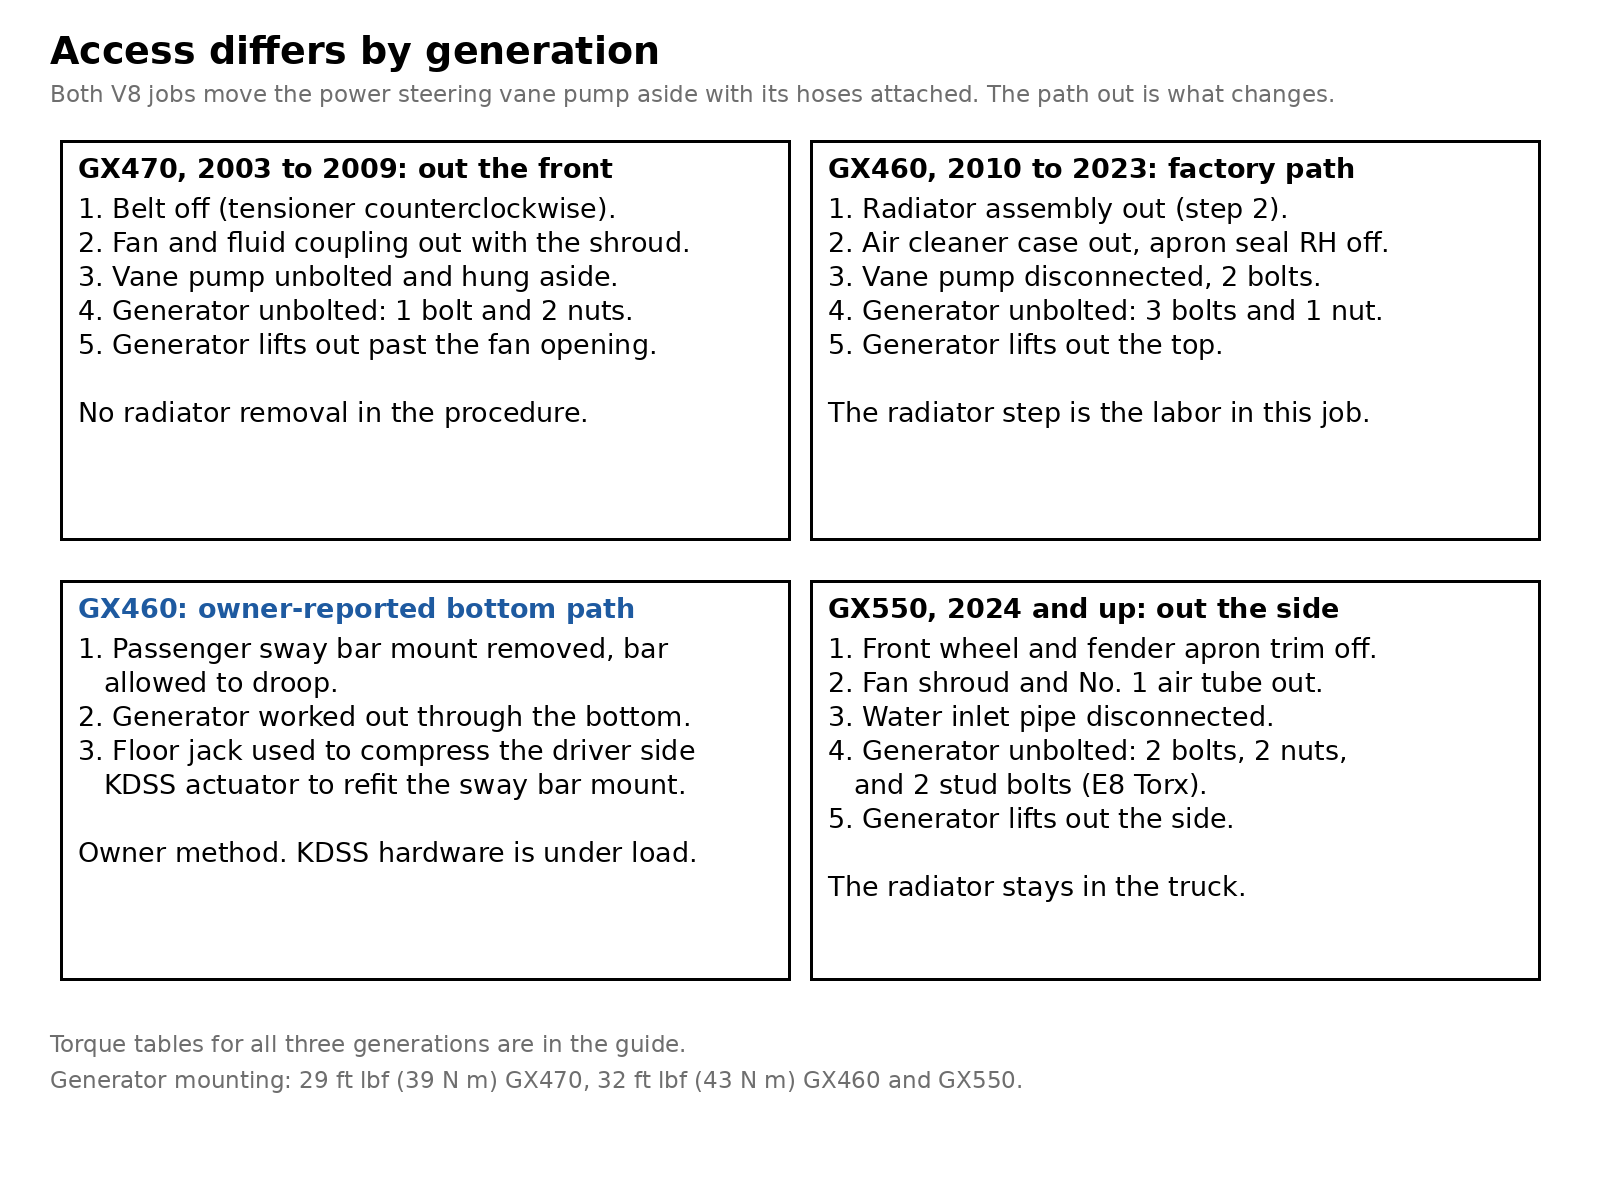
Access Differs by Generation
2010 to 2023 GX460: replacing the generator by the factory path
The factory procedure removes the radiator assembly as its second step. That step is most of the labor in this job, and it is also a clean chance to inspect the radiator hoses, the radiator side tanks, and the coolant. Our GX460 water pump guide covers the cooling system work that shares this access. Estimator pricing reflects the labor. YourMechanic puts GX460 alternator replacement at about $1,275 to $1,520 depending on model year, before any cooling parts you choose to add while the radiator is out.
Step 1. Disconnect the negative battery cable after the wait. Turn the engine switch off and wait 1 minute, or 6 minutes on a truck enrolled in Safety Connect, then disconnect the cable.
Step 2. Remove the radiator assembly. Drain the coolant and remove the radiator by its own procedure. Keep the drained coolant in a clean pan if you plan to reuse it, and plan on fresh coolant if its age or condition is in any doubt. A spill-free funnel makes the refill and bleed at the end of the job cleaner.
Step 3. Remove the air cleaner assembly. Remove the air cleaner cap and hose, the filter element, and the air cleaner case. Then remove the right-hand front fender apron seal.
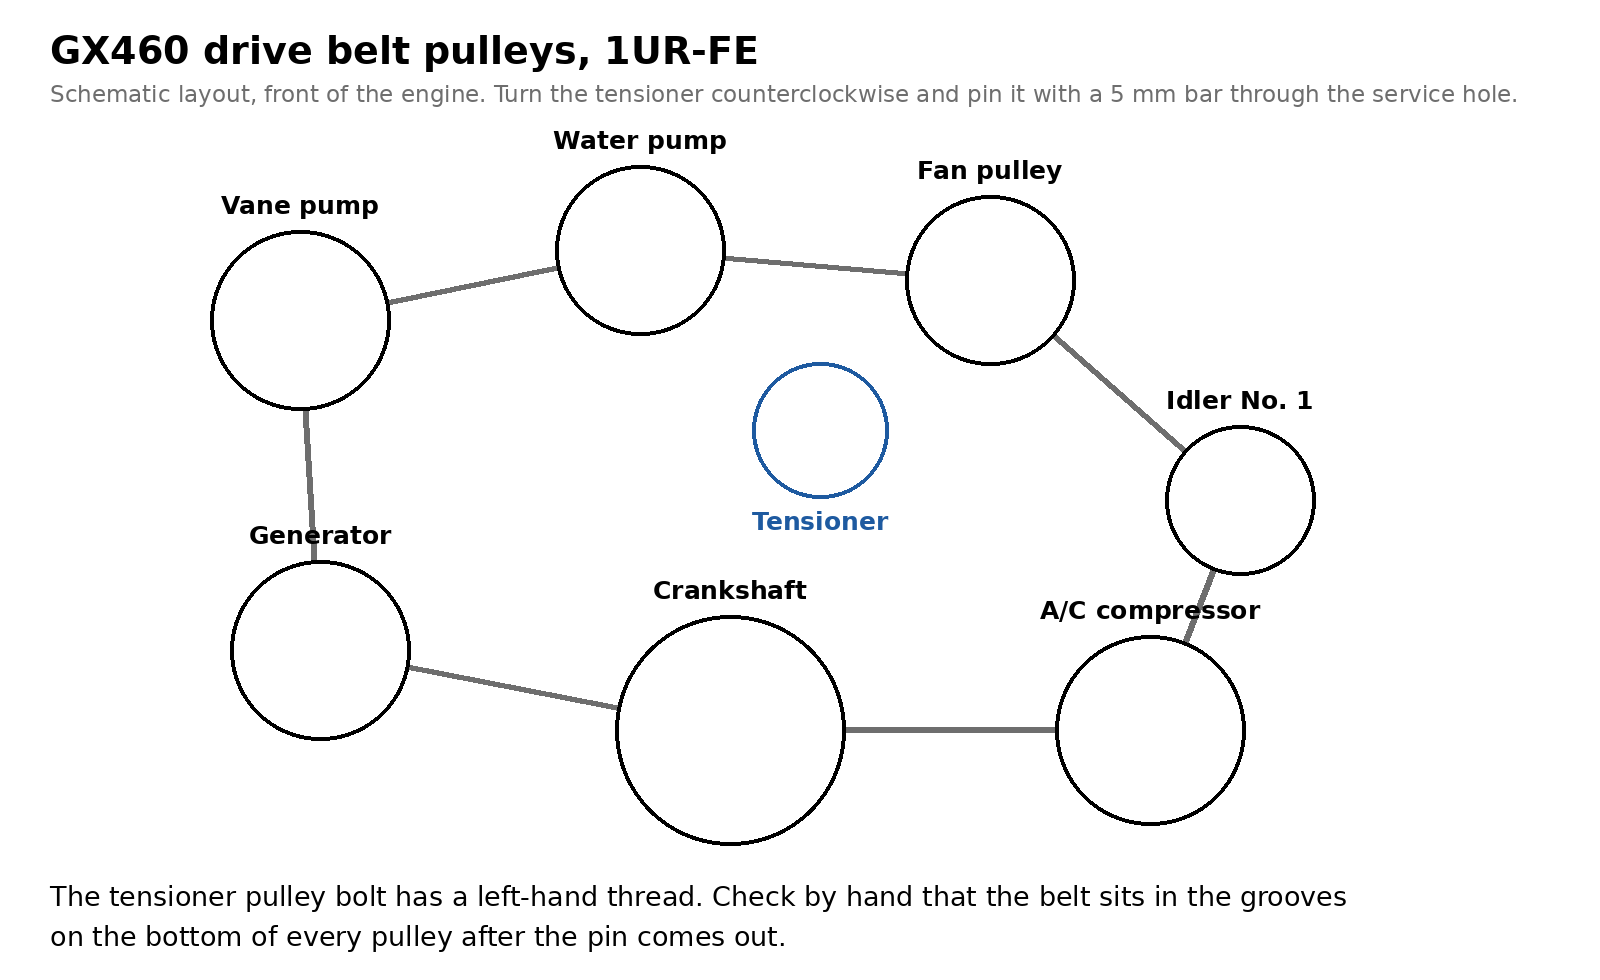
GX460 Drive Belt Pulleys
Step 4. Disconnect the vane pump. Detach the clamp and disconnect the pump connector. Remove the 2 bolts and move the pump aside with its hoses attached. Owners report this pump fits tight in its bracket and that gentle prying with patience frees it. One owner in the bottom-path thread reports a rear threaded bushing that refused to slide on refit, which is worth knowing before you force anything.
Step 5. Remove the generator. Remove the bolt and disconnect the No. 2 return tube bracket. Disconnect the generator connector. Remove the terminal cap, remove the nut, and disconnect the generator wire, then detach the wire. Remove the bolt that holds the wire harness bracket to the generator. Remove the 3 bolts and the nut, and lift the generator out.
Step 6. Install the generator. Fit the generator with the 3 bolts and the nut at 32 ft·lbf (43 N·m). Connect the wire harness bracket with its bolt at 18 ft·lbf (24 N·m). Connect the generator wire with its nut at 87 in·lbf (9.8 N·m), fit the terminal cap, and connect the generator connector. Connect the No. 2 return tube bracket with its bolt at 21 ft·lbf (28 N·m).
Step 7. Refit the vane pump. Connect the pump with the 2 bolts at 32 ft·lbf (43 N·m). Attach the clamp and connect the pump connector.
Step 8. Reassemble and refill. Refit the front fender apron seal, the air cleaner case, the filter element, and the cap and hose. Install the radiator assembly and refill the cooling system, then bleed the air from it by the cooling procedure. Reconnect the negative battery cable. Some systems need initialization after a battery reconnect, so check the windows, the steering, and the idle behavior on the first drive.
Step 9. Retest the charging system. Run the full test order from this guide. Confirm the loaded current on a warmed engine, because owner reports put several GX460 failures at full operating temperature after a cold start that tested fine.
2010 to 2023 GX460: the owner-reported bottom path
One detailed IH8MUD thread documents a GX460 alternator change that leaves the radiator in place. The owner removed the passenger side sway bar mount, let the sway bar droop, and worked the old generator out through the bottom and the new one in the same way. A floor jack then compressed the driver side KDSS actuator so the passenger side mount could be refitted. The same owner puts the whole job at about 5 hours in a driveway and calls the power steering pump refit the slowest step.
A second owner account adds useful detail for the same route. The top alternator bolts are reachable through the wheel well, the bottom bolts are crowded with the sway bar in place, and removing the radiator with the bumper off gives the most room for solo work. That owner chose the top path for a one-person job because refitting the front sway bar is easier with a second person.
Treat the bottom path as a trade. You save the coolant drain and the radiator labor, and you take on sway bar and KDSS hardware that sits under load. Work on stands, keep hands clear of the actuator as it compresses, and have a second person for the sway bar refit if you can. The factory path stays the safer default for a first attempt at this job.
2024 and up GX550: replacing the generator
The GX550 generator comes out the side. The front wheel and the fender apron trim come off on the ground side, the fan shroud and the intake air tube come off on the engine side, and the radiator stays in the truck. Two suppliers build the unit, DENSO and VALEO, and the removal order is the same for both.
The GX550 also talks to its generator. The engine computer sets the generated voltage over a data line and reads the alternator output duty ratio and reported voltage in scan data. A scan tool active test can command the alternator voltage between 12.5 and 14.8 V on a stopped truck. Run that test before removal when the charging values are close to the line, because it separates a control fault from a worn unit.
Step 1. Disconnect the negative battery cable. Give the truck its waiting time after shutdown first. Support the truck on stands for the wheel work that follows.
Step 2. Remove the front wheel and the front fender apron trim packing. The generator is reached through the opening the trim covers.
Step 3. Disconnect the engine wire and remove the fan shroud. Then remove the No. 1 air tube assembly and the No. 1 air hose. Disconnect the water inlet pipe where it crosses the work area.
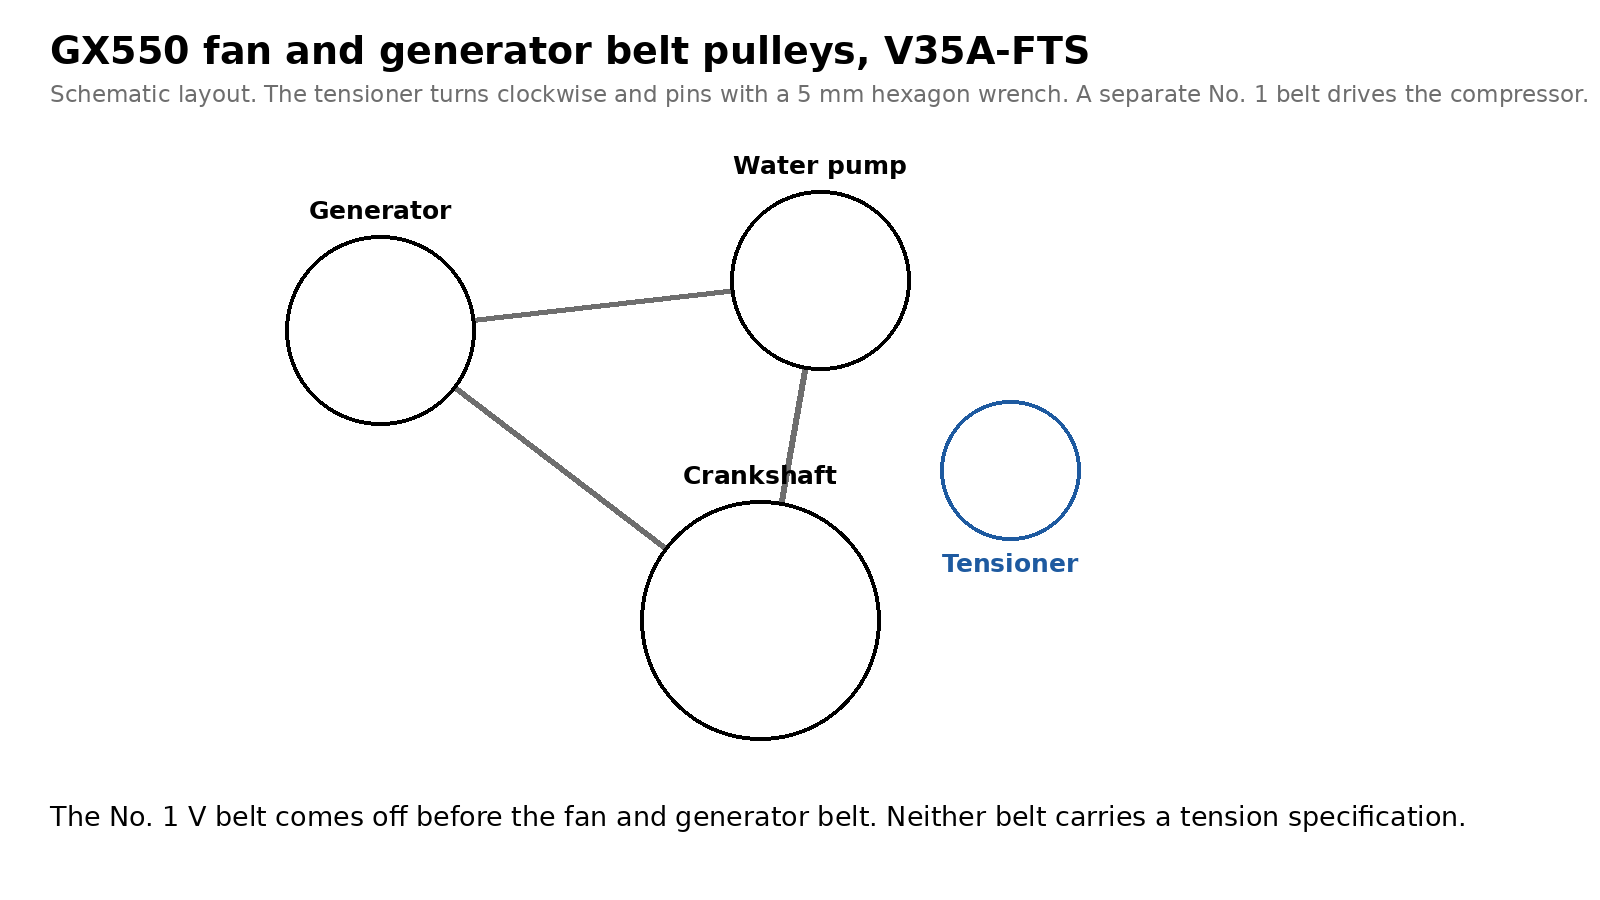
GX550 Fan and Generator Belt Pulleys
Step 4. Remove the generator. Disconnect the generator connector. Remove the terminal nut and disconnect the engine wire at terminal B. Remove the 2 bolts and the 2 nuts, then remove the 2 stud bolts with an E8 Torx socket and lift the generator out.
Step 5. Install the generator. Set the generator on its stud bolts first and torque the stud bolts to 7 ft·lbf (10 N·m). Fit the 2 bolts and the 2 nuts at 32 ft·lbf (43 N·m). Connect the engine wire at terminal B with its nut at 9 ft·lbf (12 N·m). The engine wire fasteners in the installation figure torque to 15 ft·lbf (20 N·m) for bolt A and 7 ft·lbf (10 N·m) for bolt B, and the wire connection at the generator torques to 7 ft·lbf (10 N·m). Connect the generator connector.
Step 6. Refit the pipe, tubes, and shroud. Connect the water inlet pipe at 15 ft·lbf (21 N·m). Install the No. 1 air hose and the No. 1 air tube assembly. Install the fan shroud and connect the engine wire.
Step 7. Refit the trim and wheel, then reconnect and retest. Install the fender apron trim packing and the front wheel. Reconnect the negative battery cable. Systems that lost power relearn on first use, and the power back door completes its learning after one full close by hand. Run the full test order from this guide, and read the alternator output duty ratio in scan data on the road test.
The GX550 runs two belts. The fan and generator V belt runs over the generator, the water pump, and the crankshaft pulley with an automatic tensioner. The No. 1 V belt drives the A/C compressor on its own tensioner. Both tensioners release clockwise and pin in place with a 5 mm hexagon wrench, and the No. 1 belt comes off before the fan and generator belt. Neither belt carries a deflection or tension specification, because the tensioners set the tension.
Parts and tools
| Part | GX470 | GX460 | GX550 |
|---|---|---|---|
| Alternator | 130 A. 27060-50320 through 07/2006 production, 27060-50360 from 07/2006 production, one remanufactured listing covers both numbers | 130 A: 27060-38080. 150 A: 27060-38090 for 2010 to 2013, 27060-38110 for 2014 to 2023 | 27060-0W070, alternator assembly with regulator |
| Drive belt | 90916-02586 for 2003 to 2004, 90916-02585 for 2005 to 2009 | 90916-A2033 | Fan and generator V belt plus No. 1 V belt for the compressor. Order both by VIN |
| Belt tensioner assembly | 16620-0W101, with 16620-0W100 as the earlier number in the same chain | 16620-0S012, sold in a kit with the 90916-A2033 belt | Automatic tensioners on both belts |
| Brush holder assembly | 27370-20130, through the middle of the run | 27370-27060 | DENSO unit takes a brush holder. VALEO brushes are part of the regulator assembly |
Tools. A digital multimeter covers the voltage tests, the fuse checks, and the rotor resistance checks if you bench test the old unit. A clamp meter or a battery and charging tester covers the current tests without breaking the B terminal connection. The belt work needs a long wrench or breaker bar for the tensioner, and the GX550 belts need a 5 mm hexagon wrench to pin the tensioners. The generator work needs standard sockets, an E8 Torx socket for the GX550 stud bolts, a torque wrench that reads accurately in the 7 to 32 ft·lbf range and down into in·lbf for the wire nuts, and a hook or bungee for the vane pump. Top the power steering reservoir with ATF if the pump work spills any fluid. A Home Mechanic can substitute a parts store charging test for the clamp meter step, because most large parts stores will run a charging system test at the counter or in the parking lot at no charge.
Common mistakes
Replacing the battery and the alternator in the same visit with no tests. The GX470 owner cases include trucks that went through several batteries and alternators in a few months because the underlying fault was never isolated. Test in order and change the part the tests condemn.
Trusting idle voltage alone. A weak generator can hold a fair voltage at idle with no load and fall apart at 2,000 rpm under load. The loaded current test is the step that separates a tired unit from a healthy one.
Letting the vane pump hang by its hoses. The pump is heavy and the hoses are old. Support it with a hook or a bungee every time it comes off its bolts.
Forcing the GX460 pump back into its bracket. Owners report a tight fit and a sliding threaded bushing that can refuse to move. Clean the bushing and the boss, align the pump by hand, and draw it in with its bolts evenly.
Ordering a GX550 generator by year alone. Two suppliers and two output types cover the same truck. Read the make and the rating off the old unit, and order by VIN.
Skipping the retest. Every replacement ends with the no-load voltage test and the loaded current test. A new unit with a loose B terminal nut or a belt sitting one groove off will pass a start test and fail on the road.
Opening the power steering lines when the job does not need it. Both V8 procedures move the vane pump with its hoses attached. Keep the system closed and the job stays an alternator job.
FAQ
Q: What voltage should a GX alternator put out?
13.2 to 14.8 V at 2,000 rpm with no electrical load on the GX470 and the GX460. The GX550 range is 13.5 to 14.35 V at the same speed, with no-load current at 10 A or higher. Below the range, run the loaded current test. Above the range, regulation has failed.
Q: My GX whines and the battery light is off. Is the alternator still the suspect?
Yes. Owners report the whine arriving first, with voltage dropping later and the warning staying off in some cases. Run the test order. A whine that tracks engine speed with charging values in range points at the bearings, and a bearing failure ends the same way on its own schedule.
Q: Does a GX460 alternator really need the radiator out?
The factory procedure removes the radiator assembly, and that step is most of the labor. Owners have also done the job through the bottom with the front sway bar drooped and the radiator in place. That path trades the coolant work for sway bar and KDSS work under load.
Q: Which GX460 alternator rating does my truck take?
GX460 trucks use a 130 A type and a 150 A type. The equipment on the truck decides, the 150 A unit pairs with the dual automatic air conditioning equipment, and an owner with three-zone air conditioning reports the 150 A unit. Order by VIN and compare the rating on the old unit at the counter.
Q: Which GX550 generator does my truck take?
GX550 generators come from two suppliers, DENSO and VALEO, in 200 A and 240 A output types. The service data differs by supplier, down to the brush minimums. Read the make off the old unit before you order, and order by VIN.
Q: Can I test the alternator by pulling the battery cable with the engine running?
No. Disconnecting the battery with the engine running can damage the truck electronics. Use the voltmeter tests in this guide. They give you a number you can act on, and they carry no risk to the truck.
Q: The battery keeps dying overnight and the charging tests pass. What is next?
A parasitic drain test. A charging system that passes the loaded test has done its job, and a battery that dies parked has a load that stays awake. The drain test works through the fuse circuits with a multimeter in series on the negative cable after the truck goes to sleep.
Q: Should I replace a working alternator before a long trip?
Decide from the tests. A quiet unit that passes the loaded current test has earned its place. A high-mileage unit with a new whine, a hot smell, or a timing belt job already opening the front of a GX470 engine is a reasonable preventive change, and the take-off unit makes a good spare if it passed.
Sources
- GX470 factory manuals
- GX460 factory manuals
- GX550 repair manuals
- IH8MUD, How do alternators on the GX470 fail: forum.ih8mud.com
- IH8MUD, 2010 Alternator replacement: forum.ih8mud.com
- IH8MUD, GX460 and Prado 150 picture thread, alternator failure post at 160,000 miles: forum.ih8mud.com
- IH8MUD, Alternator Replacement, 100-series Land Cruiser with the 2UZ-FE: forum.ih8mud.com
- YourMechanic, Lexus GX460 alternator replacement estimates: yourmechanic.com
Leave a Reply