What the inner fender apron is and where the damage forms
Open the hood and look down along the left and right edges of the engine bay. The metal panels you are looking at are the inner fender aprons. Each one forms the inner wall of a front fender, runs from the firewall at the back of the bay toward the front of the truck, and passes over the front wheel on its side.
Ten minutes with the hood up. That is the whole cost of this check, and it can save you a truck.
The aprons have stamped shapes in the metal, and the stamped crumple zone ripples are part of that shape. You can see both aprons from above with the hood open, and the full check uses that access.
Damage on these trucks forms in a small number of places.
| Location | Where to look |
|---|---|
| Inner upper portion of the fender, inside the engine bay | Pop the hood and inspect that inner upper portion for bulging or tearing. AutoTrader.ca directs buyers to this check |
| Stamped crumple zone ripples, about 10 inches from the firewall | Go-Parts places typical apron cracks near the ripples, and the problem can begin as a bulge or dimple before a crack appears |
| Area near the hood struts | UseCarScout reports that early 2007 and some early 2008 trucks developed cracks and bulging in the aprons near the hood struts |
| Inner forward part of the door openings, near the hinges | Leave the engine bay. AutoTrader.ca directs buyers to inspect this area for bulging or tearing |
Owner reports in the NHTSA structure category for the 2007 FJ Cruiser give the same locations in owner words. One report describes cracks on both inner fenders at the crumple dimples, about 4 inches long, noticed at about 39,500 miles with no accident. Another describes cracks on both sides directly above each upper wheel well at about 18,000 miles. A third describes aprons cracked in under 20,000 miles.
Eighteen thousand miles. So much for the idea that a low odometer clears an early truck.
The collection holds 22 structure problems reported for the 2007 model year, and several of those reports describe both sides of the truck. Check the aprons as a pair, always. A clean left side tells you nothing about the right.
Five stages, in the order the metal goes.
| Stage | What it is |
|---|---|
| Bulge | A raised area in the apron metal |
| Dimple | An early shallow form of that raised area at the ripples |
| Cracked paint | Paint that has split over a raised area while the metal underneath still forms a closed surface |
| Open crack or rip | A visible separation in the metal itself |
| Torn or separated metal | A wider failure where the metal has pulled apart |
Changed door gaps belong in the same inspection. The door opening check points sit near the apron structure, and a door gap that differs from the gap on the other side gives you a second measurement to record. The grading table later in this guide uses those five stages in that order.
Jalopnik describes the sequence in direct terms. Pre-2010 FJ Cruisers had an issue with inner fenders bulging, and the bulging leads to a structural crack on the inner fender wall. AutoTrader.ca links the damage to weak fenders and fender supports in earlier models, and to strong twisting forces in off-road use.
Then the owner reports spoil the tidy version. Several describe bulges and tears with normal driving and no off-road use at all. A clean off-road history on a listing changes nothing. You check the metal on the truck in front of you and write down what it shows.
I had a 2008 FJ Cruiser in the shop a while back, a clean street truck whose owner swore it had never left pavement, and the passenger side apron was already waving at the ripples. The habit stuck with me: Toyota sheet metal from this period tells you the truth early, as long as you look at it clean, dry, and in raking light.
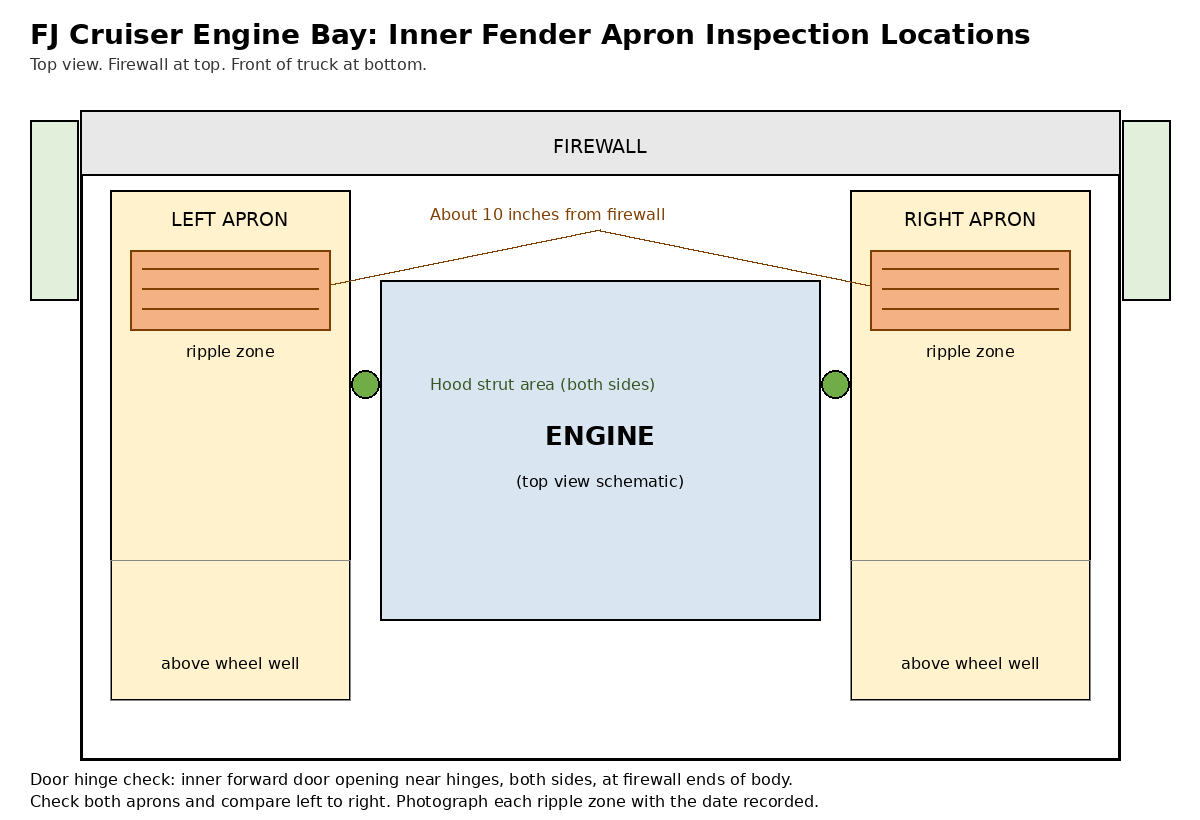
Inspection locations. Both aprons, both ripple zones, the hood strut areas, and the door hinge points, on every truck.
Which trucks to check hardest
Every FJ Cruiser from 2007 to 2014 gets the apron check. The check takes a short time with the hood open, and reports of the condition exist across production years. Go-Parts states that the condition is more common on 2007 to 2008 models that saw heavy use, while reported across production years.
That spread is why the check covers the full run. Limit the check to the earliest trucks and you miss the later reports. Skip it on a clean looking later truck and you give up a short inspection for no reason.
Trucks from 2007 to 2009 get the closest attention. Jalopnik frames the bulge issue as a pre-2010 issue. UseCarScout reports cracks and bulging on early 2007 and some early 2008 trucks near the hood struts and directs buyers to check that area on any pre-2009 truck. AutoTrader.ca links the damage to earlier models. The NHTSA structure collection for the 2007 model year alone holds 22 reported structure problems, with low mileage failures at about 18,000 miles and under 20,000 miles alongside a report at about 39,500 miles.
Mileage gives you no clearance. A low mileage 2007 to 2009 truck gets the same full inspection as a high mileage truck from those years.
The sources disagree on the cutoff year, and the disagreement is worth printing because you will hear all three versions from sellers. AutoTrader.ca states that the issue seems to have been addressed from 2009 onward and advises choosing a 2009 or later model where possible. UseCarScout describes a factory design flaw corrected mid-production after the early trucks, and treats the 2010 model year as a dividing line with a redesigned inner fender apron for 2010. Jalopnik uses the pre-2010 frame.
Three placements: 2009, a mid-production point after the early 2008 trucks, and 2010. Your response is simple. Inspect every 2007 to 2009 truck in person, and clear no truck by model year alone. A seller telling you his truck is “after the fix” is telling you a story. The metal is the document.
Trucks from 2010 to 2014 get the same check during a general purchase inspection, same locations, same order, same grades. The difference is in the decision weight. A clean 2010 to 2014 truck with clean aprons, clean door openings, and a clean frame rust check moves forward with the apron item closed for that visit.
A 2010 to 2014 truck with a bulge or a crack receives the same grading and the same body shop step as an earlier truck with the same finding. The year changes your expectation going in. It changes nothing about metal that has already moved or split.
The sister platform inspection method in the Truck Garage buying coverage applies here in approach. The ultimate GX buying guide works a truck in a fixed order, records findings as the inspection proceeds, and separates a clean truck from a truck that needs a shop quote before money changes hands: The Ultimate GX Buying Guide.
This guide follows the same working method for one specific failure area, and adds the frame rust companion check that the FJ shares with the GX as a purchase risk.
Parts and tools
Read the inspection steps before you gather tools. The list covers the inspection, the accident cross-checks, and the record with dates. Every item serves a named step in this guide.
| Item | Used for |
|---|---|
| LED inspection light, rechargeable magnetic work light, 2-pack | Lighting the aprons at a low angle so bulges and paint cracks cast shadows you can see |
| Flashlight, rechargeable LED work light for mechanics | General engine bay light and the frame rust companion check |
| Telescoping inspection mirror, NoCry heavy duty | Viewing the far side of the apron surface and the areas behind the hood strut mounts |
| Paint thickness gauge, CM-205FN coating thickness gauge | The accident cross-checks. Readings that differ from side to side support a prior repair explanation |
| Borescope camera, DEPSTECH dual lens endoscope, 16.5 ft | Viewing apron pockets and frame pockets that direct light and a mirror cannot reach |
| Camera phone | Photographs with the date recorded of each ripple zone, each door opening, and every finding the grading table records |
| Notebook and pen | The inspection record with dates: year, mileage as shown, grade per side, door gap notes, and photo references |
| Microfiber cleaning cloths, 24-pack and Simple Green foaming all-purpose cleaner, 2-pack | Cleaning and drying the aprons before inspection so dirt and moisture hide nothing |
| Ball peen hammer, Estwing 8 oz and wire brush set, WORKPRO 6-piece | The frame rust companion check only, for sounding and cleaning small frame areas |
| Work gloves, Mechanix Wear Original and safety glasses, NoCry clear | Hand and eye protection during cleaning and during the frame rust companion check |
The inspection
- Park the truck on level ground in good light, open the hood, and secure the hood. Confirm the engine bay is cool enough to work in, and keep hands clear of moving parts if the engine runs for any other check.
- Clean both inner fender aprons with a rag and a mild cleaner, then dry both aprons fully. Dirt, road film, and moisture hide shallow bulges and fine paint cracks, so the inspection starts only when both surfaces are clean and dry.
- Stand at the front of the truck and view both aprons together. Note any area where one side is higher, is flatter, or has a different surface shape than the matching area on the other side. Write that first impression in the notebook before close work begins.
- Move to the left apron. Find the stamped crumple zone ripples about 10 inches from the firewall and run a flat hand lightly across the ripple area to feel for a raised area or a shallow dimple. Repeat the same hand pass on the right apron at the matching location.
- Set the inspection light at a low angle across the left ripple zone so the light rakes the surface. A bulge casts a shadow line under raking light that overhead light hides. View the area from two positions, then repeat the low angle light pass on the right ripple zone.
- Check the paint at each ripple zone at close range. Look for paint that has split in short lines over a raised area, and record cracked paint as its own finding even when the metal surface still forms a closed surface. Use the mirror to view the far side of the apron surface at each ripple zone.
- Check the apron area near the hood struts on both sides. UseCarScout places early truck cracks and bulging near the hood struts, so give that area the same low angle light pass and the same hand pass as the ripple zones.
- Check the apron surface directly above each upper wheel well on both sides. Owner reports in the NHTSA collection describe cracks on both sides at that location, so include that surface in the light pass and the hand pass for each side.
- Close the hood and move to the door openings. Inspect the inner forward part of each door opening near the hinges for bulging or tearing in the metal, following the AutoTrader.ca inspection points. View each hinge area with the door open and with the flashlight aimed along the surface.
- Check the door gaps on both sides with the doors closed. Compare the gap along the front edge of the left door with the gap along the front edge of the right door, and compare the top and bottom gap widths on each door. The factory manual prints clearances for 12 points around the front door, and the front edge standard is 4.0 to 7.0 mm (0.157 to 0.276 in.). Record any gap outside that range, any gap that differs from the matching gap on the other side, and the difference in the notebook in plain words.
- Photograph every finding with the camera phone, and record the date for each photograph in the notebook next to the grade for that side. Photograph each ripple zone even when the grade is clean. A clean photograph with the date recorded sets the baseline for an owner who will monitor the truck later.
- Check each apron for signs of prior repair. Look for weld marks, filler under paint, fresh paint over a ripple zone, and surface texture that differs from the matching area on the other side. Record each sign you find, and grade the truck from the metal condition together with the repair signs.
- Run the accident cross-checks in the accident section of this guide on the same visit. Take paint thickness readings at matching points on both aprons and at matching points on both front fenders, look for overspray on nearby parts, and compare bolts and fasteners from side to side for replaced bolts and mismatched fasteners.
- Run the frame rust companion check in the companion section of this guide. The frame rust guide gives the full method, and this visit needs at least the visual pass, the hammer sounding at suspect areas, and a borescope view into frame pockets where access allows: GX Frame Rust Inspection and Treatment.
- Grade each side from the grading table in the next section, assign the truck the higher of the two side grades for decision purposes, and record the date, the truck year, the mileage as shown, and the seller history notes on the same notebook page as the grades.
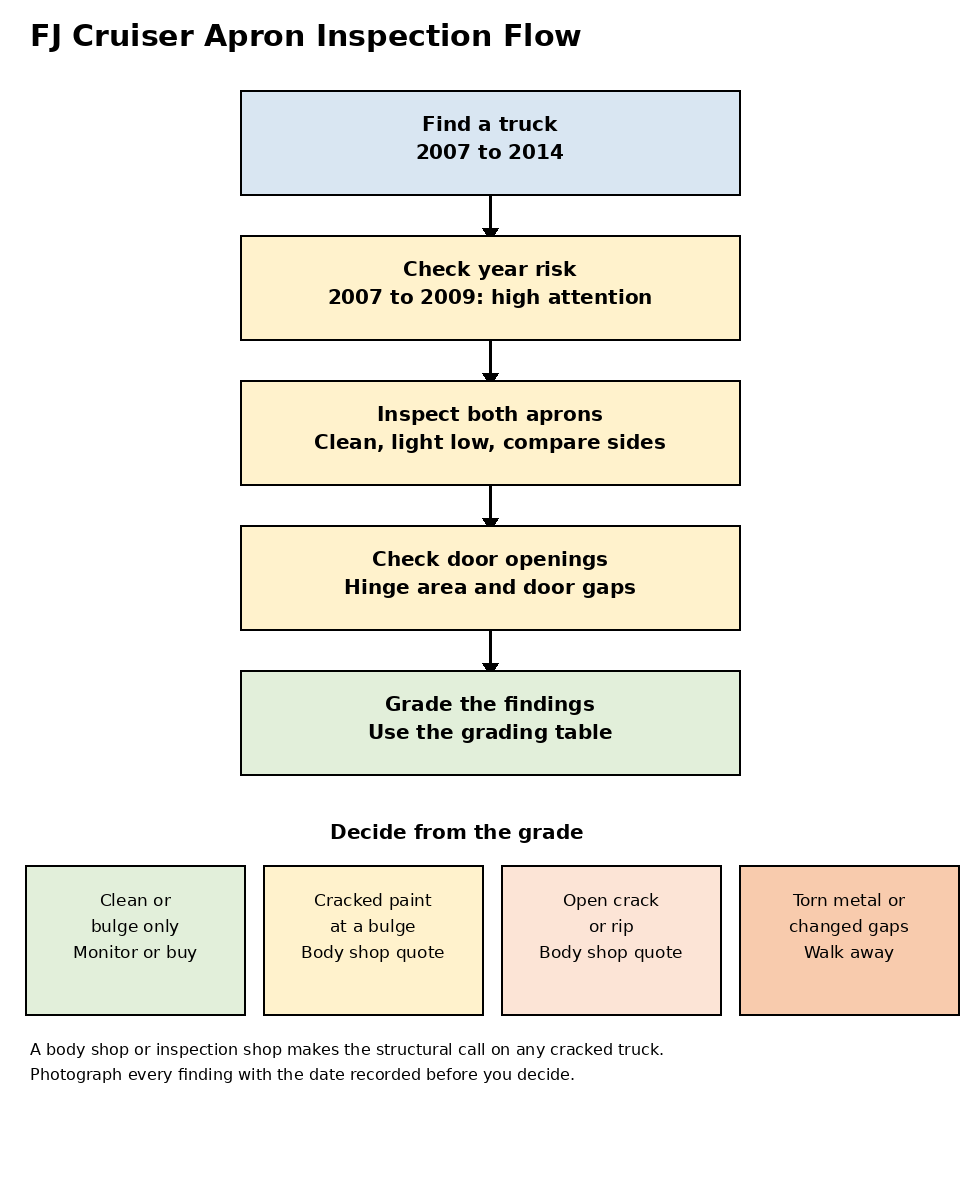
Inspection flow. The year check sets your attention, the two apron inspections set the grade, and the grade sets the decision.
How to grade what you find
Grade each side on its own, then use the higher grade for the purchase or ownership decision. The table gives five grades in the order the damage develops. Go-Parts states that the problem can begin as a bulge or dimple before a crack appears, and Jalopnik describes bulging that leads to a structural crack on the inner fender wall. The table follows that order and adds the paint stage and the door gap stage that the inspection steps record.
| Grade | What it looks like | What it means for the purchase or ownership decision | Next step |
|---|---|---|---|
| Clean | The apron surface is flat at the ripples, the paint is intact, the door gaps match from side to side, and the hinge areas show no bulge or tear | The apron item closes for this visit. The truck still needs the rest of a full purchase inspection, including the frame rust check | Record the grade with photographs and the date for each photograph, and proceed with the rest of the inspection |
| Bulge only | A raised area or shallow dimple is at a ripple zone or near a hood strut, and the paint over the area is intact with no split lines | The truck is at the early stage the sources describe. You treat the truck as a monitor candidate and price it with that record in mind. An owner starts the photo record with dates | Photograph the bulge with the date recorded, measure its position against the ripple zone in the notebook, and set a repeat check date |
| Cracked paint at a bulge | A raised area has short split lines in the paint over the bulge, and the metal surface still forms a closed surface at close range | The surface has moved enough to split the paint. You move the truck into the body shop quote group before purchase. An owner books a body shop structural assessment | Photograph the paint cracks at close range, record the length and position in plain words, and call a body shop for an assessment before purchase or hard use |
| Open crack or rip | A visible separation runs through the metal at a ripple zone, above a wheel well, or near a hood strut, and the edges of the separation can be seen as separate edges | The bulge stage has become the crack stage Jalopnik describes. You require a body shop structural assessment and a written quote before any purchase decision. An owner stops hard use until a shop grades the truck | Record the crack position and approximate length, photograph both sides of the area where access allows, and make the body shop call before purchase or hard use |
| Torn or separated metal or changed door gaps | The metal has torn or pulled apart, or a door gap differs from the matching gap on the other side, or the hinge area shows tearing | The truck has the strongest findings in this guide. You treat the truck as a walk away candidate unless a body shop grades the truck in person and you accept the shop path in writing. An owner books a structural assessment before further regular use | Stop the purchase process at that truck until a body shop grades it in person, and record the door gap difference and the tear position with photographs and the date for each photograph |
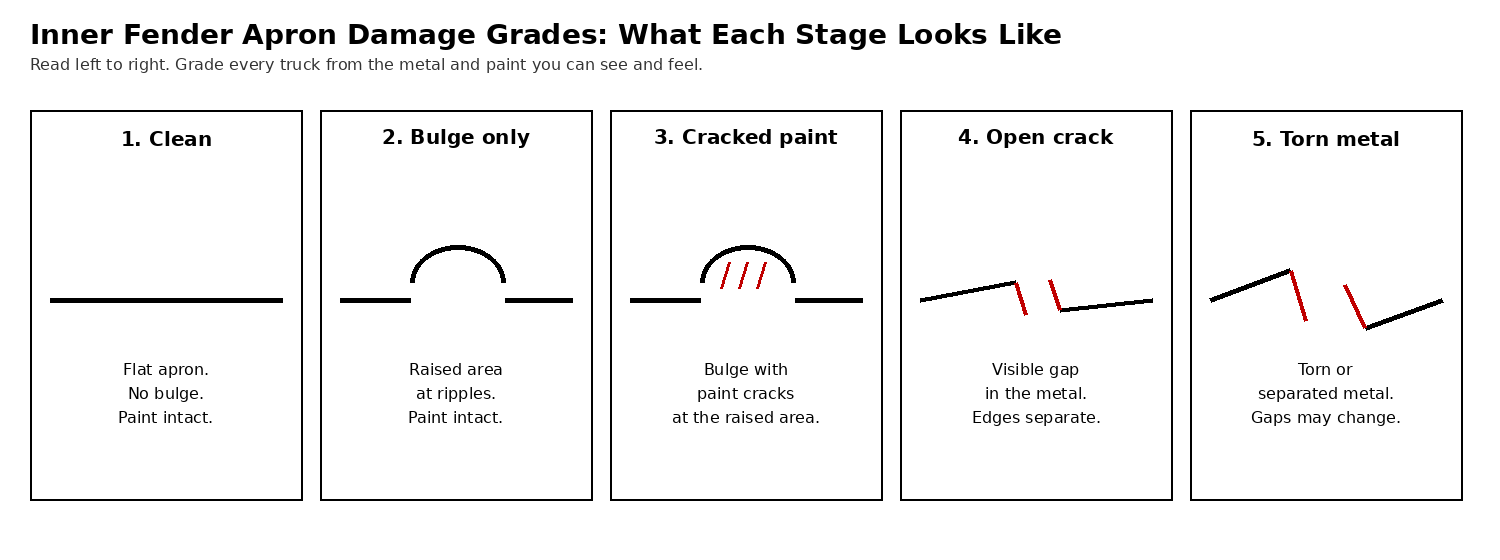
Damage grades. The five stages run from a flat apron with intact paint to torn metal with separated edges.
Decision rules for buyers
Your decisions follow the grade, and the grade follows the metal. The rules below sort trucks into three groups. A truck moves between groups only when a body shop assessment or a deeper inspection changes the recorded findings. A seller explanation changes no group on its own.
Run the VIN for open recalls as part of your general purchase work. The check covers whatever open items apply to that specific truck.
Walk away signs close the purchase at that truck unless you choose to involve a body shop in person and accept a shop path in writing.
| Walk away sign |
|---|
| Open cracks with torn or separated metal |
| Changed door gaps paired with apron damage |
| Bulges or tears at the inner forward door opening near the hinges, paired with any apron crack |
| Damage on both aprons at the open crack grade or higher |
A truck with damage on both aprons at that grade belongs in this group for most buyers, because the field technician report in the sources recommended replacement of both front inner fenders for a verified bulge case, and a both sides crack case presents at least that scale of shop work.
A truck where the seller refuses a body shop assessment or a full mechanical inspection also belongs in this group. You cannot grade what you cannot inspect, and the refusal settles it.
Negotiate with a body shop quote signs keep the truck in play under a condition. Cracked paint at a bulge belongs in this group. A single open crack or rip with no door gap change and no tear belongs in this group, with the condition that a body shop grades the truck and gives a written quote before purchase. A bulge paired with accident cross-check signs that suggest prior repair belongs in this group until the body shop separates the apron condition from the repair history.
The negotiation uses the shop quote as its basis: the actual quote for that truck, in that market, at that time. Record the quote in the notebook next to the grade.
Monitor signs describe trucks you can purchase with a record and a plan. A clean grade belongs in this group with no apron condition attached. A bulge only grade with intact paint, matching door gaps, and clean hinge areas belongs in this group when you accept the monitoring work in the owner section of this guide. Photograph the bulge with the date recorded before purchase where access allows, repeat the photographs on the owner schedule, and book a body shop assessment if the grade changes at any repeat check.
If you know you will skip the monitoring work, treat a bulge only truck as a negotiate group truck instead. An unmonitored bulge gives you no record to act on when the paint splits or the metal opens.
What owners with a bulge do
You own the truck and the inspection found a bulge only grade. Start with a record. Photograph each bulge with the date recorded, note the position against the ripple zone or the hood strut area in plain words, and store the photographs where a later pass can sit beside them for comparison. Repeat the clean, dry, and low angle light steps from the inspection on a regular schedule and after any hard off-road use, because AutoTrader.ca links the damage to strong twisting forces in off-road use.
Each repeat pass gets its own photographs with the date recorded and its own notebook line. A bulge that looks the same across several passes stays in the monitor group. A bulge that grows, splits its paint, or opens into a crack changes grade, and the grade change triggers the body shop step.
Cracked paint at a bulge means you book a body shop structural assessment. Cracked paint shows that the surface moved enough to split the coating, and the assessment tells you whether the metal under that paint still forms a closed surface or has started the crack stage. Bring the photographs with dates recorded and the notebook record to that visit. The history of the finding helps the shop grade the rate of change, and a timeline is what separates “watch it” from “schedule it.”
Ask the shop to check both aprons during the same visit. The owner reports describe both sides in several cases, and a shop pass over one side alone can miss the matching early stage on the other side. Half a look is half a look.
An open crack, a rip, torn metal, or a changed door gap ends the monitoring pattern. Book the structural assessment before hard use and before any long trip, and keep the truck to normal driving until the shop has graded it.
When a shop grades your truck, record the grade, the shop name, and the date in the same notebook that holds the inspection record. One continuous history, from the first bulge photograph forward.
Inner fender replacement is the extensive shop path in the sources. The May 14, 2010 owner report in the NHTSA collection describes a driver side bulge at the crumple zone where a Toyota field technician verified the bulged inner fender and recommended replacement of the right and left front inner fenders. A separate owner report describes an apron repair as requiring extensive dismantling. Replacement is a shop path a body shop may recommend after an in-person assessment, with both sides in scope in the field technician case.
If a shop recommends replacement, get three answers in writing before you authorize work: which sides the recommendation covers, what surrounding parts the job would move or remove, and what the truck needs after the job for alignment of panels and door fit. The factory standards in the next section give you the numbers that last answer is measured against.
Reinforcement appears in the secondary coverage of this condition as an aftermarket path. Treat it as a shop conversation rather than a driveway project. The shop that graded your truck can state whether reinforcement suits the grade on that truck or whether the grade calls for a different path, and that answer belongs in the same written record.
Factory panel fit standards
The FJ Cruiser factory service manual prints clearance standards for the hood and the front doors, and the figures hold unchanged across the manuals for the full 2007 to 2014 run. After apron work, a shop sets the panels back to these numbers. You can check the result with a ruler and a careful eye before you pay the bill.
| Part | Factory standard |
|---|---|
| Hood side gap | 4.0 to 7.0 mm (0.157 to 0.276 in.) |
| Hood height against the fender | 1.4 to 4.4 mm (0.055 to 0.173 in.) difference |
| Hood front edge gap | 5 to 8 mm (0.197 to 0.315 in.) |
| Front door front edge gap | 4.0 to 7.0 mm (0.157 to 0.276 in.) |
| Hood hinge bolts | 10 ft·lbf (13 N·m) |
| Hood lock bolts | 71 in·lbf (8.0 N·m) |
| Front door hinge bolts | 19 ft·lbf (26 N·m), at the body and at the door |
The door table in the manual covers 12 points around the front door, and most of the gaps fall between 3.5 and 7.6 mm. The front edge figure in the table above is the one this guide uses, because that edge faces the fender and the apron behind it. The manual also prints the adjustment method behind the numbers: the hood and the doors hang on centering bolts from the factory, adjustment starts by swapping those for standard bolts with washers, then the gaps get set, then the bolts get torqued to the figures in the table.
Accident damage separation
The same signs can point to a previous accident. AutoTrader.ca states that point directly in its FJ Cruiser review, and the statement changes how you grade a truck. A bulge, a crack, or a tear from the design and use pattern in the main sections enters a different purchase discussion than the same shape produced by a collision and a repair. A truck can hold both histories at once.
You separate the two explanations with cross-checks that run at inspection depth during the same visit. The cross-checks support or weaken the accident explanation. They settle nothing on their own, and the body shop assessment settles the question on any truck where the apron grade and the accident signs arrive together.
Paint thickness readings form the first cross-check. Take readings at matching points on the left and right aprons and at matching points on the left and right front fenders, and record each reading in the notebook. Readings that match closely from side to side support a factory paint explanation for both sides. Readings that differ in a clear way support a repair explanation for the side with the differing readings, because repair work commonly adds material or replaces a panel and changes the coating thickness at that area.
A differing reading at a bulge location deserves a notebook note that pairs the two findings. A repaired panel can also bulge or crack later, and the body shop will want both facts at the assessment.
Overspray forms the second cross-check. Look for paint mist on parts that factory paint work would leave clean, including rubber seals near the fender edges, fasteners inside the engine bay near the aprons, and the edges of nearby plastic parts. Overspray near one apron supports a repair explanation for that side.
Clean surrounding parts support the factory explanation, with the limit that careful repair work can leave little overspray. Record what the visit found rather than what the visit assumed. A clean overspray check on a truck with differing paint readings still leaves the readings in the record.
Replaced bolts and mismatched fasteners form the third and fourth cross-checks. Compare the bolts along each apron and at each fender edge from side to side. A bolt with fresh tool marks, a bolt with a different finish than its neighbors, or a fastener that differs in type from the matching fastener on the other side supports a removal and refit explanation for that area.
Factory assembly tends to leave matching fasteners in matching condition across the two sides of the same truck. Repair work tends to disturb one side. Photograph any replaced bolt or mismatched fastener and record the date. A seller discussion about repair history goes better with a photograph than with a memory of a bolt.
Companion checks on the same visit
Frame rust is the bigger FJ Cruiser purchase risk in the companion coverage, and Jalopnik lists frame rust across the production run among its used FJ watch items. Spend the full visit on the aprons and skip the frame, and you can purchase a truck with clean aprons over a frame that fails the purchase on its own. The frame rust companion check therefore runs on the same visit as step 14 of the inspection. The Truck Garage frame rust guide gives the full method for checking, treating, and preventing frame rust, and you should work from that guide for the complete frame pass: GX Frame Rust Inspection and Treatment.
At minimum on a first visit, view the frame rails and crossmembers with the flashlight, sound suspect areas with the small ball peen hammer after cleaning with the wire brush, check pockets with the borescope where access allows, and record frame findings on a separate notebook page from the apron grades. A truck with a poor frame grade leaves the purchase process regardless of the apron grade. A truck with a clean frame and a poor apron grade follows the apron decision rules.
Drivetrain vibration and a faulty driveshaft are headline watch items from the same Jalopnik coverage, which lists drivetrain vibration, shaky steering, and a faulty driveshaft as other watch items for a used FJ Cruiser. On a test drive, note any vibration that arrives at highway speed, any steering shake that repeats at the same speed, and any change in those signs between acceleration and steady cruise, and record those notes for the full mechanical inspection.
The Truck Garage highway vibration guide works through a method for separating tire, wheel, and driveline causes on the GX, and you can use the same separation logic during the mechanical inspection discussion: GX Highway Vibration Diagnosis. A vibration finding changes no apron grade, and an apron finding explains no vibration. The two records travel together to the inspection shop as separate items.
Stop conditions
Open cracks stop the purchase process at that truck until a body shop grades the truck in person. If you find an open crack or a rip in either apron, make the body shop call before purchase. If you own the truck, book the structural assessment before hard use.
The reason follows from the sources in plain terms. Jalopnik describes bulging that leads to a structural crack on the inner fender wall, so an open crack is the stage where the design issue has reached the structure in the language of the coverage itself.
Tears and separated metal stop the process in the same way. Torn metal at a ripple zone, above a wheel well, near a hood strut, or at the door opening near the hinges earns the body shop call before purchase or hard use. Separated edges can move under load, and only an in-person shop grade can state what load the surrounding structure still supports.
Photograph the tear, record its position and approximate size, and avoid pressing or pulling at separated edges during the inspection. The inspection needs the metal as found, and the shop needs the same condition to grade.
Changed door gaps paired with apron damage stop the process in the same way. A door gap that differs from the matching gap on the other side, arriving together with a bulge, cracked paint, an open crack, or a tear on the same side, earns the body shop call before purchase.
The door gap finding on its own, with clean aprons and clean hinge metal, earns a notebook record, a seller question, and coverage during the full mechanical inspection. The pairing is the trigger, because the pairing suggests that metal movement has reached the door opening area that the AutoTrader.ca inspection points cover.
A bulge alone triggers monitoring and a repeat check schedule. A bulge alone with intact paint, matching door gaps, and clean hinge areas has no stop rule here. If you want a shop view on a bulge before purchase anyway, the decision rules give you the negotiate group for exactly that truck.
FAQ
Which FJ Cruiser years need the closest inner fender check?
Trucks from 2007 to 2009 need the closest check. Jalopnik frames the bulge issue as a pre-2010 issue, UseCarScout reports cracks and bulging on early 2007 and some early 2008 trucks, and AutoTrader.ca links the damage to earlier models. Sources disagree on the cutoff year, with placements at 2009, at a mid-production correction after the early 2008 trucks, and at a 2010 redesign. Inspect every 2007 to 2009 truck in person and clear no truck by model year alone.
Where exactly do the cracks form on the apron?
Owner reports and location descriptions place the damage at the stamped crumple zone ripples about 10 inches from the firewall, near the hood struts, and directly above each upper wheel well. One owner report describes cracks on both inner fenders at the crumple dimples about 4 inches long. AutoTrader.ca adds the inner forward part of the door openings near the hinges as a second area to inspect for bulging or tearing.
Can a 2010 to 2014 FJ Cruiser have this damage?
Yes. Reports of the condition exist across production years, and Go-Parts states that the condition is more common on 2007 to 2008 models that saw heavy use while reported across production years. A 2010 to 2014 truck receives the same apron and door opening check during a purchase inspection. A clean later truck closes the apron item for that visit, and a later truck with a bulge or a crack follows the same grading and body shop steps as an earlier truck.
Does a bulge mean the truck had an accident?
A bulge alone settles nothing about accident history. AutoTrader.ca notes that the same signs can also point to a previous accident, and the same review links the damage to weak fenders and fender supports in earlier models and to strong twisting forces in off-road use. Several owner reports describe bulges and tears with normal driving and with no off-road use. The accident cross-checks in this guide, paint readings that differ from side to side, overspray, replaced bolts, and mismatched fasteners, help you separate the explanations at inspection depth.
What should a buyer do after finding an open crack?
Stop the purchase process at that truck and call a body shop for a structural assessment and a written quote before any purchase decision. Record the crack position and approximate length and photograph the area with the date recorded. Torn or separated metal and changed door gaps paired with apron damage have the same stop rule. The factory standard for the front edge gap of the front door is 4.0 to 7.0 mm, so a changed gap is a measurable finding, not an opinion. A buyer who purchases first owns the finding at whatever grade the shop assigns later, with no seller in the discussion.
What does an owner with a bulge only do first?
Start a record with dates. Photograph the bulge with the date recorded, note the position against the ripple zone or the hood strut area, and repeat the clean, dry, and low angle light inspection on a regular schedule and after hard off-road use. A bulge that stays the same across passes with dates recorded stays in the monitor group. A bulge that grows, splits its paint, or opens into a crack changes grade, and you book a body shop structural assessment at that grade change.
Is inner fender replacement the only repair path for a crack?
Replacement is the extensive shop path documented in the sources. A May 14, 2010 owner report describes a field technician who verified a bulged inner fender at the crumple zone and recommended replacement of the right and left front inner fenders, and another owner report describes an apron repair as requiring extensive dismantling. Reinforcement exists as an aftermarket path in secondary coverage. A body shop that grades your specific truck states which path suits the grade on that truck.
How does frame rust compare with the apron issue as a purchase risk?
Frame rust is the bigger purchase risk in the companion coverage, and Jalopnik lists frame rust across the production run among its used FJ Cruiser watch items. The apron check and the frame check run on the same visit. A truck with a poor frame grade leaves the purchase process regardless of the apron grade, and a truck with a clean frame and a poor apron grade follows the apron decision rules in this guide. The full frame method lives in the Truck Garage frame rust guide linked in the companion section.
Sources
- FJ Cruiser factory service manuals
- Jalopnik, What To Know Before Buying A Used Toyota FJ Cruiser, https://www.jalopnik.com/2264329/what-to-know-before-buying-used-toyota-fj-cruiser/
- AutoTrader.ca, Used Toyota FJ Cruiser Review 2007 to 2014, https://www.autotrader.ca/editorial/expert-reviews/toyota/fj-cruiser/used-vehicle-review-toyota-fj-cruiser-2007-2014/
- UseCarScout, Used Toyota FJ Cruiser 2007 to 2014 Best and Worst Years, https://usecarscout.com/blog/used-toyota-fj-cruiser-1st-gen-buying-guide
- CarProblemZoo, 2007 Toyota FJ Cruiser Structure Problems, NHTSA complaints collection, https://www.carproblemzoo.com/toyota/fjcruiser/2007/structure-problems.php
- Go-Parts, Toyota FJ Cruiser Frame Guide 2010 to 2014, location description only, https://www.go-parts.com/garage/frame-toyota-fj-cruiser-2010-2014
Leave a Reply