A practical guide to the GX rear air suspension: GX470 (2003 through 2009) and GX460 (2010 through 2023). How it works, how to find the leak, when to fix it, and when to convert to coils.
Who This Guide Is For
This guide is for GX owners dealing with a sagging rear end. If your truck sits low overnight, the compressor runs every time you start it, or you are lifting the truck and deciding what to do about the air bags, this is the guide. It covers beginner-to-intermediate DIY work: finding air leaks, testing the compressor and height sensors, replacing air springs or the compressor, and doing a full coil conversion.
The two generations run similar but not identical hardware. Every GX470 came with rear air suspension as standard. On the GX460 it was trim dependent. The GX550 is not covered here because its rear suspension details are not yet verified against a factory manual.

Which Trucks Have Rear Air Suspension
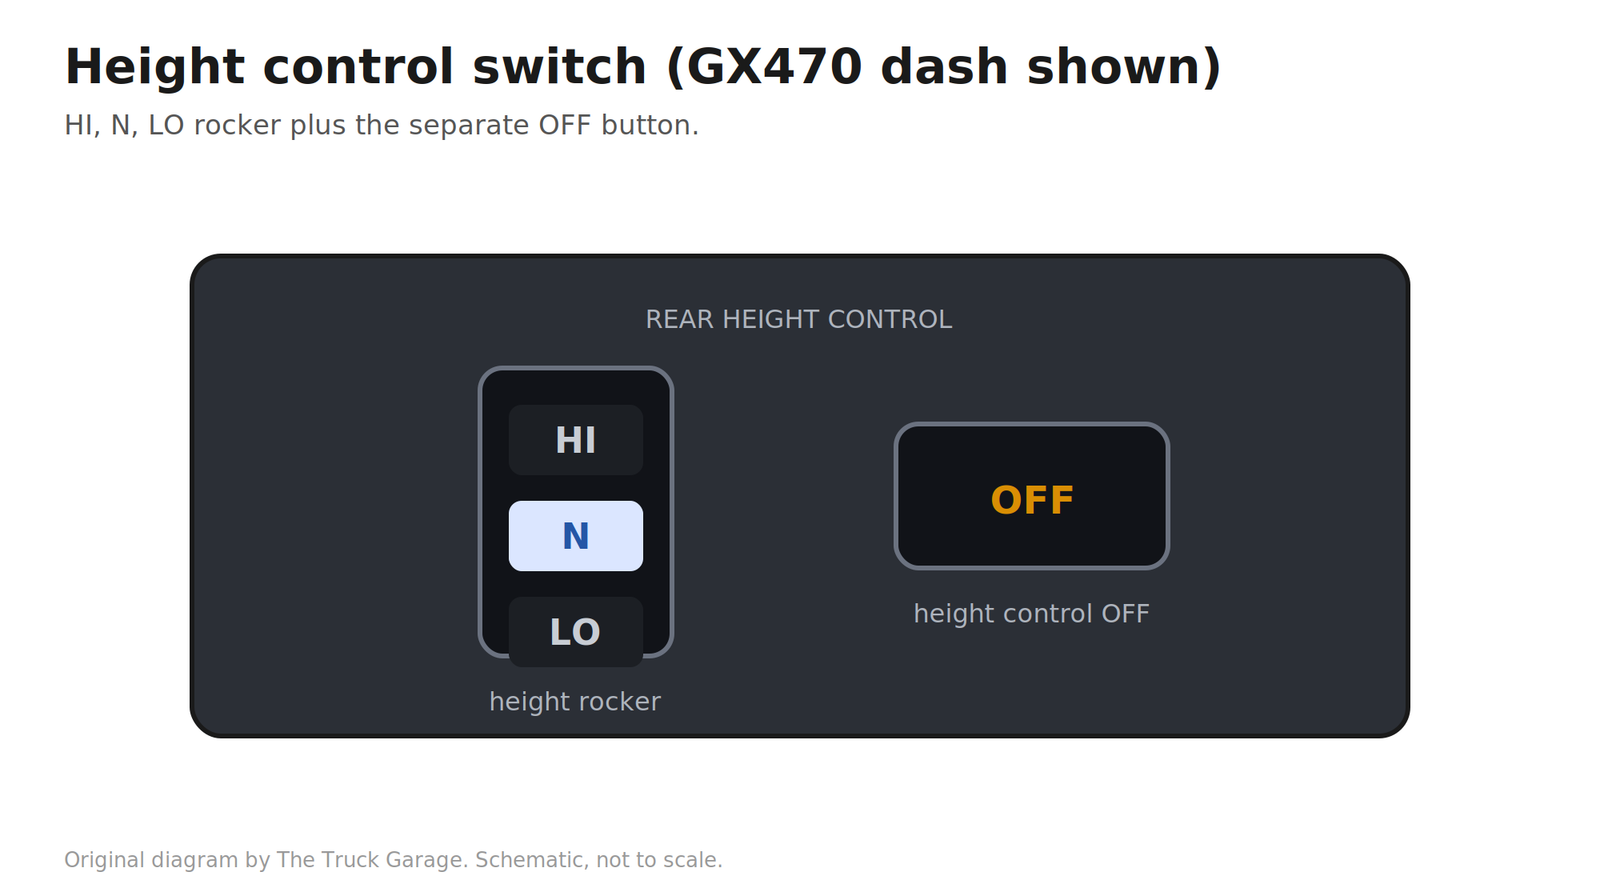
GX470 (2003 through 2009). All of them. Rear air springs with three position height control (HI, normal, LO) and a height control OFF switch on the dash.
GX460 (2010 through 2023). Trim dependent. In the U.S., the 2010 through 2013 Premium trim had rear air springs with electronically controlled shocks and height control. The base trim had coils. For 2016 and newer, only the Luxury trim had the air system. The 2014 and 2015 model years are ambiguous in Lexus literature, so trim alone is not a reliable ID for those years.
The definitive field check. If your dash has the height control switch (HI, N, LO) and a height control OFF button, you have the system. Coil trucks do not have them. The badge on the tailgate is marketing. The switches on the dash are the truth.
GX550 (2024+). Not verified. This guide makes no claims about the GX550 rear suspension.
How the System Works
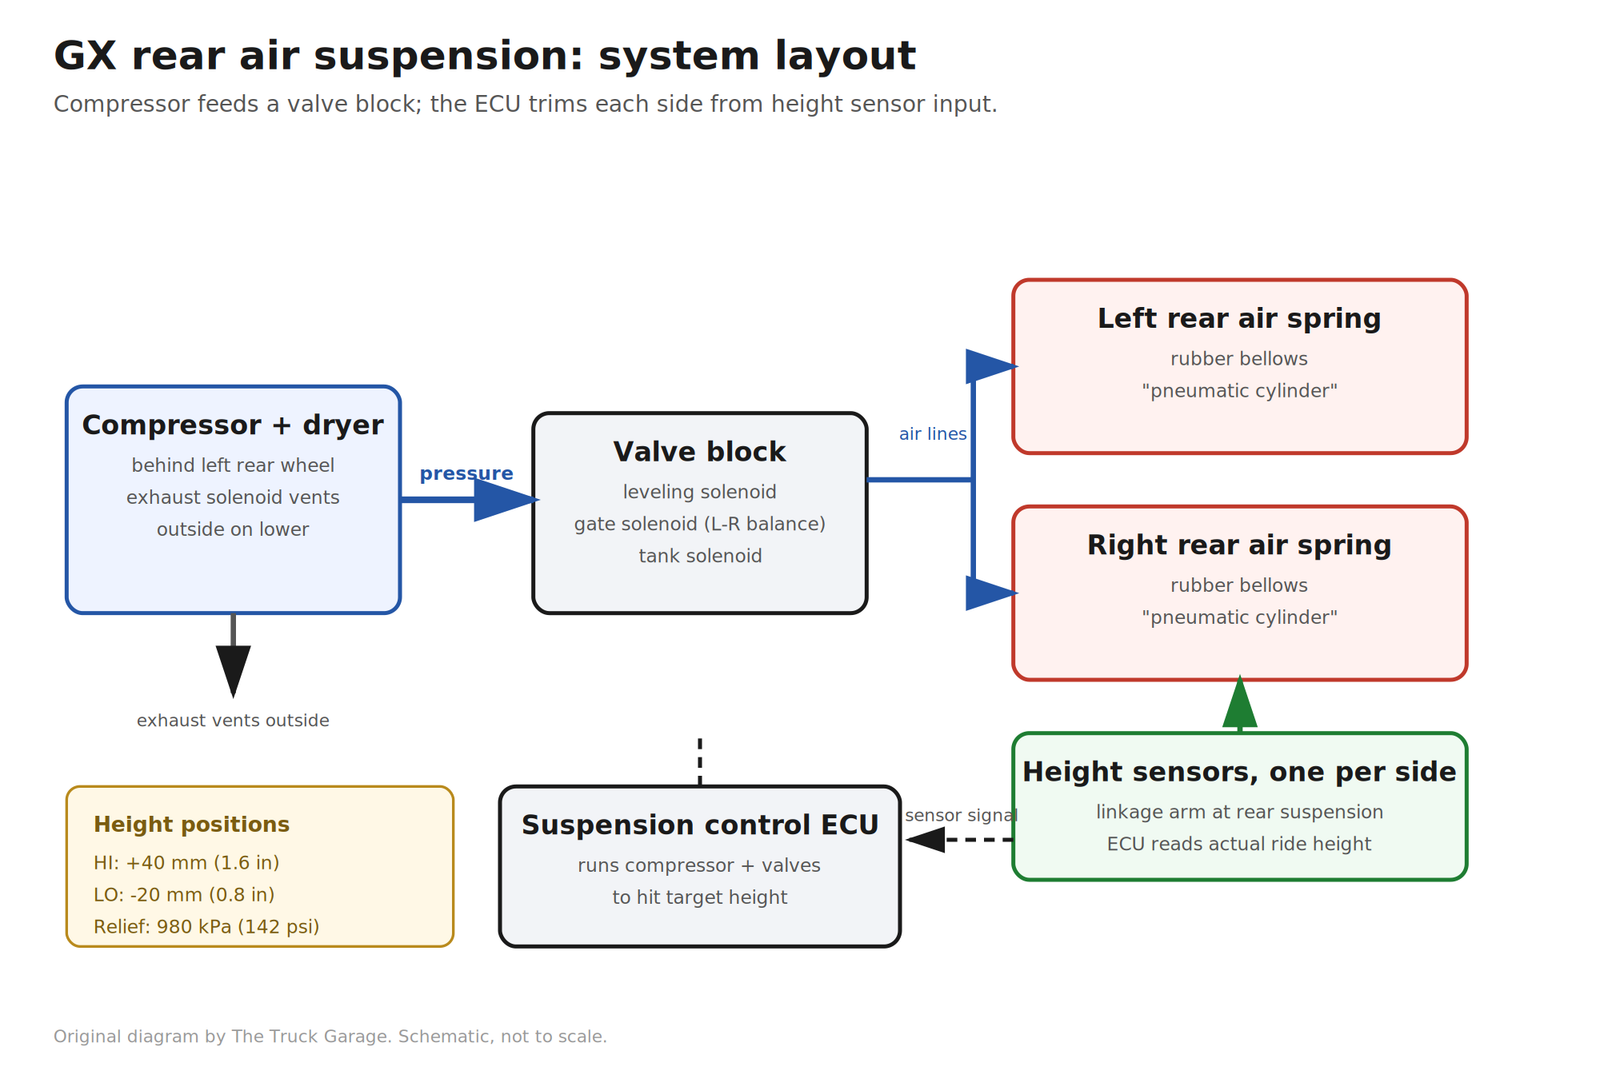
Each rear corner has an air spring, a rubber bellows the factory manual calls a pneumatic cylinder. A compressor behind the left rear wheel fills them through a dryer and a valve block. The valve block holds the leveling solenoid (compressor to springs), the gate solenoid (left spring to right spring, for side to side balance), and the tank solenoid (springs to the low pressure reservoir when lowering). An exhaust solenoid on the compressor vents air outside when the truck lowers.
One height sensor per side, mounted at the rear suspension with a small linkage arm, tells the suspension control ECU the actual ride height. The ECU runs the compressor and valves to hit the target.
Height positions. HI raises the rear about 40 mm (1.6 inches) above normal.[1] LO drops it about 20 mm (0.8 inches).[1] A full raise takes roughly 15 to 20 seconds.[1] On the GX460, HI will not engage above 18 mph and LO will not engage above 7 mph.[2]
Relief pressure. The system vents at 980 kPa (142 psi).[1] That number matters because a weak compressor or a leak shows up as the system never reaching target pressure.
Normal behavior that is not a fault. In cold weather the rear can sit slightly lower overnight because the air inside the springs contracts. That is cold air being cold air, not a leak, and the system corrects it on startup. The springs are not leaking. They are just chilly.
Diagnosis: Symptom to Cause
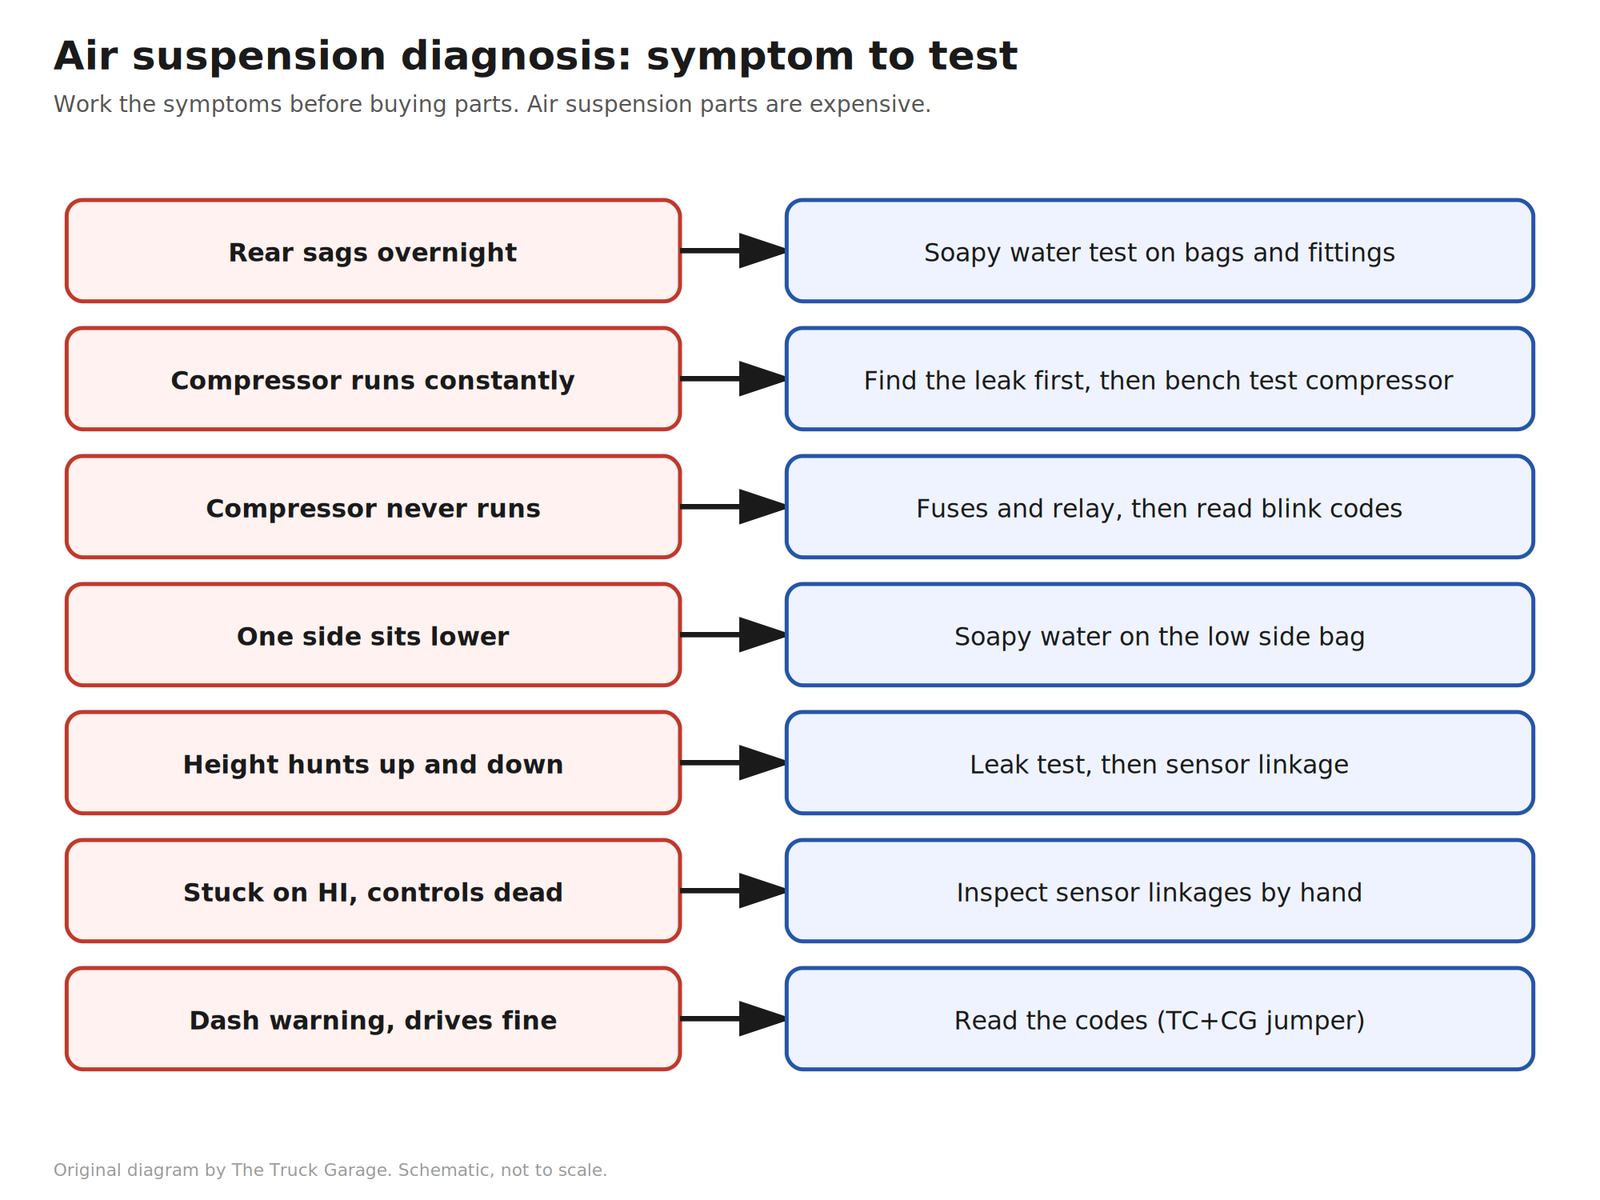
Work through the symptoms before buying parts. Air suspension parts are expensive, and the wrong guess gets expensive fast.
| Symptom | Most likely cause | Check first |
|---|---|---|
| Rear sags overnight or after a few hours parked | Leaking air spring bellows. Micro cracks are often invisible until the bag is off the truck. | Soapy water test on the bags and line fittings. |
| Compressor runs constantly or every startup | A leak downstream is forcing continuous duty. The compressor overheats, thermal protection shuts it down, and it recovers after about an hour of cooling.[2] | Find the leak first. A new compressor on a leaking system dies the same way. |
| Compressor never runs at all | Blown fuse, bad relay, height control OFF switch engaged, or a stored fault suspending control. | Fuses and relay, then read codes. |
| One side sits lower | That side’s air spring is leaking. The good side works overtime and you still ride the bump stops. | Soapy water on the low side bag. |
| Rear height hunts up and down | Air leak at a spring, or a height sensor problem. | Leak test, then sensor linkage. |
| Stuck on HI or controls do nothing | Height sensor linkage corroded or broken (common in rust belt trucks), or a stored fault. | Inspect both sensor linkages by hand. |
| Dash shows a suspension warning with no driveability change | Stored DTC. The system logs faults and suspends control until they clear. | Read the codes. |
The soapy water leak test
Raise the truck to HI with the engine running, then shut the engine off. Brush soapy water over each air spring bellows, every air line fitting, and the valve block. Bubbles mark the leak. Run this test first. It costs nothing and it finds the leak. On the GX460 the manual specifies this exact check at HIGH height with the engine off after any air spring or compressor work.[2]
Fuses and relay
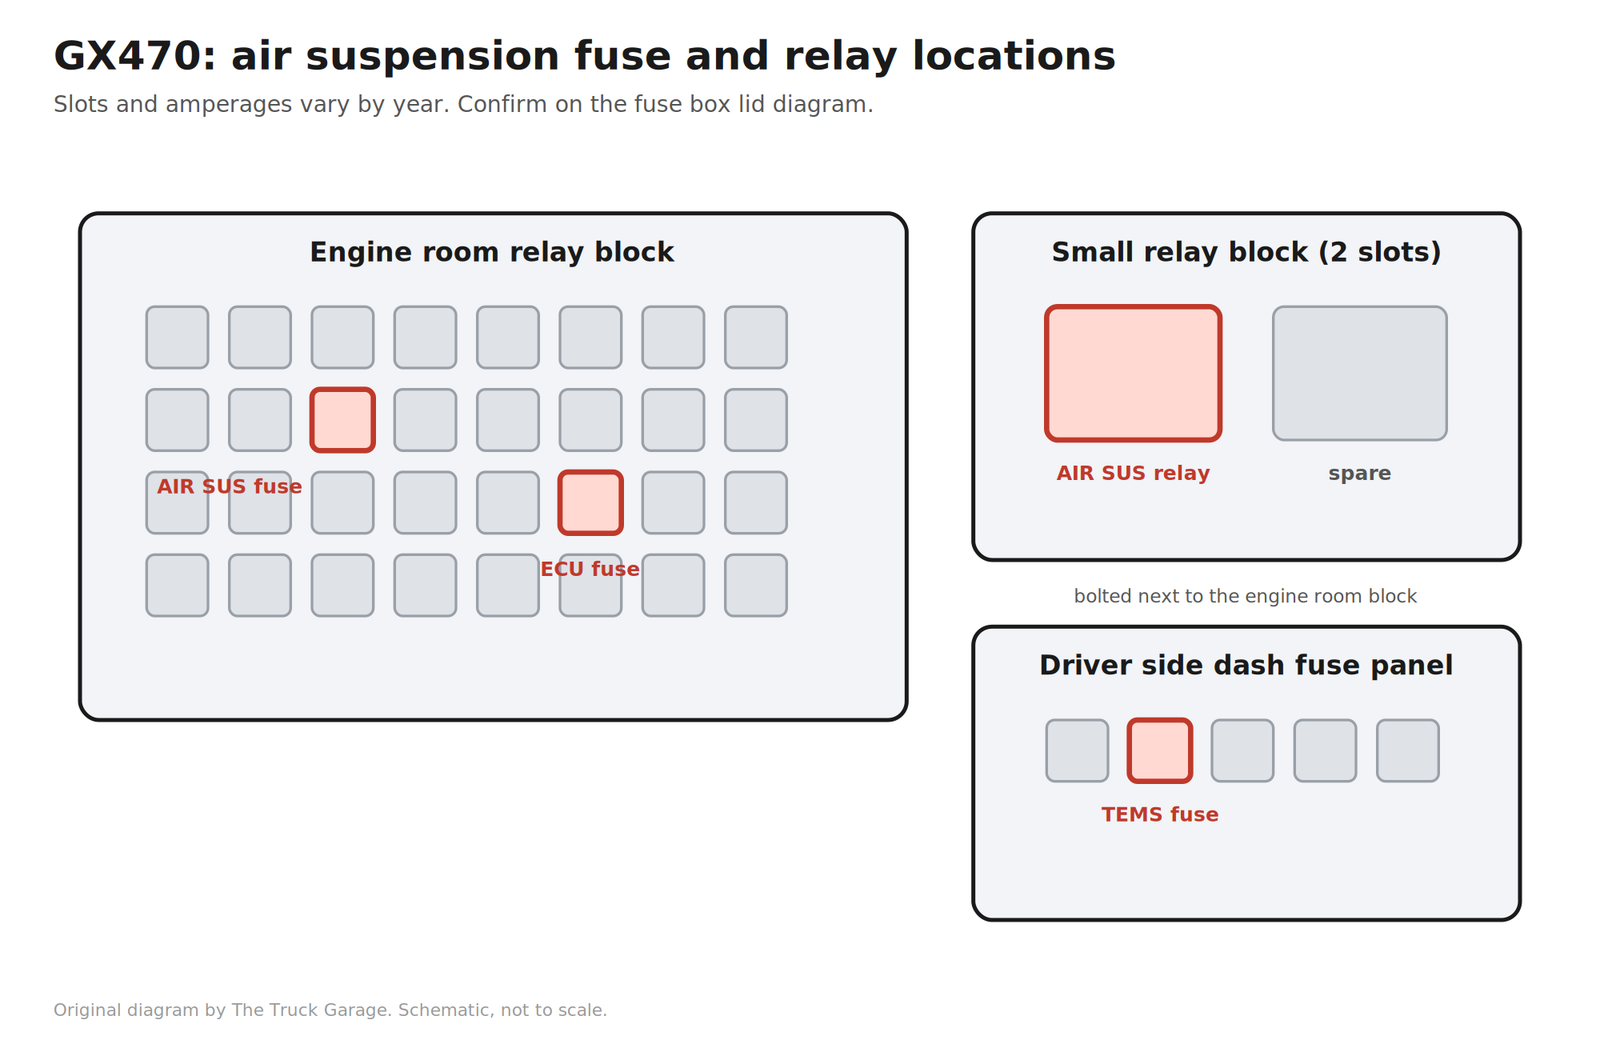
On the GX470, the compressor power fuse and the suspension ECU fuse live in the engine room relay block, and the AIR SUS relay sits in the small two slot relay block next to it. There is also a TEMS fuse under the driver side dash.
On the GX460 the AIR SUS relay and fuses are in the engine room relay block.
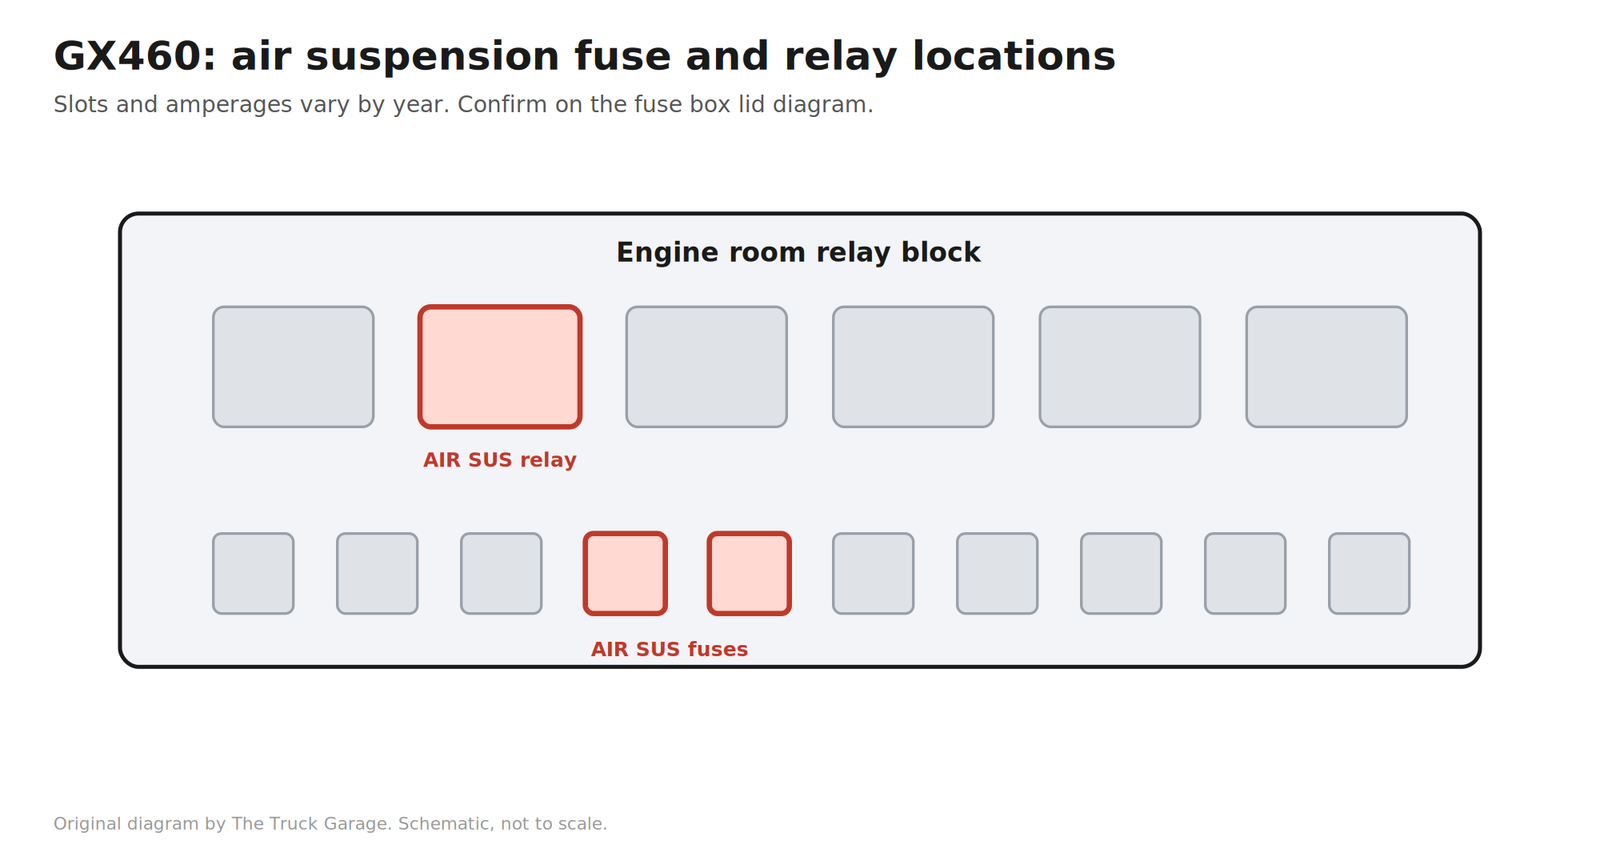
Check the fuse box lid diagram for exact slots and amperages on your truck, and confirm with a test light rather than by eye. A fuse can look fine and still be open. Your eyes are not a multimeter.
Reading the fault codes without a scan tool
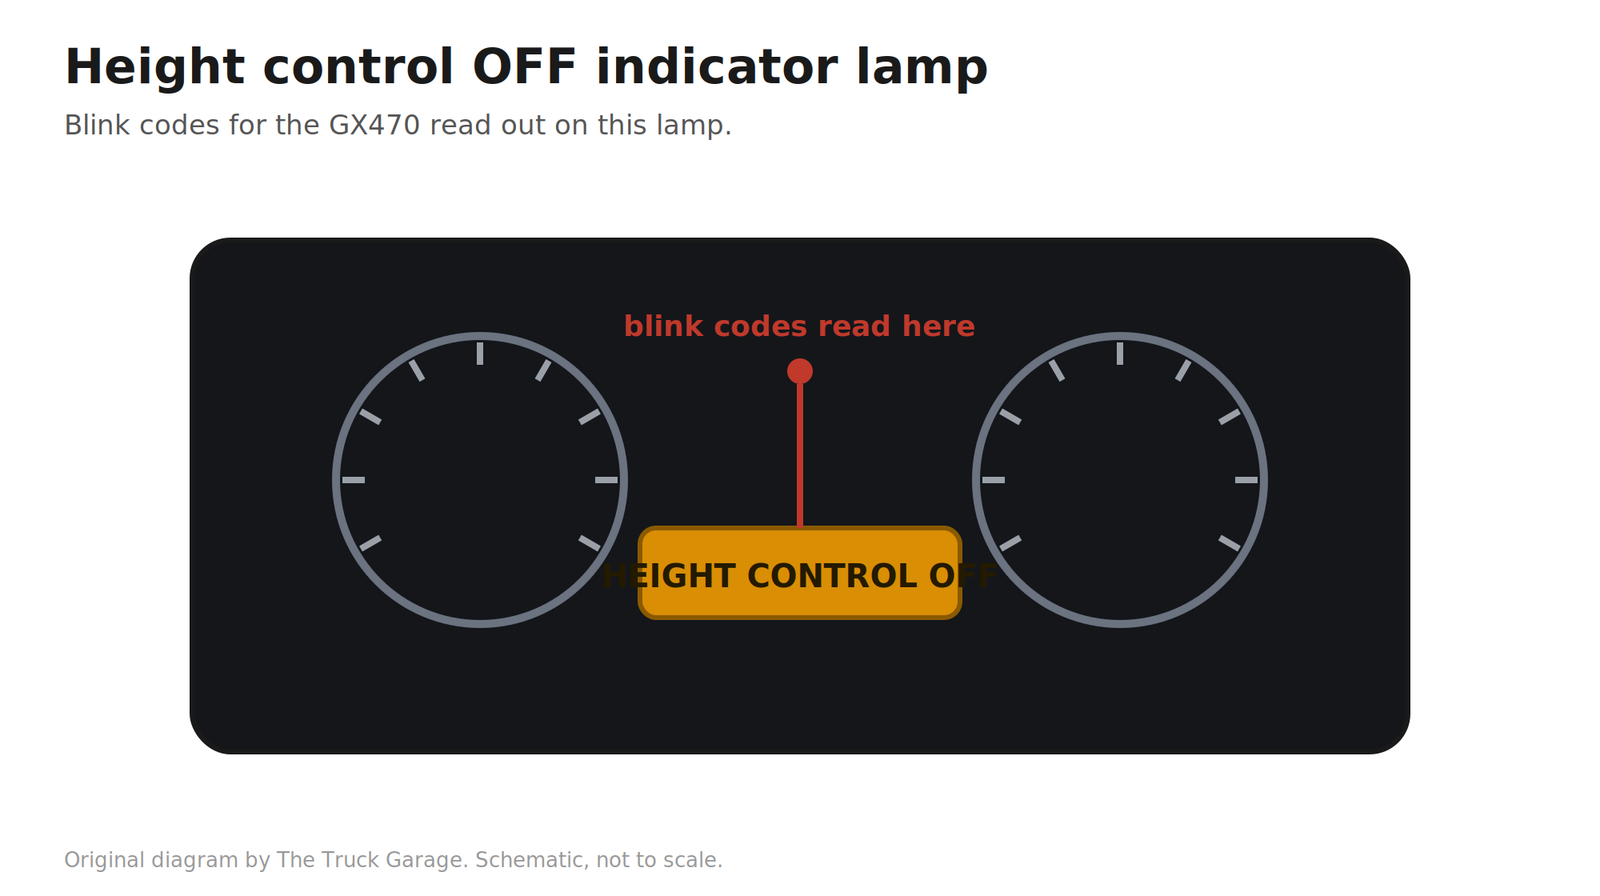
GX470. Bridge terminals TC and CG at the DLC3 OBD port with a jumper wire, turn the ignition on, and read the blink codes on the height control OFF indicator lamp. Steady quarter second blinking means no faults. Fault codes use a longer blink pattern, lowest number first. Clear codes by pressing the brake pedal 8 or more times within 5 seconds. Disconnecting the battery does not clear these codes.[1]
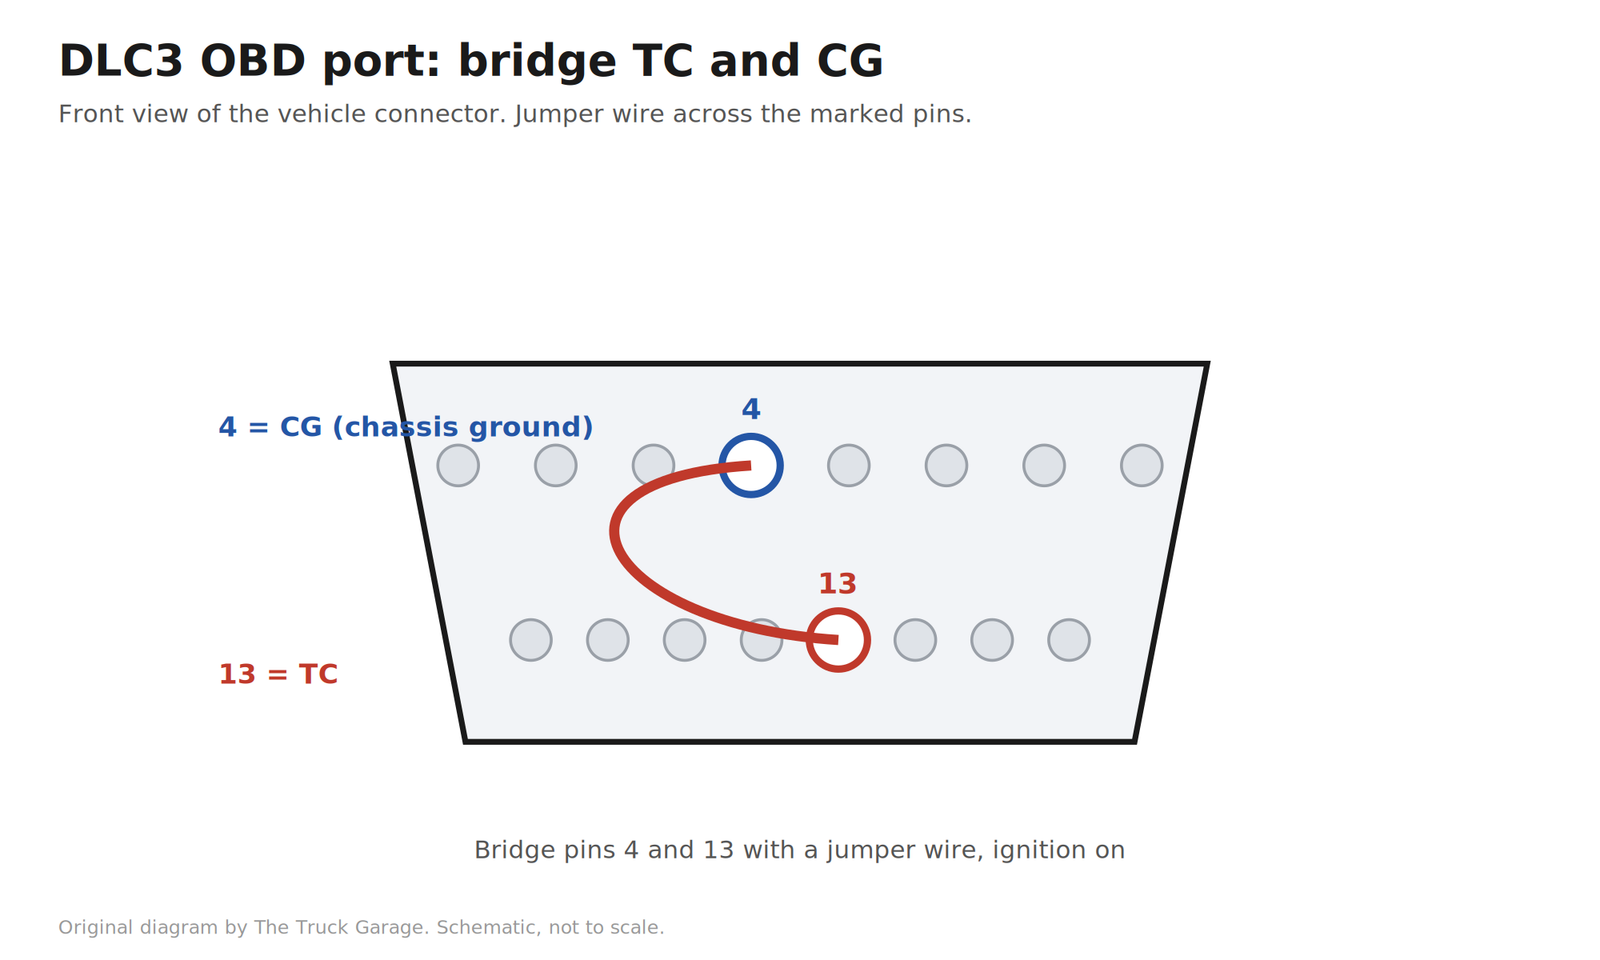
GX460. Bridge DLC3 terminals 12 (TS) and 4 (CG) to enter test mode. A scan tool with Toyota software is the easier path here: the Chassis / Air suspension menu shows live height sensor readings, switch states, and active tests that click each solenoid so you can hear whether it works.
Codes worth knowing
GX470 codes: C1713 and C1714 are the right and left rear height sensor circuits.[1] C1733, C1734, C1735, and C1744 are the gate, leveling, exhaust, and tank solenoid circuits.[1] C1741 is the AIR SUS relay circuit.[1] C1742 is the compressor circuit.[1] C1751 is the important one: continuous current to the compressor, set when the relay has been active for 100 seconds without reaching standard height.[1] That code points at a worn compressor or an air leak, not just wiring. The manual notes it can set spuriously on a steep slope, when overloaded, or when jacked up with the engine running.[1]
GX460 codes follow the same pattern with different numbers: C1745 exhaust solenoid, C1746 gate solenoid, C1747 leveling solenoid, C1751 compressor relay coil, C1752 compressor motor, C1761 continuous compressor current (points at air leaks or clogged tubes, not just electrics), C1762 continuous exhaust solenoid current.[2][3] Fail safe behavior: one height sensor fault and control continues, both sensors failed and control stops.[2]
Height sensor inspection and testing
Find both rear sensors and work each linkage arm by hand. In rust belt trucks the linkage seizes or the bracket corrodes until it breaks. The GX470 manual gives a bench test: power the sensor with three AA batteries in series (about 4.5 volts) and read the signal terminal through its travel.[1] Roughly 2.5 volts at center, swinging from about 0.8 volts one way to about 4.3 volts the other way.[1] No change across the travel means a dead sensor. On the truck, after any sensor replacement, vehicle height must be rechecked and adjusted: left to right difference within 10 mm, and on the GX460 the sensor is set to read 2.5 volts via the slotted bracket first, then the link lock nuts.[2][3]
Shadetree note: the three AA battery trick replaces a bench power supply, and the jumper wire replaces the factory service tool for reading blink codes. A cheap Bluetooth OBD adapter with a Toyota capable app gets you most of what the factory scan tool does for under $30.
Solenoid click test
Each solenoid should click when energized. With a scan tool, use the active test. Without one, apply 12 volts directly to the valve connector terminals. A silent valve is a dead valve. On the GX470 a failed gate, leveling, or tank valve means replacing the reservoir assembly. A failed exhaust valve means replacing the compressor assembly.
Repair or Convert: The Decision
Fix the air system when: the compressor is healthy and only a spring leaks, you tow heavy and value the self leveling, or you like the ride and the truck is otherwise solid. Plan on air springs as a wear item at 15 plus years. Replace them in pairs. For aftermarket springs, start with Arnott. Their springs carry a limited lifetime warranty, and no brand wide quality complaints surfaced in owner threads.
Convert to coils when: the compressor is dead and the bags are original, you are lifting the truck anyway, or you want the simplest long term setup with no compressor to maintain. At 15 plus years old, conversion is the practical choice for most owners. Ride reports after conversion are generally positive, with several owners rating it close to stock on quality shocks.
The towing caveat. The air system self levels under tongue weight. Coils do not. With coils and a heavy trailer, expect several inches of rear squat. If you tow near the GX 6,500 lb rating regularly, either keep the air system healthy, use a weight distribution hitch, or add auxiliary airbags inside the coils.
What it costs
Prices below are as stated by owners and vendors, not quotes. They move around.
| Job | DIY parts | Dealer |
|---|---|---|
| One air spring, aftermarket | $100 to $215 per bag | $470 to $1,400 |
| Both rear air springs, aftermarket | $400 to $1,000 | $940 to $2,500 |
| Compressor, aftermarket | $145 to $980 | $660 to $1,900 |
| Full rear air to coil conversion | $240 to $600 in kits | $1,120 to $3,100 |
Representative part prices seen in owner threads: Arnott A-2949 rear air spring around $211[4], Vigor air springs around $116 each, Arnott C-2410 conversion kit $350 to $432[5], Dobinsons WA59-561K hardware kit $375 to $465[6], Strutmasters rear only kit $589[7], Monroe 90022C kit around $240. OEM compressor list is over $1,900. GX470 rear air spring part numbers 48090-35011 (left) and 48080-35011 (right) appear in aftermarket cross references.[8] Verify against a parts counter before ordering.
No compressor rebuild kits exist for the GX platform. Unlike some Land Rover compressors, there is no piston and ring kit. The dryer assembly can be replaced separately, but replacing the compressor as a unit is the practical move.
Parts and Tools
For air spring or compressor replacement
- Replacement air springs, in pairs. Arnott A-2949 is the widely used GX470 part.[4]
- Or a replacement compressor assembly with new O-rings.
- MP grease for O-rings (the factory manual specifies it for every air line O-ring).
- New air line O-rings, plates, and connectors. These are one time use. Do not reuse them.
- Soapy water in a spray bottle, the most used diagnostic tool on this job.
- Jack, jack stands, wheel chocks, basic metric sockets.
- Jumper wire for DLC3 blink codes, or a Toyota capable OBD scan tool (eBay).
For coil conversion
- A conversion kit, or junkyard springs plus separate hardware. Kit options owners use: MetalTech 4×4 (GX specialist, KDSS compatible, bolt on), Dobinsons WA59-561K hardware plus Dobinsons springs[6], Arnott C-2410 (includes upper isolators)[5], Strutmasters rear kit[7], Monroe 90022C, Ironman hardware, Roam Overland Outfitters hardware kit.
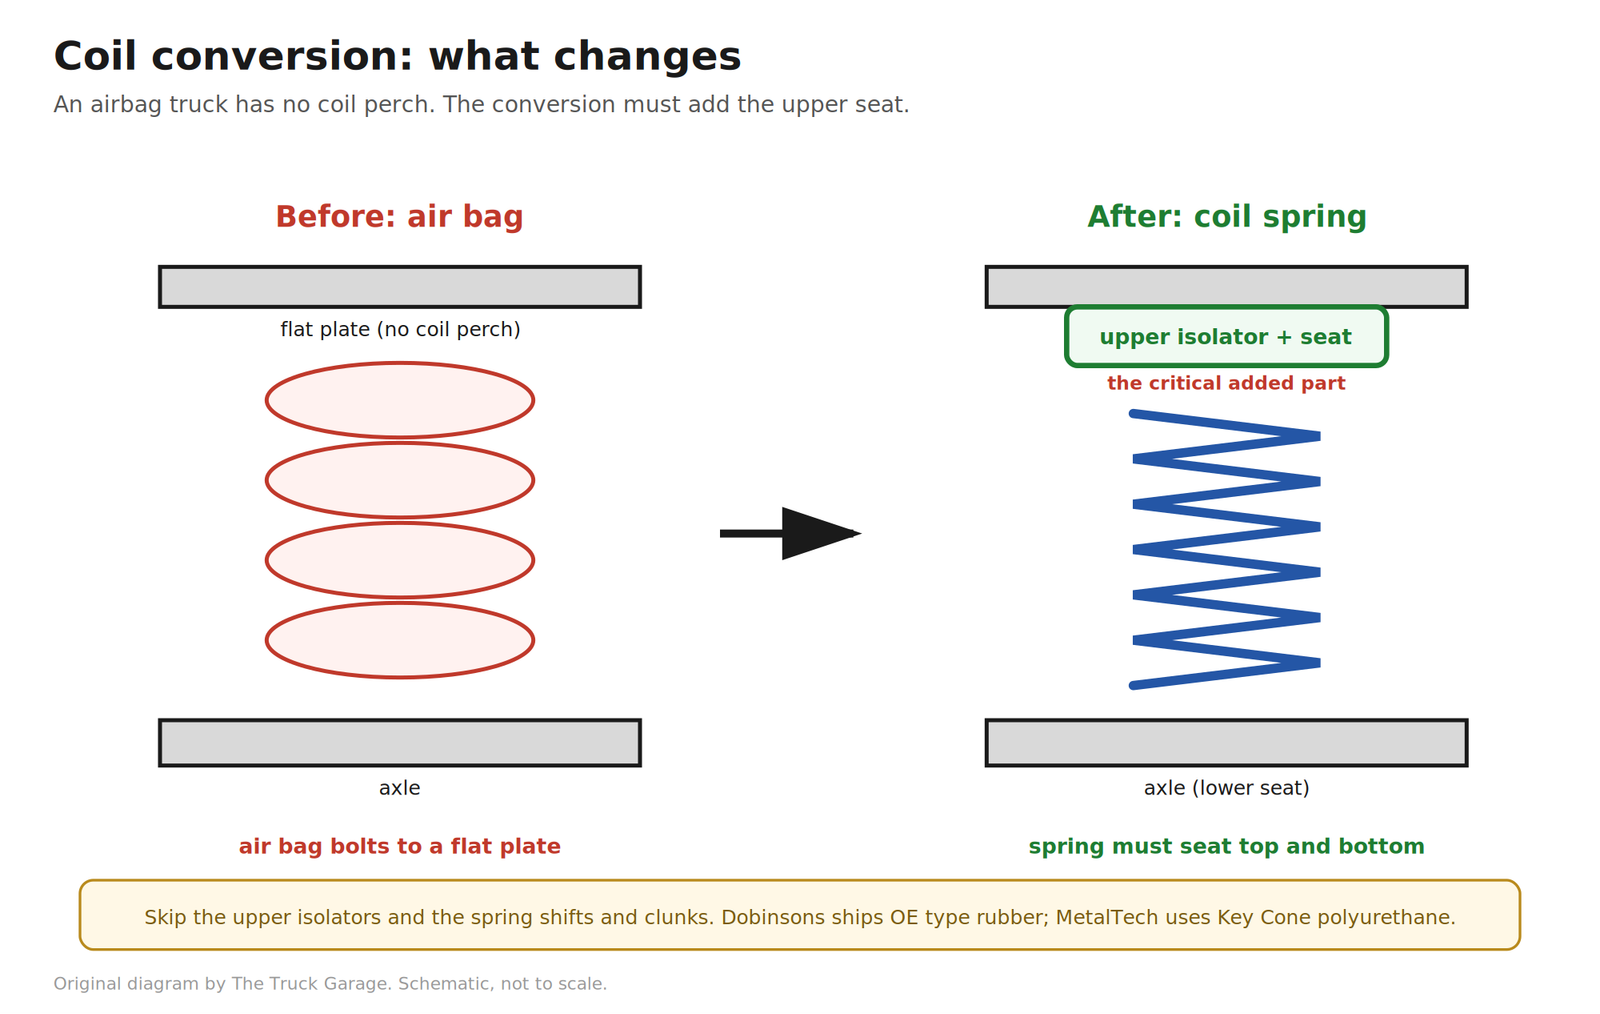
- Upper spring isolators with built in seats. This is the critical part. An airbag truck has no coil perch at all. The airbag bolts to a flat plate, so the conversion must add the upper seat or the spring shifts and clunks. Dobinsons ships OE type rubber upper isolators. MetalTech uses their Key Cone polyurethane upper springs. Do not skip these.
- Coil springs. 4th and 5th gen 4Runner and FJ Cruiser rear coils physically fit because the platforms are shared. Owner experience: 4Runner springs sit a little lower than stock GX height, FJ Cruiser springs land close to stock. The GX470 is 300 to 500 lbs heavier than a 4th gen 4Runner, so 4Runner rate springs sit at the edge of ideal. Dobinsons publishes a spring chart: C59-323 adds about 0.5 inch, C59-599 about 1 inch, C59-505 about 1.5 inches, C59-325 about 2 inches on a GX.[9] Note that Dobinsons conversion hardware itself adds roughly 0.75 inch minimum, while MetalTech and Apache hardware adds zero.
- Rear shocks if yours are worn. Good aftermarket shocks are worth it either way.
- Same jacks, stands, and sockets as above.
Air Spring Replacement
Before jacking the truck for any of this, press the height control OFF switch. The system must be suspended before the wheels leave the ground.
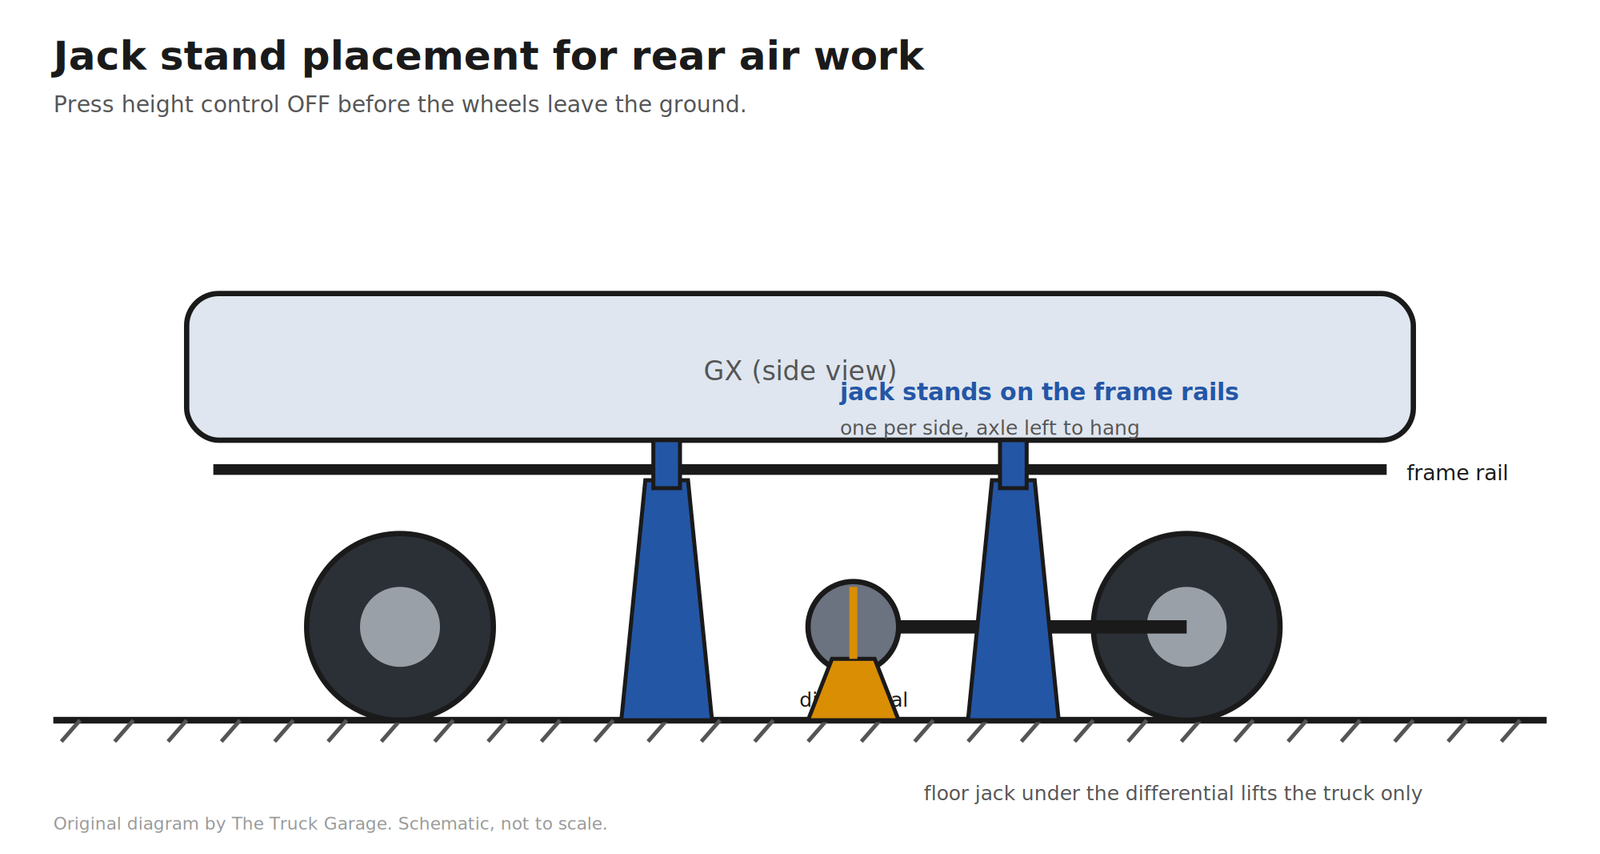
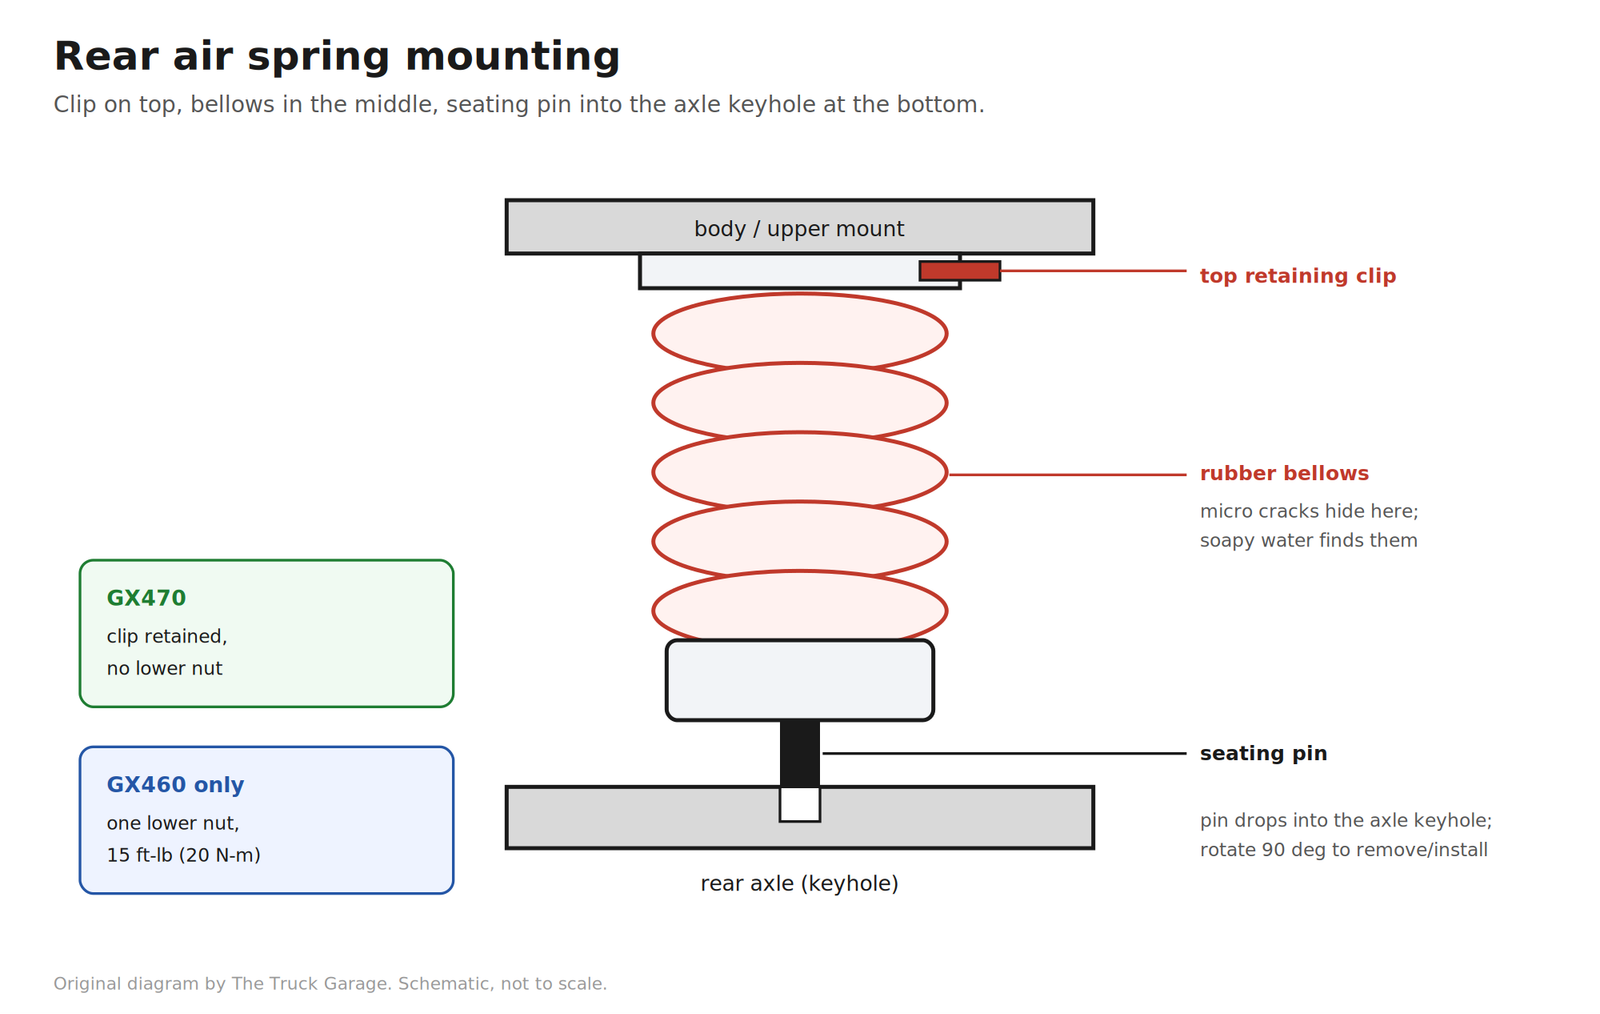
Summary of the factory procedure, in plain terms. Support the frame on jack stands with the rear axle lowered and the shock absorbers still installed. Disconnect the height control air tube by hand. If the two pawl fitting will not let go, the shadetree release is a 2 inch section of 1/4 inch sprinkler line, slit lengthwise and slipped over the air line to spread the pawls. Line the slit up 90 degrees from the pawls: they sit at 12 and 6 o clock on the spring fitting, 3 and 9 at the valve block. Never yank the line. Remove the top retaining clip. Discharge the air from the spring so it retracts. Rotate the spring 90 degrees and lift it off the axle. Never stretch the spring during removal or installation.
Install in reverse: seat the spring with its clip fully engaged, reconnect the air tube until the connector clicks, then jack the axle up until the spring bottom touches the axle and the seating pin drops into the axle keyhole. On the GX460 there is one lower nut torqued to 15 ft-lb (20 N·m)[3] after the engine is started and the spring refills. Start the engine to refill the springs, then do the soapy water leak check and verify ride height.
Compressor Replacement
Press the height control OFF switch and confirm the indicator. On the GX460, also disconnect the negative battery cable and wait 90 seconds for the SRS system. Remove the left rear wheel, the left rear quarter mudguard, and the compressor cover. Disconnect the filter hoses, the air tube (pull straight out by hand, never yank), and the electrical connector. Unbolt the compressor and dryer as a unit from the bracket.
Bench check the new or replacement unit before installing: the exhaust solenoid should read 10 to 14 ohms and click on 12 volts, and the motor should run on direct 12 volts.[1] Never run the compressor more than 60 seconds on the bench.[1] Install with new O-rings coated in MP grease and new hose clips, then finish with the soapy water leak check at HIGH height with the engine off.
Key torque specs: compressor bracket to frame 21 ft-lb (29 N·m), compressor to bracket 4.3 ft-lb (52 in-lb), dryer bolt 4.75 ft-lb (57 in-lb), reservoir assembly bolts 21 ft-lb (29 N·m).[1][3]
Coil Conversion Step by Step
- Press the height control OFF switch. Chock the front wheels, lift the rear, and support the frame on jack stands with the axle hanging.
- Disconnect the air lines at the springs and discharge the air. Remove the top clips, rotate each spring 90 degrees, and lift them out.
- Remove the rear shocks if replacing them. Note the upper shock nut is non reusable.[1] Final torque on the new hardware comes later.
- Fit the upper spring isolators and seats per your kit instructions. This is the step that makes or breaks the conversion. The spring must locate positively into the upper seat. Get it wrong and the truck will announce it with a clunk at every bump.
- Set the coil springs in place. Jack the axle up slowly until the springs seat top and bottom. Verify each spring is centered in its seats before the axle takes weight.
- Install the shocks. Torque the upper nut to 18 ft-lb (25 N·m) with a new nut.[1][3] Torque the lower bolt to 72 ft-lb (98 N·m), but only after the truck is back on the ground and the suspension has been bounced to settle.[1][3]
- Torque the wheels to 83 ft-lb (112 N·m), lower the truck, bounce each corner, and check ride height side to side.[1][3]
What to do about the dash warnings and the compressor
This is where the GX470 and GX460 differ completely. Follow the wrong generation’s procedure and your dash will light up like a Christmas tree that never comes down.
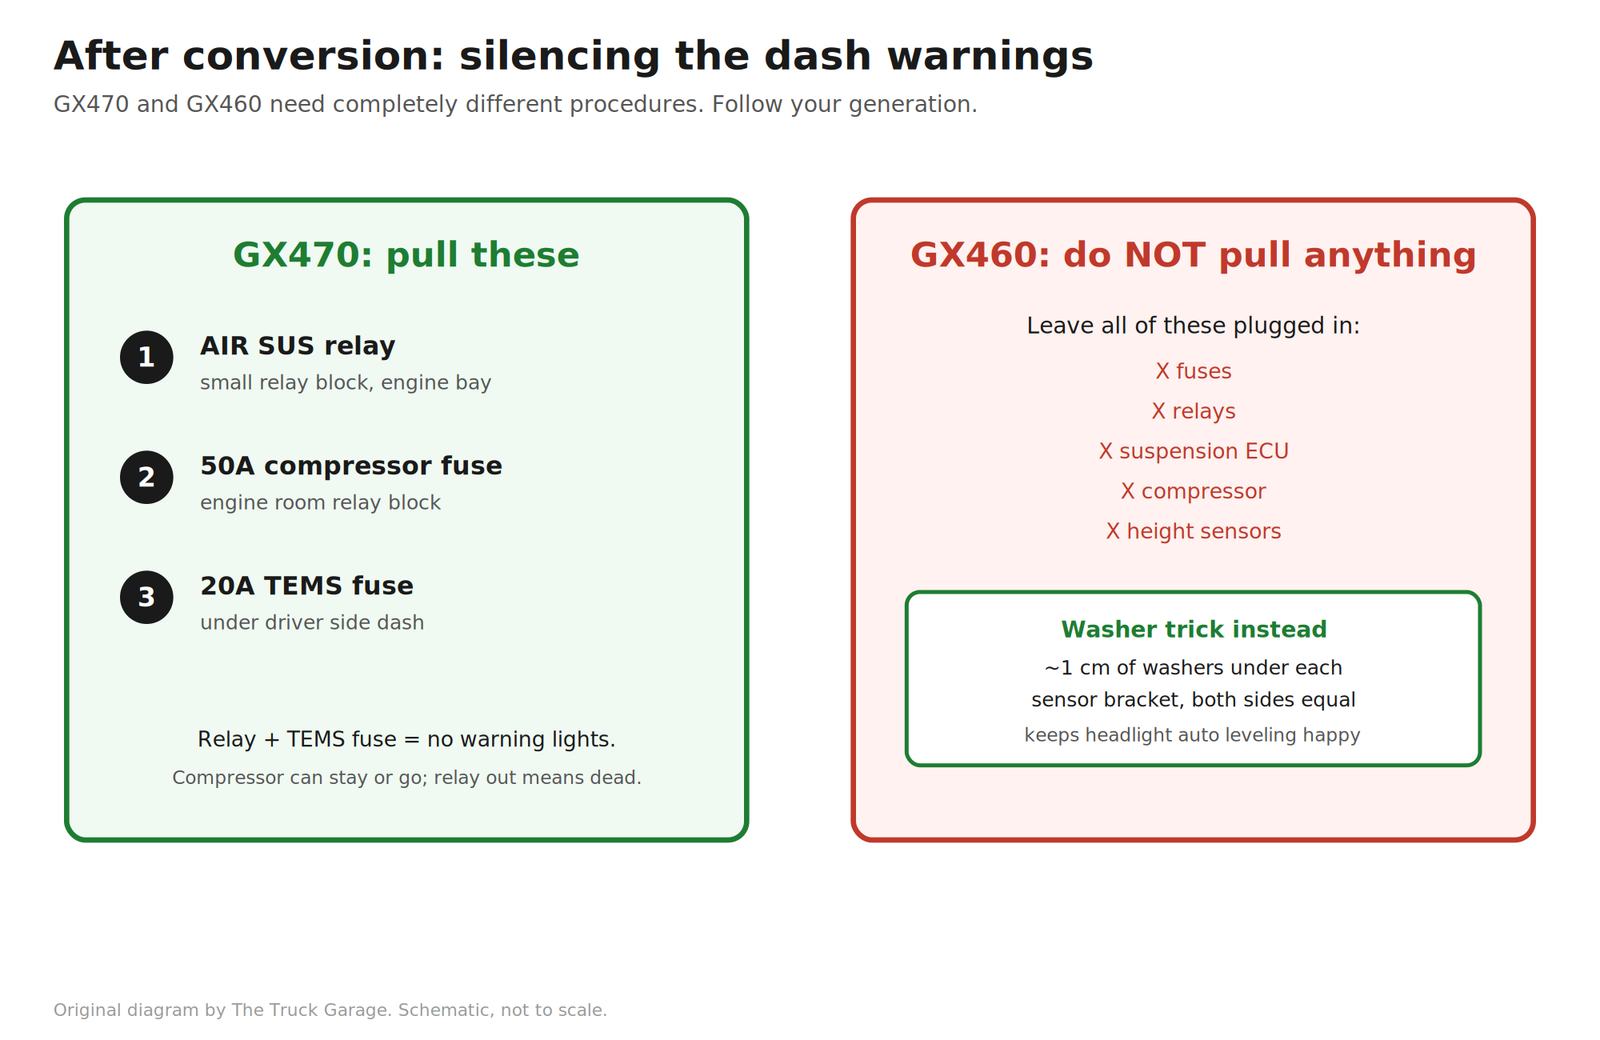
GX470. Pull the AIR SUS relay from the small relay block in the engine bay, pull the 50A compressor fuse, and pull the 20A TEMS fuse under the driver side dash. Relay only leaves the height control OFF light blinking with the ignition on. Relay plus TEMS fuse gives no warning lights. The compressor can be removed or left in place. Once the relay is out it cannot run either way. Some owners fit a blank cover over the dash height switch.
GX460. Do not follow the GX470 procedure. Do not remove any suspension fuses. Do not remove any relays. Do not disconnect the suspension ECU. Do not disconnect the compressor. Do not remove the rear height sensors. Owners who pulled fuses or unplugged the ECU got persistent warnings they could not clear. The community consensus that works: leave everything plugged in and trick the height sensors with about 1 cm of washers under each sensor bracket on the 12 mm bolt, both sides equal. That silences the check suspension message and keeps the headlight auto leveling happy, since the GX460 headlight ECU gets height data from the suspension ECU.[2] Arnott’s GX460 conversion kit takes a different approach with an included electronic bypass module. Follow that kit’s own instructions if you buy it.
Ride height notes
Expect the rear to sit wherever your spring choice puts it. Dobinsons hardware adds about 0.75 inch by itself, so factor that into spring selection. After any conversion, drive the truck for a week and recheck. New springs settle slightly. If the truck leans, recheck that each spring is seated correctly before suspecting the springs.
Torque Specs
Fastener torque, ft-lb first, from the factory manuals.[1][3]
| Fastener | GX470 | GX460 |
|---|---|---|
| Compressor bracket to frame | 21 ft-lb (29 N·m) | 21 ft-lb (29 N·m) |
| Compressor to bracket | 4.3 ft-lb (52 in-lb) | 4.3 ft-lb (52 in-lb) |
| Dryer bolt | 4.75 ft-lb (57 in-lb) | 4.75 ft-lb (57 in-lb) |
| Reservoir / No. 2 valve bolts | 21 ft-lb (29 N·m) | 21 ft-lb (29 N·m) |
| Height sensor bolts | 10 ft-lb (13 N·m) | 10 ft-lb (13 N·m) |
| Height sensor link nut | 4 ft-lb (48 in-lb) | 4.2 ft-lb (50 in-lb) |
| Rear shock upper nut (new nut) | 18 ft-lb (25 N·m) | 18 ft-lb (25 N·m) |
| Rear shock lower bolt (torque at ride height) | 72 ft-lb (98 N·m) | 72 ft-lb (98 N·m) |
| Air spring lower nut | n/a (clip retained) | 15 ft-lb (20 N·m) |
| Rear wheel lug nuts | 83 ft-lb (112 N·m) | 83 ft-lb (112 N·m) |
| Suspension control ECU bolts | 5.75 ft-lb (69 in-lb) | 6.25 ft-lb (75 in-lb) |
Air line fittings have no torque spec. They are hand operated quick connectors with O-rings and clips. Connect by hand until the click, then tug to confirm.
Related guides
- Lift kits and suspension for the Lexus GX: the full lift guide, including how a lift interacts with the rear air system.
- GX tire size and fitment guide: what fits each generation before you set your final ride height.
Sources
- Factory manual: 2005 GX470 repair manual, Electronic Modulated Suspension and Rear Air Suspension diagnostics, Suspension Control System service, Rear Suspension service ↑
- Factory manual: 2013 GX460 repair manual, air suspension system description, DTC chart, component R&I ↑
- Factory manual: 2016-2021 GX460 repair manual, air suspension system description, calibration procedure, component R&I ↑
- ih8mud, Arnott vs OEM air ride parts GX470: https://forum.ih8mud.com/threads/arnott-vs-oem-air-ride-parts-gx470.972961/
- ih8mud, I replaced my airbags and here is my how to: https://forum.ih8mud.com/threads/i-replaced-my-airbags-and-heres-my-how-to.1010652/
- ih8mud, Question about air suspension on GX470: https://forum.ih8mud.com/threads/question-about-air-suspension-on-gx470.1347624/
- ih8mud, Intermittent air spring failure to inflate: https://forum.ih8mud.com/threads/intermittent-air-spring-failure-to-inflate.1012645/
- ih8mud, 2010 GX460 airbag delete error: https://forum.ih8mud.com/threads/2010-gx-460-airbag-delete-error.1101964/
- ih8mud, 2016 GX460 air suspension stuck on high setting: https://forum.ih8mud.com/threads/2016-gx460-air-suspension-stuck-on-high-setting.1341056/
- ih8mud, Coil conversion for towing 6500 lb trailer: https://forum.ih8mud.com/threads/coil-conversion-for-towing-6500-lb-trailer.1323960/
- ih8mud, Where is the air suspension relay: https://forum.ih8mud.com/threads/where-is-the-air-suspension-relay.800441/
- Arnott, P-3191 compressor warranty manual (cracked air springs void compressor warranty): http://arnottinfo.com/manuals/P-3191.pdf
- MetalTech 4×4, GX470 rear coil conversion Stage 3: https://www.metaltech4x4.com/products/metal-tech-4×4-gx470-rear-coil-conversion-stage-3-stock-height-w-key-cones
- Strutmasters, GX470 rear air suspension conversion kit TE1RB: https://www.strutmasters.com/products/2003-2009-lexus-gx-470-rear-air-suspension-conversion-kit-te1rb ↑
- ShockWarehouse, Arnott A-2949 rear air spring: https://www.shockwarehouse.com/products/arnott-a-2949-rear-air-spring-lexus-gx470 ↑
- ShockWarehouse, Arnott C-2410 rear coil spring conversion kit: https://www.shockwarehouse.com/products/arnott-c-2410-rear-coil-spring-conversion-kit-lexus-gx470-toyota-land-cruiser-prado-j120 ↑
- Yota Mafia, Dobinsons WA59-561K airbag to coil conversion kit: https://yotamafia.com/product/sso-air-to-coil-spring-conversion-kit-with-upper-isolators/ ↑
- Apache Offroad, Dobinsons rear springs for GX470/GX460: https://apacheoffroad.com/product/dobinsons-rear-springs-pair-toyota-lexus-fj-cruiser-4runner-gx470-gx460/ ↑
- CarParts.com and vendor listings for compressor and air spring pricing cross references: https://www.carparts.com
- Standard part number references: parts.lexus.com and toyodiy.com ↑
Leave a Reply