Quick answer
On a GX460, that pattern points at the valley plate. Coolant level drops week after week. There is no puddle under the front of the truck. You find pink crust at the back of the engine, or coolant running down the transmission bellhousing.
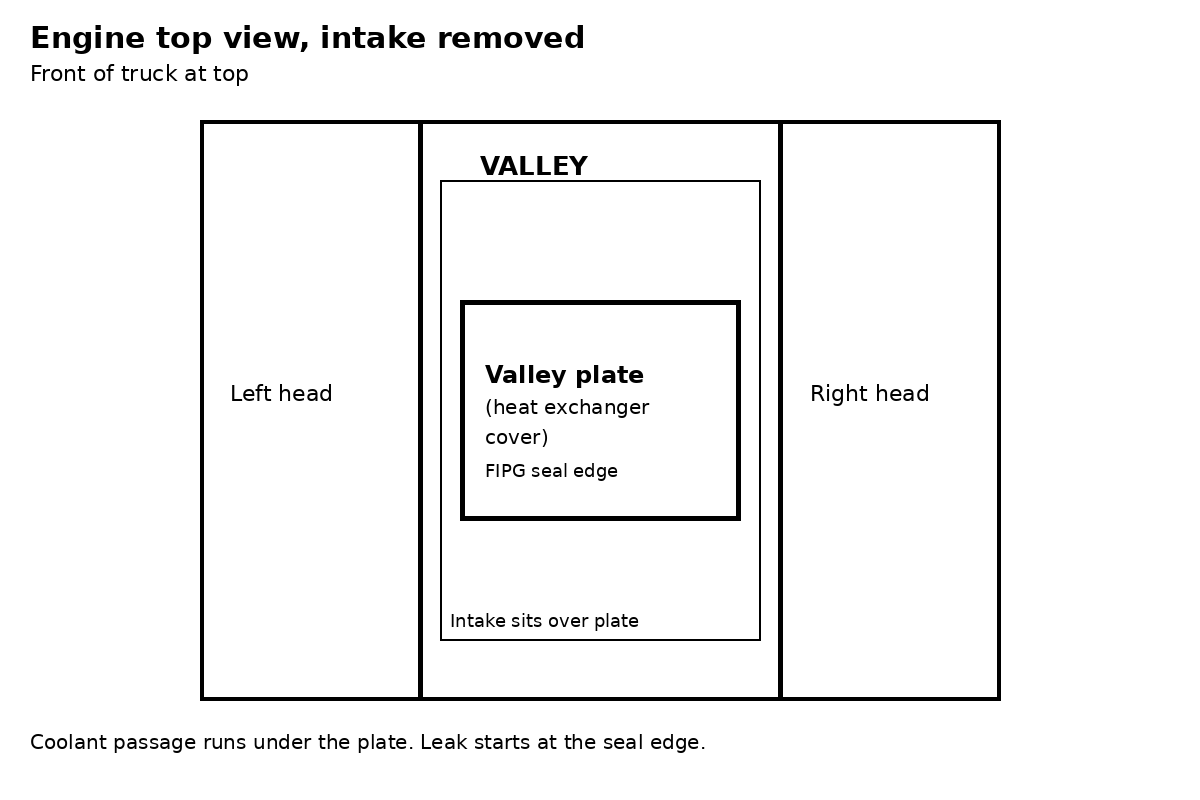
The plate is the cover in the valley between the cylinder heads, under the intake manifold. The factory manual calls it the No. 1 heat exchanger cover. It seals a coolant passage with FIPG, formed in place gasket, instead of a cut gasket. Heat cycles age that seal. Coolant escapes, pools in the valley, cooks into pink crust, and overflows off the back of the engine.
GX470 owners: this is not your failure pattern. The GX470 uses the 2UZ-FE, a different engine with a different valley layout. If a GX470 loses coolant, start with its radiator, heater hose tees, and timing belt area water pump. GX550 owners: your V35A-FTS is a different engine again, and no verified valley plate pattern for it is on file here. The rest of this guide is a GX460 1UR-FE guide.
Do not order parts on suspicion. Confirm the source first. The checks below take an hour and save an intake off job done for the wrong leak.
Symptoms that fit the valley plate
- Coolant reservoir drops slowly, with regular top offs and no puddle where you park.
- Sweet coolant smell after a drive, with no visible wet hose or radiator seam.
- Pink or reddish crust under the intake area, seen with a mirror or borescope at the back of the valley.
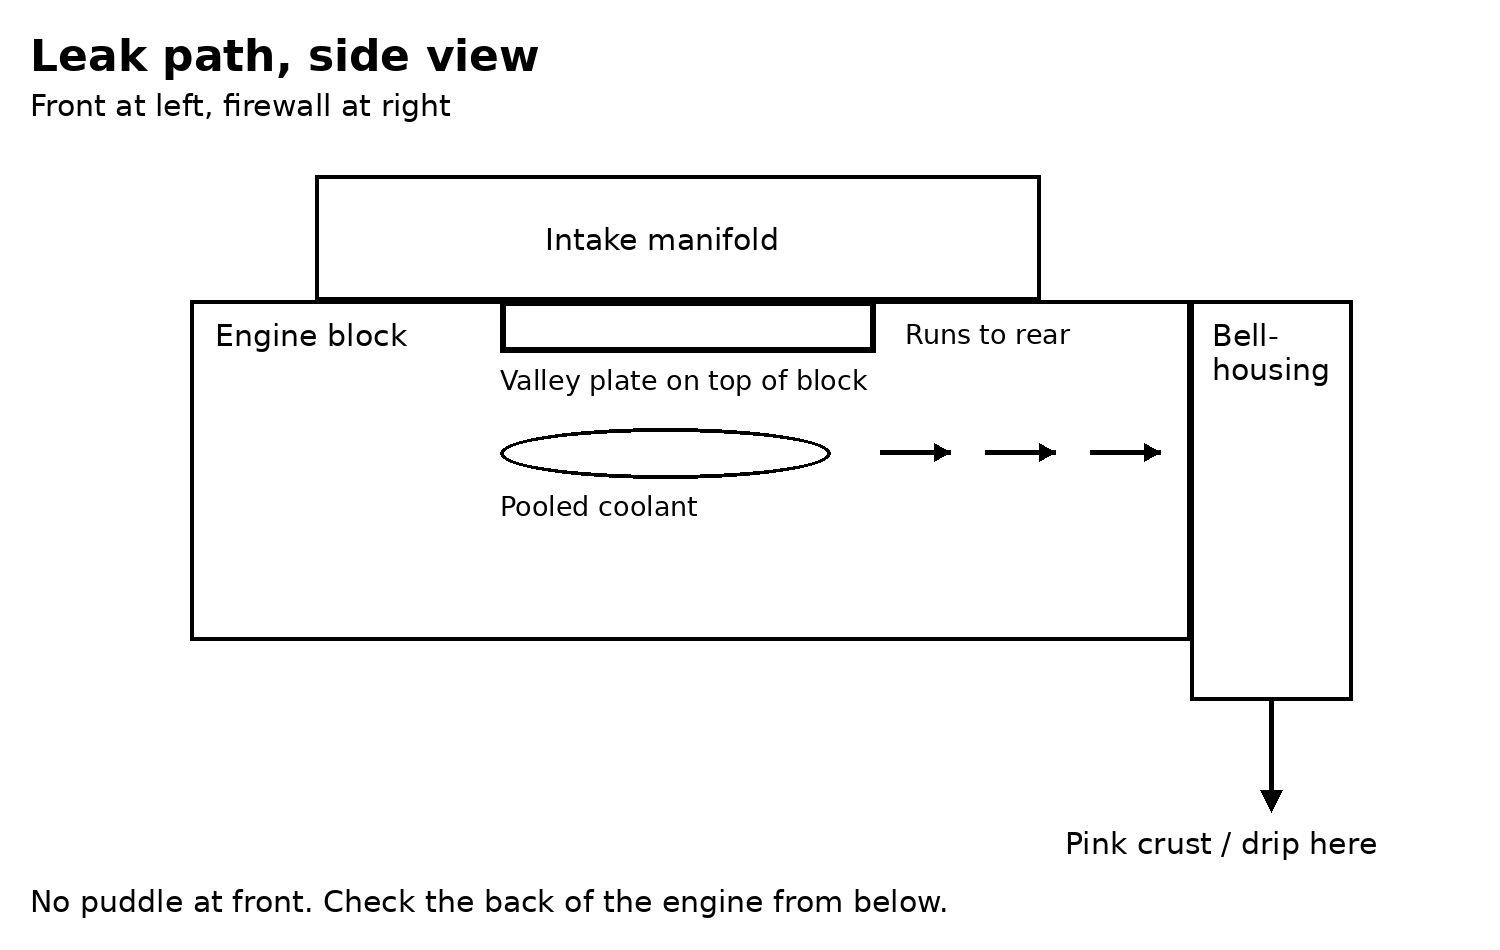
- Pink residue or a wet trail down the back of the engine and onto the transmission bellhousing, seen from below behind a front wheel.
- Temperature gauge still normal in most cases, because the leak is slow. Normal gauge readings do not rule this leak out.
- Owners commonly report it near 100,000 miles. Treat that as an owner pattern. Toyota publishes no mileage threshold for this leak.
A puddle at the front, drips off the front of the engine, or pink crust around the water pump pulley point away from the valley plate. That is front of engine work. See the water pump section below.
How the leak travels
Coolant that escapes the plate seal has nowhere to go at first. The valley is a tray. It pools there, under the intake, out of sight. Heat bakes part of it into pink crust. The rest finds the back of the valley and runs down the rear of the block.
That travel path is why owners chase the wrong end of the truck. When a drip forms, it lands near the transmission, far from the source. A leak at the back of the engine on a GX460 should make you think valley first, then confirm it.
Confirm it before you open anything
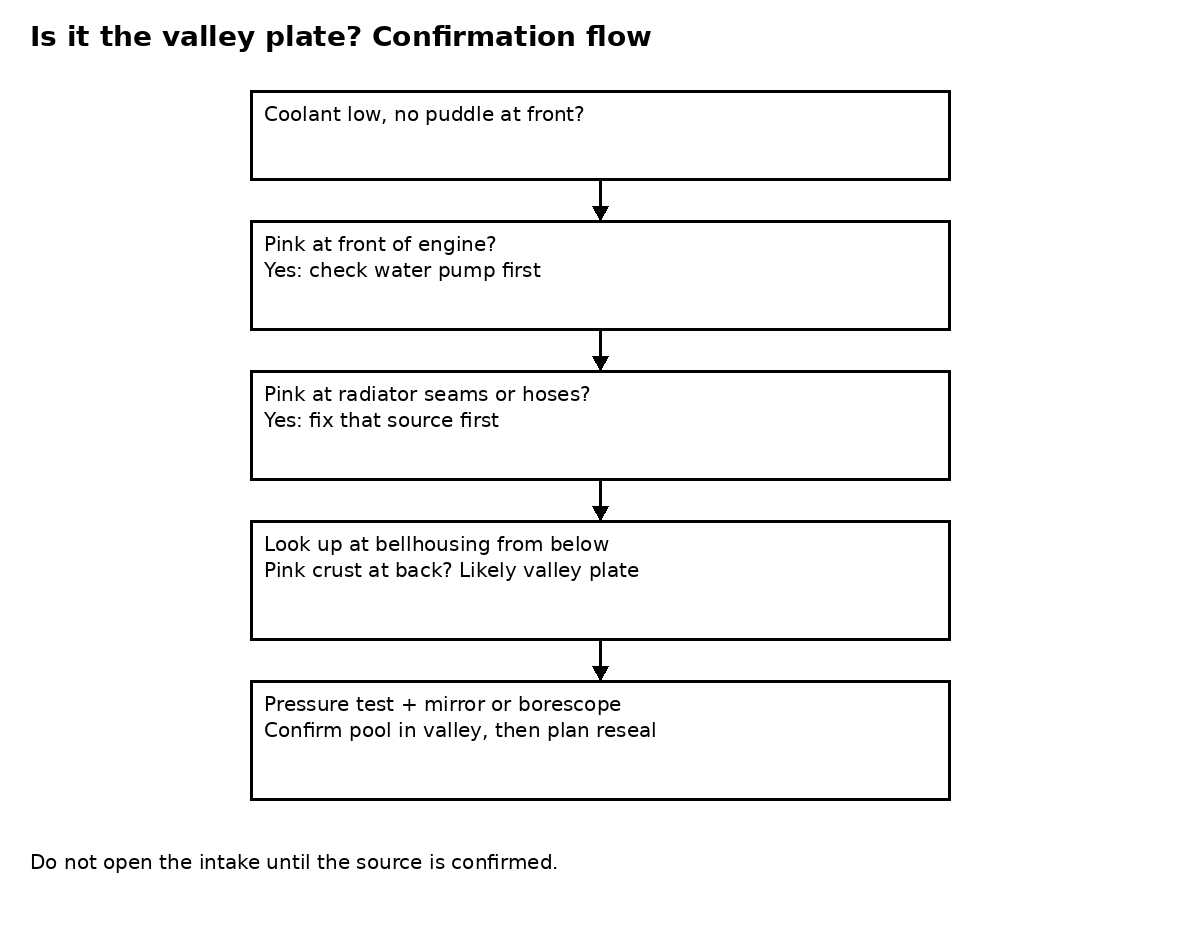
Work in this order. Each step rules out a cheaper job.
- Mark the reservoir level cold. Check it cold again over several drives. A steady cold level drop across those checks confirms the system is losing coolant.
- Inspect the front of the engine. Look for pink crust or wet coolant around the water pump, thermostat housing, and front bypass joints. Crust at the front means the leak is at the front.
- Inspect the radiator. Check the seams where the plastic tanks meet the core, the upper hose neck area, and the hoses and clamps. Our radiator preventative replacement guide covers seam failure signs on the GX radiator family.
- Inspect the heater hoses and tees at the firewall. A tee leak can also wet the back of the engine, so check the tees before you settle on the plate.
- Look at the bellhousing from below. Crawl under behind a front wheel and look up. Pink residue high on the bellhousing, with a dry front of engine, points to the valley plate.
- Look into the valley itself. Use a mirror and light at the back of the intake, or a borescope slipped in from the rear. Pink crust or pooled coolant in the valley confirms the area. If the valley is clean and dry, the leak is elsewhere.
- Run the pressure test last. Pressurize the cold system and watch for the level drop and for coolant appearing in the valley or at the back of the engine.
Home mechanic alternatives. Borrow a pressure tester from a parts store loaner program instead of buying one. Add UV dye made for coolant systems, drive a few cycles, and check the valley and bellhousing with a UV light in the dark. A phone borescope or a cheap USB inspection camera lets you inspect the valley for the price of one shop diagnostic hour. A small mirror on a stick and a bright light still work, and they cost almost nothing.
Valley plate versus water pump, radiator, and heater hoses
Each of these leaks leaves coolant in a different place, and the table below uses that location to separate them.
| Sign | Most likely source |
|---|---|
| Pink crust at the front of the engine, drips off the front, puddle ahead of the front wheels | Water pump |
| Pink at radiator tank seams, wet core edges, crust at the hose necks | Radiator or radiator hoses |
| Wet firewall hoses, crust at the plastic tees, coolant smell in the cabin area | Heater hoses or heater tees |
| Dry front, pink at the back of the engine and on the bellhousing, crust in the valley | Valley plate |
The water pump lives at the front of the 1UR-FE and is driven by the serpentine belt. Its leak stays at the front. The valley leak stays at the back. Our GX460 water pump guide covers pump symptoms, cost, and the full front of engine job. Do both diagnoses before you buy either parts set, because owners often meet these two leaks within a year or two of each other on higher mileage trucks.
A truck can have two leaks at once. Fixing the crust you found first does not prove it was the only source. Recheck the cold level for two weeks after any cooling system repair.
What the reseal job involves
This is an intake off job. The steps below follow the factory procedure at a high level.
- Work cold. Discharge fuel system pressure first. The factory intake procedure starts there, then disconnects the negative battery cable.
- Remove the intake manifold. The factory procedure removes the EGR valve, side covers, cowl louver, water pipe and hose assembly, bypass pipe connection, ventilation hose, reservoir, and air tube on the way in. The manifold itself comes off with 8 bolts and 2 nuts, and its 2 gaskets are replaced with new ones on install.[1]
- Clean the valley. Remove pooled coolant and crust. Inspect the plate, the bypass pipe joints in the valley, and the pipe O-ring sealing surfaces for pitting. Reseal the parts that are sound and replace any part that is pitted or cracked.
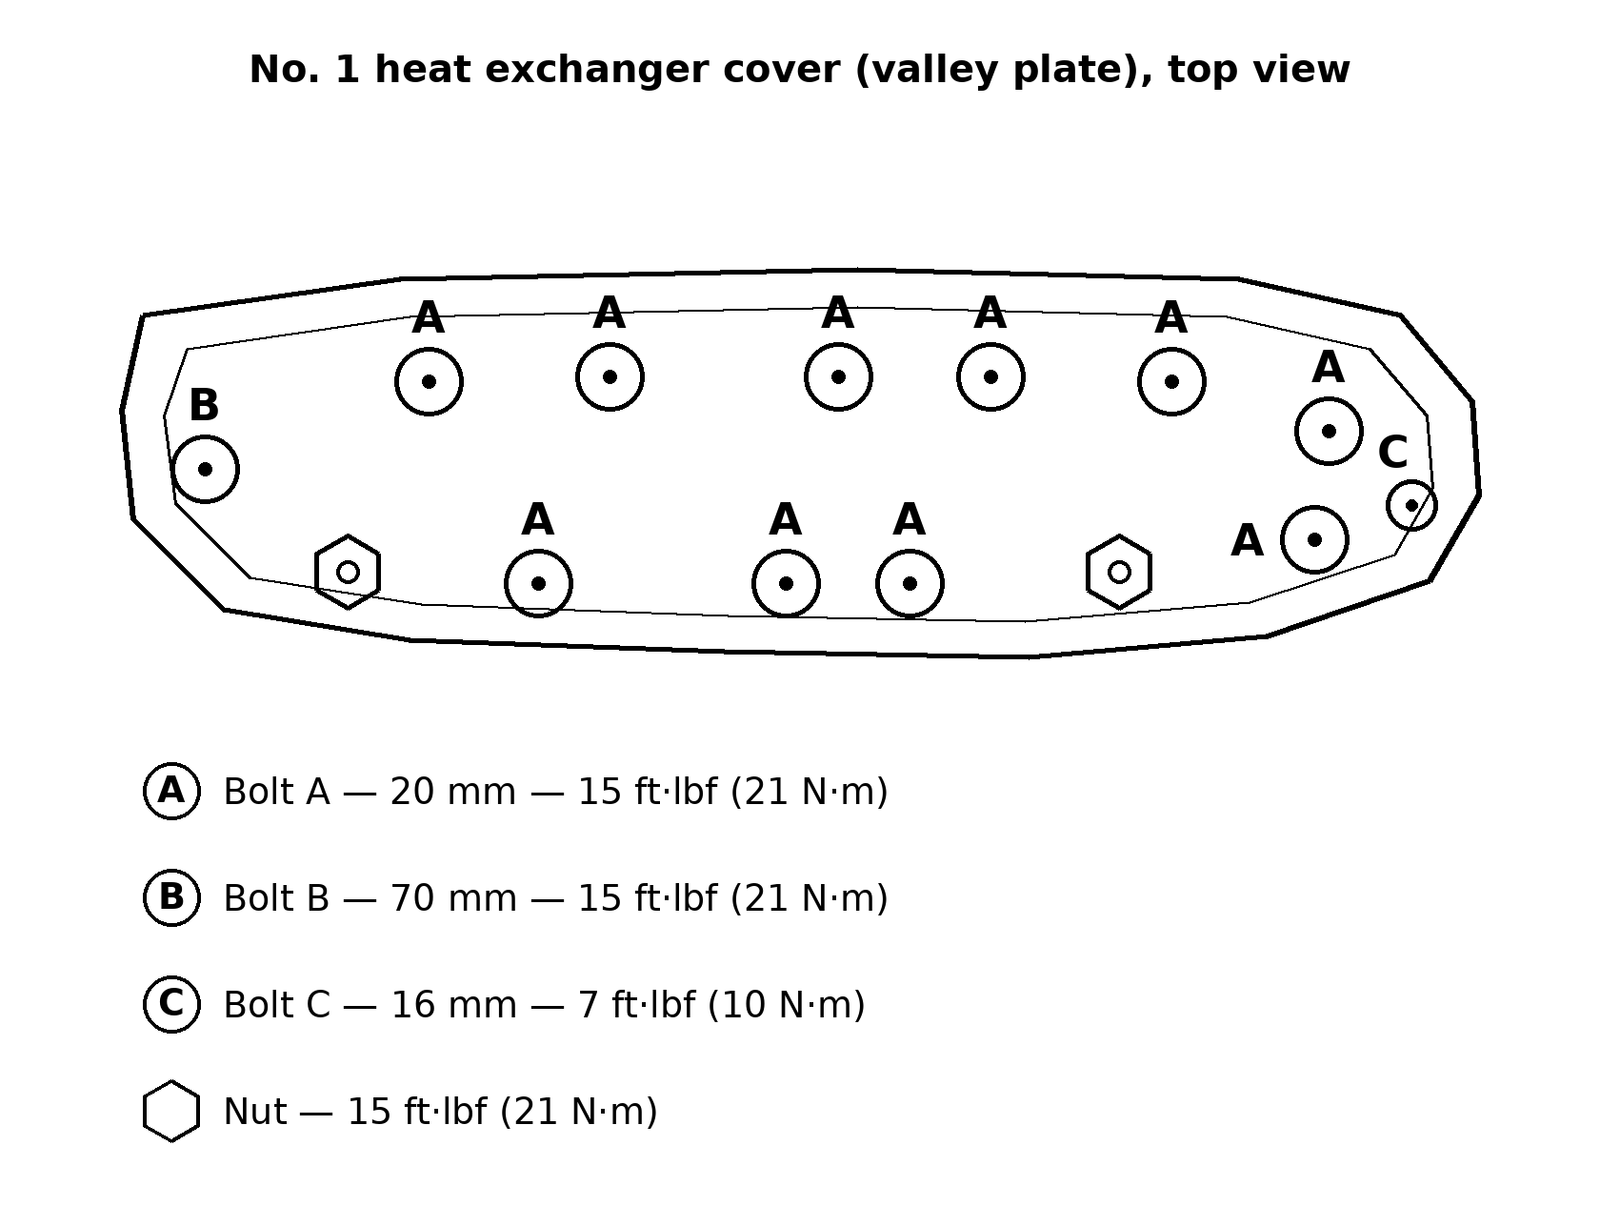
- Lift the plate. The factory overhaul procedure removes the No. 1 heat exchanger cover with 12 bolts and 2 nuts, prying carefully at the seal line without gouging the contact surfaces.
- Clean both sealing surfaces fully. Remove all old FIPG with a razor blade and gasket scraper, then wipe the surfaces clean and remove any oil from the contact surface.
- Apply new seal packing in a continuous line, 3.0 to 4.0 mm (0.118 to 0.157 in.) in diameter, using Toyota Genuine Seal Packing 1282B, Three Bond 1282B or equivalent.[2] Fit the cover within 3 minutes and tighten the bolts and nuts within 15 minutes of applying the seal packing.
- Torque the cover fasteners by bolt class. Bolt A, bolt B, and the nuts go to 15 ft·lbf (21 N·m). Bolt C goes to 7 ft·lbf (10 N·m). The bolt classes differ by length, so keep them in order as they come out.[3]
- Do not start the engine for at least 2 hours after installing the cover.
- Refit the intake manifold with new gaskets. Uniformly tighten the 8 bolts and 2 nuts in several steps to 15 ft·lbf (21 N·m).[1] Reconnect fuel lines, hoses, harness, and the parts removed for access.
- Refill and burp the cooling system, then leak check cold, hot, and again after several drive cycles. Watch the valley and the bellhousing, not just the reservoir.
Time and difficulty. No single step is exotic, but there are many steps, and several brittle plastic connectors and hoses live in the valley area. The fasteners and harness brackets at the back of the manifold are the slow, awkward part owners warn about. First timers should plan a full day and a clean parts layout, and label every connector and hose as it comes off. Keep a magnetic pickup tool within reach, because retrieving a dropped bolt from the valley takes real time.
While the intake is off, owners commonly inspect or replace the PCV valve, the EGR gaskets disturbed during access, the coolant pipe O-rings, and tired vacuum and coolant hoses in the valley. The factory procedure requires none of that work. Price each added item as its own line item on the quote.
Dealer versus DIY cost, owner reported
All figures in this section are owner reported from the threads in Sources. Prices vary by region and by how much extra work gets bundled while the intake is off.
- Owner reported dealer cost for the valley reseal alone: about $1,500, described as roughly $200 in parts with 6 to 8 hours of labor.
- One owner reported a dealer total of $1,700 for the job, with no leak after the repair.
- One owner of a 2018 truck reported a dealer quote of $3,400 for a valley reseal, on a truck that had also needed a water pump at low mileage. High quotes usually bundle extra work, so ask for the reseal line by itself.
- Owner reported DIY bare minimum: about $110 in consumables for a careful owner who reused sound parts where the write-up allowed it, rising to about $500 in that same write-up when the owner also replaced the water pump, thermostat, radiator, gaskets, and PCV valve while the truck was apart.
Labor makes up most of the bill on this job. The parts are cheap, and the hours go to removing and refitting the intake and everything around it. That is why confirming the diagnosis matters, and why owners bundle sensible valley work into the one time the intake is off.
Can you drive it while it leaks?
Many owners found this problem over weeks of watching the reservoir, and the truck kept driving during that time. A slow leak can speed up, the valley hides the rate, and an overheated aluminum V8 turns a reseal bill into an engine bill.
Top off only with the correct pink coolant, check the level cold before drives, and watch the temperature gauge. Do not use stop leak products. They do not repair an FIPG seal under the intake, and they can clog the heater core and radiator passages on the way there. Book the reseal, or park the truck until you can do it.
Parts and tools
Coolant first: full system capacity is 14.5 US qt without the rear heater and 16.3 US qt with the rear heater. A drain and refill uses less than the full dry capacity, so buy for top offs and spills as well.[4]
| Part | Details | Price |
|---|---|---|
| Seal packing 00295-01282 | Genuine Toyota tube for the 1282B specification, sold under factory number 08826-00100 | $83.78 plus $9.99 delivery |
| Intake manifold gaskets 17171-0S030 | Genuine Toyota, sold each, 2 required | $17.61 each |
| Intake manifold gasket set, Fel-Pro MS 97044 | Amazon | $16.99 |
| Coolant transfer tube O-rings 96761-35035 | eBay, 2 required | $15.14 |
| EGR valve gasket 25627-38020 | Genuine Toyota | — |
| EGR valve gasket, Standard Motor Products VG243 | eBay | $14.99 |
| PCV valve 12204-38030 | Genuine Toyota, Daytona Toyota | $16.74 |
| Toyota Super Long Life Coolant 00272-SLLC2, 1 gallon premix | eBay | $33.99 |
Tools:
- TEKTON TRQ50402 torque wrench, 1/4 inch drive, 20 to 200 in·lbf, $85.00. That range covers every torque in this guide, from bolt C at 7 ft·lbf (10 N·m) to the cover and manifold fasteners at 15 ft·lbf (21 N·m).
- Mityvac MV4560 cooling system pressure tester kit, $74.55, with Asian cap adapters for the Toyota radiator cap.
- LEAKFINDER LF3001CS coolant UV dye, 1 oz, $11.99, for the dye check in the dark.
- DEPSTECH DS300 borescope with 4.3 inch screen, $30.99, for looking into the valley before you open anything.
- Lisle 24680 spill free funnel, $28.78, for the refill and burp.
- Ullman HTC-2 telescoping inspection mirror, $17.20.
- FOSHIO plastic razor scraper set, $9.89, for old FIPG on finished surfaces.
- Socket set and ratchets, with deep and shallow sockets and extensions
- E Torx socket for manifold stud work, per the factory intake procedure
- Pry tool for the plate seal line, with tape on the tip to protect surfaces
- Pliers for hose clamps, including long reach pliers for rear hoses
- Drain pan and a way to soak up pooled coolant in the valley
- Magnetic pickup tool for dropped fasteners
- Labels, tape, and a phone for connector and routing photos
Home mechanic alternatives. If you have no low range torque wrench, borrow one, because the cover torques are low and uneven by bolt class and guessing them risks a warped seal or a snapped small bolt. If you have no borescope, the mirror and light check above confirms most leaks. If you have no pressure tester, the parts store loaner is the standard move, and the UV dye route needs only the dye and a cheap UV light. Rags and a turkey baster remove pooled coolant from the valley when no shop vacuum is available.
FAQ
Is a valley plate leak serious on a GX460?
Yes. It rarely strands you the week it starts, but it will not heal, the loss usually grows, and low coolant risks overheating. Confirm it, then schedule the reseal.
How do I know it is not the water pump?
The leak location separates them. Pump leaks show at the front of the engine with crust around the pump and drips off the front. Valley leaks keep the front dry and leave pink at the back of the engine and on the bellhousing.
Can I see the valley plate without removing the intake?
You can see into the valley edges with a mirror, light, or borescope from the back, enough to confirm pooled coolant and crust. You cannot reseal the plate without removing the intake.
What sealant does the valley plate use?
The factory manual specifies Toyota Genuine Seal Packing 1282B, Three Bond 1282B or equivalent, in a 3.0 to 4.0 mm bead. Owner threads debate other Toyota FIPG products in practice. Follow the manual spec, and confirm the product at the parts counter by VIN if there is any doubt.
How long does the reseal take?
Owner reported shop labor is 6 to 8 hours for the reseal. A first time DIY should plan a full day, plus the factory wait of at least 2 hours after fitting the cover before starting the engine.
Should I do the water pump at the same time?
Only if it shows leak signs or bearing noise. The pump is a front of engine job and does not share the intake off access, so bundling it is a mileage and condition call. Inspect it while the cooling system is drained.
Does the GX470 have this same leak?
No. The GX470 uses the 2UZ-FE with a different valley and cooling layout. Its common coolant checks are the radiator, heater hose tees, and the timing belt driven water pump area.
Will topping off coolant fix it?
No. Topping off only manages the level while the seal keeps failing. The fix is cleaning the surfaces and resealing the plate with new FIPG.
Sources
- GX460 factory service manual, engine service data, No. 1 heat exchanger cover installation, and intake manifold removal and installation.
- IH8MUD: DIY Coolant Valley Leak Repair
- IH8MUD: Reseal Valley Plate Leak and Alternator Replacement Costs
- IH8MUD: Engine valley plate leak
- IH8MUD: What did you pay for your valley plate coolant leak?
- TorqueNews: GX460 valley plate leak owner reports
- Tundras.com: Valley Plate Leak, FIPG sealant failure discussion
- The Truck Garage: GX470 Radiator Preventative Replacement
- The Truck Garage: GX460 Water Pump Replacement
Footnotes
[1] GX460 factory service manual, intake manifold: the manifold is held by 8 bolts and 2 nuts with 2 gaskets. Install torque is 15 ft·lbf (21 N·m), tightened uniformly in several steps. Fuel system pressure is discharged before removal.
[2] GX460 factory service manual, No. 1 heat exchanger cover installation: seal packing is Toyota Genuine Seal Packing 1282B, Three Bond 1282B or equivalent, applied in a continuous line at a standard seal diameter of 3.0 to 4.0 mm (0.118 to 0.157 in.). The cover is installed within 3 minutes of applying the seal packing and the bolts and nuts are tightened within 15 minutes. The engine is not started for at least 2 hours after installation.
[3] GX460 factory service manual, No. 1 heat exchanger cover: 12 bolts and 2 nuts. Torque for bolt A, bolt B, and the nuts is 15 ft·lbf (21 N·m). Torque for bolt C is 7 ft·lbf (10 N·m). Bolt lengths are A 20 mm, B 70 mm, C 16 mm.
[4] GX460 factory service manual, engine coolant specification: Toyota Super Long Life Coolant or the equivalent specified type. Capacity is 13.7 liters (14.5 US qt) without the rear heater and 15.4 liters (16.3 US qt) with the rear heater.
Leave a Reply