What the whine is
The GX470 and the GX460 steer with a hydraulic system. A belt-driven vane pump draws fluid from a reservoir, sends it under pressure to the steering rack, and the rack returns low-pressure fluid to the reservoir. The pump turns whenever the engine runs, and steering input raises the load on it.
A whine is the sound of that pump working against a problem. Air mixed into the fluid makes the pump whine because air compresses and fluid does not, so the vanes churn a foamy mixture instead of moving a solid column of fluid. Low fluid lets the pump draw air at the reservoir pickup. Worn vanes, a scored cam ring, or a worn housing make the pump whine because the pump can no longer seal internally and build full pressure. The diagnosis in this guide separates those three causes in order, because the first two are cheap and the third one is a pump replacement.
The abnormal noise diagnosis order for this system starts with low power steering fluid level, then steering system joints, then the vane pump, then the power steering link assembly. This guide follows that order and adds the suction side air checks that owner experience points to.
Scope for GX550 owners. The GX550 uses EPS, Electric Power Steering, with an electric motor that reduces the effort needed to turn the steering wheel. A GX550 has no vane pump, no power steering fluid, and no reservoir. Steering noise or heavy steering on a GX550 is an EPS diagnosis, and the power steering warning light points to dealer inspection. Nothing in the hydraulic sections below applies to a GX550.
Parts and tools
Gather the fluid and the inspection tools before the diagnosis steps. The parts list grows only after the checks name a failed part.
| Item | Used for |
|---|---|
| ATF DEXRON II or III fluid, 2 quarts on hand (case of 6 quarts) | Topping up, the reservoir exchange, and a full flush. Total system capacity is 1.0 liters (1.0 US qts) on the GX470 and 1.0 liters (1.1 US qts) on the GX460 |
| Turkey baster or a hand fluid extractor | The Home Mechanic reservoir exchange method |
| Mechanic’s stethoscope, or a long screwdriver | Isolating pump noise from the other belt-driven accessories |
| Flashlight and inspection mirror | Leak hunting at the pump, the hose crimps, and the rack boots |
| Drain pan and shop towels | Catching fluid at hose connections and cleaning parts before inspection |
| Jack and jack stands | Raising the front of the truck for the bleeding sequence |
| Hose clamp pliers and basic sockets | Suction and return hose service |
| Torque wrench covering 9 to 61 ft·lbf (12 to 83 N·m) | Pump and fitting torques if the pump comes off |
| Power steering pressure gauge set | The shop-level pressure test. Most Home Mechanics borrow this test from a shop |
Replacement parts to have only when a check calls for them:
| Part | Truck | Part number | Link |
|---|---|---|---|
| Reservoir-to-pump suction hose | GX470 | 44348-35250 | GX470 genuine hose 44348-35250 GX470 hose at Lexus Parts |
| Reservoir-to-pump suction hose | GX460 | 44348-35300 | GX460 hose 44348-35300 at Lexus Parts |
| Return hose | GX460 | 44412-35370 | GX460 return hose 44412-35370 |
| Pump inlet O-ring at the suction port union | GX470 | 90301-11016 | GX470 O-ring 90301-11016 |
| Pump inlet O-ring at the suction port union | GX460 | 90301-11020 | GX460 O-ring 90301-11020 |
| Hose clamps | GX470 and GX460 | No part number | hose clamps rated for oil service |
| Pressure feed tube connection gasket | GX470 and GX460 | 44327-30040 | gasket 44327-30040 |
Pump seal kits: GX470 gasket kit at Lexus Parts and the Sunsong GX470 pump seal kit. Lexus sells the hoses, O-rings, and gaskets by VIN, and the parts diagrams at parts.lexus.com show each connection before you order.
Step 1: Check the fluid first
Every whine diagnosis on this system starts at the reservoir. The check takes five minutes and it decides which branch of the diagnosis the truck follows.
- Park on level ground and stop the engine.
- Read the fluid level on the reservoir. On the GX470, read the level on the reservoir dipstick, in the HOT range when the fluid is hot and in the COLD range when the fluid is cold. On the GX460, read the level on the reservoir the same way. Fluid over 40 °C (104 °F) counts as hot on the GX460 and uses the HOT range.
- Note the color. Fresh ATF is red and translucent. Aged fluid runs brown to black, and fluid that smells burnt has been hot and worked hard. Dark fluid alone does not condemn the pump. Dark fluid tells you the fluid is old and that a refresh belongs in the plan.
- Look for foam and bubbles. Foam on the surface, bubbles rising in the fluid, or a pale milky look after steering input all mean air is in the system. When foaming or emulsification shows up, bleed the system. The bleeding section below covers it.
- Warm the fluid and run the level rise check. Start the engine, turn the wheel lock to lock several times to raise fluid temperature, and read the level at idle. Run the GX470 check at a fluid temperature of 75 to 80 °C (167 to 176 °F). Run the GX460 check at 80 °C (176 °F). Stop the engine, wait a few minutes, and read the level again. The level may rise 5 mm (0.20 in.) at most on a GX470, and approximately 5 mm (0.197 in.) on a GX460. A rise past that limit means air is trapped in the system. Bleed the system.
Record three facts before you move on: the level, the color, and whether the fluid foams.
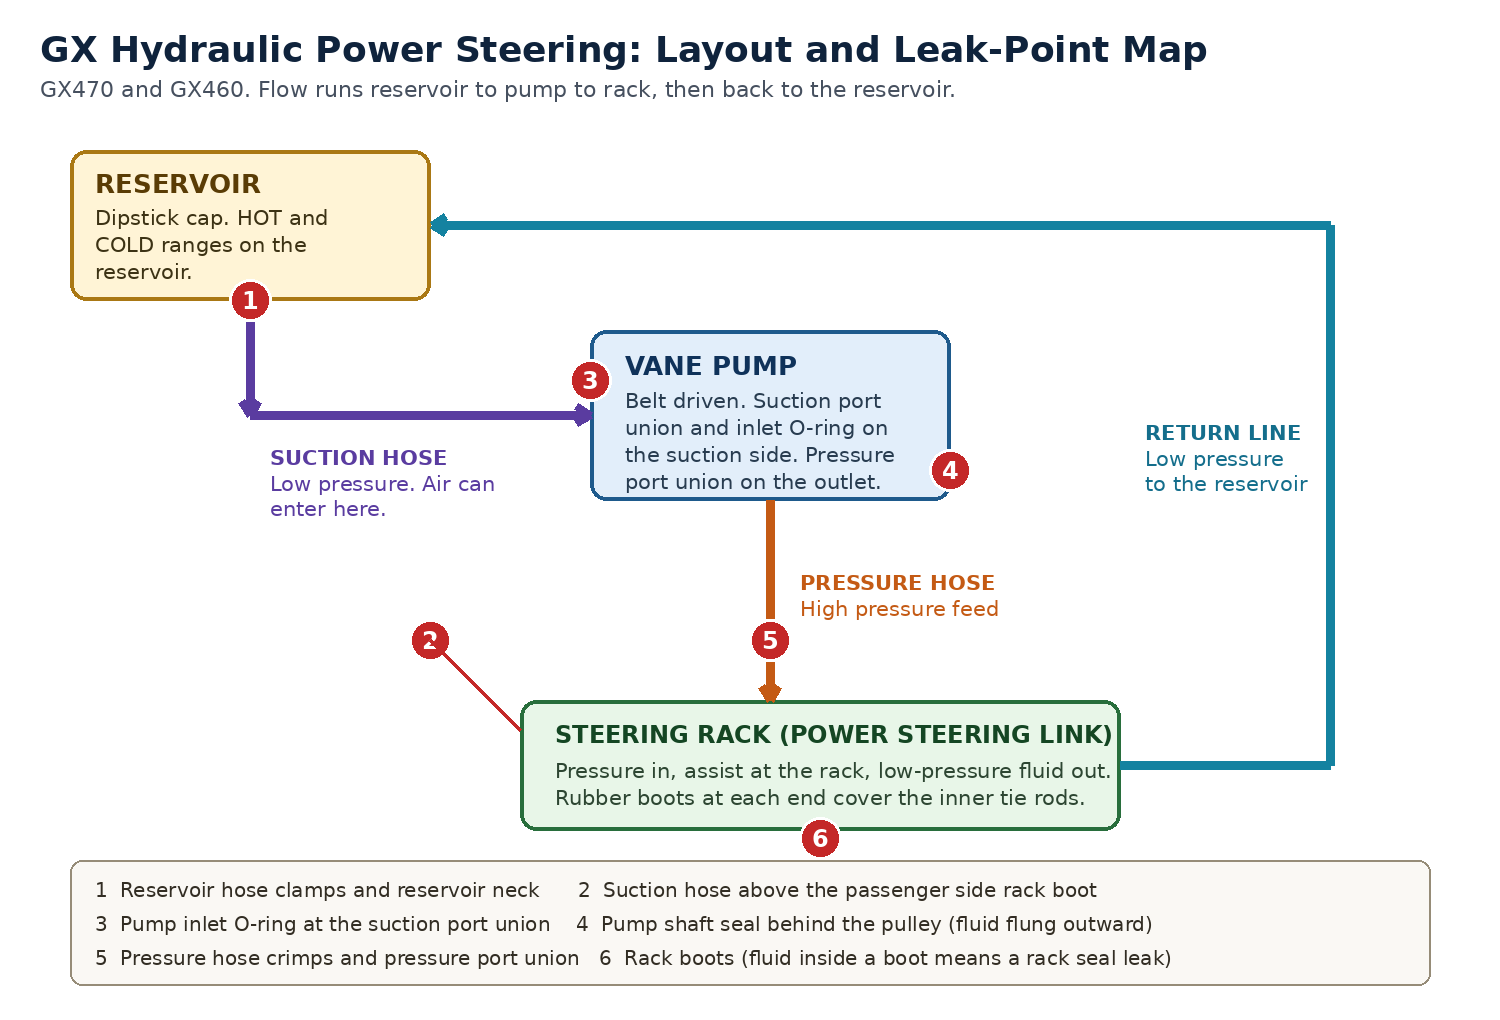
System layout and leak-point map. The numbered points match the ranked leak hunt in Step 5.
Step 2: Record when the whine happens
The timing of the whine carries the diagnosis. Run the truck through four conditions and write down what you hear in each one.
Cold only, fading as the truck warms. A whine that shows up on a cold start and fades within the first minutes of driving points to fluid condition and the suction side. Cold fluid is thicker, a marginal suction hose or a hardened inlet O-ring passes air more easily on a cold start, and both effects ease as the fluid warms and thins. Owners report this pattern often, and it responds to the fluid refresh and the suction side inspection in Steps 3 and 6.
Present at all temperatures. A whine that sounds the same hot and cold has moved past the fluid branch. Work the aeration check and the leak hunt, and expect the pressure test to make the final call on the pump.
Under load, quiet at idle. A whine that rises when you turn the wheel, and especially in a parking lot at low speed, means the noise follows pump load. Air in the fluid whines louder under load, and a worn pump whines louder under load, so this pattern alone does not separate them. The foam check in Step 1 and the aeration check in Step 3 do the separating.
Groan at full lock. A brief groan held at full lock is the relief side of the system working at maximum pressure. Do not hold the wheel at full lock for more than 10 seconds during tests. A groan that arrives before full lock, or a groan paired with heavy steering, belongs in the main diagnosis. The rack section near the end of this guide covers groans that come from the rack itself.
Step 3: Run the aeration check
Aeration means air entering the fluid and staying in circulation. The air enters on the suction side of the pump, between the reservoir and the pump inlet. That side of the system runs under vacuum while the pump draws, so a cracked hose, a loose clamp, or a hardened inlet O-ring can pull air inward and drip very little fluid outward. A dry looking suction hose can still be the air entry point.
- Start the engine and let it idle.
- Turn the wheel lock to lock two or three times, then hold the reservoir in view with the cap off.
- Watch the fluid for a full minute. Bubbles rising, a foam layer forming, or fluid that churns and stays pale all confirm aeration.
- Shut the engine off and inspect the suction path in order: the reservoir outlet, the reservoir-to-pump hose along its whole length, both clamps, and the suction port union where the hose path meets the pump. Squeeze the hose. A hose that feels hard, crunchy, or oil swollen has aged out.
- Check the pump inlet O-ring joint for wetness and dirt buildup. Dirt caked around a joint marks a long term seep, and a seep on the suction side is an air entry point.
If the system needs bleeding a second time because of foaming or emulsification, check the system for fluid leaks. Air that returns after a correct bleed is entering somewhere, and the suction path in this step is where it enters.
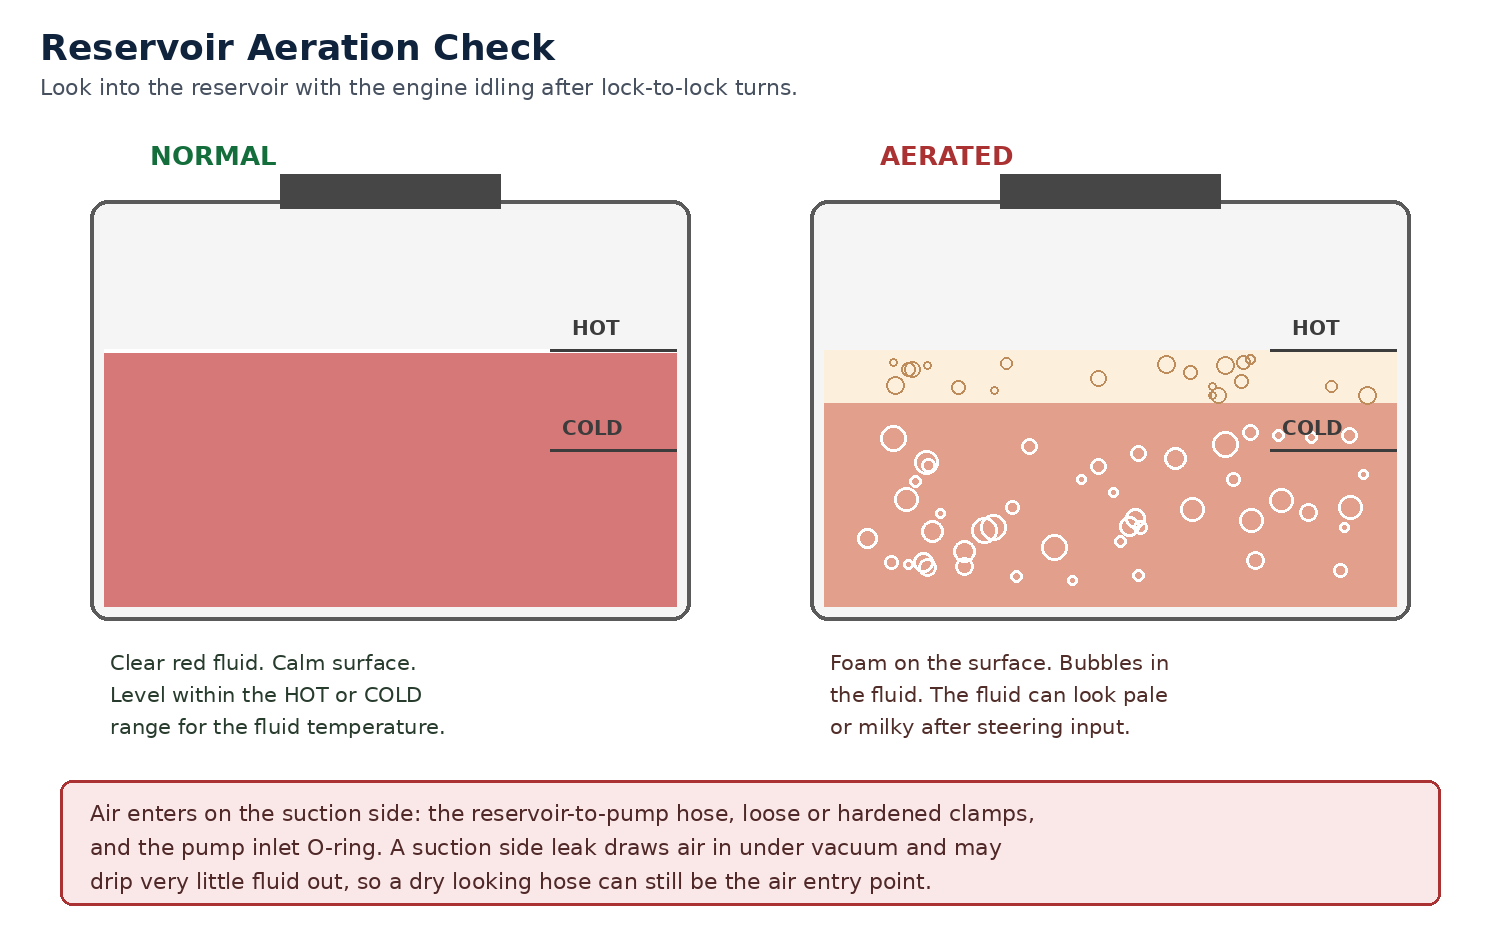
Reservoir aeration check. Foam and bubbles point to air entering on the suction side.
Step 4: Isolate the noise at the pump
Confirm that the whine comes from the power steering pump before you price one. The pump shares the front of the engine with the alternator, the air conditioning compressor, and idler pulleys, and each of them can sing.
- Inspect the drive belt first. Look for excessive wear and frayed cords, and replace a belt with missing rib chunks. A slipping belt squeals under steering load and can read as a pump whine.
- Start the engine and place a mechanic’s stethoscope probe on the pump body. Move the probe to the alternator and the compressor in turn. The accessory that carries the whine loudest in the probe is the source.
- The Home Mechanic version of the same test uses a long screwdriver. Place the tip on the pump body and the handle against your ear, and repeat at each accessory. Keep hands, sleeves, and the tool clear of the belt and the fan while the engine runs.
- Note whether the pulley runs true. A wobbling pump pulley points to a bent shaft or a failed pump bearing, and either one ends at pump replacement. Owners in the IH8MUD flush thread make the same check when a whine survives a flush.
A whine that isolates to the pump, with clean fluid at the correct level and no foam, is the pattern that sends you to the pressure test in Step 7 after the leak hunt and the fluid refresh have had their chance.
Step 5: Hunt leaks in ranked order
Low fluid sits first in the diagnosis order, and low fluid means fluid is leaving somewhere. Clean the pump, the hoses, and the rack area first, because old grime hides the fresh leak. Then work the points in this order, which follows the numbered points on the layout diagram and the ranking owners report.
1. Reservoir return and suction hoses and their clamps. Owner leak rankings put the reservoir hoses first. The hoses age, the clamps lose tension, and the connections weep. Owners quote about 15 minutes for a low-pressure line swap, and the job is clamps and hose only. The Truck Garage fluids guide covers fluid handling and disposal for this kind of work: GX Fluids Guide.
2. The reservoir-to-pump suction hose above the passenger side rack boot. This hose draws the most misdiagnosis on the GX470. It drips down onto the passenger side rack boot, and the wet boot reads as a leaking rack. Owners call this hose a notorious rack lookalike. Dry the boot and the hose, run the engine, and watch which one gets wet first before you price a rack.
3. The pump inlet O-ring at the suction port union. The suction port union seals to the pump with an O-ring on both models. Fit a new O-ring during pump service. A hardened O-ring seeps fluid and admits air, so this one part can produce a leak and a whine at the same time.
4. The pump shaft seal and the pump body O-ring. A Lexus Owners Club thread on a 2016 GX460 leak ranks the pump shaft seal and the body O-ring first among pump leaks, and owners in that thread give the tell: fluid flung outward by the pulley in a radial pattern around the pump. Fluid pooled below a still pump usually came from a hose or a fitting. Fluid sprayed in an arc came past the shaft seal while the pulley spun.
5. Pressure and return hose crimps, and the pressure port union. The pressure hose carries full pump pressure, and its crimp joints and the union at the pump are the pressure side leak points. The GX470 pressure feed tube connects to the pump with a union bolt and a gasket on each side of the tube eye, and the GX460 connects with a union bolt and a single gasket. Reused gaskets at this joint leak. Fit new gaskets whenever the joint opens.
6. Rack boots. Pull back or squeeze each rack boot. A boot with fluid inside it means a rack end seal is leaking into the boot. That finding belongs to the rack section at the end of this guide, and no pump work fixes it.
Step 6: Refresh the fluid, then decide on the flush
Fresh fluid fixes two whine causes: aerated fluid that needs to be replaced and bled, and aged fluid that has lost its condition. Fresh fluid does not repair worn vanes, a scored cam ring, or a scored housing. Make the decision on the evidence from Steps 1 to 5.
The reservoir exchange is the Home Mechanic refresh. It needs a turkey baster or a hand extractor and one quart of ATF DEXRON II or III.
- Stop the engine and pull the reservoir cap.
- Draw the fluid out of the reservoir with the baster or extractor, down to the reservoir outlet.
- Refill the reservoir to the COLD range with fresh fluid.
- Start the engine and turn the wheel lock to lock several times.
- Stop the engine, draw the reservoir down again, and refill.
- Repeat the cycle until the fluid coming out reads red and clean. The total system holds about 1.0 liters, so three to four reservoir cycles move most of the system volume through the reservoir.
The full flush moves the whole system at once. Disconnect the return line at the reservoir, route it into a drain container, and turn the wheel lock to lock slowly with the engine stopped and the front of the truck raised, while a helper keeps the reservoir filled with fresh fluid. Owners in the IH8MUD flush thread describe this method and its failure mode in detail: turning too fast froths the fluid, letting the reservoir run dry pumps air through the whole system, and a brittle return line draws air and makes the flush worthless. Work slowly, keep the reservoir above the outlet at all times, and inspect the return line before you start. That thread is in the Sources section.
Bleed the system after any opened connection.
- Check the fluid level and top up to the correct range.
- Raise the front of the vehicle and support it with stands.
- With the engine stopped, turn the wheel slowly from lock to lock several times.
- Lower the vehicle.
- Start the engine and let it idle for a few minutes.
- With the engine idling, turn the wheel to one full lock position and hold it there for 2 to 3 seconds. Turn to the opposite full lock and hold for 2 to 3 seconds. Repeat the cycle several times.
- Stop the engine and check for foaming or emulsification. Foam at this point means air is still entering or still trapped. Check the system for leaks when a second bleed is needed for foaming.
- Check the fluid level again and top up to the range for the fluid temperature.
Make the flush decision on the retest. If the whine leaves with fresh fluid, a sealed suction side, and a full bleed, the pump was working with bad fluid or air and the diagnosis is done. If the whine survives with clean fluid at the correct level and no foam after bleeding, the cause is inside the pump or the rack, and the pressure test decides between them.
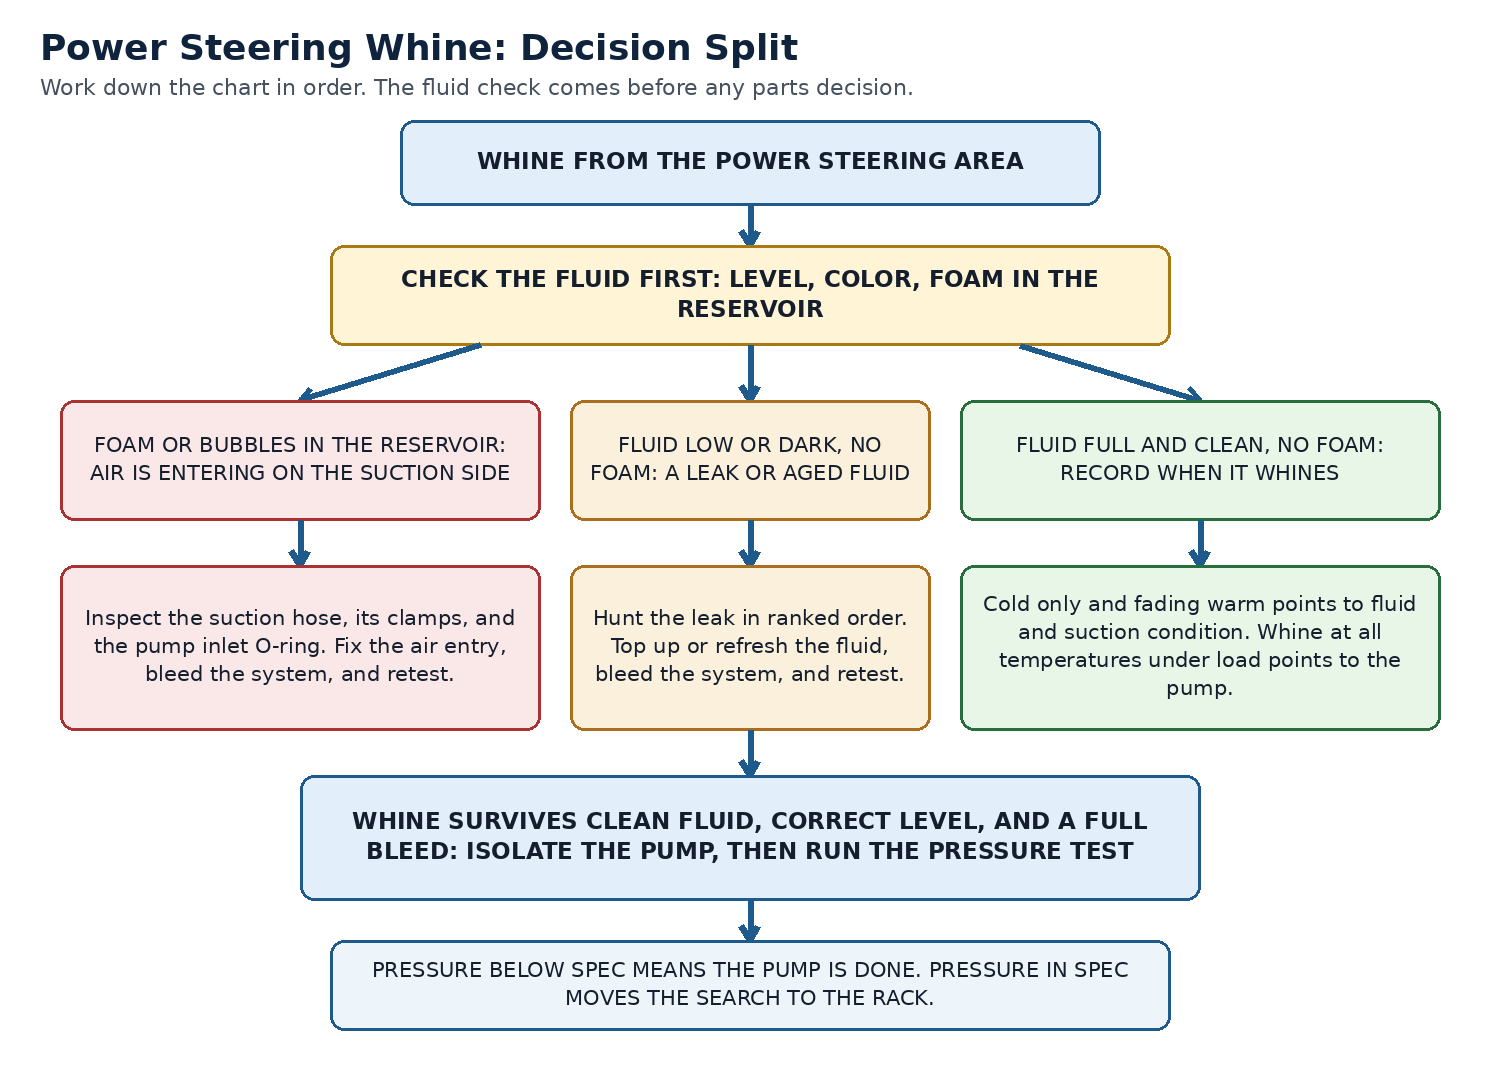
Whine decision split. The fluid check and the aeration branch come before any pump decision.
Step 7: Run the pressure test
The pressure test is the shop-level confirmation, and it is the test that separates a worn pump from a rack problem. It uses a pressure gauge set teed into the pressure feed tube connection at the pump. The test uses gauge set SST 09640-10010 with attachments 09641-01010, 09641-01030, and 09641-01060. A general power steering pressure kit covers the same job. Most Home Mechanics hand this test to a shop.
- Disconnect the pressure feed tube at the pump and connect the gauge set between the pump and the tube, with the gauge valve open.
- Bleed the system using the sequence in Step 6.
- Start the engine, run it at idle, and turn the wheel lock to lock several times to raise the fluid temperature to the test temperature for your model.
- Close the gauge valve with the engine idling and read the pressure. Hold the valve closed for no more than 10 seconds.
- Open the valve fully and read the pressure at 1,000 rpm and at 3,000 rpm without turning the steering wheel. Compare the two readings.
- With the valve fully open and the engine idling, turn the wheel to full lock and read the pressure. Hold full lock for no more than 10 seconds.
- Disconnect the gauge set, reconnect the pressure feed tube with new gaskets, and bleed the system again.
Standard values.
| Check | GX470 | GX460 |
|---|---|---|
| Pressure at idle with valve closed | Minimum 8,336 kPa (1,209 psi) | 8,300 to 8,800 kPa (1,204 to 1,276 psi) |
| Pressure at full lock with valve open | Minimum 8,336 kPa (1,209 psi) | 8,300 to 8,800 kPa (1,204 to 1,276 psi) |
| Pressure difference, 1,000 rpm vs 3,000 rpm | 490 kPa (71 psi) or less | 490 kPa (71 psi) or less |
Read the results as a pair. Pressure below the standard with clean fluid and a sealed suction side means the pump can no longer build pressure, and pump replacement is the repair. Pressure inside the standard with a whine that isolates away from the pump moves the search to the rack and the steering joints, and the rack section below covers that split. A steering noise that turns out to come from the front driveline instead of the steering system follows a different path, and the Truck Garage front drivetrain noise guide covers it: Front Drivetrain Noise Diagnosis. A vibration complaint that arrives with the noise belongs to the highway vibration guide: Highway Vibration Diagnosis.
Step 8: Replace the pump when the test condemns it
Pump replacement follows the removal order below. The outline carries the shared order, with the model differences called out where the models differ. Replacement pumps: MOCA pump for the GX470, GX470 pump with pulley, and Getanye pump for the GX460.
- Drain the power steering fluid and remove the parts that block access. The GX470 procedure removes the air cleaner assembly. The GX460 procedure works through the right front wheel opening and removes the fan and generator belt after the air cleaner case.
- Loosen the belt tensioner and remove the drive belt from the pump pulley.
- Disconnect the reservoir-to-pump hose at the pump. On the GX470, the same step frees the two small vacuum hoses at the pump.
- Disconnect the pressure feed tube at the pump. Remove the union bolt and the gaskets, and cap the tube so dirt stays out.
- Remove the pump. The GX470 pump comes off with two bolts, a nut, and a stud bolt that takes a Torx E10 socket. The GX460 pump comes off with two bolts.
- Transfer the fittings to the replacement pump with new O-rings and gaskets. Coat each new O-ring with power steering fluid before assembly. The GX470 pulley transfers with its set nut. Fit new gaskets on both sides of the GX470 pressure feed tube eye, and a new gasket at the GX460 pressure feed tube.
- Install the pump and torque the fasteners from the table for your model.
- Reconnect the hoses and the belt, fill the reservoir, bleed the system with the Step 6 sequence, and check every connection for leaks at idle and at full lock.
GX470 torque values
| Connection | Torque |
|---|---|
| Vane pump assembly to engine, 2 bolts and nut | 32 ft·lbf (43 N·m) |
| Vane pump assembly to stud bolt | 16 ft·lbf (22 N·m) |
| Vane pump pulley set nut | 32 ft·lbf (44 N·m) |
| Pressure feed tube assembly to vane pump, union bolt | 38 ft·lbf (51 N·m) |
| Pressure port union | 61 ft·lbf (83 N·m) |
| Suction port union set bolt | 9 ft·lbf (13 N·m) |
| Vane pump housing rear to housing front, 4 bolts | 17 ft·lbf (24 N·m) |
GX460 torque values
| Connection | Torque |
|---|---|
| Vane pump assembly, 2 bolts | 32 ft·lbf (43 N·m) |
| Pump rear bracket to vane pump assembly | 32 ft·lbf (43 N·m) |
| Pressure feed tube union bolt | 37 ft·lbf (50 N·m) |
| Pressure port union | 51 ft·lbf (69 N·m) |
| Pressure feed tube to pressure port union | 51 ft·lbf (69 N·m) |
| Suction port union set bolt | 9 ft·lbf (12 N·m) |
| Vane pump front housing to rear housing | 16 ft·lbf (22 N·m) |
GX470 pump overhaul inspection limits. The rotor carries 10 vane plates.
| Part or check | Limit type | Value |
|---|---|---|
| Vane plate height | Minimum | 0.33858 in. (8.6 mm) |
| Vane plate thickness | Minimum | 0.05500 in. (1.397 mm) |
| Vane plate length | Minimum | 0.59020 in. (14.991 mm) |
| Clearance between the rotor groove and the vane plate | Maximum | 0.00130 in. (0.033 mm) |
| Flow control valve spring free length | Minimum | 1.264 in. (32.1 mm) |
| Flow control valve | Inspection | Inspect for leakage |
A Home Mechanic with a clean bench can inspect a GX470 pump against those limits and reseal it with a seal kit when the internals pass. A pump with plates or clearances past the limits gets replaced as an assembly. While the front of the truck is apart for pump work, the suspension refresh guide lists the steering and suspension wear items worth checking in the same session: GX470 Suspension Refresh.
The rack split: groan and fluid in the boots
The rack makes its own noises, and they survive a healthy pump. The power steering link assembly, the rack assembly, sits after the vane pump in the abnormal noise diagnosis order, so a truck that passes the pressure test with a groan still has a named suspect.
Work the rack split with three checks.
- Squeeze both rack boots. Fluid inside a boot confirms a rack end seal leak, and the repair is rack service or a replacement rack.
- Listen at the rack with the stethoscope while a helper turns the wheel at idle. A groan or a grinding note that peaks at the rack body, with a quiet pump, belongs to the rack.
- Check the steering joints and the intermediate shaft for play. Worn joints clunk and groan under load and sit ahead of the rack in the diagnosis order.
A rack that leaks into the boots loses fluid slowly, so it often arrives as the low fluid whine at the top of this guide. Work in this order. Seal the suction side. Refresh the fluid. Prove the pump with the pressure test. Condemn the rack last.
Stop conditions
Stop the diagnosis and change the plan when any of these shows up.
Metal in the fluid. Glitter, flakes, or gray paste in the reservoir or on the dipstick means pump or rack metal is circulating. Stop driving the truck on that fluid. The system needs a full flush, the source of the metal found, and the rack treated as at risk, because circulated metal scores the rack seals and the replacement pump if it stays in the system.
Steering effort rising. A wheel that gets heavy at parking speed means assist is falling. Low pressure from a failing pump and a rack fault both do this, and the truck should not stay in daily service while the cause is open.
Fluid level dropping between checks. A level that falls over days means an active leak. Find it with the ranked hunt before the reservoir runs low enough to run the pump dry, because a pump run dry wears in minutes and turns a hose repair into a pump replacement.
A second bleed that still foams. Foam after two correct bleeds means air is entering as fast as you remove it. Go back to the suction path in Step 3 and find the entry point before any further parts decisions.
FAQ
Will a power steering flush fix a whining pump?
A flush fixes the whine when the cause is air in the system or aged fluid, and it works after the air entry point is sealed. Air entering at the suction hose, the clamps, or the pump inlet O-ring refills the system with foam as fast as fresh fluid goes in. A whine caused by worn vanes or a scored pump housing stays after a flush, and the pressure test in Step 7 is the check that proves which case you have.
What fluid does a GX470 or GX460 power steering system use?
Both systems specify ATF DEXRON II or III. The GX460 specification adds “or equivalent.” The GX470 system holds 1.0 liters (1.0 US qts). The GX460 system holds 1.0 liters (1.1 US qts). Generic power steering fluid with a stop-leak additive is a different product from the specified ATF, and this guide prints no recommendation for it.
Why does my GX whine only on a cold start?
The cold-only pattern points to fluid condition and the suction side. Cold fluid is thicker, and a hardened suction hose or inlet O-ring passes air more easily before the engine bay warms. Run the fluid check and the aeration check in Steps 1 and 3, refresh the fluid, and retest fully warm. A whine that stays at full operating temperature follows the pump branch of the diagnosis.
Why is the fluid in my reservoir foamy?
Foam means air is mixed into the fluid and circulating. The air enters on the suction side, at the reservoir-to-pump hose, its clamps, or the pump inlet O-ring, or it stays trapped after a hose or pump job that ended without a full bleed. Bleed the system with the Step 6 sequence. Treat foam that returns as an air entry problem and check the system for leaks.
How do I tell a suction hose leak from a rack leak?
Clean and dry the passenger side rack boot and the suction hose above it, run the engine, and watch which part gets wet first. The suction hose drips onto the boot, so a wet boot with a wet hose above it usually starts at the hose. Fluid found inside the boot, with the hose and the boot surface dry, means a rack end seal is leaking into the boot.
Can I keep driving while the steering whines?
Keep the reservoir at the correct level and find the cause promptly. A whine from low fluid or air gets worse as the level falls, and a pump run low wears quickly. Park the truck and change the plan when the fluid shows metal, when steering effort rises, or when the level drops between checks. The stop conditions section lists all three.
Does the GX550 have power steering fluid to check?
No. The GX550 uses EPS, Electric Power Steering, with an electric motor providing the assist. It has no hydraulic fluid, no pump, and no reservoir, and steering faults on a GX550 are electronic diagnoses.
Sources
- GX470 factory manuals, Power Steering section: on-vehicle inspection, bleeding, fluid level and pressure checks, vane pump components, overhaul, and preparation (fluid and capacity)
- GX460 factory manuals, Power Assist Systems: vane pump on-vehicle inspection, removal, disassembly, reassembly and installation, problem symptoms table, service data, and torque specifications
- 2024 GX550 owner’s manual, driving support systems and warning light sections (EPS description)
- IH8MUD, Power steering flush gone wrong, forum.ih8mud.com
- IH8MUD, 25% incline and power steering fluid everywhere, forum.ih8mud.com
- Lexus Parts, parts diagrams and part lookup by VIN, parts.lexus.com
Leave a Reply