Scope and program status
The GX470 dash problem has two forms that often arrive together. The pad surface cracks in visible lines across the top of the dash. The pad surface also degrades into a shiny finish that feels sticky or adherent and throws glare in sun. Lexus documented both forms and ran a warranty enhancement program that replaced affected pads at no charge while the program stayed open. That program has closed for every GX470 truck. Primary Coverage ended on May 31, 2017. Secondary Coverage ended ten years after each truck entered service, and every 2003 to 2008 truck passed that date by 2018. A GX470 owner in 2026 faces a records question first and a paid repair decision after that question returns an answer.
A used GX470 buyer can use the same material during an inspection: The Ultimate GX Buying Guide.
GX460 owners get a scope section near the end, and GX550 owners get a scope note. The program and bulletin documents in this guide cover the GX470 only.
Parts and tools
Gather the confirmation tools before any purchase.
| Item | Used for |
|---|---|
| Camera or phone | Photographs of the cracks, the shiny areas, and the airbag door outline for the records check |
| Soft cloth and mild interior cleaner | The dressing check on a small test area |
| Dash Mat For Lexus GX470 2003-2009 (Wellvisors), or the Fcovergurus carpet dash cover, custom fit for the 2003 to 2009 GX470 (Amazon alternate) | The cover option that hides cracks and cuts glare |
| Leather and vinyl repair kit with mixable colors | The fill repair for an isolated hairline crack only: filler compound, texture, and color in one kit |
| Plastic trim tool kit | Trim and panel removal during a pad replacement |
| Steering wheel puller kit | Steering wheel removal |
| T30 Torx bit socket | The two horn button assembly Torx screws |
| Inch-pound torque wrench | The horn button Torx screws at 78 in.·lbf (8.8 N·m) |
| Torque wrench, 3/8 inch drive, 10 to 80 ft·lbf | Pad bolt B at 14 ft·lbf (20 N·m) and the steering wheel set nut at 37 ft·lbf (50 N·m) |
| Replacement trim clips for Toyota and Lexus, 345 pieces | Clips broken during console, garnish, and lower panel removal |
| Windshield Sun Shade Custom Fit For Lexus GX470 2003-2009 (Wellvisors), or the HeatShield custom-fit sun shade (Amazon alternate) | Daily protection for a repaired or replaced pad |
Replacement pad ordering needs a VIN check before money changes hands. The pad is the Pad Sub-Assy, Instrument Panel, Safety, quantity 1, with previous part numbers 55401-60904, 55401-60919, 55401-60900, and 55401-60915, and new kit numbers 04005-14660 and 04005-14760, each with color suffixes C0, C1, and E0. The program parts chart maps service part 55401-60926-C0 / -C1 / -E0 to kit 04005-14660-C0 / -C1 / -E0, and 55401-60922-C0 / -C1 / -E0 to kit 04005-14760-C0 / -C1 / -E0, and the program required the kit number where a kit number exists. The suffix selects the color and trim variant. Confirm the suffix by VIN on parts.lexus.com before you order, because this guide assigns no color to any suffix. LexusPartsNow lists the 55401-60926-C0 pad, the 55401-60922-C0 pad, and both kits, 04005-14660-C0 and 04005-14760-C0, as orderable. Match the center speaker opening on your truck to the opening on any pad you consider.
The condition on a GX470 dash
Lexus Service Bulletin L-SB-0011-15 covers certain 2003 to 2009 Lexus vehicles that may exhibit an instrument panel pad that becomes cracked and/or has a shiny/degraded appearance, and the surface may also become sticky or adherent. GX470 applicability covers 2003 to 2008 model years produced within the VIN range JTJBT20X#30001032 to JTJBT20X#80159573, where the # character marks the check digit position. Lexus received reports of cracked and/or sticky/melting dashboards as a result of heat or humidity, and the majority of affected vehicles were operated for extended periods in high temperature and high humidity areas.
Owners describe the crack locations in consistent places. The Lexus Owners Club thread in the Sources section records a 2003 truck with long cracks in the front edge of the instrument panel and at the driver side air vent, a hairline crack from the left side of the panel to the right side, and a crack on the passenger side above the glove compartment along the wood trim. ClubLexus owners add the area above the instrument cluster, including a 2004 truck with an 18 inch crack above the cluster in an owner report in the ZLD thread. The passenger airbag door outline can also show through the surface as a defined line. Run a fingertip lightly across the line. A crack catches the fingertip at a split edge. A door outline sits under an intact surface and feels smooth across the line.
A degraded surface also reflects sun across the windshield base, and an NHTSA complaint describes shiny spots giving glare in sun. Lexus documents treat the condition as a cosmetic and glare problem.
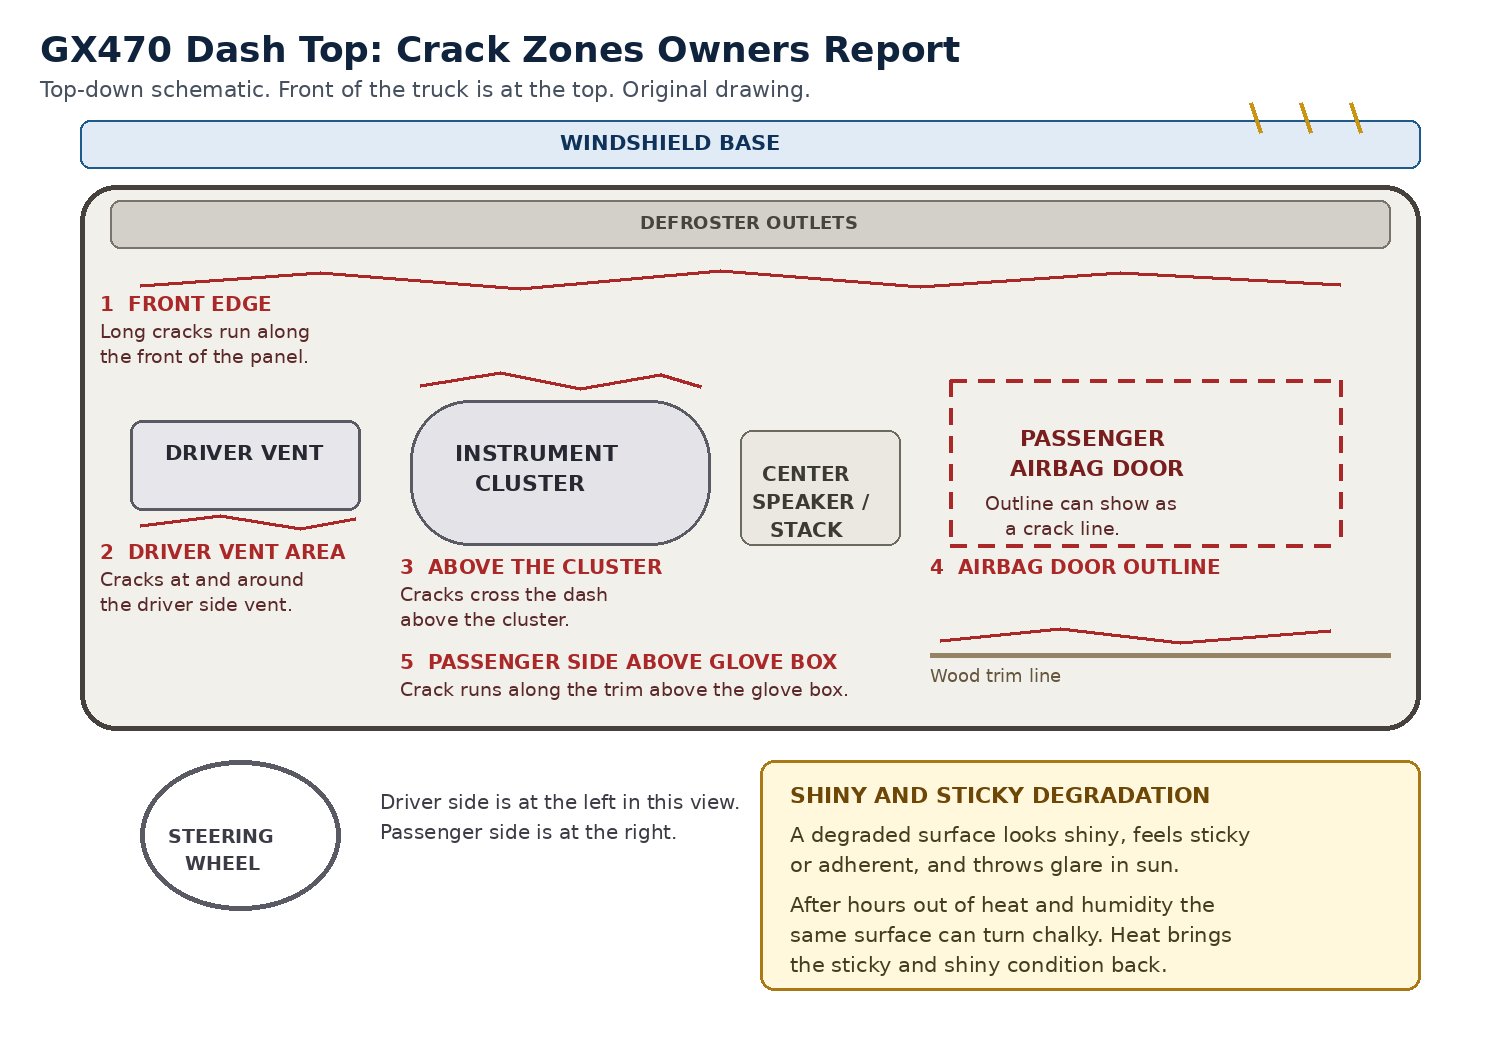
Crack zones owners report on a GX470 dash top.
How to confirm the condition
Confirmation takes three passes over the same dash. The first pass records cracks. The second pass tests the shiny and sticky surface. The third pass separates dressing shine from degraded material. Photograph the dash at the start and keep the photographs with the truck records for the dealer records question later in this guide.
Pass one records the cracks. Work in daylight with sun across the dash top. Trace each crack from end to end, note the zone from the crack map diagram, and note whether one edge lifts. A crack with lifted edges faces harder filler work than a flat hairline. Photograph each crack up close and photograph the full dash from both front seats. A cracked dash goes straight to replacement.
Pass two tests the surface by touch and by light. Press a clean fingertip to a shiny area away from any crack and lift it slowly. A degraded surface can feel sticky or adherent as the fingertip releases. Wipe a small test area with a soft cloth and mild interior cleaner, let the area dry fully, and repeat the touch test on that cleaned area only.
Pass three runs the chalky check. A truck with a sticky or shiny dash that is parked out of heat and humidity for more than a few hours turns chalky, and exposure to heat brings the sticky or shiny condition back. Park the truck in shade or in a garage for more than a few hours, and recheck the same test area before sun reaches the dash. A surface that turned chalky during the cool park and turns sticky or shiny again after heat returns matches the degraded condition.
Dressing shine. Aftermarket interior dressing products can also make a dashboard look shiny. Dressing sits on top of the pad material and can feel slick. Dressing holds its shine through a cool park while degraded material changes with temperature and humidity, and the chalky check on a cleaned test area separates the two.
Write the result in one of three forms. Form one is cracked, with or without sticky or shiny areas. Form two is sticky or shiny with a positive chalky check and no cracks. Form three is shine only with a negative chalky check, which points to dressing on an intact pad. Forms one and two go to the records check. Form three describes a cleaning task.
Warranty Enhancement Program ZLD
Warranty Enhancement Program ZLD sits in Lexus Warranty Policy Bulletin POL14-03, revised June 23, 2016. The program covered certain 2003 to 2008 GX470 trucks, and VIN applicability was verified in TIS, so model year alone never guaranteed coverage for a specific truck. GX470 part replacement was Phase 3 of the rollout, with a tentative mailing in late July 2015.
Base coverage for the dash was the Lexus New Vehicle Limited Warranty, at 4 years from date of first use or 50,000 miles. Primary Coverage under ZLD ran until May 31, 2017, regardless of mileage. Secondary Coverage after that date ran for 10 years from the date of first use, regardless of mileage. Secondary Coverage ended on the tenth anniversary of each truck entering service, and every 2003 to 2008 truck passed that date by 2018. No open ZLD coverage remains in 2026, and a dealer who checks a VIN today checks history and documentation.
The program repair replaced the Instrument Panel Safety Pad Sub-assembly at a GX470 flat rate time of 2.3 hours. Home Mechanic time runs much longer than the flat rate time.
A 2009 GX470 was never listed in the GX470 program coverage, which covered 2003 to 2008 only. Service Bulletin L-SB-0011-15 also lists the GX470 through the 2008 model year within the VIN range given earlier in this guide. A 2009 owner has the same checks, options, and replacement job in this guide.
One narrow exception survives the closing dates for a truck a dealership documented before its coverage expired, under a Lexus dealer letter dated March 22, 2017.
The records check for this truck
Run the records check before you spend money on any option in the next section. The check asks whether a dealer already replaced the pad on this truck under ZLD, and whether a dealership documented this truck before its coverage expired. Both questions go to a Lexus dealer with the full VIN.
Check for a pad already replaced under ZLD. A replaced pad carries the later part number family from the program parts chart, and a truck with a program replacement in its history holds a newer pad than its model year suggests. Ask the dealer to confirm the replacement date and the part number family when the history shows a pad job. Buyers should ask for the paperwork during the inspection covered in The Ultimate GX Buying Guide and should still run the chalky check.
The documented before expiry exception needs three elements. Lexus will authorize repairs after May 31, 2017 or after Secondary Coverage expires for a vehicle, provided the customer contacted the dealership about the repair before the end of coverage. The dealership must verify the condition and open and close a repair order for the replacement before the program expires for that vehicle. Element one is customer contact about the dash repair before the end of coverage. Element two is dealership verification of the condition during that contact. Element three is a repair order the dealership opened and closed before expiry. A truck that meets all three elements holds the only remaining program path in 2026, and a dealer makes that records finding by VIN. Ask the dealer to state the finding in writing, and keep pad orders paused while you wait.
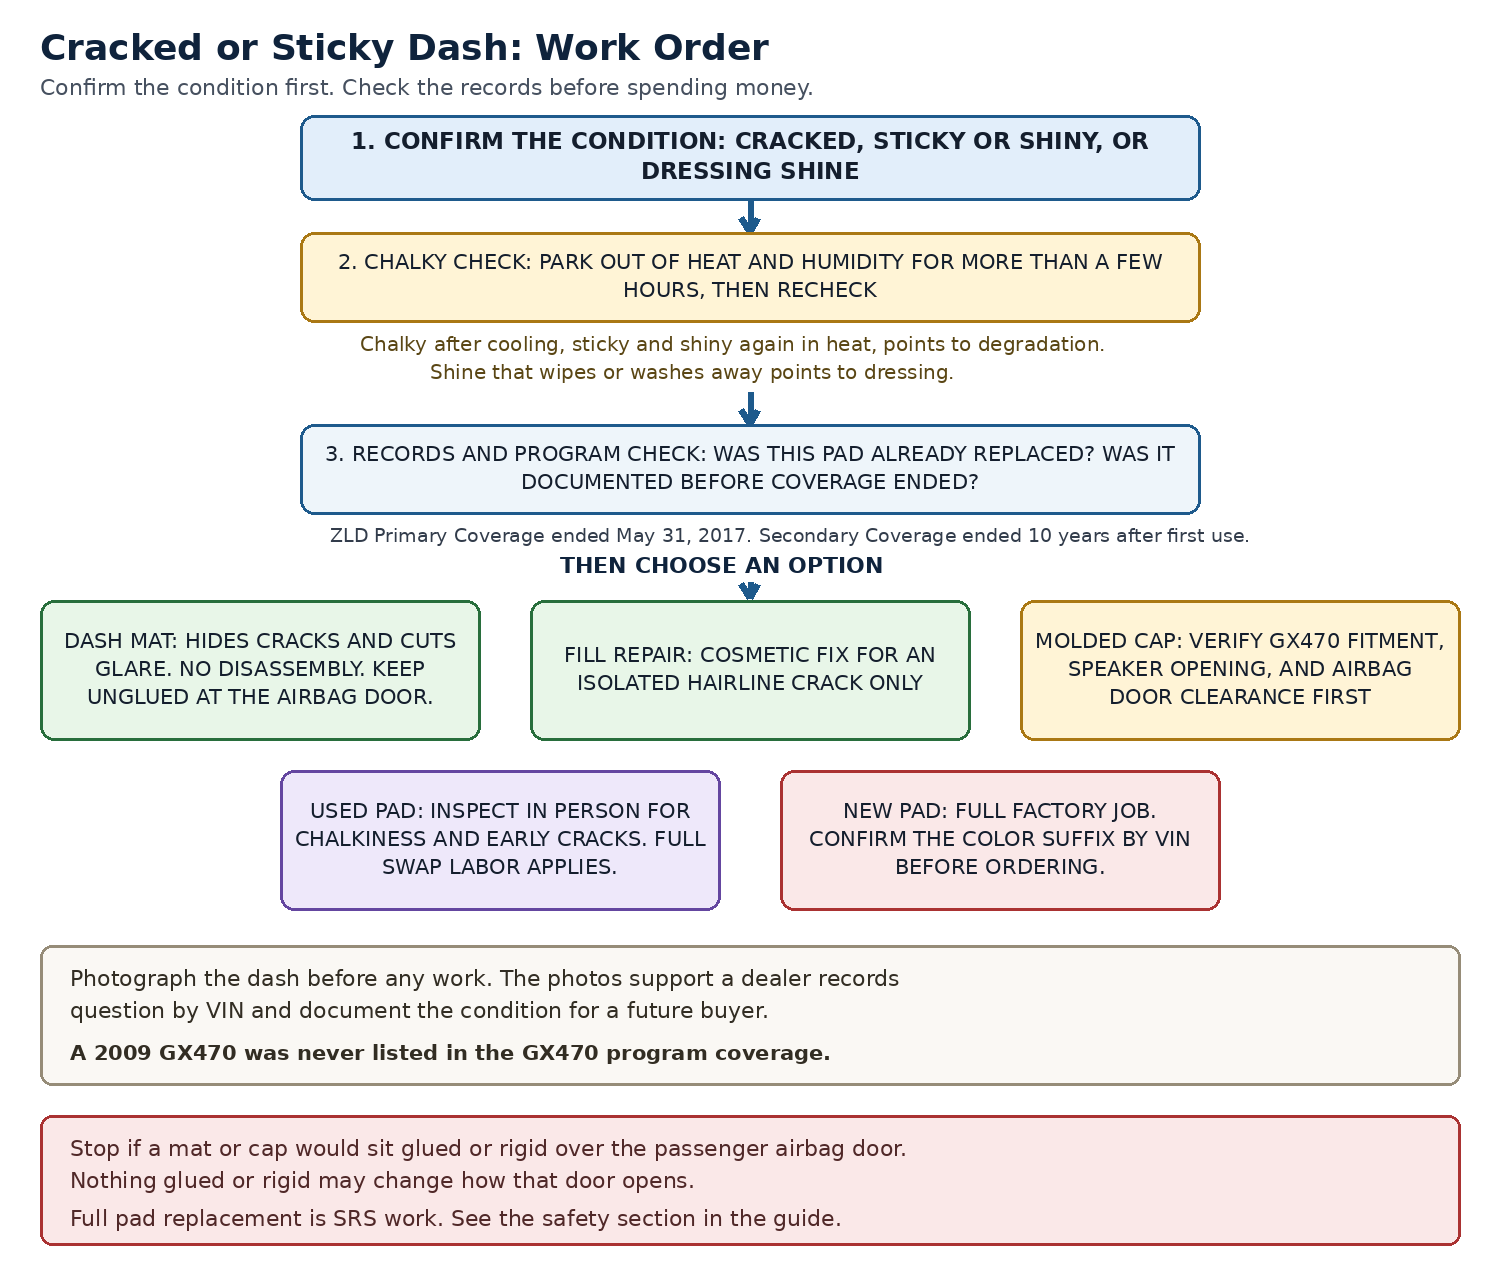
Work order for a cracked or sticky dash. Confirmation and the records check come before every spending option.
Ranked options for a degraded pad
The options below run from the least invasive work to the most invasive work. Cost figures carry dates and labels in every case. Owners who bought a cracked truck after the program closed report Lexus offering only a paid replacement at about $2,000 in one 2017 post for a desert truck in the ClubLexus thread. Dated owner reports from 2009 in the Lexus Owners Club thread give about $1,100 for the part and about $482 for labor in one certified pre-owned case, and a total near $2,000 in another case where the owner paid $489 of labor. Those dated owner reports promise no 2026 price.
| Option | What it does | Work involved |
|---|---|---|
| Dash mat | Covers the dash top, hides cracks, and cuts glare | No disassembly |
| Fill and texture repair | Fills and colors one isolated hairline crack | Surface work on the mildest crack pattern only |
| Molded cap or skin | A shaped shell glued over the old pad | Surface fitting, after the airbag door clearance questions are answered |
| Used pad | A donor pad swapped in place of the old pad | The full pad replacement job |
| New OEM pad | A new pad in the correct color variant and speaker opening | The full pad replacement job |
Dash mat
A fabric dash mat covers the dash top, hides the cracks, and cuts glare from a shiny degraded surface. The Dash Mat For Lexus GX470 2003-2009 from Wellvisors is the fitted mat this guide links, at $56.99 in November 2026. The mat needs no disassembly, touches no SRS component, and reverses in seconds. For a Home Mechanic, the mat is the first option to try before judging the more expensive options.
Fit the mat by model year and by equipment, with shaping that matches the defroster outlets, the center speaker opening, and the light sensor position. The mat must rest on the surface over the passenger airbag door area and stay unglued at that door. Adhesive strips that some kits include belong away from the airbag door outline.
Fill and texture repair
A fill and texture repair addresses one isolated hairline crack on a pad that otherwise holds a sound surface. The work cleans the crack, fills the split with a flexible filler made for interior vinyl work, levels the fill, adds texture to match the surrounding grain, and colors the repair to match the pad. Clean the crack and the surrounding surface fully before the filler goes in. The leather and vinyl repair kit in the parts table supplies the filler compound and the mixable colors for this work.
The pad around the repair stays degraded, and new cracks beside the repair are the common outcome owners should expect. A pad with cracks in two or more zones, lifted crack edges, or degradation across the top sits past the useful range of fill work. Treat fill work as a cosmetic trial on the mildest crack pattern only.
Molded cap or skin
A molded dash cap or skin covers the old pad with a shaped shell glued over the existing surface. GX470 specific caps exist. A dash cap overlay molded for the 2003 to 2009 GX470 was verified on eBay on November 14, 2026, with the center speaker opening, in taupe gray, at $167.49. The listing states a self-adhesive installation and gives no statement on passenger airbag door deployment clearance. Get written answers to four questions before ordering any cap.
Question one asks whether the mold was made for the GX470 dash specifically, with the model years named. Question two asks how the cap handles the center speaker opening, with and without the Mark Levinson center speaker. Question three asks how the cap clears the passenger airbag door, what the maker instructs for adhesive placement around that door, and whether the maker tested door deployment clearance with the cap fitted. Question four asks what adhesive the kit uses, how the cap handles the defroster outlets and the light sensor, and what return terms apply if the mold misses the GX470 contours. Any cap that requires adhesive across the airbag door or that sits rigid over the door fails the safety rule in this guide regardless of seller answers.
Used pad
A used pad comes from a donor GX470 and carries the same age and the same original material as the pad you would remove. One category stands apart. A pad from a truck whose dash was replaced under ZLD carries the later part number family, and that pad entered service years after the donor truck was built. A documented ZLD replacement pad is the strongest used option in this market.
Inspect any used pad in person before you pay. Run the confirmation passes on the used pad, check the five crack zones and the mounting points, and look for chalkiness. Press no area hard, because an aged pad can crack under handling pressure. The labor to swap a used pad equals the labor to swap a new pad. A used pad that fails a year later charges the owner the same full job a second time.
New OEM pad
A new OEM pad ends the dash problem with a fresh part in the correct color variant and with the correct speaker opening. Order by VIN, confirm the color suffix on parts.lexus.com, and confirm whether the order needs a kit number from the program parts chart. The IH8MUD classified listing posted in November 2026 gives a labeled market data point. That classified seller claim from November 2026 describes a new GX470 dashboard as part number 55401-60926-C0, black with gray lower trim, with the Mark Levinson center speaker opening, and the seller states a retail figure of $827.21 and an asking price of $580 for pickup. The seller’s retail figure matches the Lexus list price for the part. A parts check on November 14, 2026 found the pad orderable at LexusPartsNow at $596.77 against the $827.21 list price, with both program kits orderable at $596.77 each. The classified listing itself promises no availability for any other buyer.
The flat rate time of 2.3 hours gives the professional labor benchmark. Owner reports placed paid replacements near $2,000 in total in a 2009 owner report and in a 2017 owner report, each labeled with its year earlier in this section. Collect two quotes with the part number and kit number written on each quote. Home Mechanics should read the full replacement section before ordering and schedule a full day or a weekend. The console work overlaps the Truck Garage head unit guide: GX Head Unit Guide.
Replacing the pad with a new OEM pad
The factory procedure for the Instrument Panel Safety Pad Sub-assembly runs to 69 numbered steps. This section groups those steps into stages in factory order. Photograph every connector and clip row before separation, label connectors with tape, and keep fasteners for each stage in a separate labeled container. One owner who did the job at home counted about 121 clips and 23 harness connectors across the job in an owner report in the Lexus Owners Club thread.
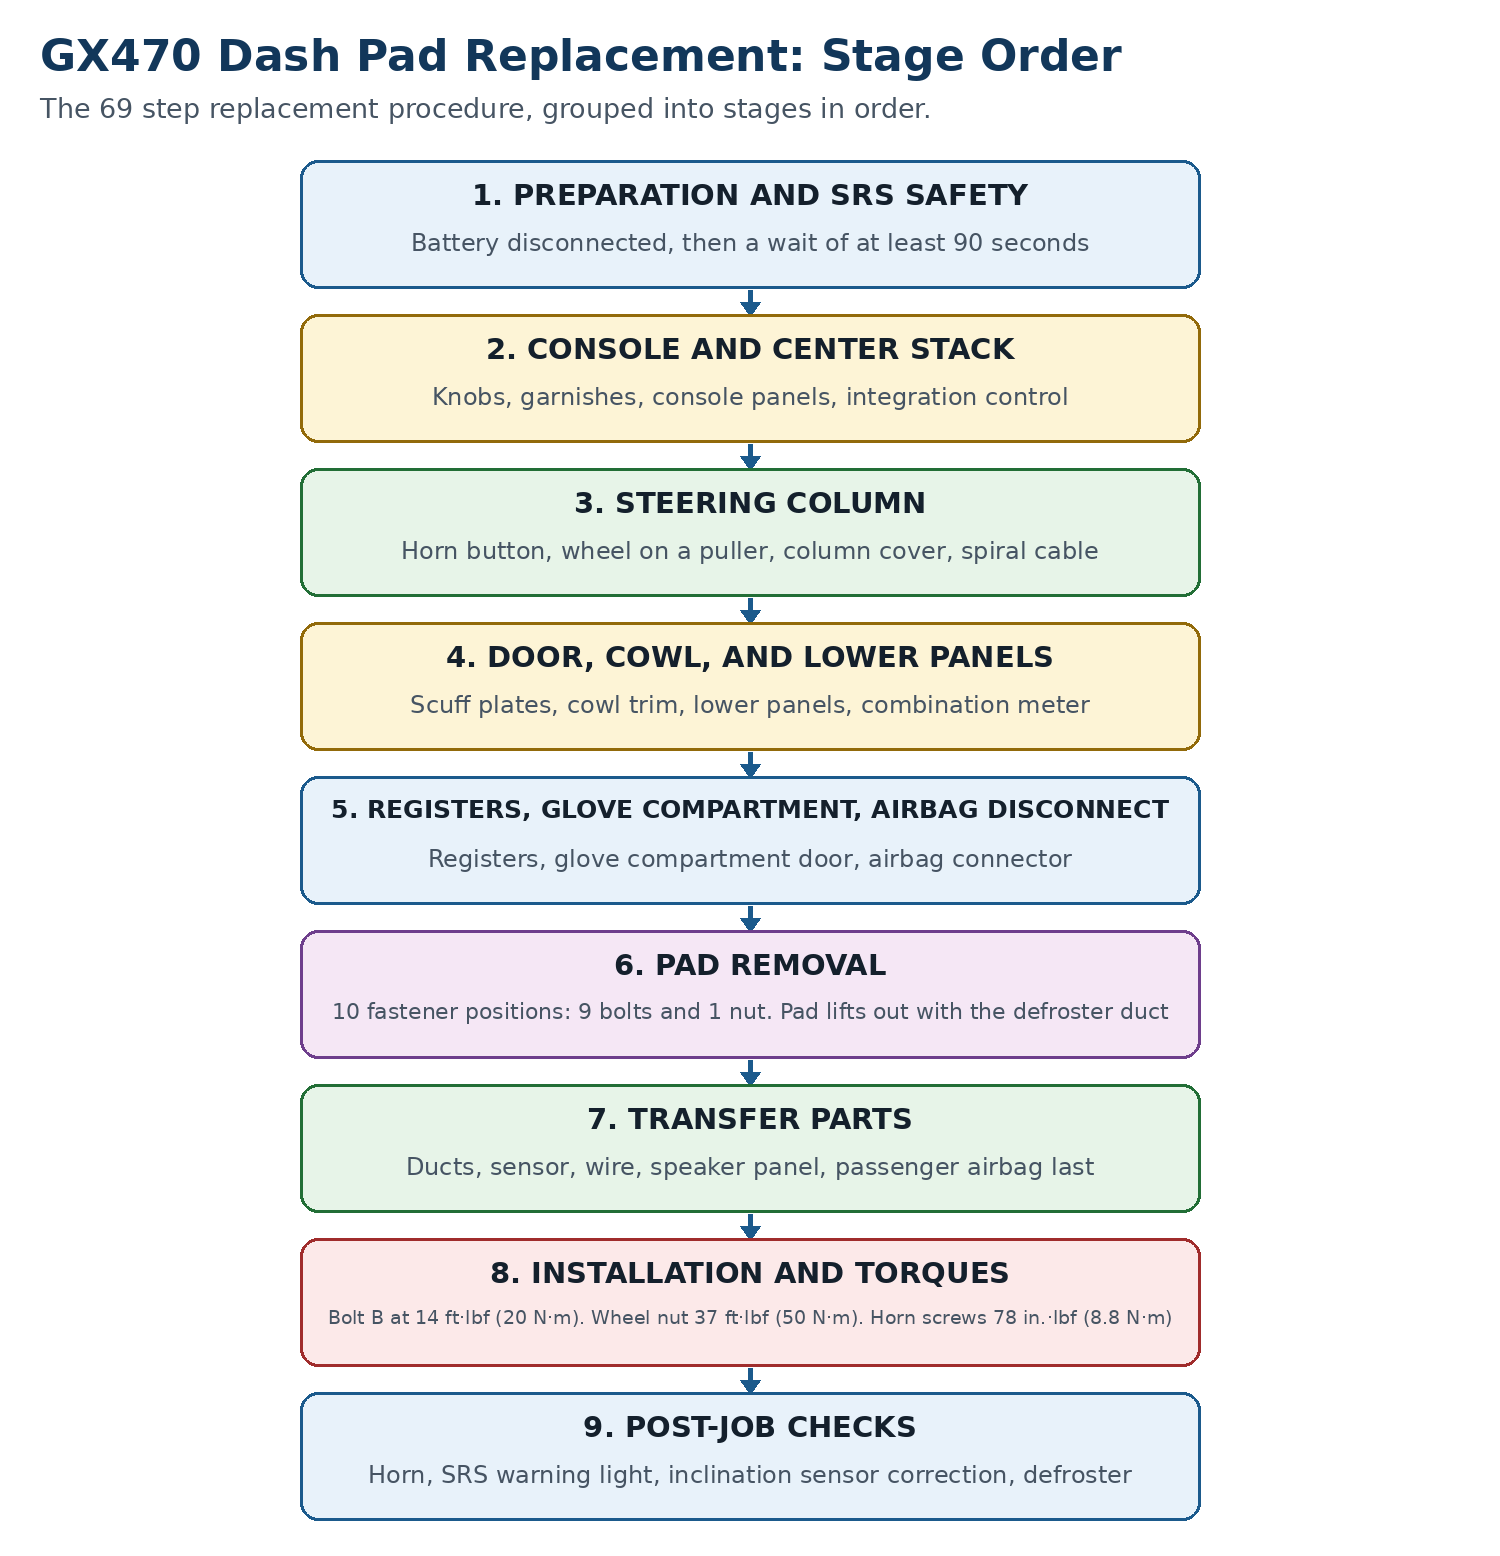
The nine stages of the pad replacement, in order.
Preparation and SRS safety
Disconnect the negative battery terminal and wait at least 90 seconds before starting work. Work on level ground, because the closing steps include a sensor correction that needs a level surface. Clear a padded work surface for both pads.
Store the removed passenger airbag assembly with the airbag side facing up, keep grease off the assembly, and keep the assembly away from heat and flames. The assembly attaches to the pad with 2 screws, and removal releases the rear side wall of the airbag door from its hook by deflecting the wall slightly and rolling the assembly forward, then releases the front side wall from the other hook. Nothing rigid and nothing glued may sit over the passenger airbag door in a way that could change how the door opens. Dash mats rest on the surface and stay unglued at the door. Any cap product must clear the door.
Console and center stack stages
Remove the shift lever knobs first. Remove the console upper panel garnishes and the console panel upper assembly next. The clip counts for this stage are 3 clips for garnish No.2, 4 clips for garnish No.1, and 11 clips for the console panel upper. Work each garnish loose with a plastic trim tool at the clip positions and lift evenly. Remove the instrument panel garnish sub-assemblies on the left and right sides. Remove the instrument cluster finish panel center lower, which carries 5 clips. Remove the integration control and panel assembly. This area overlaps the job in the GX Head Unit Guide. Remove the console rear end panel, the rear console box, held with 2 bolts and 2 screws, the console inserts, and the console box lower.
Steering column stages
Remove the steering wheel covers and the horn button assembly. The horn button Torx screws use a T30 socket, and their torque appears in the torque table later in this section. Remove the steering wheel assembly with a steering wheel puller. Mark the wheel position on the shaft before separation. Remove the steering column cover and the turn signal switch assembly with the spiral cable, and keep the spiral cable centered while it sits off the column.
Door, cowl, and lower panel stages
Remove the front door scuff plates, the front floor footrest, and the cowl side trim boards on both sides. Remove the instrument panel under cover No.1, held with 1 screw, 2 clips, and 1 claw. Remove the cluster finish panel ornament, the switch hole base, and the finish plate. Remove the finish lower panel on the right side, which carries 3 bolts, and the instrument panel lower on the left side, which carries 3 bolts. Remove the cluster finish panel sub-assembly. Remove the combination meter assembly, held with 4 screws followed by loosening 2 bolts. Label the meter connectors with extra care. The closing steps cover the meter connector click and check pin rule and the inclination sensor correction.
Registers, glove compartment, and airbag disconnect stages
Remove the instrument panel registers No.1 and No.2 and the instrument panel under cover No.2. Remove the glove compartment door assembly, held with 5 screws and 2 clips. Disconnect the passenger airbag connector at this stage, with the battery long disconnected and the 90 second wait long past. Photograph the connector lock action before you release it. Remove the instrument panel ornament, the assist grips, and the front pillar garnishes. The dash pad itself comes next.
Pad removal and the fastener count
Remove the pad fasteners and disconnect the connectors, then remove the instrument panel safety pad sub-assembly with the defroster nozzle duct as one unit. The fastener position diagram shows 10 positions in total, with 1 bolt type B, 6 bolts type C, 2 bolts type E, and 1 nut type A, which matches the removal count of 9 bolts and 1 nut. The two-bolt pair carries the label E in the 2003 to 2006 procedure text and the label D in the 2007 and 2009 procedure text. The pair is two bolts in every year, and the 10 position total and the bolt B torque are the same in every year. Keep a hand or a helper hand under the pad as the last fasteners come out. Lift the pad clear, check the empty dash structure for dropped clips, and set the old pad next to the new pad with both pads facing the same direction.
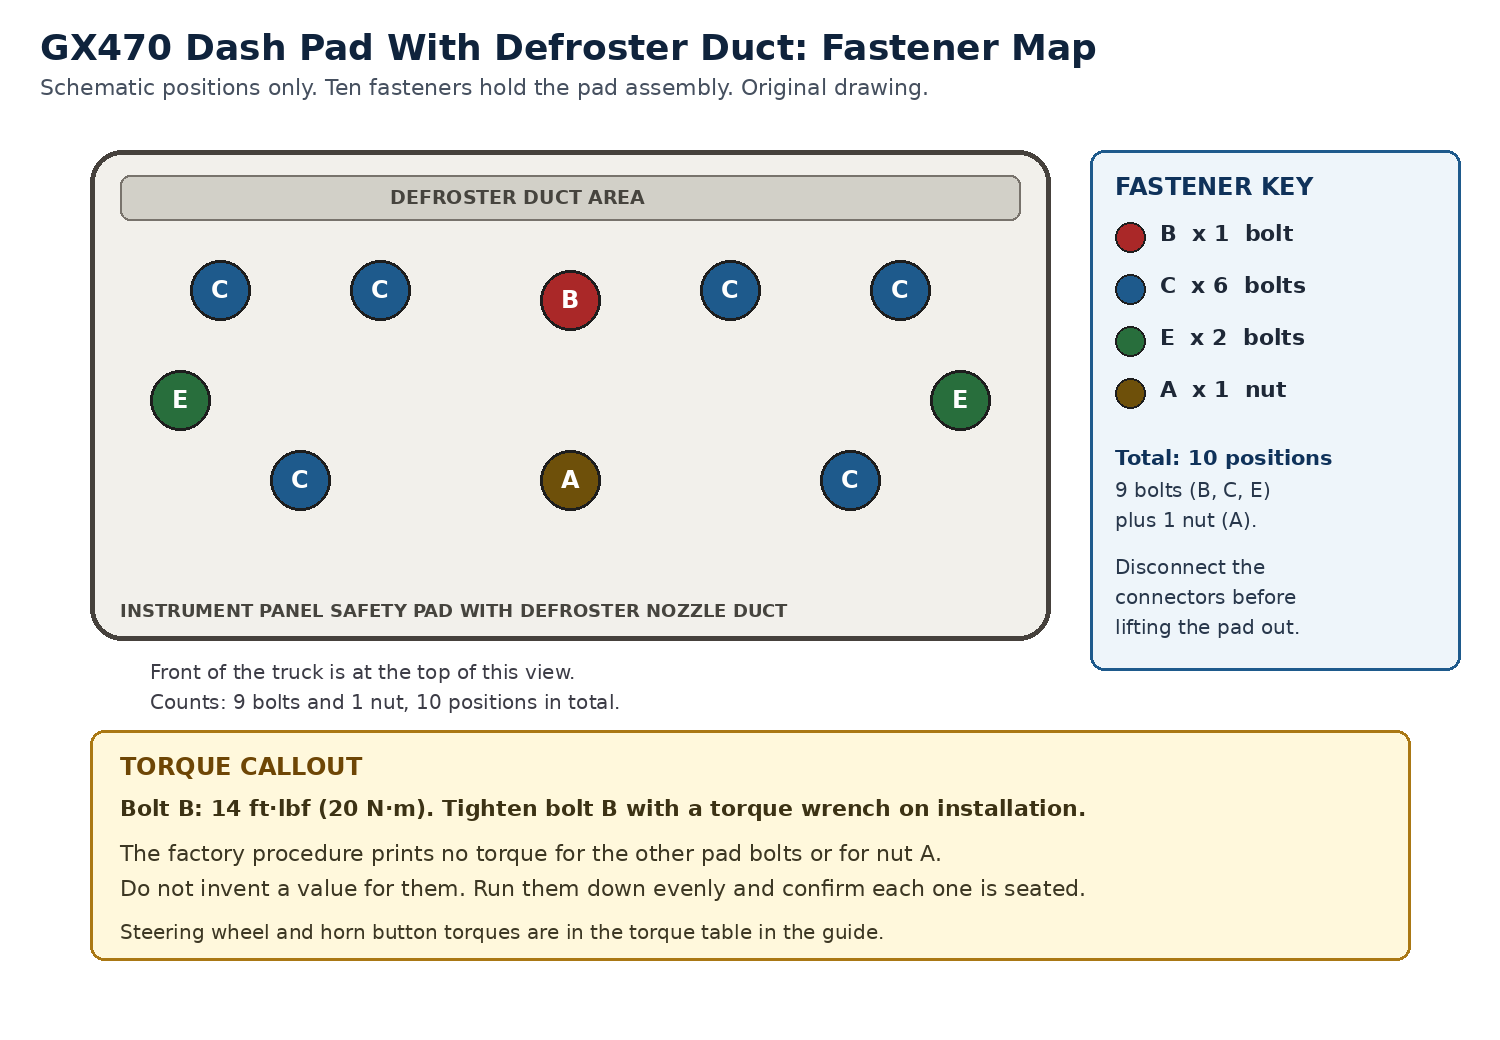
Pad fastener map. Bolt B is the only pad fastener with a torque value, 14 ft·lbf (20 N·m).
Transfer parts
Transfer the defroster nozzle assembly, held with 5 screws. Transfer the heater to register duct No.3, held with 2 screws. Transfer the side defroster nozzle ducts No.1 and No.2, the automatic light control sensor, the instrument panel wire No.3, and the connector holder. Transfer the instrument panel speaker panel and the front stereo component speaker on 12 speaker trucks. Transfer the antenna cord, and transfer the navigation antenna on navigation trucks. Transfer the passenger airbag assembly last, with its 2 screws and both door side walls seated on their hooks. A missed duct or a pinched wire found after the pad is bolted in costs a second removal.
Installation and torques
Installation reverses the removal stages in order. Seat the new pad with the defroster duct, reconnect the connectors from your labels, and install the 10 pad fasteners. The pad install step torques bolt B with a torque wrench, and bolt B is the only pad fastener with a torque value. No torque value exists for the other pad bolts or for the nut. Run those fasteners down evenly and confirm each one is seated. Tighten the combination meter connector fitting bolts until a click is heard and confirm the check pin protrudes.
| Connection | Torque |
|---|---|
| Instrument panel safety pad bolt B | 14 ft·lbf (20 N·m) |
| Steering wheel set nut | 37 ft·lbf (50 N·m) |
| Horn button assembly Torx screws, T30, 2 screws | 78 in.·lbf (8.8 N·m) |
Post-job checks
Reconnect the negative battery terminal after reassembly completes. Inspect the horn button assembly. Inspect the SRS warning light with the ignition on and confirm no warning light stays on after the system check: Dash Warning Lights Guide. Perform the inclination sensor zero degree correction when the combination meter was removed and reinstalled. The correction runs from the meter RESET switch with the truck on a level surface, and the correction is required when the combination meter assembly and inclination sensor are replaced or removed and installed. Test every switch and control that came apart, and run the defroster to confirm airflow across the windshield base.
GX460 scope
GX460 owners should read the confirmation section and stop before the program and parts sections. Neither ZLD nor L-SB-0011-15 lists the GX460, and their GX coverage is the 2003 to 2008 GX470 only. No Lexus enhancement program covers a GX460 or GX550 dash. A GX460 dealer visit runs as a standard warranty or customer pay inquiry by VIN.
The confirmation method transfers to the GX460. The dash mat option transfers as a concept, with the same rule at the passenger airbag door, and Wellvisors lists a Dash Mat For Lexus GX460 2010-2023 at $56.99. The GX470 part numbers, fastener counts, and pad torques in this guide stay with the GX470.
The GX460 has its own Instrument Panel Safety Pad procedure under Interior Panels/Trim, and its removal sequence runs to a pad removal step numbered 48, so a GX460 pad replacement is at least as involved as the GX470 job. The front passenger airbag assembly to instrument panel reinforcement torque on a GX460 is 15 ft·lbf (20 N·m). GX460 owners who need the full job should work from the GX460 procedure for their model year.
GX550 scope note
The GX550 appears in this guide as a scope note only. The truck is a current model under factory warranty, and neither ZLD nor L-SB-0011-15 lists the GX550. GX550 owners should take any dash surface concern to the dealer under warranty.
Prevention habits for a repaired or replaced pad
Heat and humidity drove the original degradation. Windshield sun shade use and shade parking are the recurring owner habits after replacement. A fitted windshield sun shade used at every park in sun gives the largest daily reduction in dash top temperature for the smallest effort.
Clean the pad with mild interior products and avoid heavy dressing applications that hide early shine changes. Recheck the dash top twice a year, run the fingertip test on the same test area each time, and photograph the dash once a year with the truck records.
Stop conditions
Any SRS warning light after reassembly. A warning light that stays on after the post-job inspection needs diagnosis before the truck returns to regular use. Check the passenger airbag connector and the combination meter connections first: Dash Warning Lights Guide.
A damaged airbag connector or harness. A bent pin, a cracked connector lock, heat damage, or chafed insulation on the passenger airbag circuit ends the job until a correct repair replaces the damaged section. Hand the truck to a shop with SRS equipment.
A cap or mat that interferes with the airbag door. Any cover product that needs adhesive across the passenger airbag door, sits rigid over the door, or blocks the door outline in a way that could change how the door opens comes off the truck and stays off.
A pad that cracks during handling. A pad that splits while you lift or transfer parts has no handling margin left. Stop the transfer, photograph the split, and reassess the option choice.
A connector that will not seat or a check pin that will not protrude. A meter connector that gives no click or shows no pin needs reseating and inspection for a bent pin or trapped harness.
Missing fasteners or broken mounts found at pad seating. A pad that rocks or gaps at an edge with all 10 fasteners installed has a trapped harness, a mis-seated duct, or a broken mount under that edge.
FAQ
Is there still a Lexus replacement program for a cracked GX470 dash in 2026?
Coverage under Warranty Enhancement Program ZLD has ended for every GX470. Primary Coverage ended on May 31, 2017, and Secondary Coverage ended 10 years from the date of first use for each truck, so every 2003 to 2008 truck passed its end date by 2018. The only remaining program path is a truck that a dealership documented before its coverage expired, with the condition verified and a repair order opened and closed before expiry. A dealer answers that records question by VIN.
Was the ZLD program a recall?
ZLD was a voluntary warranty enhancement program in Lexus Warranty Policy Bulletin POL14-03. It was not a recall.
My GX470 is a 2009. Was my truck covered?
A 2009 GX470 was never listed in the GX470 program coverage, which covered certain 2003 to 2008 GX470 trucks. Service Bulletin L-SB-0011-15 also lists GX470 applicability for 2003 to 2008 model years within the VIN range JTJBT20X#30001032 to JTJBT20X#80159573. The rest of this guide applies to a 2009 truck in full.
How do I tell degraded material from dressing shine?
Run the chalky check. Park the truck out of heat and humidity for more than a few hours, then recheck the surface. A degraded surface turns chalky during the cool park and turns sticky or shiny again when heat returns. Dressing holds its shine through the cool park on a cleaned test area. The check comes from Lexus Service Bulletin L-SB-0011-15.
How long does a new pad replacement take?
The GX470 flat rate time for removal and replacement of the pad is 2.3 hours. A Home Mechanic doing the job for the first time should schedule a full day or a weekend.
Can I glue a molded cap over my cracked pad?
A GX470 specific cap exists, and a molded overlay for the 2003 to 2009 GX470 was verified on eBay on November 14, 2026 at $167.49. The listing states a self-adhesive installation and gives no statement on passenger airbag door deployment clearance. Get the four fitment questions in the cap section answered in writing before ordering, and never fit a cap that requires adhesive across the airbag door or sits rigid over the door.
What part number do I order for a new GX470 pad?
Confirm the part by VIN on parts.lexus.com before ordering. The previous part numbers and the new kit numbers 04005-14660 and 04005-14760, each with color suffixes C0, C1, and E0, sit in the Parts and tools section, with LexusPartsNow links for the two service parts and both kits. The suffix selects the color and trim variant, and this guide assigns no color to any suffix.
Does a cracked dash affect the passenger airbag?
The passenger airbag assembly lives in the pad and attaches to the pad with 2 screws, and the airbag door forms part of the pad surface on the passenger side. Keep covers unglued and clear at the door, follow the 90 second wait and the storage rules during a pad swap, and stop the job for any airbag connector or harness damage.
Sources
- GX470 factory manuals: Interior Panels/Trim sections (instrument panel safety pad removal and installation, pad fastener positions, transfer parts, torques) and Supplemental Restraint System sections (precautions, passenger airbag handling, inclination sensor correction)
- GX460 factory manuals: Interior Panels/Trim section (instrument panel safety pad procedure) and Supplemental Restraint System specifications (front passenger airbag assembly torque)
- Lexus Warranty Policy Bulletin POL14-03, Warranty Enhancement Program ZLD, https://static.oemdtc.com/NHTSA-PDFs/MC-10134097-9999.pdf
- Lexus Service Bulletin L-SB-0011-15, Instrument Panel (Dashboard) Sticky/Melting/Cracked, https://static.oemdtc.com/NHTSA-PDFs/MC-10134474-9999.pdf
- Lexus dealer letter on ZLD claim filing after May 2017, March 22, 2017, https://static.oemdtc.com/NHTSA-PDFs/MC-10131833-9999.pdf
- ClubLexus, Warranty Enhancement, Cracked Dash Replacement thread, https://www.clublexus.com/forums/gx-1st-gen-2003-2009/768186-warranty-enhancement-cracked-dash-replacement-14.html?ispreloading=1
- Lexus Owners Club, 03 GX470 Dashboard Cracks thread, https://us.lexusownersclub.com/forums/topic/54056-03-gx470-dashboard-cracks/?do=findComment&comment=426855
- IH8MUD classifieds, GX470 dashboard listing with part number 55401-60926-C0, https://forum.ih8mud.com/classifieds/gx470-dashboard-new-black-top.2863/
- Lexus Parts, parts diagrams and part lookup by VIN, https://parts.lexus.com/
Leave a Reply