Meta description: The 2UZ-FE timing belt and water pump service every 90k miles. Procedure overview, torque specs, parts list, and owner tips for the GX470, 4Runner V8, Land Cruiser 100, Tundra, and Sequoia.
Reading time: ~14 minutes · Difficulty: advanced DIY (full weekend) · Engine: Toyota/Lexus 2UZ-FE 4.7L V8
Every “just bought a 200k-mile GX470” thread ends at the same place: when was the timing belt last done? On the 2UZ-FE, that belt is the difference between a 400,000-mile engine and a very heavy paperweight. This guide covers when to do it, what to replace while you’re in there, the procedure in overview, and the torque specs that matter. All checked against the factory service manual for the GX470 and cross-checked with owners who’ve done it in their driveways.
Want every bolt in order? Read the complete step-by-step companion.
Why this job can’t wait
The 2UZ-FE is a timing-belt engine with no warning lights and no second chances. The factory manual instructs setting the crankshaft to a specific pre-removal position (about 50° before top dead center) and warns that turning things at the wrong angle can slam valves into pistons. On the VVT-i engines (2005 and up), that contact bends valves. [manual] The owner community is even more specific. The pre-VVT-i engines (1998–2004) are widely regarded as non-interference. The VVT-i engines (2005 and up) are interference. A broken belt there means bent valves and, often, a dead engine. [community] Owners have also reported belt fibers starting to tear at just 30% over the mileage limit. [community]
The hard lesson from the forums: age kills belts as much as mileage does. A 135k-mile original belt on a 20-year-old truck looked far worse than its odometer suggested. The engine ran noticeably better once a fresh Aisin kit went on. Cam timing had been wandering as the old belt stretched. [community]
When to do it
The book and the community agree: every 90,000 miles or 108 months. That is the Lexus published interval for the timing belt. [manual] Several owners add a time rule of roughly 6–7 years regardless of mileage, because a truck that’s only been driven 8k a year still has a belt degrading on the same schedule. [community] If you just bought a used 4.7 and there’s no receipt or service history showing the belt was done, assume it wasn’t. Check the Lexus Drivers service history tool for dealer-reported services before trusting a seller’s word. [community]
Which vehicles this covers
This guide is procedure-verified for the Lexus GX470, 2003–2009 (the factory manual this was built from). The same 2UZ-FE 4.7L V8 also lives in the Toyota 4Runner V8 (4th gen, 2003–2009), Toyota Land Cruiser 100 and Lexus LX470 (1998–2007), Toyota Tundra 4.7 (2000–2009), Toyota Sequoia 4.7 (2001–2009), and the V8 Prado 120 in markets that got it. The procedure is extremely similar across these. But torque specs and small parts differ by year, so confirm against your own model-year manual before wrenching. It does not apply to the GX460 or GX550. Those use different engines with timing chains and have no scheduled belt service.
Parts and tools
Everything for the job in one place, before you turn a single bolt.
Parts:
- Aisin TKT-021 timing belt + water pump kit. Belt, water pump, hydraulic tensioner, idler pulleys, gaskets. [vendor] Aisin catalogs the TKT-021 for the full 2UZ-FE range, including every GX470 from 2003 to 2009. Buy from a reputable seller. Counterfeit Aisin kits exist. [community]
- Camshaft seals (x2) and crankshaft front seal [community]
- Timing cover gaskets [community]
- Accessory (serpentine) belt, tensioner, and idler [community]
- Fan pulley bracket bearing. Aisin FBT-002, OE-style. [community]
- Thermostat, upper/lower radiator hoses, heater T-fittings [community]
- Radiator. Preventive. The plastic side tanks leak right around this age. [community]
- Toyota Red Long Life coolant [community]
Tools:
- Torque wrench that reaches 181 ft·lbf (245 N·m). That is the crank bolt spec. [manual]
- Crankshaft pulley holding tool (SST 09213-70011 or equivalent) and damper puller [manual]. Shadetree options for the holder are below.
- Lisle 24680 spill-free funnel, or any funnel plus patience. The Lisle seals to the radiator neck with twist-lock adapters and holds a column of coolant above the system so trapped air burps out without spilling. Nice to have, not required. [community]
- 1.27 mm hex wrench. Pins the tensioner in the compressed position during install. [manual] Note: 1.27 mm is exactly 0.05 inch, so a 0.05 in hex wrench is the same tool.
- Standard socket set, jack and jack stands
What to replace while you’re in there
The labor to reach the timing belt is nearly identical to the labor for everything around it. Doing the belt alone and leaving a 90k-mile water pump behind is the classic false economy. The standard owner recommendation is the Aisin TKT-021 kit. Aisin is the OEM supplier. The kit bundles the water pump, timing belt, hydraulic tensioner, idler pulleys, and gaskets. [vendor] Owners report the kit (plus seals) covering everything needed for the job. [community]
Recommended “while you’re in there” list:
- Aisin TKT-021. Timing belt, water pump, hydraulic tensioner, idler pulleys, gaskets [vendor]
- Camshaft seals (x2) and crankshaft front seal. They’re behind the same covers and cost a few dollars each [community]
- Timing cover gaskets. Brittle after 15+ years
- Accessory (serpentine) belt and its tensioner/idler. All comes off during the job anyway
- Fan pulley bracket bearing. Spins constantly, commonly noisy by belt-change time. The Aisin FBT-002 is the OE-style replacement. [community]
- Thermostat, upper/lower radiator hoses, heater T-fittings. The plastic heater Ts under the intake are a known failure point on aging 2UZs, and the whole cooling system is drained for this job [community]
- Radiator. The plastic side tanks start leaking right around this age. Several owners preemptively replace it during the belt service. [community]
One correction worth noting from the owner threads: it’s the starter that sits buried in the V of the engine (some owners do it at 240k as preventive maintenance), not the alternator. That one was a mix-up in the original thread. [community] Do not tear into the intake hunting for the alternator.
Fitment note: the TKT-021 is the correct kit for every 2UZ-FE, 1998 through 2009. [vendor] Don’t buy the TKT-001 by mistake. It looks similar but ships without the hydraulic tensioner.
The procedure (overview)
The factory procedure is a long chain of “remove X to reach Y.” Drain the coolant. Disconnect the battery. Pull the V-bank cover and engine covers. Remove the fan and fluid coupling with the shroud, the accessory drive belt, the power steering vane pump (hung aside without disconnecting hoses), the generator, and the A/C compressor (also hung aside, hoses attached). Then the idler pulleys, oil cooler pipe, timing covers, accessory belt tensioner, and fan bracket. Finally the crankshaft damper comes off and the belt is exposed. [manual]
The steps that owners say demand the most care:
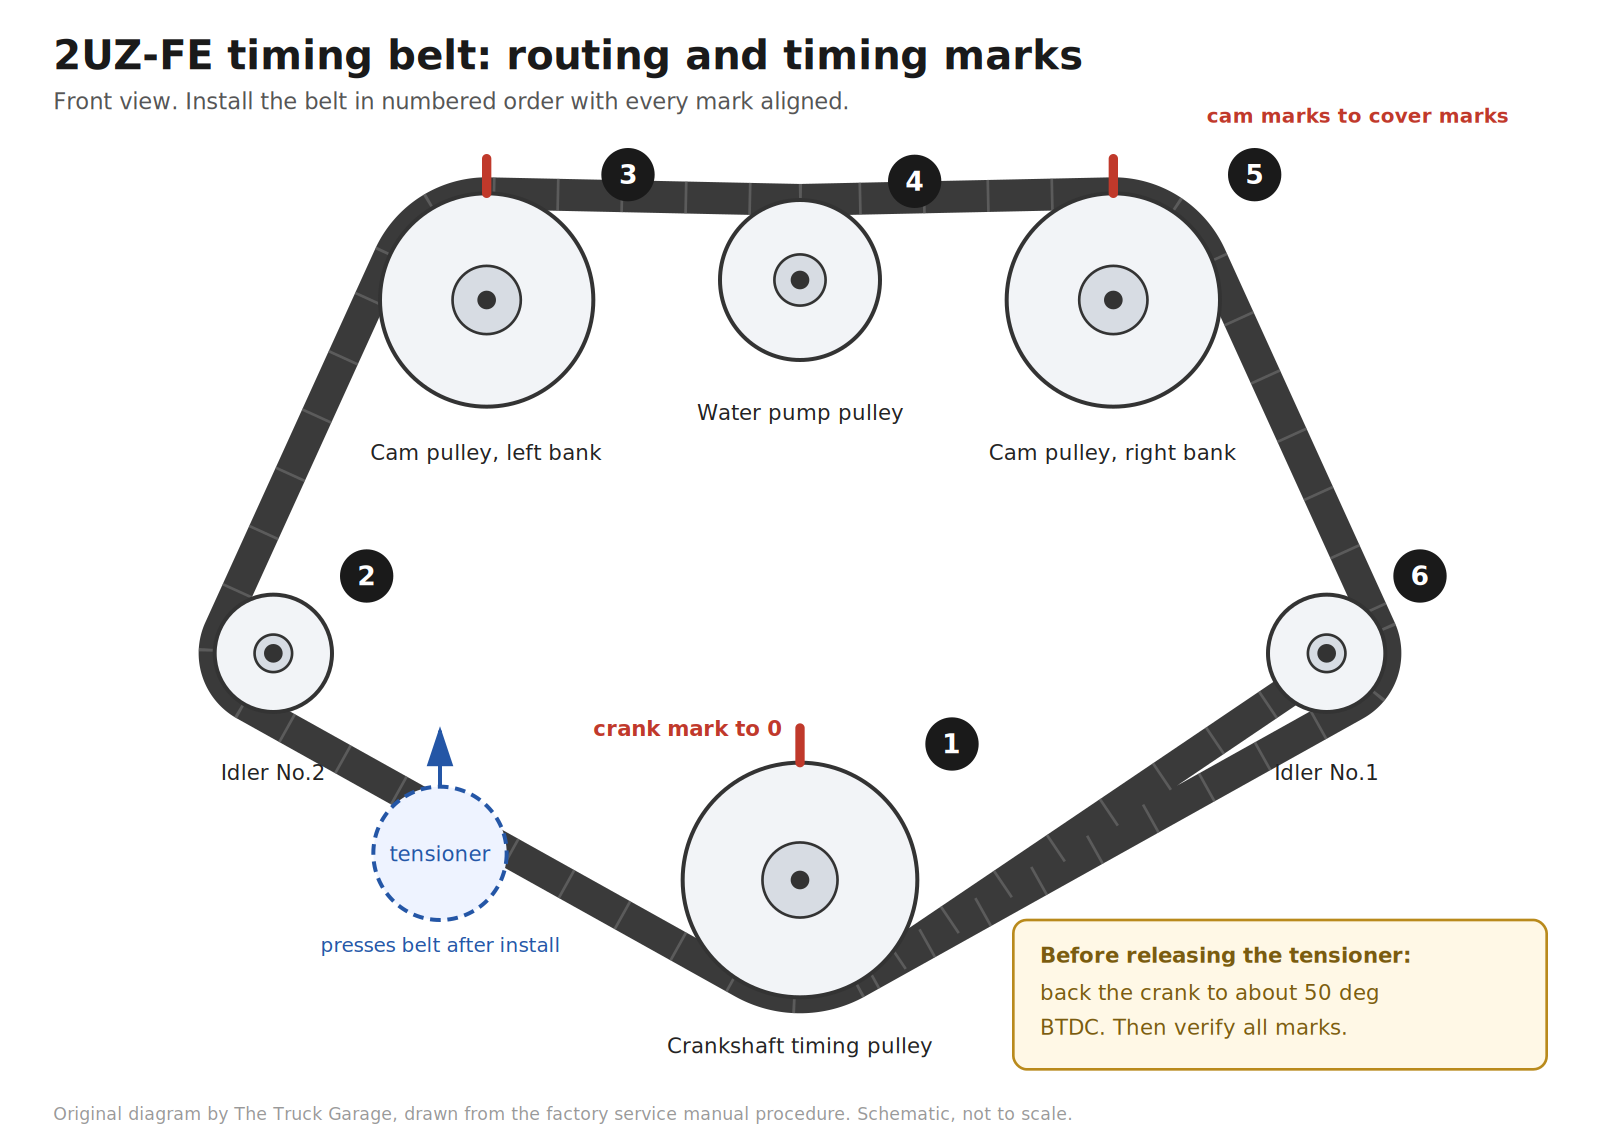
- Set the crank before you touch the belt. With the covers off, the factory manual has you rotate the crankshaft to align its timing marks, verify the camshaft timing pulleys align with their timing marks, then back the crank off about 50° before top dead center, before releasing the tensioner. [manual] This is the interference-engine safety step. Skip it and the pistons and valves can meet when the belt comes off.
- Compress and pin the tensioner. The hydraulic tensioner push rod is slowly compressed in a press (between about 220 and 2,200 lbf of pressure) and pinned in the compressed position with a 1.27 mm (0.05 in) hex wrench before it’s bolted on. [manual] No press in your garage. A large bench vise does the same job. Compress slowly. Owners buy a new tensioner with the kit rather than reusing the old one. A hydraulic tensioner that has been holding belt tension for 90k miles isn’t worth gambling on. [community]
- Install the new belt in order, marks aligned. The belt goes on in sequence. Crankshaft timing pulley, idler No.2, left-bank cam pulley, water pump pulley, right-bank cam pulley, idler No.1. The belt’s installation marks align to each pulley’s timing mark, with the belt’s front arrow facing forward. [manual] Pulleys get wiped clean. The manual specifically says no cleansing agents on them. [manual]
- Verify before closing up. After tensioning, the crankshaft is turned clockwise two full revolutions and every pulley’s timing marks are rechecked. [manual] Miss this and a tooth-off mistake only shows up as a rough-running engine after everything’s bolted back together.
- Refill and bleed the coolant carefully. The whole system was drained. A spill-free funnel on the radiator neck makes it easier to work air out of the V8’s long cooling circuit. An air pocket left in the system can cause a scary overheat on the test drive. [community]
Realistic time: a full weekend for a first-timer with a manual and patience. Specialty tools needed include a crankshaft pulley holding tool and a puller for the damper, plus a torque wrench that reaches the crank bolt spec. [manual]
No crank holder? Shadetree options
The crank bolt is the gatekeeper of this job. 181 ft·lbf (245 N·m), and you need the crank held still to break it loose and to torque it back down. If you don’t own the factory holding tool, here are the options owners actually use, ranked by sanity.
- Electric impact for removal. A modern 1/2 in brushless impact with 1,000+ ft·lbf of breakaway torque zips the bolt off with the crank held by nothing but inertia. This is the current driveway standard. Never use the impact to install the bolt. Torque it to spec with a wrench. [community]
- Fabricated holder. A length of flat steel bar with two holes drilled to match the pulley bolt holes, braced against the ground or the frame. Cheap, controlled, and safe if built stout. [community]
- Torque converter window trick. Pull the transmission inspection cover, put a deep socket on a torque converter bolt, and rotate until it seats against the bell housing. Costs nothing. Make sure the socket is straight and fully seated so it can’t walk off at an angle. [community]
- Loaner puller set. AutoZone, O’Reilly, and Advance loan harmonic balancer puller sets free with a refundable deposit. Note what those are: pullers, for getting the damper off after the bolt is out. They are not crank holders. (Many owners report the 2UZ damper slides off by hand with a few taps anyway.) [community]
- Shop assist. Have a shop crack the bolt loose, drive home, and do the job. Have them torque it to spec afterward if you can’t. [community]
- What not to do. The starter bump method (breaker bar against the frame, bump the starter) has snapped 1/2 in breaker bars in owners’ hands. Treat it as a last resort, not a plan. And skip the strap wrench on the damper. It can damage the pulley. [community]
Torque specs (GX470 2003–2009)
These come straight from the factory service manual. [manual] Use them for the GX470. For 4Runner V8, LC100, Tundra, and Sequoia, confirm against your own manual. Owner-compiled lists show small variations between model years (one lists 34.5 N·m vs. the GX470 manual’s 35 N·m on the idlers). Close enough to trust the factory number below, but verify. [community]
| Fastener | Torque | Source |
|---|---|---|
| Crankshaft damper (pulley) bolt | 181 ft·lbf (245 N·m) | [manual] |
| Camshaft timing pulley bolt | 80 ft·lbf (108 N·m) | [manual] |
| Timing belt idler No.1 / No.2 bolts | 25 ft·lbf (35 N·m) | [manual] |
| Belt tensioner bolts | 19 ft·lbf (26 N·m) | [manual] |
| Water pump bolts | 15 ft·lbf (21 N·m) | [manual] |
| Water pump studs/nuts | 13 ft·lbf (18 N·m) | [manual] |
| Timing belt covers and plates | 5.5 ft·lbf (66 in·lbf, 7.5 N·m) | [manual] |
The crankshaft damper bolt is the one that ends DIY careers. 181 ft·lbf (245 N·m) is a tight bolt. Breaking it loose takes a proper holding tool or one of the shadetree methods above. This single bolt is the most common reason owners hand the whole job to a mechanic.
Cost: DIY vs. shop
Real numbers. The Aisin kit runs $200 to $250. Two gallons of Toyota coolant run $30 to $45. Thermostat, seals, and incidentals add $50 to $100. A careful DIY lands around $280 to $400 in parts. [community]
Independent shops and Toyota dealers quote $1,300 to $1,800 with owner-supplied parts, and full dealer quotes run $2,000 to $4,500 depending on region. [community] What actually drives the price is the labor. Book time is around 4 to 5 hours, and most shops bill 6 to 8. That is also exactly why replacing everything once beats doing the belt now and the water pump next year.
Owner tips that the manual doesn’t tell you
- Mark the old belt before removal if you reuse timing marks as a reference. The manual says to mark a fresh belt if the installation marks have disappeared. [manual]
- Don’t reuse the tensioner or idlers. Spin them by hand. Any roughness or oil weep from the idler seals means replace. [manual] New ones come in the kit.
- Check the water pump before it fails. The manual’s on-vehicle check: look at the pump’s air hole and drain (weep) hole. Coolant leaking from either means replace the pump and the belt. [manual] A weep-hole drip caught early is a cheap save. Ignored, it becomes an overheat. [community]
- Photograph everything as it comes apart. The GX470’s front end has a surprising number of small brackets, pipe stays, and covers that all look alike at 9 p.m. on a Sunday.
- Change the belt on the calendar, not just the odometer. Twenty years and 135k miles looked worse than 100k miles and ten years. [community]
FAQ
Does my GX470 really need the belt at 90k miles? Yes. The Lexus maintenance schedule says to replace the timing belt every 90,000 miles or 108 months. [manual] Many owners also apply a ~6-year time rule regardless of mileage. [community] This isn’t a maintenance upsell. It’s an interference-engine timing belt.
What happens if the timing belt breaks? On the VVT-i 2UZ-FE (2005–2009 GX470), valves contact pistons. Expect bent valves and major head work or a replacement engine. [community] On 1998–2004 pre-VVT-i engines, owners widely report them surviving a belt failure as non-interference. [community]
Can I just do the belt and skip the water pump? You can, but nobody recommends it. The pump sits behind the same covers. It’s a 90k-mile part. A weep-hole leak later means doing the whole job over again. [community]
Is the Aisin TKT-021 the right kit for my truck? Yes, for any 2UZ-FE. Aisin catalogs the TKT-021 for the full 2UZ-FE range, including every GX470 from 2003 to 2009. [vendor] Don’t buy the TKT-001 by mistake. It ships without the hydraulic tensioner. Buy from a reputable seller. Counterfeit Aisin kits exist. [community]
Is this a realistic first big DIY? It’s a long, careful job but mechanically straightforward. Mostly bolts in the open once the front of the engine is stripped. The two skills it demands are patience (the marks must align exactly) and a torque wrench used religiously. If the crank bolt fight worries you, do the teardown and have a shop pop the damper bolt.
Bottom line
The 2UZ-FE timing belt service is the rite of passage for every 4.7-liter Toyota truck. Belt, water pump, tensioner, and idlers every 90k miles or 108 months, all in one go, with torque specs straight from the factory manual. Do it once, do it right, and the engine that’s famous for half a million miles gets its best shot at getting there.
Leave a Reply