Reading time: about 14 minutes. Difficulty: full day for a first timer, half day once you have done it. Applies to: LX470 and Land Cruiser 100 (1998-2007), Tundra (2000-2007), Sequoia (2001-2007), GX470 (2003-2009), 4Runner V8 (2003-2009). All carry the 4.7L 2UZ-FE.
Who This Guide Is For
You turn the key and get a single loud click, or a short burst of clicks, and the engine never turns over. The lights are bright. The radio works. A jump start changes nothing. A week ago it started fine every time, then it started needing two or three key turns, and now it is dead in the driveway.
That pattern is the classic 2UZ-FE starter failure. The solenoid contacts inside the starter wear down until they cannot pass enough current to spin the motor. It starts as intermittent and ends as a no crank.
This guide covers what the job actually involves, how to confirm the diagnosis before you spend money, whether to replace the starter or just rebuild its contacts, and what to replace while you are in there. It is an overview, not a bolt by bolt walkthrough. The full factory procedure runs about 32 steps and lives in the factory manual.[1]
Why This Job Is Famous
On most engines the starter bolts to the side of the block where you can see it. On the 2UZ-FE, Toyota put the starter in the valley between the cylinder banks, underneath the intake manifold. You cannot see it, reach it, or test it without taking the top of the engine apart.
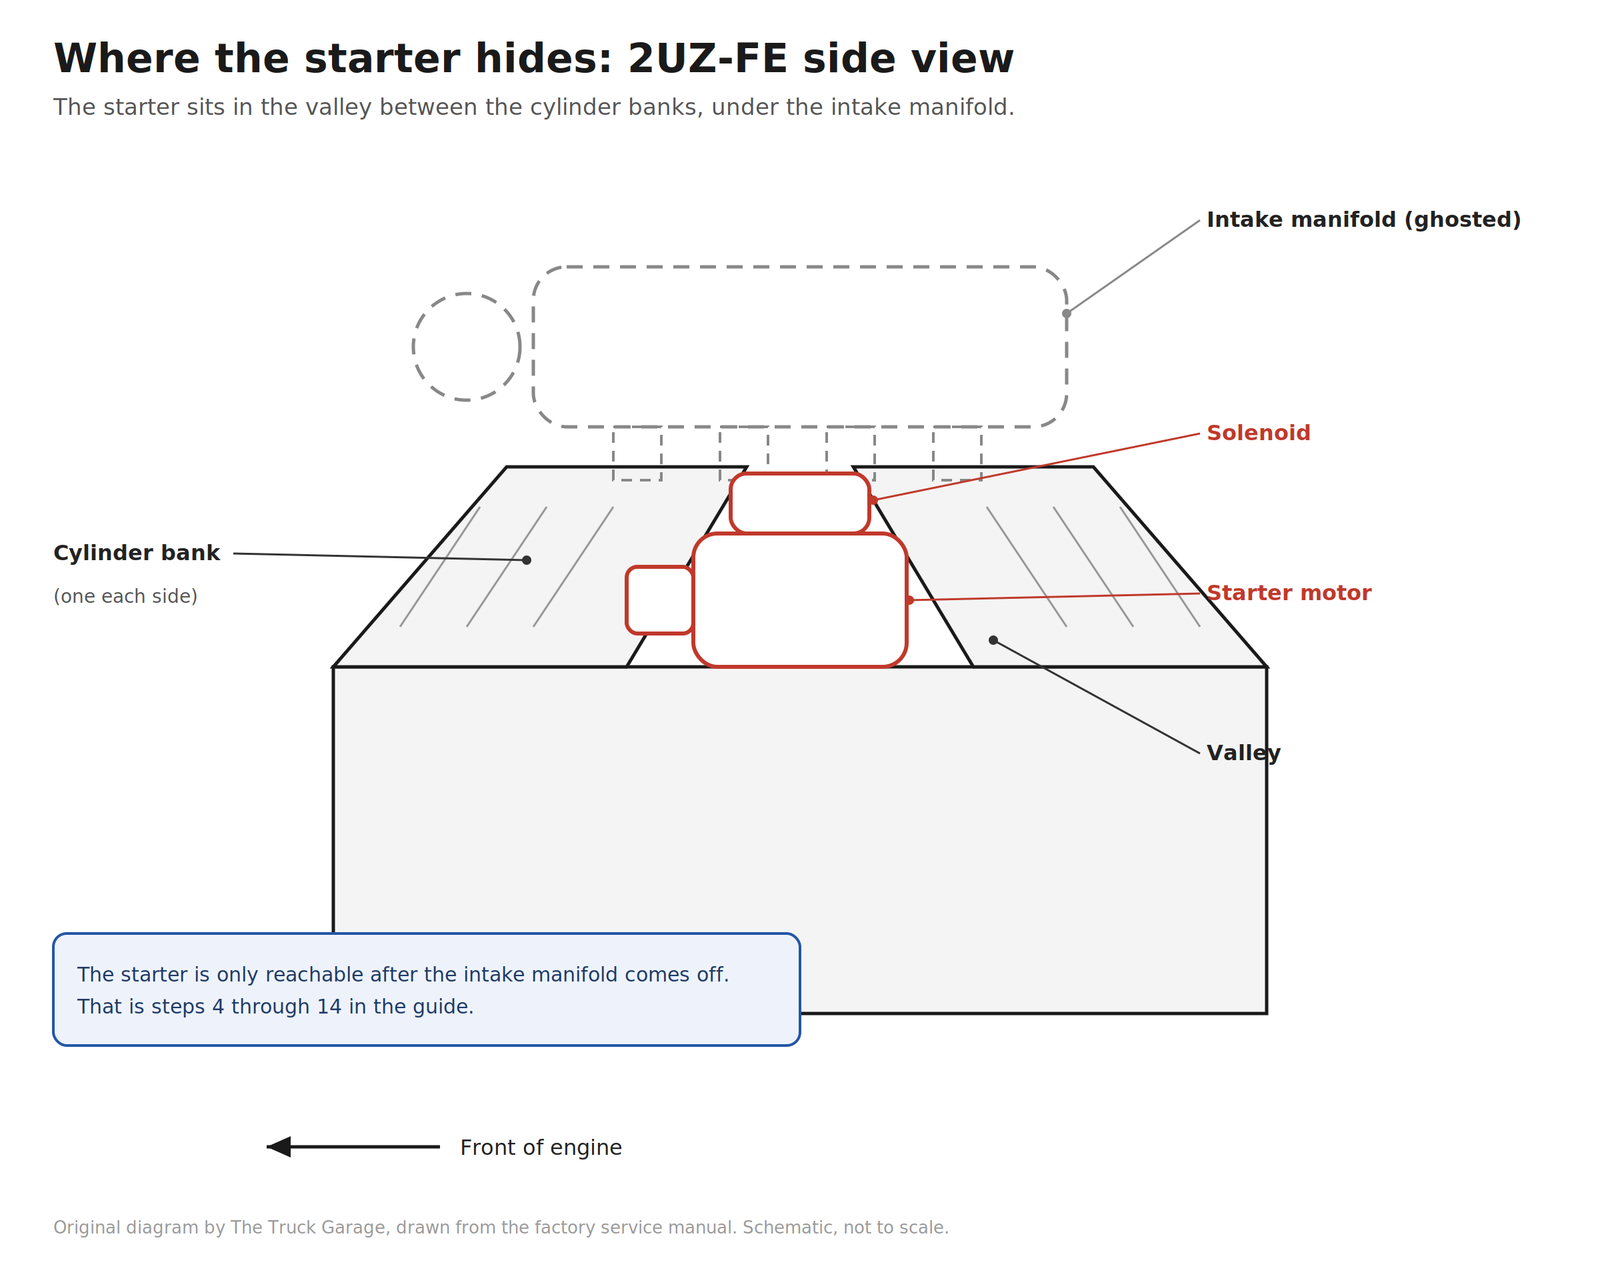
That single design decision turns a 30 minute starter swap into a full day job. Everything above the valley has to come off: the engine cover, the air intake hose, the fuel hoses, the engine wiring harness, the coolant bypass plumbing, and the intake manifold itself. On 2005 and newer GX470 models, the secondary air injection system adds an air pump and switching valves that also have to come out of the way.
The job is not technically difficult. There are no special tools and nothing requires a lift. It is just long, and the rear starter bolt is genuinely hard to reach.
Diagnose First: Make Sure It Is the Starter
A no crank with clicking has several possible causes, and the starter is the most expensive one to guess at. Work through this list in order.
- Load test the battery. Expect this to be the number one misdiagnosis. A battery can show 12 volts and run the headlights while being too weak internally to crank the engine. The giveaway is lights that flicker or die the moment you turn the key. Pull the battery and have any auto parts store load test it for free. Replace it if it fails.
- Clean the connections. Corroded battery terminals or a bad ground strap can starve the starter of current. Remove both terminals, clean them, and check the ground cable where it bolts to the frame. A jumper cable run from the negative battery post straight to an unpainted bolt on the engine rules out every ground issue at once.
- Check the starter relay. The starter relay lives in the engine room relay block. Swap it with an identical relay from a non critical circuit and try again. If the truck starts, buy a relay, not a starter.
- Listen to the click. A single solid click from deep in the engine bay when you turn the key, with a known good battery and clean connections, points at worn solenoid contacts inside the starter. Rapid machine gun clicking usually means low voltage, which sends you back to step 1.
- Rule out the ignition switch. If there is no click at all, no dimming of the lights, and the battery and relay check out, the ignition switch or its wiring is suspect. That is a different repair.
My recommendation: buy a starter only after the battery, connections, and relay are eliminated.

Replace the Starter or Just Rebuild the Contacts?
Most 2UZ-FE starters do not die. Their solenoid contacts wear out. The motor, brushes, and bearings are often fine at 150,000 to 200,000 miles. That gives you two legitimate options.
Option A: rebuild the solenoid contacts. A contact and plunger kit costs roughly 15 to 40 dollars in Toyota parts, and the actual contact swap takes minutes once the starter is on the bench. If your starter spins strongly when it does engage and the only symptom is clicking, the contacts are the likely culprit and a rebuild is the cheapest fix that lasts. Owners report another 75,000 plus miles out of a contact rebuild.
Option B: replace the whole starter. A new or remanufactured unit runs roughly 120 to 280 dollars depending on brand and source[2]. My recommendation: install a quality unit and never think about it again. The labor to reach this starter is too high to risk a cheap one. The Denso remanufactured unit is the crowd favorite because Denso built the original.[3] In my experience, cheap parts store starters have a reputation for short life, so plan on doing this job only once.
If the starter drags slowly, grinds, or the nose gear bearing is noisy, rebuild the contacts will not help. Replace the unit.

Parts and tools
Buy the gaskets before you start. The factory manual calls out new gaskets and a new O-ring at every sealing surface you disturb, and reusing them is the most common source of a coolant leak after this job.
Parts for a straight replacement:
- Starter, Toyota reman 28100-50101-84 or equivalent Denso reman[3]
- Intake manifold gaskets, 2 required, 17171-50030[4]
- Water bypass joint gaskets, 2 required, 16341-50020[5]
- Water bypass pipe O-ring, 1 required, 96761-24019[5]
- Metal gaskets for the number 2 air switching valves, 4 required, 17377-50010, 2005 and newer GX470 with secondary air injection only[6]
- Engine coolant, Toyota red or equivalent, to replace what you drain
- Solenoid contact and plunger kit, if you are rebuilding instead of replacing
Confirm every part number against your VIN at parts.lexus.com or toyodiy.com before ordering. The numbers above come from a video creator’s published parts list for a 2008 GX470 and may differ by year.
While you are in there (optional but smart):
- Knock sensors, 2 required, 89615-20090.[5] They live under the intake manifold next to the starter. If you have knock sensor codes, or the truck has high miles and you never want to remove this manifold again, replace them now.
Tools:
- Metric socket set, 10, 12, and 14 mm cover nearly everything
- Long 3/8 inch extensions and a universal swivel joint. The rear starter bolt demands them
- Torque wrench that reads down to 5 ft·lbf
- Drain pan for coolant, at least 2 gallons
- Painter’s tape and a marker for labeling connectors and hoses
- Penetrating oil for the intake and bypass fasteners
- A phone camera. Photograph every connector before you unplug it
Shadetree alternative: if you do not own long extensions, a 12 inch extension plus a swivel is the minimum that reaches the rear starter bolt. Borrow the set if you have to. Do not attempt this job with a single short ratchet.
The Job at a Glance
What follows is the shape of the factory procedure for a 2005 GX470, condensed. Your year may skip the air pump steps if it predates the secondary air injection system. Read the whole thing before you touch a bolt.
Teardown:
- Relieve the fuel system pressure and disconnect the negative battery cable. You are opening fuel lines, so do this first.
- Drain the engine coolant. The water bypass plumbing at the back of the engine has to come off, and it is full of coolant.
- Remove the V-bank engine cover and the air cleaner hose.
- Disconnect the fuel hoses and the fuel vapor feed hose. Wrap each fitting in a rag. A little fuel will spill.
- Separate the engine wiring harness. That means the 8 fuel injector connectors, the throttle position sensor connector, the water temperature sensor connector, and the harness mounting bolts. Label everything.
- Disconnect the water bypass hoses.
- Remove the intake manifold: 6 bolts and 4 nuts, then lift it off with its 2 gaskets. The fastener numbering in the diagram is my suggested removal order, not a factory sequence.
- Remove the water bypass pipe and the rear water bypass joint, 4 nuts.
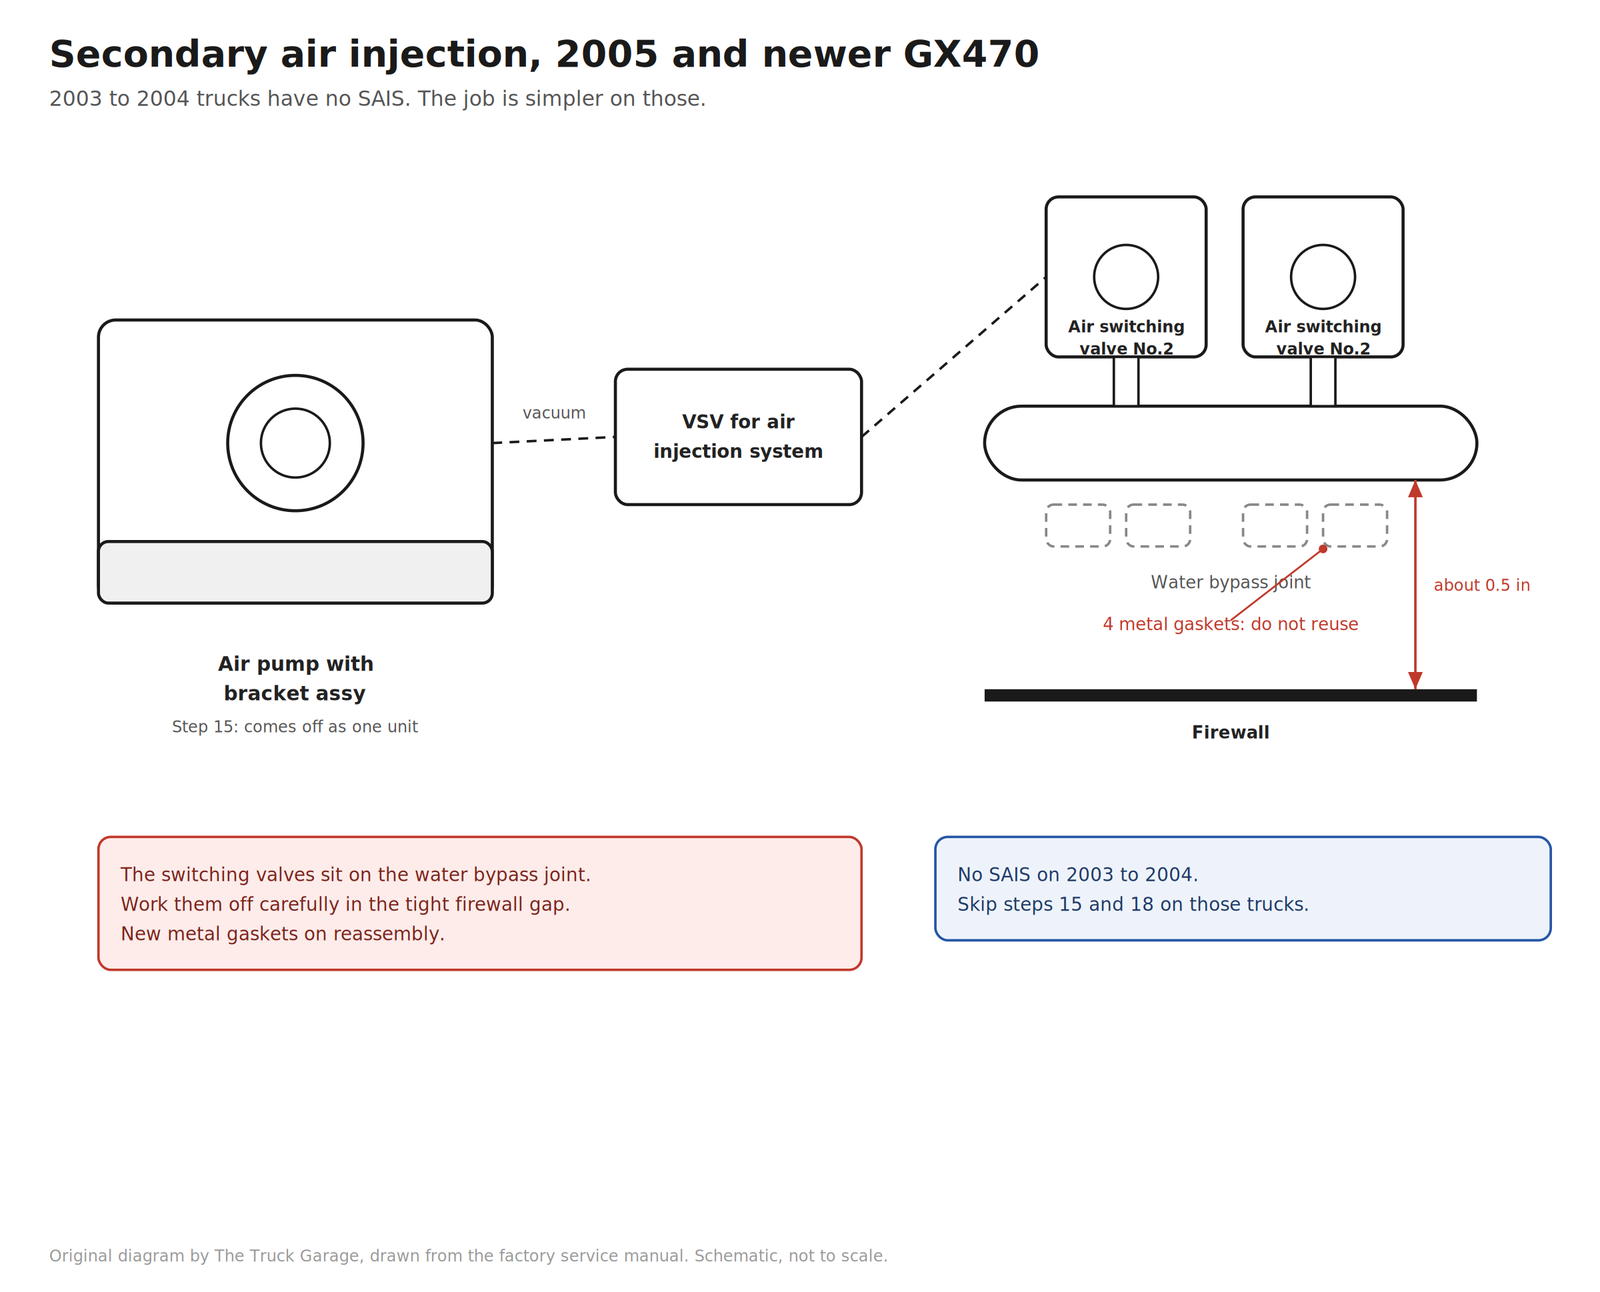
- On 2005 and newer GX470 models, remove the secondary air injection pump with its bracket. The number 2 switching valves bolt to the water bypass joint at the back of the engine, and on the GX470 there is only about half an inch of clearance to the firewall, so there is no shortcut around this.
- Now you can see the starter. Disconnect its electrical connector, remove the nut holding the main cable, remove the bolt holding the engine wire protector, then remove the 2 starter mounting bolts. Expect the bolt on the driver side to be the toughest fastener in the entire job.
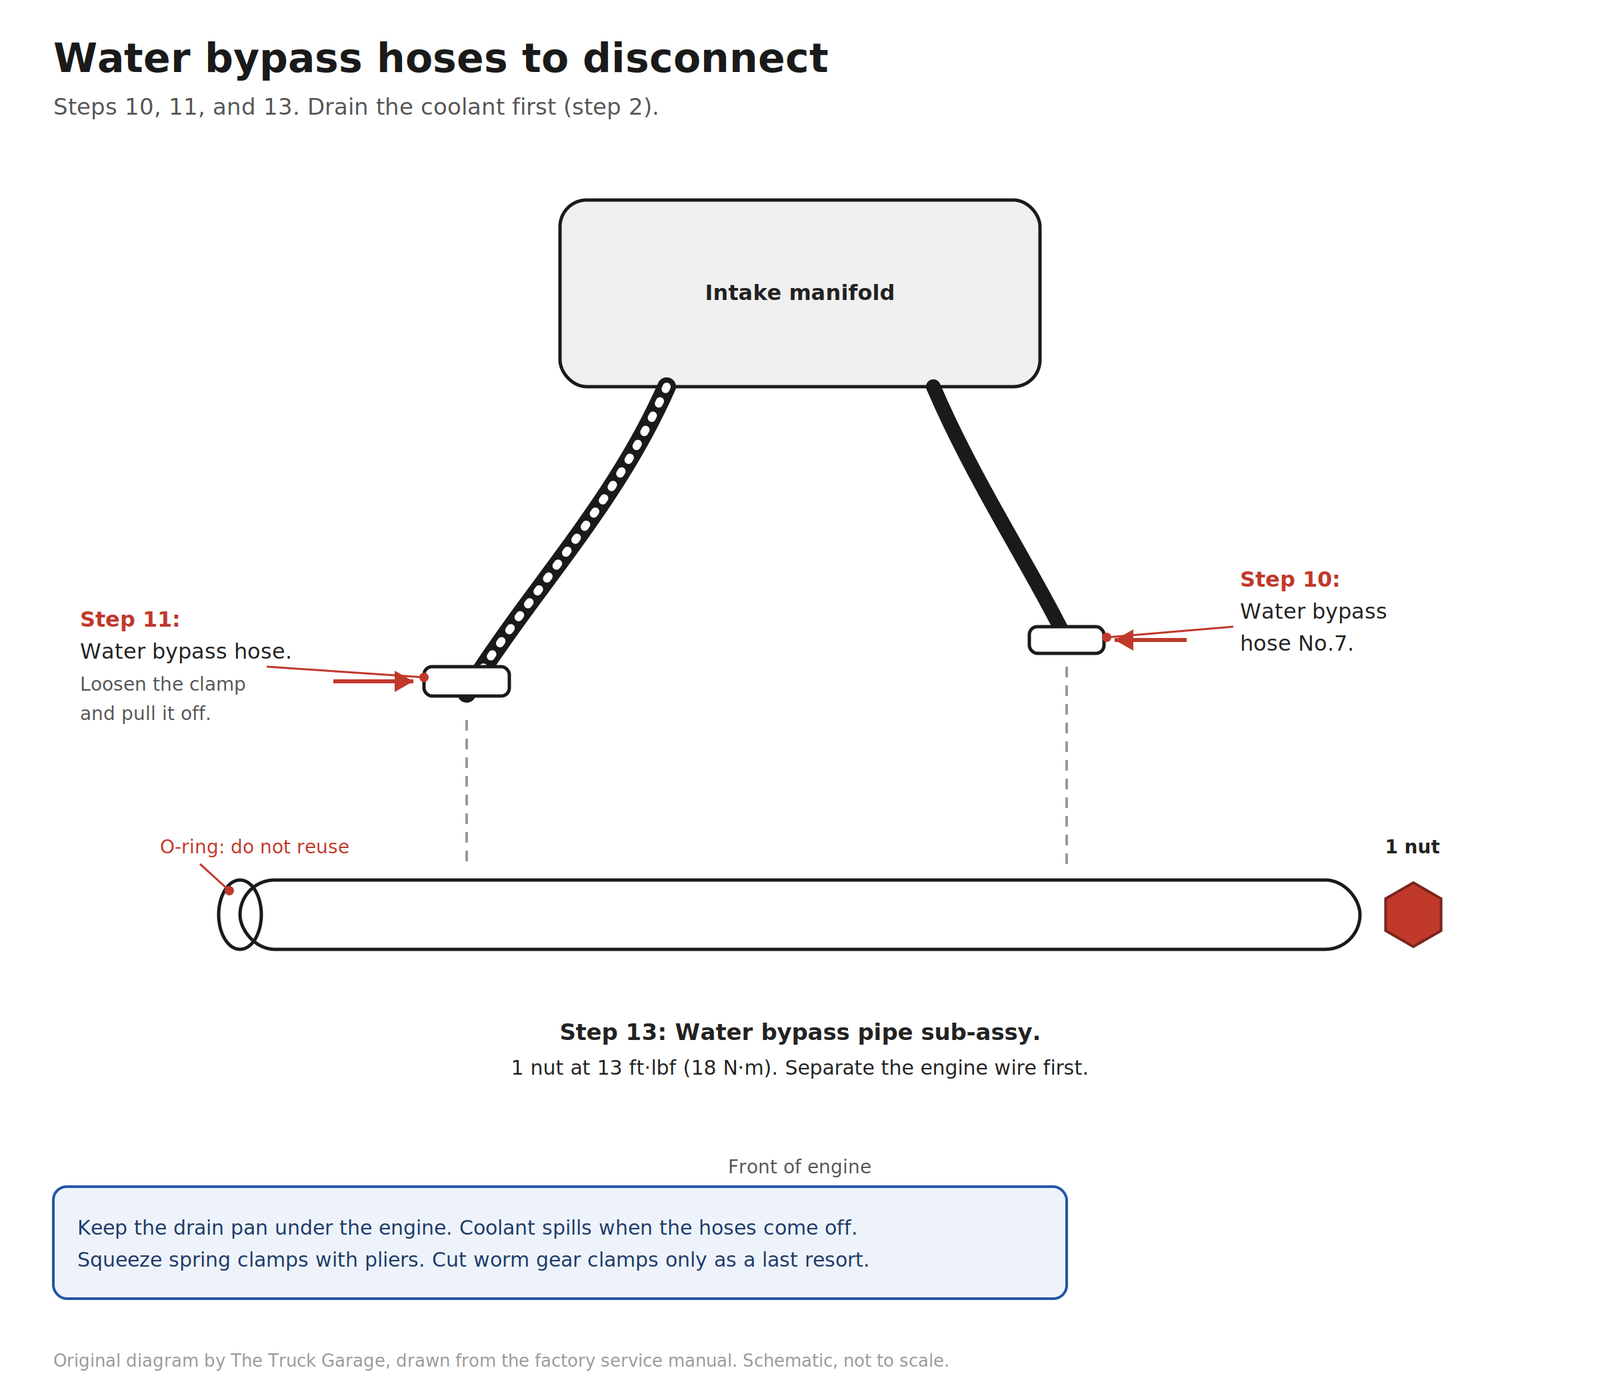


Reassembly is the reverse with new gaskets everywhere the manual specifies: intake manifold gaskets, water bypass joint gaskets, and the bypass pipe O-ring. Torque the fasteners to the specs below, refill the coolant, check for coolant and fuel leaks before the engine cover goes back on, and confirm the repair with several start cycles.
Shadetree alternative: drain the coolant into a clean pan and reuse it if it is fresh and clean. If it is due anyway, this is a convenient time to replace it. Either way, the system must be refilled and checked for air pockets and leaks before you drive.
Common mistake: pinching a hose or wire under the intake manifold on reassembly. The manifold is heavy and the valley is crowded. Set it down straight, then verify every connector and hose is free before torquing the fasteners.
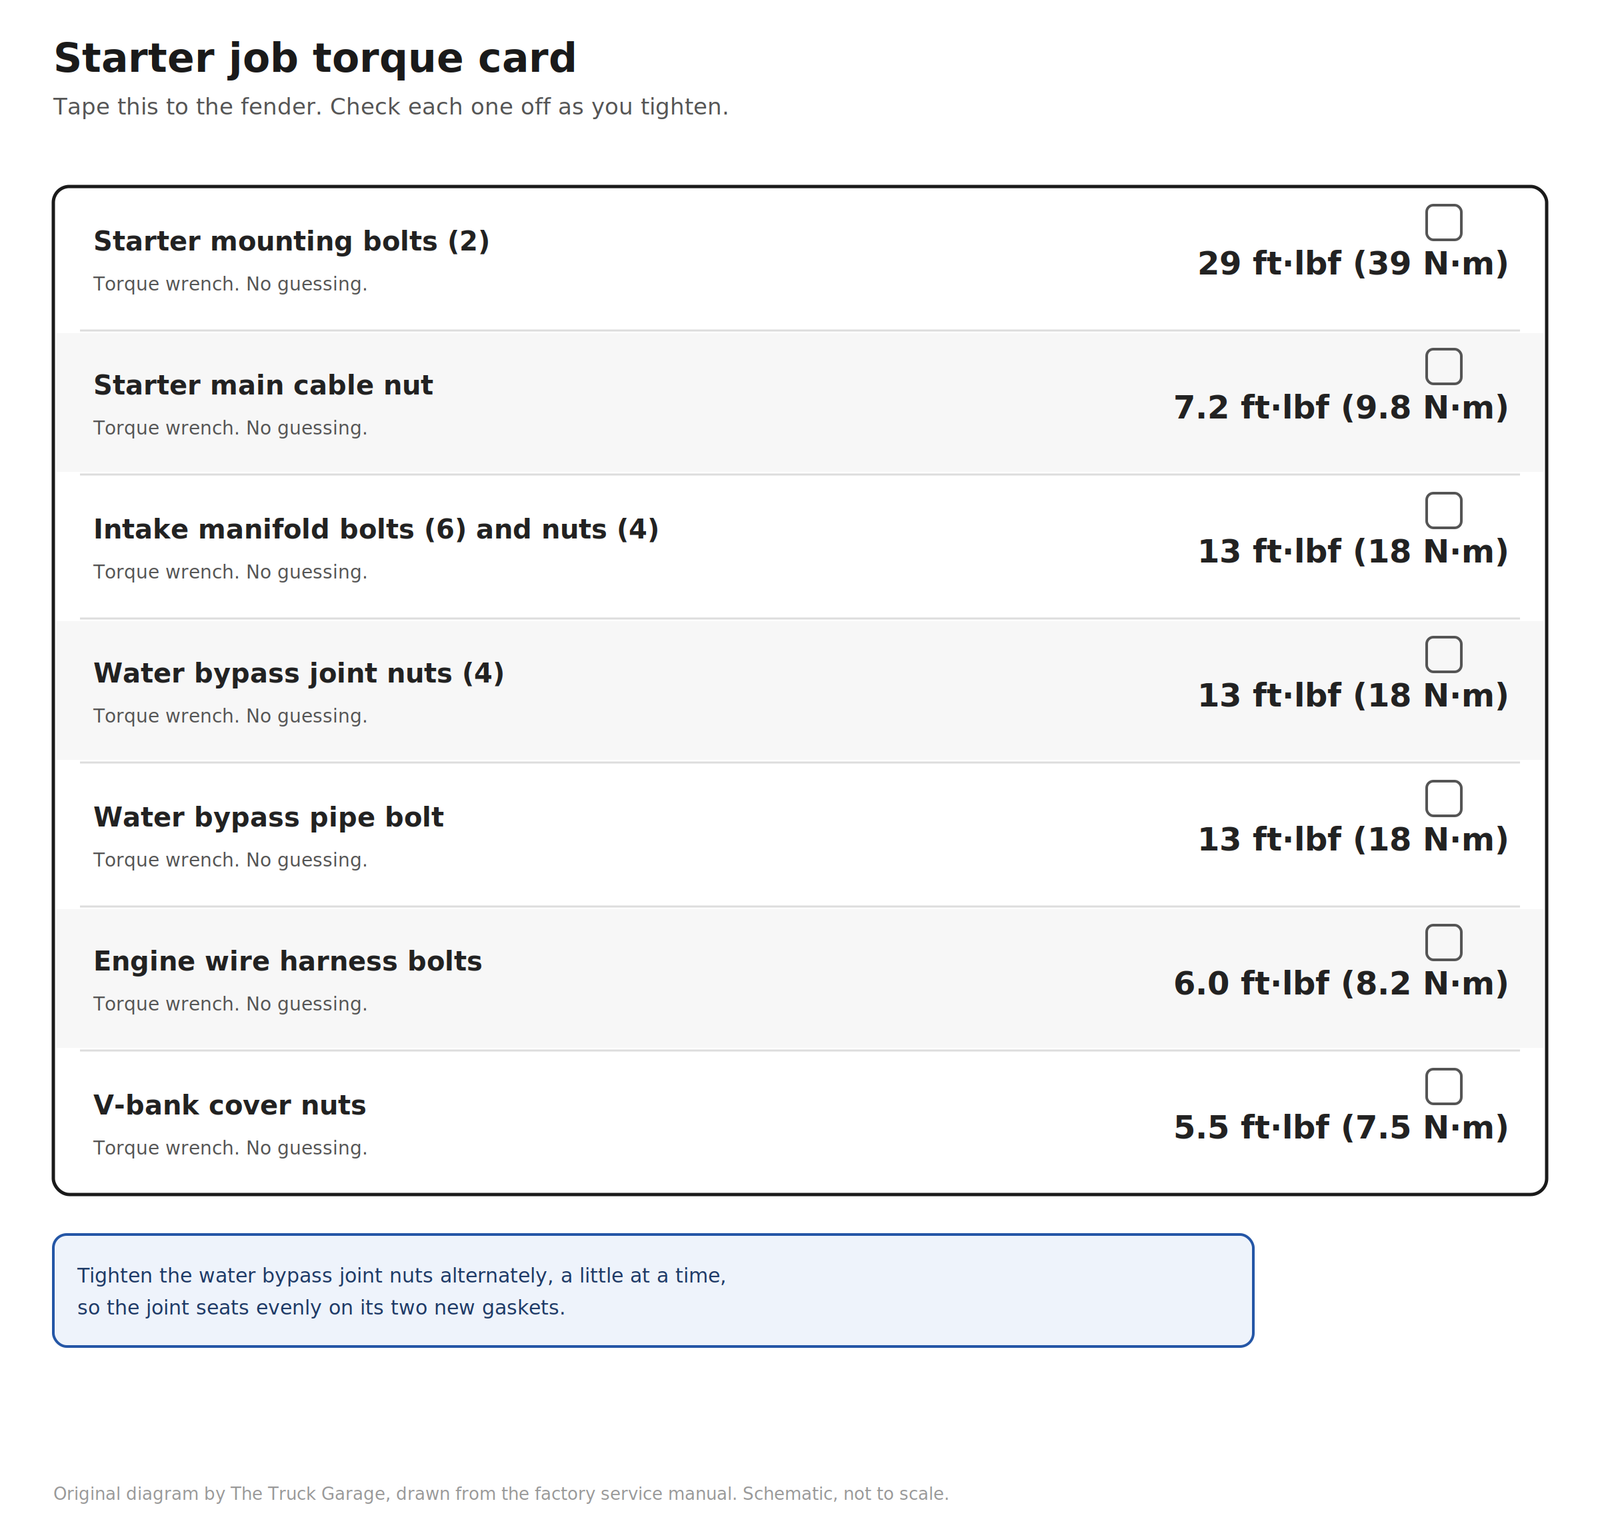
Torque Specs
All values from the factory manual for the 2005 GX470, which is the authority for GX470 guides.[1] Convert your wrench if it only reads N·m.
| Fastener | Torque |
|---|---|
| Starter mounting bolts (2) | 29 ft·lbf (39 N·m) |
| Starter main cable nut | 7.2 ft·lbf (9.8 N·m) |
| Intake manifold bolts (6) and nuts (4) | 13 ft·lbf (18 N·m) |
| Water bypass joint nuts (4) | 13 ft·lbf (18 N·m) |
| Water bypass pipe bolt | 13 ft·lbf (18 N·m) |
| Engine wire harness bolts | 6.0 ft·lbf (8.2 N·m) |
| V-bank cover nuts | 5.5 ft·lbf (7.5 N·m) |
Tighten the water bypass joint nuts alternately, a little at a time, so the joint seats evenly on its two new gaskets.
While You Are In There
With the intake manifold off, you are looking at parts of the engine most owners never see. Spend the access wisely.
Knock sensors. The two knock sensors sit in the valley beside the starter. They fail with age and heat, and replacing them later means repeating this entire job. If you have any knock sensor codes, or the truck is past 150,000 miles on original sensors, replace both now.
Gaskets, all of them. The intake manifold gaskets, water bypass joint gaskets, and bypass pipe O-ring are one time use. The manual specifies new parts at each location, and owners who reuse them report coolant leaks that force a second teardown.
Clean the valley. Years of dust, leaves, and grime collect under the manifold. Clean it out while it is open. Check the wiring for chafing or rodent damage while you have light and access.
The starter signal wire. The small signal connector on the starter gets brittle with heat and age. Inspect it when you unplug it. If the clip is cracked, secure the connector with a zip tie or replace the pigtail so it cannot vibrate loose later.
Fuel injector connectors. You already have all 8 unplugged and labeled. If any connector locks are broken, replace those pigtails now rather than discovering a loose injector connector as a misfire next month.
What It Costs: DIY Versus a Shop
| Approach | Typical cost |
|---|---|
| DIY, contact rebuild kit only | 15 to 40 dollars in parts |
| DIY, new or reman starter plus gaskets and coolant | 200 to 400 dollars in parts |
| Independent shop | 800 to 1,200 dollars |
| Dealer | 1,100 to 1,900 dollars |
The spread is almost entirely labor. The factory labor time is 2.7 hours, but owners report dealers quoting the equivalent of 7 hours, and the YourMechanic average for a GX470 lands at 644 dollars with 280 dollars in parts and 364 dollars in labor[7]. A first time DIYer should budget a full day. Owners who have done it before report 2 to 3 hours.
Shadetree math: if the diagnosis points to worn contacts and the starter motor is healthy, I recommend the contact rebuild as the best dollars per hour in all of 2UZ-FE ownership. Forty dollars in parts fixes a failure that dealers charge over a thousand dollars to reach.
Model Year Notes
LX470 and Land Cruiser 100 (1998-2007). Same engine, same valley mounted starter, same basic procedure. The 1998 through 2005 models have no secondary air injection, so there is no air pump step. The 2006 and 2007 models added it, so treat them like a 2005 and newer GX470. The intake manifold still has to come off either way.
Tundra (2000-2007) and Sequoia (2001-2007). Same starter location and procedure. The larger engine bay gives slightly better access to the rear of the engine than the GX470, where the switching valves sit half an inch from the firewall.
GX470 (2003-2009). The 2003 and 2004 models have no secondary air injection, so the job is simpler: no air pump and no switching valve gaskets. The 2005 and newer models add the air pump with bracket and the number 2 switching valves on the water bypass joint, which is the step that turns a long job into a very long job.
4Runner V8 (2003-2009). Same 2UZ-FE, same procedure as the GX470 of the same year. The 2003 and 2004 models have no secondary air injection. The 2005 through 2009 models have it, so order the switching valve gaskets too.
What Actually Fails Inside the Starter
Understanding the failure helps you choose between a contact rebuild and a full replacement.
Worn solenoid contacts (most common). The solenoid is the cylinder piggybacked on the starter motor. When you turn the key, it does two things: it pushes the drive gear into the flywheel, and it closes a pair of heavy copper contacts that feed battery current to the motor. Those contacts arc every start and slowly pit away. When they get thin enough, they cannot pass starting current. Symptom: a single loud click, no crank, with a good battery. This is the failure behind most 2UZ-FE no crank complaints, and it is the one a 15 to 40 dollar contact kit fixes.
Worn brushes (less common). The motor brushes wear like brake pads. When they get short, the motor cranks slowly or intermittently. At that point a contact kit alone will not save it. Replace the unit.
Drive gear and nose bearing (rare). One owner documented a failed nose gear drive bearing at 152,000 miles with the contacts still fine. Symptom: grinding or unusual noise during cranking rather than silence. Replacement is the fix.
Heat and oil. The starter sits in the valley under the intake manifold. High mile 2UZ-FE engines often weep oil from the valve cover gaskets, so note any leaks and clean the valley while the manifold is off.
Bench Test Before You Buy
Once the starter is out, 5 minutes on the bench tells you whether the motor is healthy or the contacts are the problem.
Clamp the starter in a vise or hold it firmly. Connect a jumper cable from the negative terminal of a known good battery to the starter case. Touch another jumper from the battery positive to the large main terminal on the solenoid. Then briefly jump battery positive to the small signal terminal. A healthy starter snaps the drive gear out and spins hard. If it just clicks, or spins weakly, the motor or contacts are done.
Shadetree alternative: most auto parts stores bench test starters for free. If you are unsure of your test setup, carry the starter in and let them run it. That test result, plus your symptom notes, is what decides between the contact kit and a new unit.
A Realistic Timeline
For a first timer working in a driveway with hand tools:
- Hours 1 to 2: fuel depressurization, battery disconnect, coolant drain, engine cover and intake hose off, fuel hoses disconnected and labeled.
- Hours 2 to 4: wiring harness separated and labeled, bypass hoses off, intake manifold off. This is where labeling discipline pays off.
- Hours 4 to 5: bypass pipe and joint out, air pump out on 2005 and newer, starter out. The rear starter bolt eats most of this window.
- Hour 5 to 6: bench test, contact rebuild or new starter prep, valley cleanup, knock sensor decision.
- Hours 6 to 8: reassembly with new gaskets, torquing to spec, coolant refill, leak checks, first start.
Experienced owners report 2 to 3 hours total. Plan a full day, keep the truck immobile overnight if needed, and do not rush the reassembly. A pinched hose discovered at midnight is worse than a slow afternoon.
Common Mistakes
Reusing the gaskets. The intake and bypass gaskets compress once. Reused gaskets weep coolant into the valley, and the leak only shows up after everything is back together. New gaskets are cheap insurance against repeating the job.
Skipping the coolant drain. The bypass plumbing holds coolant. Pulling the joint without draining makes a mess in the valley and risks coolant in the intake ports. Drain first.
Forgetting the fuel pressure. Opening a fuel hose on a pressurized system sprays gasoline. Relieve the pressure before disconnecting anything, keep a fire extinguisher within reach, and do not do this job with the engine hot.
Unlabeled connectors. Eight injector connectors, three sensors, and a handful of hoses all look alike at 9 PM. Tape and a marker cost almost nothing. Plan on a misrouted connector costing you a second teardown.
Overtorquing the small stuff. The intake fasteners only need 13 ft·lbf and the cable nut only 7.2 ft·lbf.[1] The aluminum threads in the heads and the small studs do not forgive a heavy hand. Use the torque wrench.
Sources
- Factory manual: 2005 GX470 repair manual, Starting and Charging, Starter Assy (2UZ-FE), Replacement procedure and torque specifications. ↑
- ih8mud, 100 Series Starter: replacement or rebuild, 200+ reply DIY thread. https://forum.ih8mud.com/threads/100-series-starter-replacement-or-rebuild.651604/
- ih8mud, Starter – Rebuild or Replace?, dealer versus independent quotes. https://forum.ih8mud.com/threads/starter-rebuild-or-replace.54414/
- ih8mud, Replacing the starter! Help!, manifold removal notes. https://forum.ih8mud.com/threads/replacing-the-starter-help.811687/
- ih8mud, 2006 gx470 starter removal, water crossover and emissions equipment access. https://forum.ih8mud.com/threads/2006-gx470-starter-removal.912656/
- ih8mud, Toyota 4.7L 2UZ Total Engine Teardown, first timer time reports and click diagnosis. https://forum.ih8mud.com/threads/toyota-4-7l-2uz-total-engine-teardown.1263844/
- YouTube, Toyota Lexus 2UZ-FE Starter Replacement (2008 GX470, secondary air injection series), full parts list with part numbers. https://www.youtube.com/watch?v=dXpK5YG7-A8
- YouTube, Toyota 4.7 Starter Replacement, Land Cruiser starter contact and plunger fix. https://www.youtube.com/watch?v=Ilek4gjhRF4
- YourMechanic, Lexus GX470 starter replacement cost estimates. https://www.yourmechanic.com/estimates/lexus/gx470/starter-replacement ↑
- AutoZone, Lexus GX470 starter pricing, new and remanufactured. https://www.autozone.com/batteries-starting-and-charging/starter/lexus/gx470 ↑
- JustAnswer, GX470 starter location and labor time discussion. https://www.justanswer.com/lexus/2vk67-need-locate-starter-motor-2003-lexus-gx470
- Lexus Owners Club, GX470 intermittent no start diagnosis thread. https://us.lexusownersclub.com/forums/topic/89579-car-wont-start-sometimes-no-starter-sound-then-starts-after-many-tries/
- Cruiser Patch, 100 Series 2UZ-FE starter replacement kit: remanufactured OEM Denso starter 28100-50101-84 superseding 28100-50101, plus water bypass gaskets 16341-50020. https://www.cruiserpatch.com/products/2uz-fe-100-series-starter-replacement-kit ↑
- LexusPartsNow, 17171-50030 intake manifold gasket, fits 2004-2009 GX470 and 2005-2007 LX470, quantity 2. http://www.lexuspartsnow.com/parts/lexus-gasket-intake-manifold-to-head-no-1~17171-50030.html ↑
- Weird Auto Works, GX470 2UZ part number reference: intake manifold gaskets 17171-50030, coolant crossover gaskets 16341-50020, bypass pipe O-ring 96761-24019, knock sensors 89615-20090. https://weirdautoworks.com/pages/gx470-2uz-part-number-reference ↑
- Toyota TSB T-SB-0230-12, Air Injection System MIL ON: 17377-50010 air tube gasket, 4 required, 2 per valve, plus secondary air injection model year coverage for 4Runner, Land Cruiser, Sequoia, and Tundra. https://static.nhtsa.gov/odi/tsbs/2013/MC-10132097-9999.pdf ↑
- ih8mud, Secondary Air Injection Pump, 2006-2007 100 series secondary air injection confirmation. https://forum.ih8mud.com/threads/secondary-air-injection-pump.1238230/
- ih8mud, 4.7L 2UZ-FE Valve Cover Gasket Job, high mile oil leaks. https://www.ih8mud.com/threads/4-7l-2uz-fe-valve-cover-gasket-job.1351036/
- Standard part number references: parts.lexus.com and toyodiy.com.
Leave a Reply