If your GX shakes at highway speed but the brakes feel smooth, you are chasing a different problem than warped rotors. Brake vibration only shows up when you press the pedal. This guide is about the vibration that is there at a steady 55 to 65 mph on a flat road, foot off the brake. The order below is deliberate. Free tests first, paid tests last, and no parts get ordered until a test points at something.
The factory diagnostic sequence for tire vibration is short: check the wheel nuts, inspect the tires, repair or replace as needed, check wheel balance, check the front hub bearings for looseness and runout, then road test.[1] Everything below hangs off that skeleton, with the shadetree tests owners actually use added where they fit.

Parts and tools
You need almost nothing to work through this guide. The paid step is one shop visit at the end.
| Item | What for |
|---|---|
| Torque wrench, 1/2 in drive (eBay) | Lug nuts, in a star pattern |
| Floor jack and two jack stands (eBay) | The wiggle test, the axle-slop check |
| Chalk or painter’s tape (eBay) | Marking which tire is which during the rotation test |
| Grease gun with NLGI No.2 chassis grease (eBay) | U-joint zerks on the driveshafts, if equipped |
| Dial indicator with magnetic base (eBay) | Measuring wheel runout, optional |
Step 1. Confirm it is not the brakes
Drive at highway speed on a smooth road and note when the vibration is worst. Now brake firmly from that speed. If the steering wheel or pedal pulses only while braking, stop here. That is rotor thickness variation or uneven pad transfer, and it is a different diagnosis. Our brake guide covers it. If the shake is constant at speed and braking does not change it, keep going. This is the single most useful split in the whole guide, because it rules out an entire system in one drive.
Step 2. Check the lug nuts
It sounds too simple, which is why it gets skipped. Loose or unevenly torqued lug nuts let the wheel sit slightly off the hub, and that shows up exactly as a highway-speed shake. Hand-check every nut on all four corners, then torque them in a star pattern to spec. Do this before the rotation test below, so the test is clean.
| Model | Wheel nut torque |
|---|---|
| GX470 (2003-2009) | 82 ft-lb (112 N.m)[2] |
| GX460 (2010-2014) | 83 ft-lb (112 N.m)[3] |
| GX460 (2015-2023) | 76 ft-lb (103 N.m), per the owner’s manual revision |
| GX550 (2024+) | 97 ft-lb (131 N.m)[4] |
Never put oil or grease on the wheel studs or nuts. The owner’s manual warns against it because lubrication lets the nuts work loose.[5] If a previous shop slathered anti-seize on your studs, clean it off with brake cleaner and torque dry.
Step 3. The diagnostic tire rotation
This is the highest-value free test in the guide. Mark each tire with chalk, then swap both front tires straight back (left front to left rear, right front to right rear). Do not cross them yet. Straight back keeps the test simple: if the vibration changes location, a tire or wheel moved it.
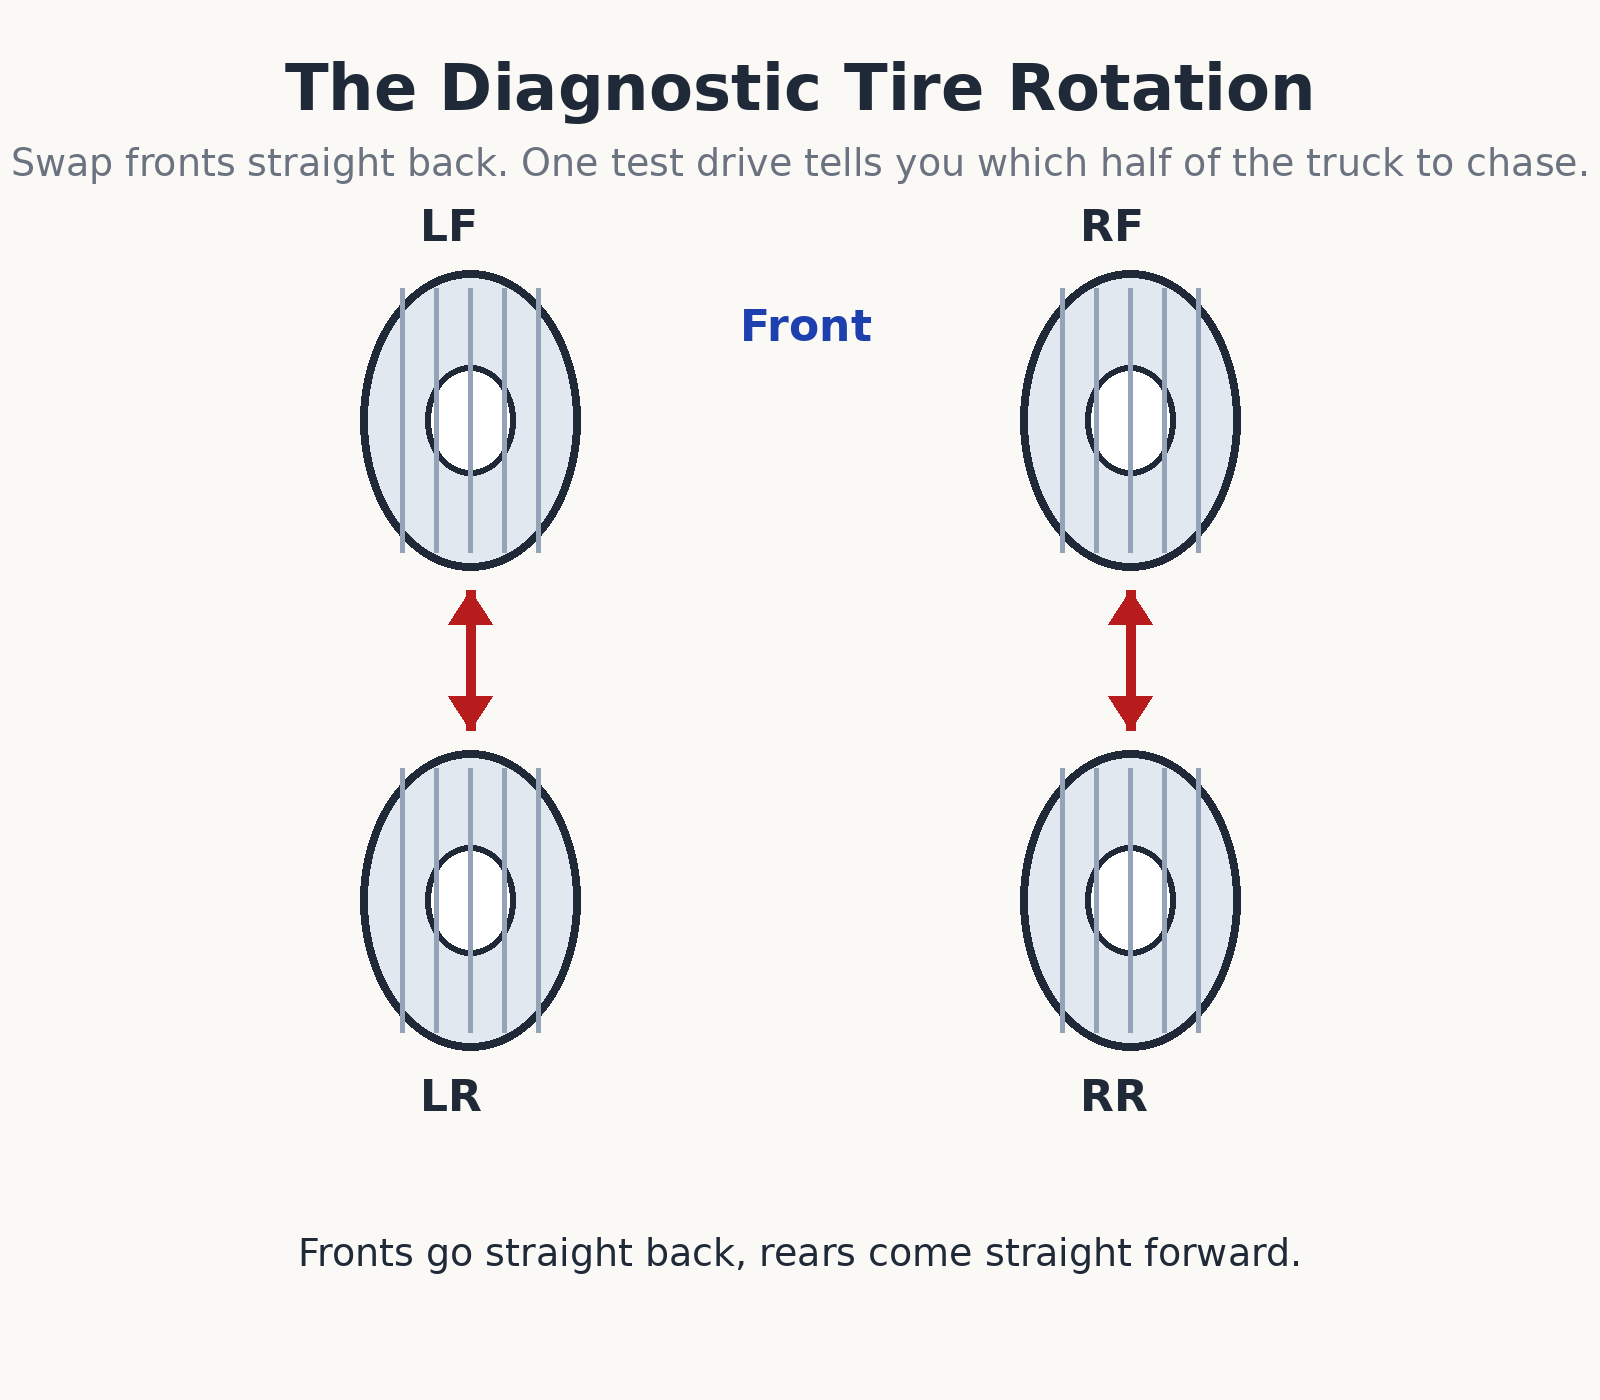
Test drive the same road at the same speed and read the result:
- The shake moved from the steering wheel to the seat, or from one side to the other. The problem moved with a tire or wheel. You are in the tire/wheel half of the flowchart. Go to Step 8.
- The shake stayed exactly where it was. The tires are probably innocent. You are in the driveline, bearing, or suspension half. Keep going with Steps 4 through 7.
- The shake changed character but did not clearly move. Note it and keep going. You may have two problems, which is common on high-mileage trucks.
Shadetree note: if your tires are directional, the straight-back swap still works because the tires stay on the same side and keep their rotation direction.
While the wheels are off, look at the tires. Cupping or scalloped wear on the tread is a vibration source that balance cannot fix. One quick check owners use: drive the same speed on concrete, then on fresh blacktop. If the noise changes a lot between pavement types, the tire tread itself is the noise maker, not a bearing.[6] Also check pressures against the door sticker before every test drive. Wrong pressure is free to fix and changes everything. Our tire pressure guide has the verified numbers for stock and upsized tires: https://thetruckgarage.com/what-psi-should-you-run-in-upsized-tires-gx470-gx460-gx550/
Step 4. Listen: the swerve test for wheel bearings
Find an empty stretch of road at highway speed and gently swerve left, then right. You are loading and unloading the bearings. A wheel bearing hum gets louder when you turn away from the bad side, because that loads the bad bearing, and quieter when you turn toward it. This is the classic road test, and owners confirm it works on the GX470: one owner traced a freeway buzzsaw rumble to the passenger-side wheel bearing after the swerve test pointed at that corner.[7]
A bearing can also be a straight vibration with no obvious hum, so do not rule it out just because the truck is quiet. The swerve test costs nothing and takes thirty seconds.
Step 5. The jack-and-wiggle test
Jack up one front corner and put it on a stand. Grab the tire with both hands and try to rock it. Then do the other front corner the same way and compare. Any difference side to side is a clue.
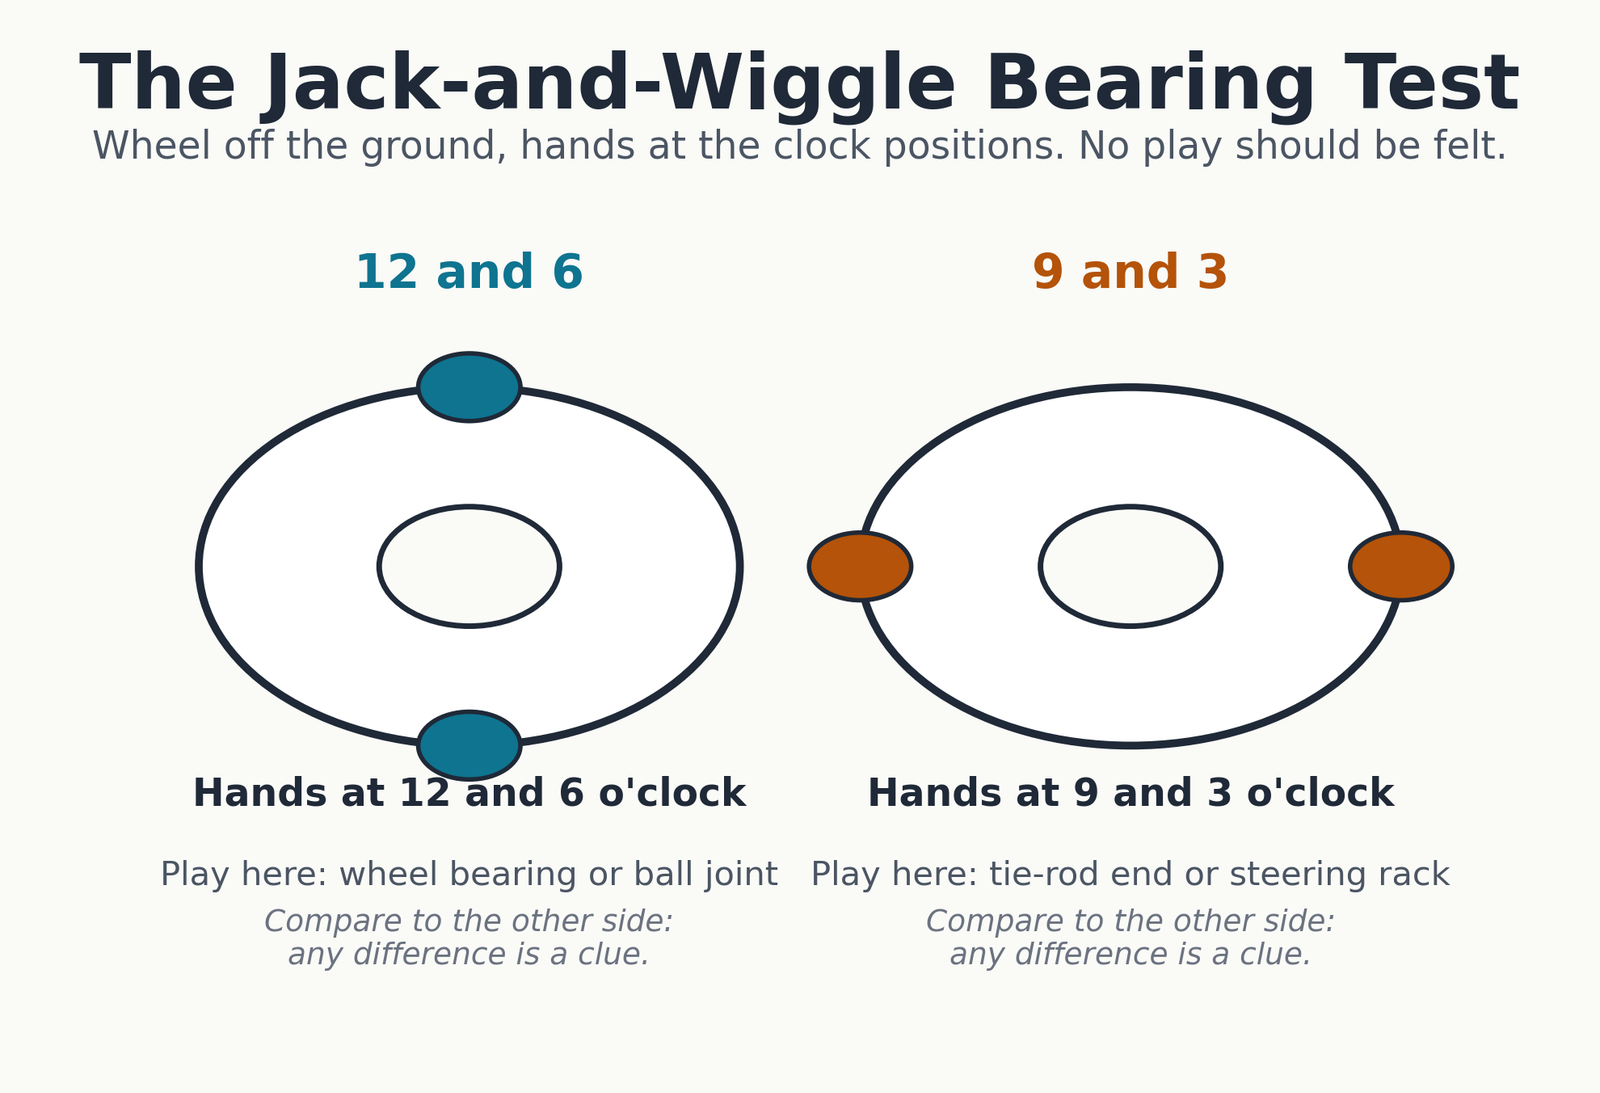
- Hands at 12 and 6, rocking top to bottom. Play here points at the wheel bearing or a ball joint.
- Hands at 9 and 3, rocking side to side. Play here points at a tie-rod end or the steering rack.
Shadetree addition: with the wheel still in the air, spin it by hand as fast as you can and let it free-spin. Feel for grinding, hesitation, or a spot that catches, and listen. A healthy bearing spins smooth and quiet. If you are not sure whether the drag you feel is the bearing or just the brake pads, that uncertainty is normal. The swerve test from Step 4 is the tiebreaker.[8]
Step 6. The front diff needle bearing (GX470 and GX460)
This one is specific to the GX470 and GX460, and it is the most common “mystery vibration” on these trucks. Inside the driver-side of the front differential, the CV axle rides in a needle bearing. When that bearing wears, you get a cyclical growl or whoomp-whoomp, usually between 35 and 55 mph, felt in the floor and gas pedal, often worse when the truck is cold. It is easy to mistake for a wheel bearing or a tire, and owners report that rotating and rebalancing tires does nothing for it.[9]
On part-time 4WD trucks, the giveaway test is well documented: drive at the speed where it growls, then shift into 4HI where it is safe to do so. If the growl vanishes in 4HI and comes back in 2WD, the driver-side needle bearing is the likely cause.[10] One caution for GX owners: the GX470 and GX460 are full-time 4WD, so there is no 2WD mode to toggle out of. The toggle test does not apply directly to your truck.
The test that does apply is physical. With the truck safely on stands, reach in and grab the driver-side CV axle right where it enters the front differential, then push it up and down and side to side. Excessive slop there is the tell. As one tech put it, all you have to do is grab the driver-side axle shaft next to the diff and push on it. If there is a problem you will see it right away.[11]
The permanent fix owners use is a solid clamshell bushing from East Coast Gear Supply that replaces the factory needle bearing. It is a metal-backed, bronze-inlaid, PTFE-coated bushing that supports the axle shaft more tightly than the loose needle bearing, and owners report the vibration staying gone after tens of thousands of miles.[12] This is a repair, not a diagnosis step, so it only belongs on your list after the slop check confirms it. Do not order the bushing on a hunch.
This section does not apply to the GX550. Its front differential is a different design, and the needle-bearing issue has not been documented on it.
Step 7. Driveshaft and U-joints
Vibration under load, a clunk when you tip into the throttle from a stop, or a shudder on takeoff point at the driveshafts rather than the wheels. Park on flat ground, set the parking brake, chock the wheels, and crawl under. Grab each driveshaft and twist it back and forth by hand while watching each U-joint. Any visible play, a metallic click, or reddish rust dust around a bearing cap means that joint is done. Rust dust is dried lubricant and metal wear escaping past a failed seal. It is one of the most reliable visual tells a U-joint gives you.
While you are under there, hit the grease zerks if your shafts have them. The factory calls for lithium base chassis grease, NLGI No.2, on the spider joints, and molybdenum-disulfide lithium base grease, NLGI No.2, on the slide yoke.[13] A dry joint will not quiet down once it is worn, but fresh grease on a joint that is still tight is cheap insurance. If you find play, the joint gets replaced, not greased and hoped over.
If your truck is lifted, say so when you talk to a shop. Lift angles change driveshaft geometry and can create vibrations that mimic everything above. The tests still apply in the same order, but the shop needs the full picture.
Step 8. When to stop guessing: get a road-force balance
If the rotation test pointed at a tire or wheel, or if everything above checked out and the truck still shakes, stop throwing free tests at it and pay for the right machine. A standard spin balance only corrects weight distribution. A road-force balance presses a loaded roller against the tire as it spins, which finds the problems a spin balance cannot: a tire with a stiff spot in the carcass, a slightly bent wheel, or a tire and wheel whose high spots stack up instead of canceling out.
Call ahead and ask specifically for a road-force balance. Not every shop has the machine. When the work is done, ask for the printout. You do not need to know the exact pass/fail numbers. What you are looking for is one corner reading far higher than the other three. That corner is the bad assembly, and now you know whether to replace a tire, straighten or replace a wheel, or have the tire remounted and match-mounted to cancel the runout. If all four corners read low and even, the tire and wheel half of the flowchart is closed, and it is time for a front-end inspection by a shop you trust.
What this guide does not cover
Vibration only under braking is a brake problem: rotor thickness variation or uneven pad transfer. It will not respond to anything in this guide. See our brake guide for that diagnosis. A shake in the steering wheel at parking-lot speeds with no highway component is usually alignment or a damaged tire, not balance. And a vibration that tracks engine RPM in every gear, including sitting still, is an engine or mount issue, not a wheel or driveline issue.
FAQ
Why does the vibration show up at 55-65 mph and not at 40? Tire and wheel vibrations are speed sensitive because they are rotational. A heavy spot or stiff spot in a tire excites the suspension at a frequency tied to wheel speed, and the suspension amplifies it most in a narrow speed band. That band landing at highway speed is typical, not a clue pointing at any one part.
Can an alignment cause a highway vibration? Alignment causes pulling and uneven tire wear, not usually a shake by itself. But the uneven wear a bad alignment creates, like cupping, absolutely can shake. Fix the wear cause and the tire, in that order.
My vibration moved after a tire rotation. Does that mean the tire is bad? It means a tire or wheel assembly is involved, which is progress, but not which one or why. The next step is the road-force balance in Step 8, which separates a balance problem from a damaged tire or bent wheel.
Is it safe to drive with the needle-bearing growl? Owners have driven on it for thousands of miles. It is a noise and vibration problem more than an imminent failure, but the loose axle can wear the seal and the axle itself over time. Diagnose it properly, then schedule the fix rather than ignoring it.
Do I need to replace wheel bearings in pairs? Advice, not a rule. Many owners do both fronts at once because the labor overlaps and the other side has the same mileage on it. If only one side failed the tests, replacing just that side is fine.
Sources
- 2013 GX460 factory service manual, tire and wheel system troubleshooting section (on file)
- GX470 factory service manual, specified torque section (on file)
- Lexus GX460 2010 US owner’s manual, hosted on lexusgxor.com: https://lexusgxor.com/_media/general:2010_gx_460_owners_manual.pdf
- Lexus GX460 2016 Canadian owner’s manual, hosted on lexusgxor.com: https://lexusgxor.com/_media/general:2016_gx_460_owners_manual.pdf
- ECGS Toyota clamshell bushing install video and FAQ: https://www.youtube.com/watch?v=xSVPePjGge4
- TacomaWorld, Front Diff Vibes ECGS bushing fix: https://www.tacomaworld.com/threads/front-diff-vibes-ecgs-bushing-fix.464941/
- Tundras.com, Front Diff Issue: https://www.tundras.com/threads/front-diff-issue.121682/
- IH8MUD, 2008 GX470 Front Wheel Bearing replacement: https://forum.ih8mud.com/threads/2008-gx470-front-wheel-bearing-replacement.893632/page-2
- IH8MUD, Front end rubbing noise stumped on cause: https://forum.ih8mud.com/threads/front-end-rubbing-noise-stumped-on-cause.1163913/
- 4Runners.com, ECGS user experience: https://www.4runners.com/threads/ecgs-user-experience.27788/
- TacomaWorld, ECGS Bushing to fix vibrations: https://www.tacomaworld.com/threads/ecgs-bushing-to-fix-vibrations.765327/
Footnotes
[1] The sequence in the 2013 GX460 factory service manual under tire vibration diagnosis: tighten the wheel nuts, inspect the tires, repair or replace as needed, inspect and adjust wheel balance, inspect the front axle hub bearing for looseness and hub runout, then road test. This guide follows that order with owner-developed tests added.
[2] GX470 factory service manual, specified torque tables: wheel nut 112 N.m (82 ft.lbf).
[3] 2010 US GX460 owner’s manual: “Have the wheel nuts tightened with a torque wrench to 83 ft.lbf (112 N.m, 11.5 kgf.m) as soon as possible after changing wheels.”
[4] 2024 GX550 owner’s manual: wheel nut torque 97 ft-lb (131 N.m), verified Sep 28, 2026.
[5] 2010 US GX460 owner’s manual: “Never use oil or grease on the wheel bolts or wheel nuts. The oil or grease can cause the wheel nuts to loosen, causing a serious accident.”
[6] IH8MUD owner report: cupped tread from a poor alignment produced a bearing-like growl that changed with pavement type, which a bearing would not do.
[7] IH8MUD owner report: freeway buzzsaw and rumble that worsened turning right, traced to the passenger-side wheel bearing; replacing both fronts eliminated it.
[8] IH8MUD owner procedure: jack the wheel, spin by hand feeling for grinding or hesitation, and rock the tire to check for wobble indicating a bad bearing or tie-rod end.
[9] 4Runners.com owner report: a whoomp-whoomp sound present from 35-55 mph that rotating and balancing did nothing to change, eliminated by the ECGS bushing.
[10] ECGS install video FAQ: “Drive around 35-45 mph in 2WD, then shift into 4HI where safe. If the vibration or growl goes away in 4HI and comes back in 2WD, the driver-side clamshell needle bearing is very likely the issue.” Verified on part-time 4WD trucks; the GX470/GX460 are full-time 4WD and have no 2WD mode.
[11] Tundras.com owner report: to check the needle bearing, grab the driver-side axle shaft next to the diff and push on it; a problem shows up right away.
[12] ECGS install video: the bushing is metal-backed, bronze-inlaid, and PTFE-coated, replacing the factory needle bearing to better support the driver-side CV axle under side load. TacomaWorld and 4Runners.com owners report the vibration staying gone after 20k+ miles.
[13] 2016 Canadian GX460 owner’s manual, vehicle specifications: propeller shaft spider joints use lithium base chassis grease NLGI No.2; the slide yoke uses molybdenum-disulfide lithium base chassis grease NLGI No.2.
Leave a Reply