Quick answer
Idle and low speed heat points at airflow first. A GX that climbs at idle, cools down once the truck moves, and warms its A/C in traffic has an airflow problem at the top of the list. The fan coupling, the fan shroud, and blockage across the condenser and radiator fins are the first checks. Road speed pushes air through the cores and masks a weak fan. Idle removes that help and exposes it.
Highway and load heat points at coolant flow first. A GX that holds normal temperature in town and climbs at highway speed, on a grade, or while towing has a coolant flow or heat rejection problem at the top of the list. The thermostat, internal radiator blockage, the water pump, and low coolant from a leak are the first checks. Airflow is strong at speed, so a truck that still climbs at speed is failing on the coolant side.
Warm A/C at idle with a normal gauge is an airflow case. The condenser is mounted in front of the radiator. The condenser loses airflow first when the fan weakens or the fins clog. The A/C fades at idle while the temperature gauge still reads normal, and the gauge moves later as the fault gets worse. Start with the condenser fins and the fan coupling on that complaint.
A system that is low on coolant overheats in any pattern, and it overheats fast. Do the cold checks in this guide before you sort the pattern. The pattern sort assumes a full system with a working cap.
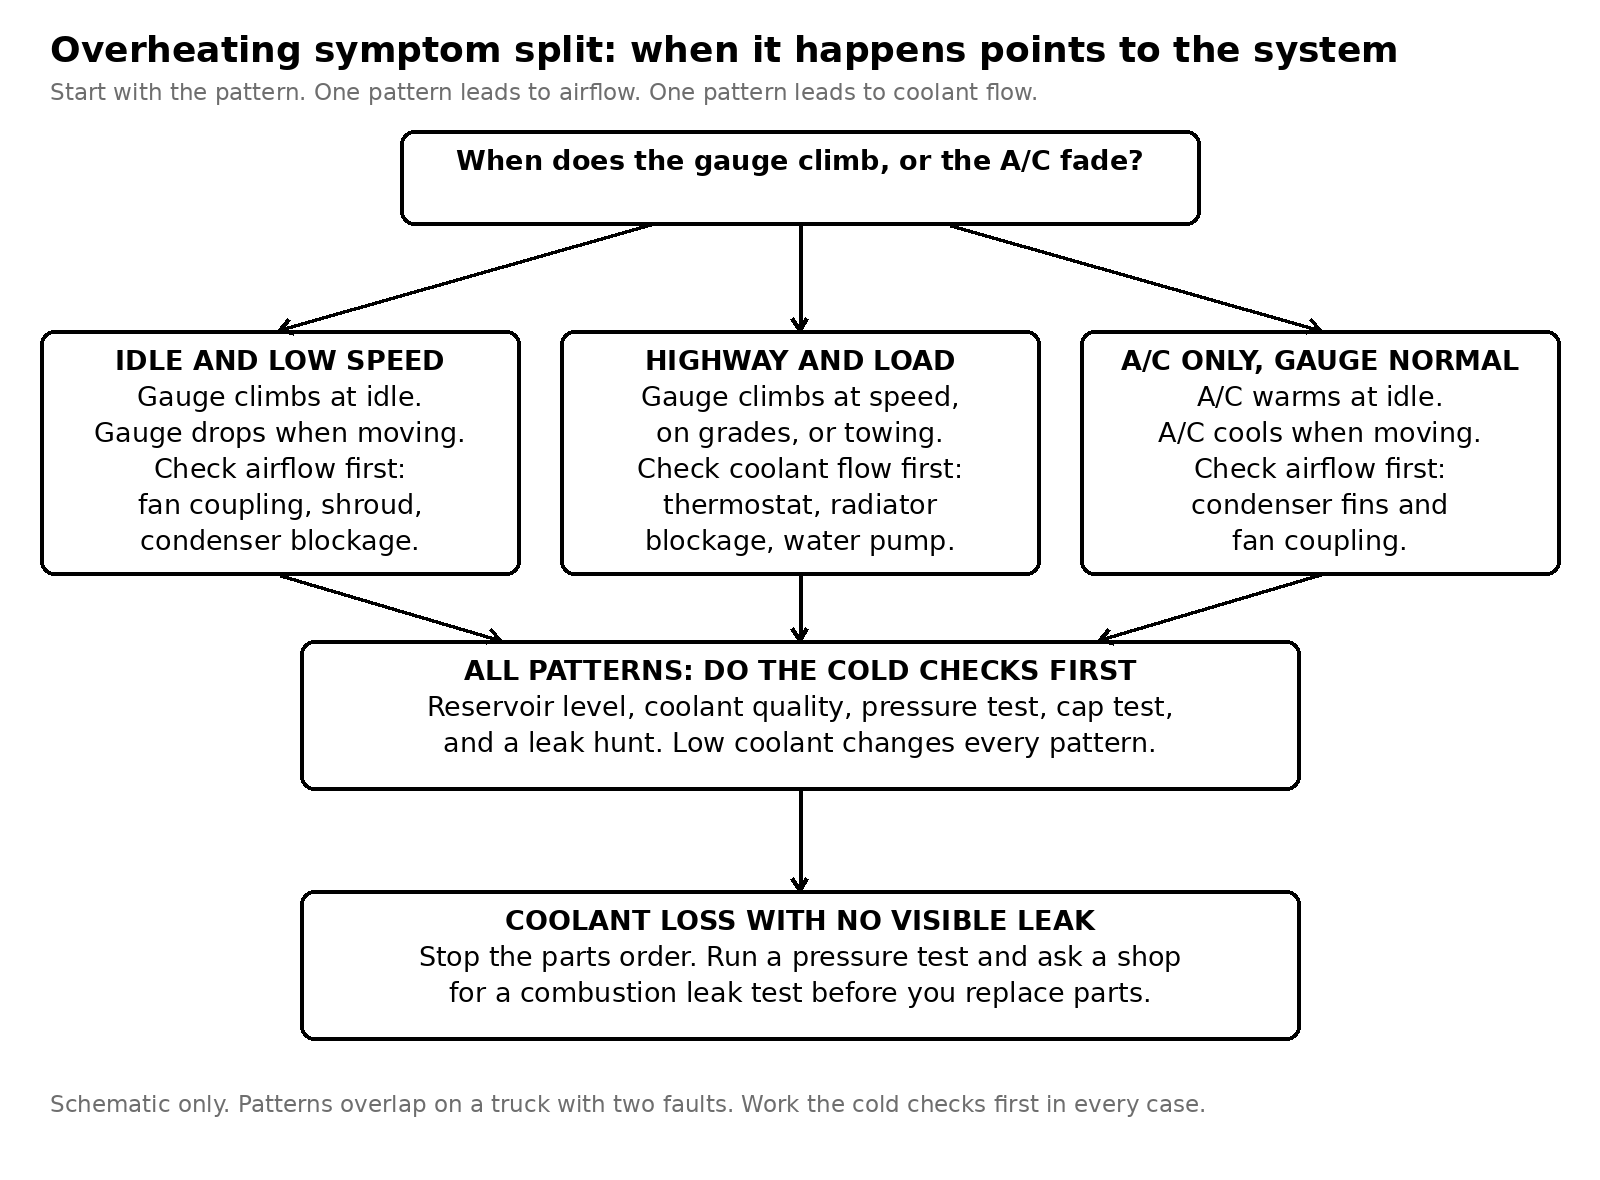
Overheating Symptom Split
Safety
Let the truck cool before you open anything. A hot cooling system holds pressurized coolant and steam. Opening the cap on a hot system can spray both. Every check in the cold checks section waits for a cold engine.
A climbing gauge on the road means pull over. Turn the A/C off, pull to a safe place, and shut the engine off when the gauge keeps climbing or steam appears. Driving a GX through a full overheat risks head damage that costs far more than a tow. The FAQ at the end of this guide covers the pull over steps in order.
Keep hands clear of the fan area with the engine running. The GX470 and GX460 fan is engine driven and it turns whenever the engine turns. The GX550 fan is engine driven through an electronically controlled fluid coupling, and it turns whenever the engine turns. Treat every fan as live during a running test.
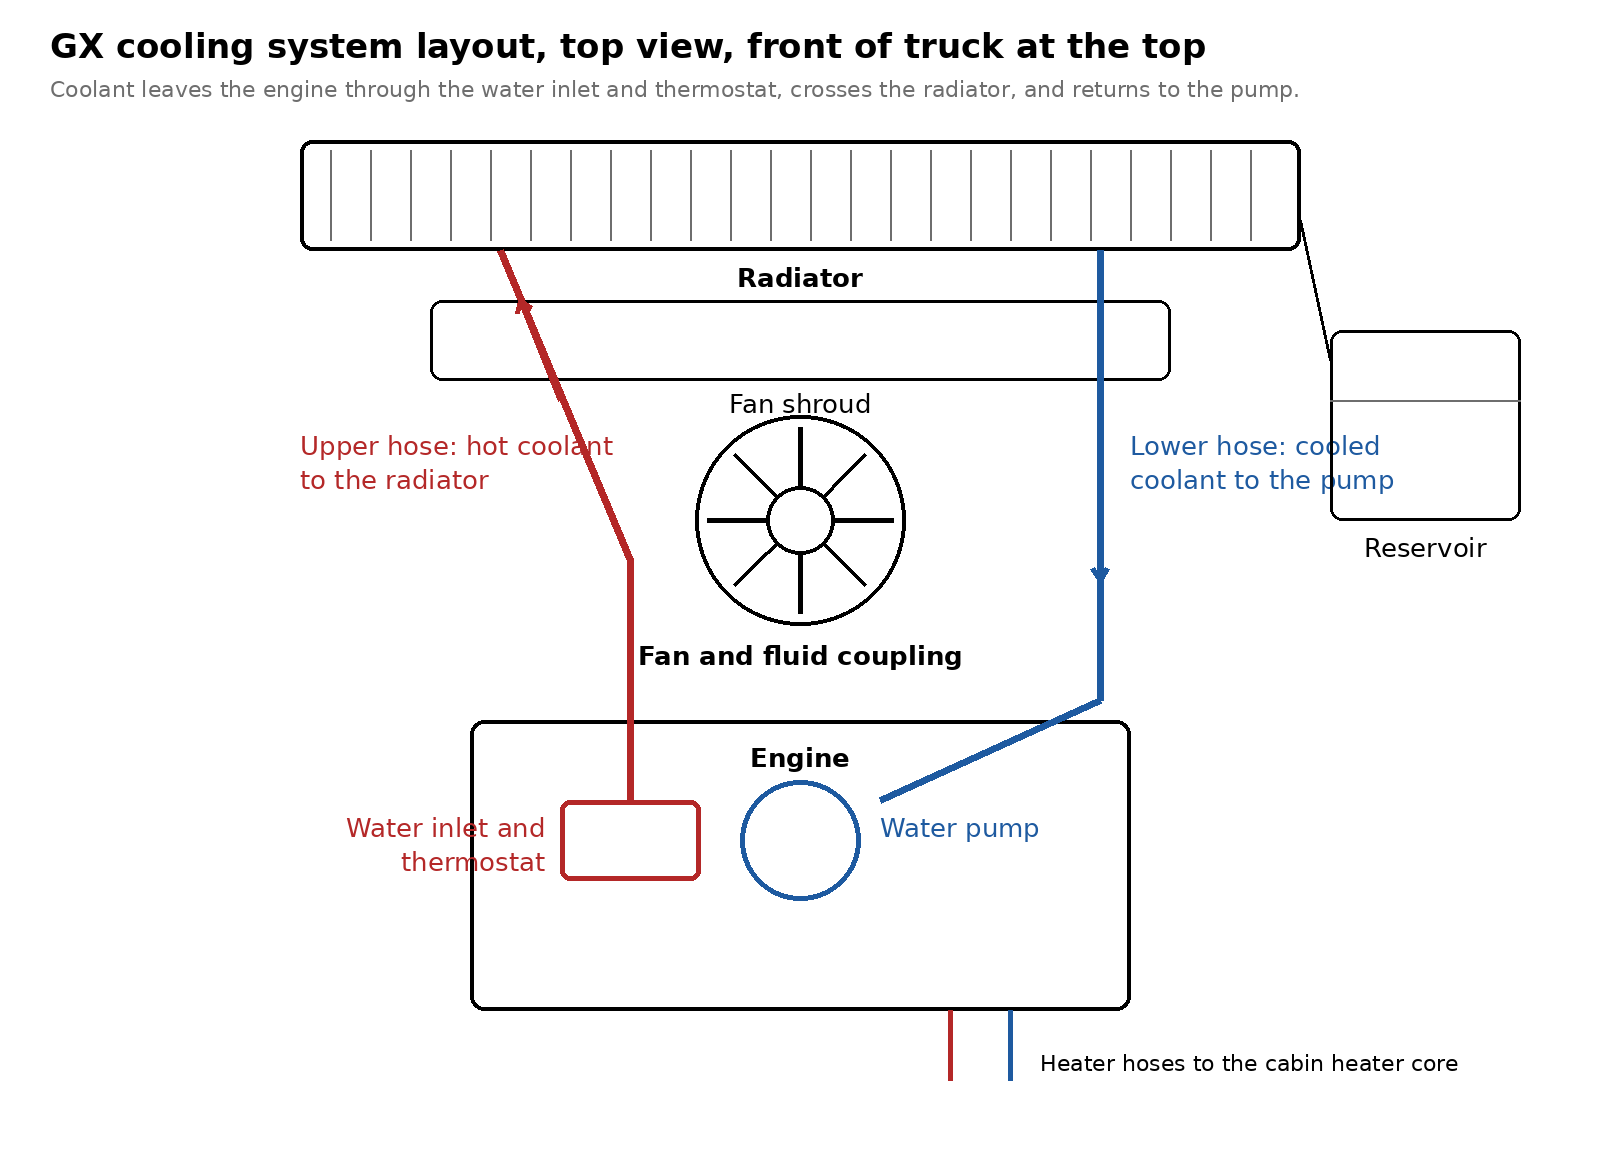
Cooling System Layout
Cold checks, in order
Work these checks on a cold engine, in this order. Each check takes minutes.
Step 1. Read the reservoir level cold. On the GX470, the coolant level in the reservoir is between LOW and FULL when the engine is cold. On the GX460, the level is between the L and F lines when the engine is cold. A level below the low mark means coolant left the system or air entered it. Top the reservoir to the full mark with the correct coolant, then find where the coolant went before you road test. Our GX fluids guide covers coolant type and service intervals for both V8 generations.
Step 2. Read the coolant itself. With the engine cold, remove the cap and look at the filler neck and the coolant surface. Look for heavy rust or scale deposits around the cap and the filler hole, and for coolant that is free of oil. Rust colored coolant, scale at the neck, or an oil film on the surface each point to a neglected system. A neglected system supports the internal blockage diagnosis later in this guide. Clean coolant with a steady level drop points to a leak.
Step 3. Pressure test the system cold. Fit a cooling system pressure tester to the filler neck, pump the system to 17.1 psi (118 kPa), and watch the gauge. Pressure that holds rules out a gross leak. Pressure that drops means coolant is leaving under pressure, and the leak hunt in the next step follows the drop. When pressure drops, check hoses, the radiator, and the water pump first. When pressure drops and no external leak shows, check the heater core, the block, and the head.
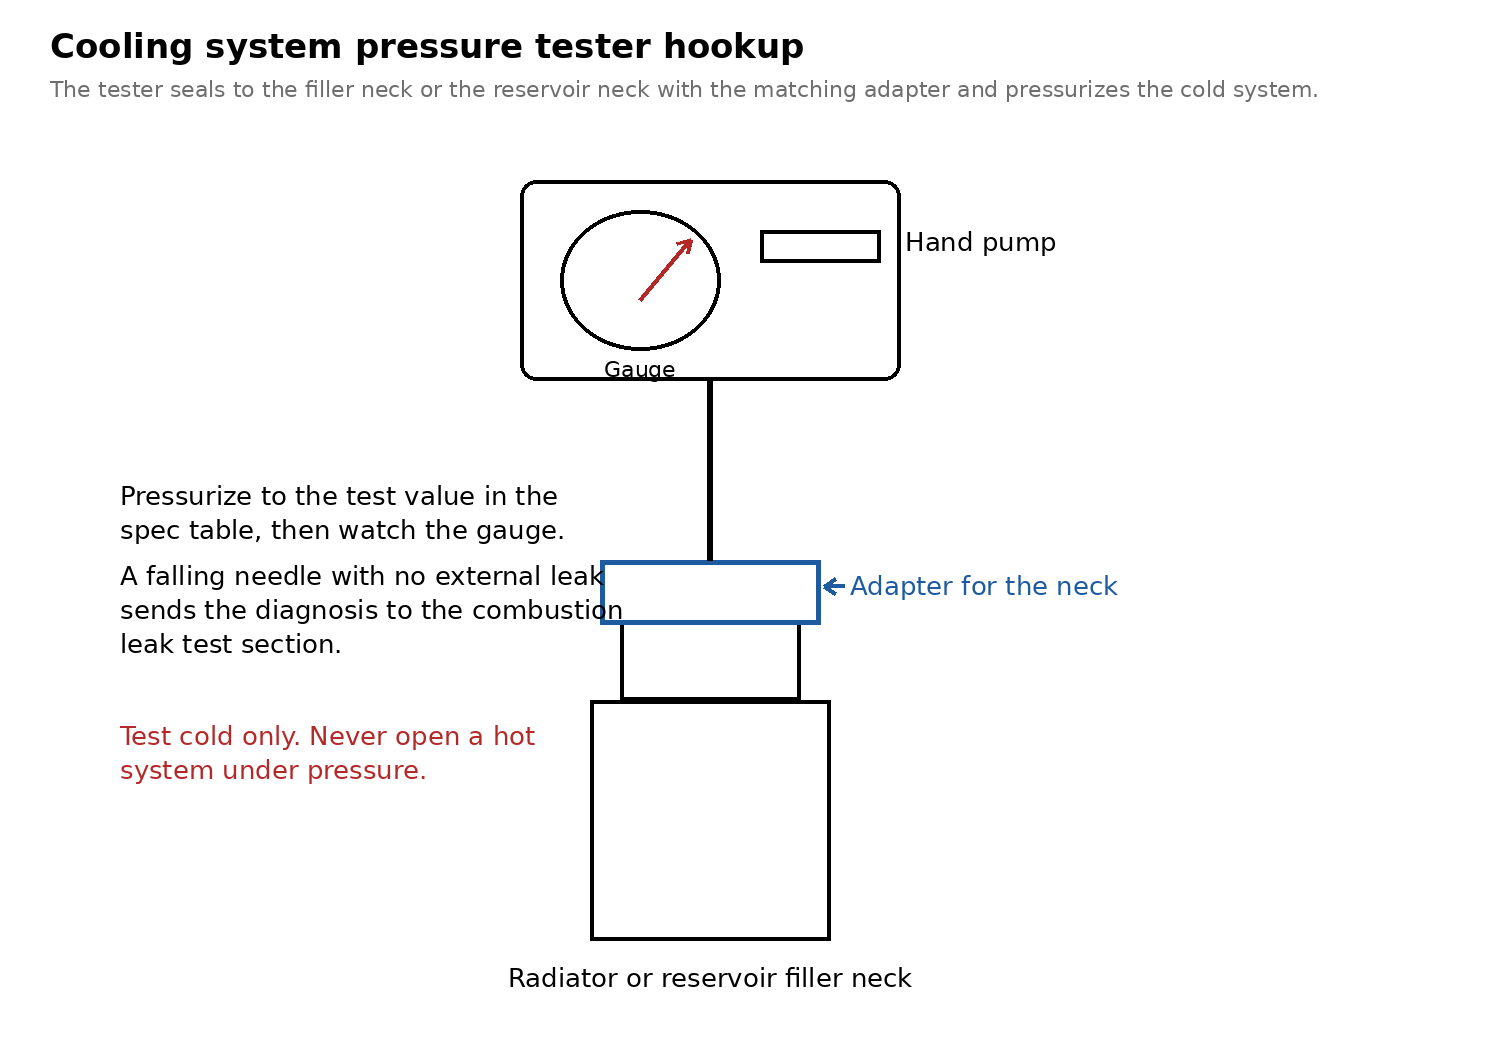
Pressure Tester Hookup
Step 4. Test the cap on the same tester. A cap that vents early lowers system pressure and lowers the boiling point with it. The GX470 cap relief valve opens at a standard pressure of 13.5 to 17.8 psi (93 to 123 kPa), and a used cap must hold at least 11.4 psi (78 kPa). Replace a cap that tests below the minimum. A cap is cheap, it fails with age, and it belongs on every high mileage cooling diagnosis before internal parts come off.
Step 5. Hunt the leak with the system under pressure. Work from the top of the engine down while the tester holds pressure. Check hose ends and clamps, the radiator side tanks and top seam, the thermostat housing, and the heater hose connections at the rear of the GX470 engine. The plastic heater hose tees on the 2UZ-FE crack with age and leak at exactly the age these trucks have reached. Our heater hose tees guide covers tee inspection and the brass replacement in full. Finish at the water pump. The pump check is its own section below because the GX470 and GX460 pumps fail in different ways and the jobs differ.
Step 6. Record what you found before the engine starts. Write down the cold level, the coolant condition, the pressure test result, and the cap result. A diagnosis that starts from written cold facts survives a confusing road test. A diagnosis from memory produces a parts order and a second failure.
Airflow checks
Airflow faults share one trait. Each fault matters most when road speed is low and engine load at idle still puts heat into the coolant and the condenser. Work the stack from the front of the truck rearward.
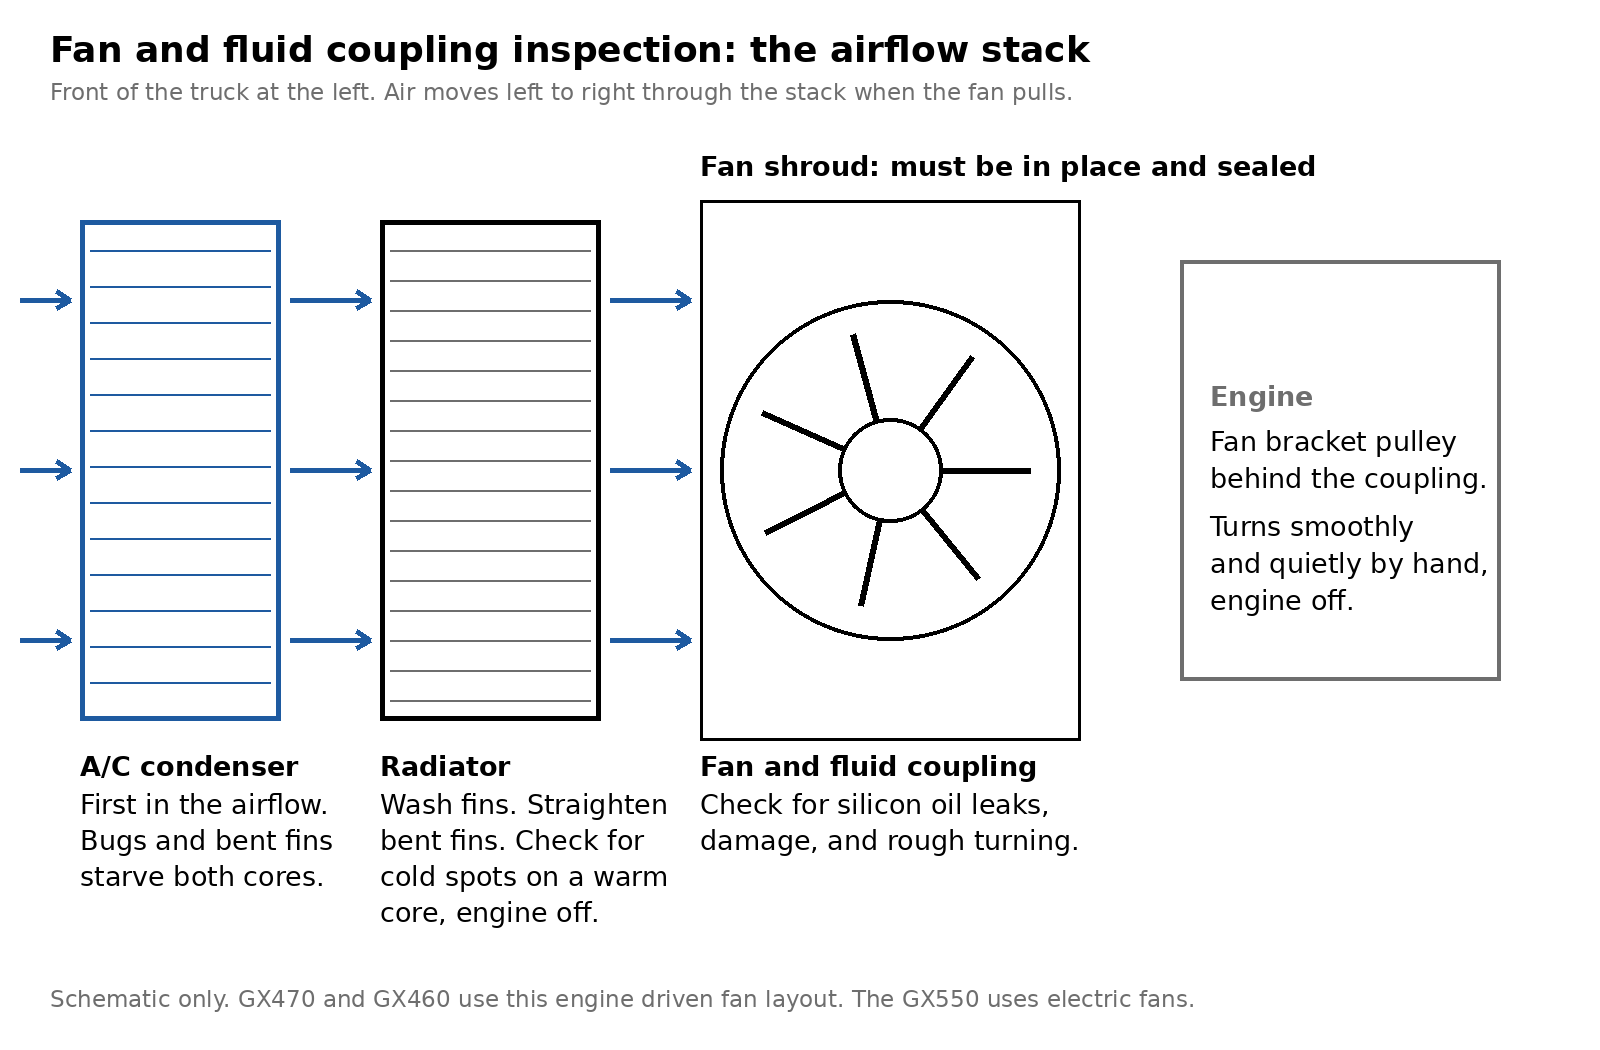
Fan and Fluid Coupling Inspection
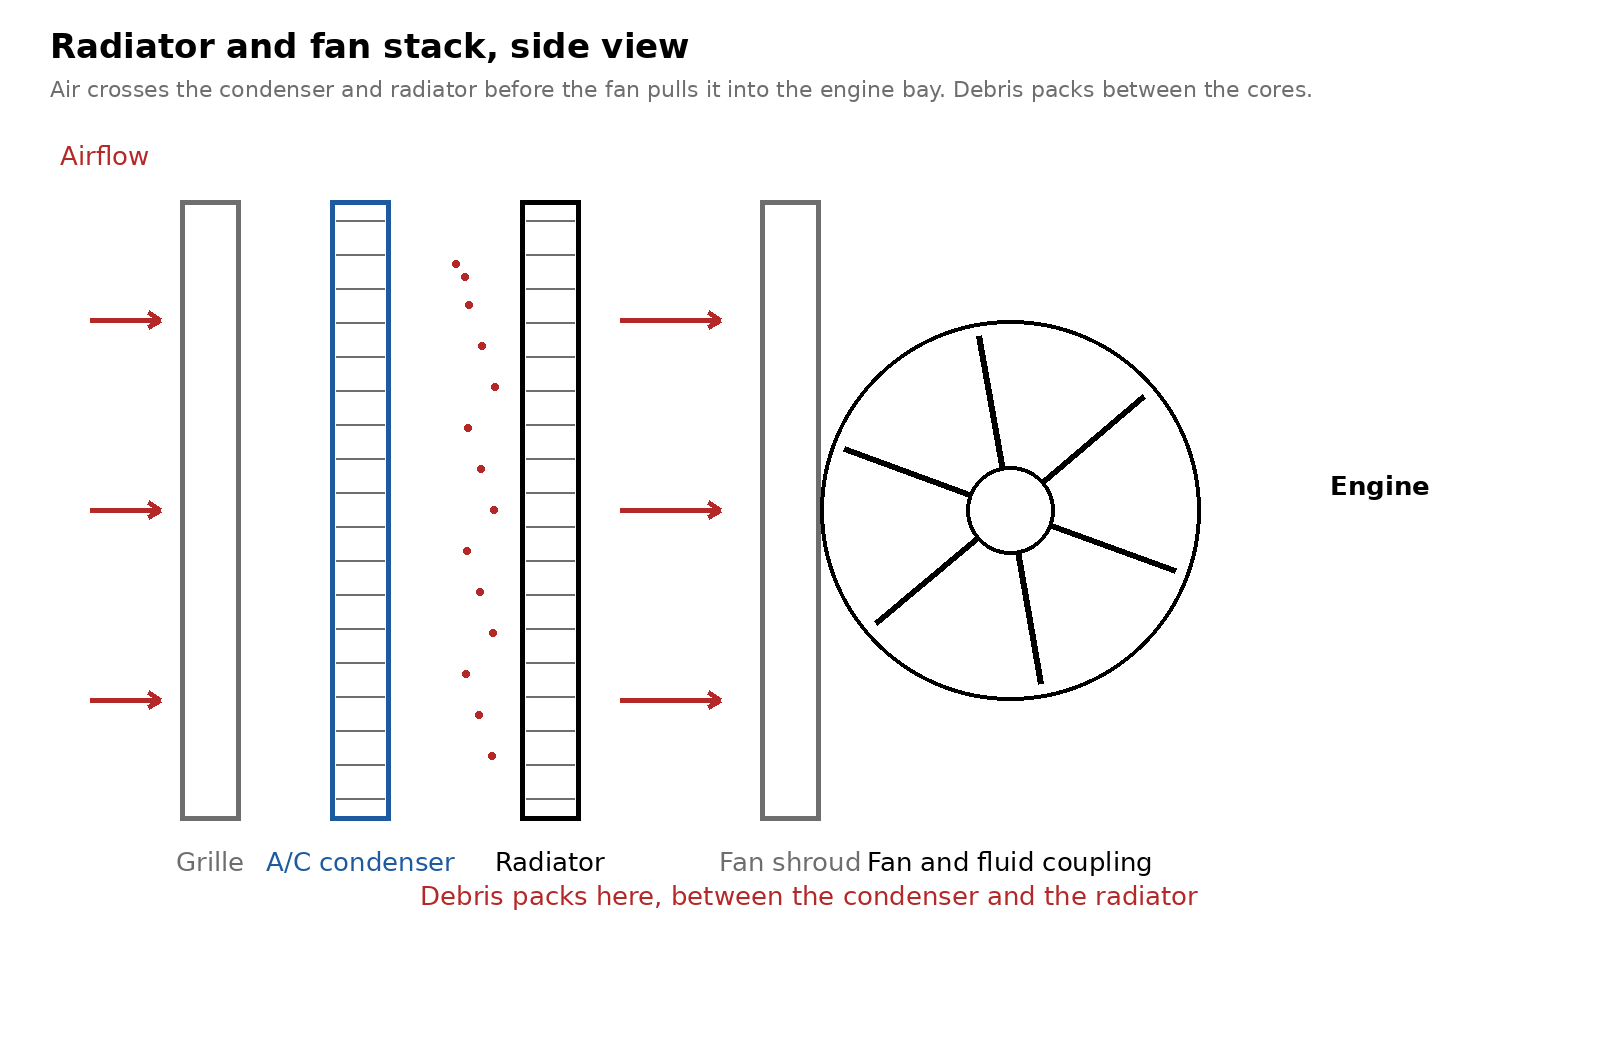
Clean the fins first. Bugs, mud, seed fluff, and trail debris pack the condenser fins and then the radiator fins behind them. Wash clogged fins with water or a steam cleaner and dry them with compressed air. Keep a steam cleaner at 300 mm from the core at 2,942 to 4,903 kPa and at 500 mm from the core at 4,903 to 7,845 kPa. Straighten bent fins with care and keep water off electronic components. A garden hose from the engine side, pushing debris back out the way it entered, clears most packed cores in a driveway.
Radiator and Fan Stack
Confirm the shroud is present and sealed. The fan pulls air through the cores only when the shroud surrounds the fan and seals to the radiator. A missing shroud, a cracked shroud, or a shroud left loose after earlier work lets the fan pull engine bay air in a circle. The temperature effect shows up at idle and in slow traffic first. Shroud bolts on the GX470 and the GX460 torque to 44 in.·lbf (5 N·m) at reinstall.
Inspect the fluid coupling with the engine off. The coupling inspection has three parts. Check that the coupling shows no damage. Check that no silicon oil leaks from the coupling. Check the turning smoothness of the coupling. A coupling with an oil film and dust caked around its seams has lost the fluid that drives the fan. A coupling that turns rough or wobbles has a bearing fault. Replace a coupling that fails any part of that inspection.
Cold spin feel. With the engine off and cold, spin the fan by hand. A healthy coupling gives firm, even resistance and the fan stops within a short arc after you let go. A coupling that freewheels with almost no resistance has lost drive.
Hot roar check. A working coupling engages as the air through the radiator heats up, and engagement produces a clear fan roar and a strong pull of air at idle on a hot day with the A/C on. A hot truck at idle with a quiet fan and warm A/C vents has a coupling that is failing to engage, provided the fins are clean and the shroud is sealed. Owner threads on IH8MUD split the complaint the same way. A bad fan clutch heats at idle and stays normal while moving, and a bad thermostat overheats quickly in any pattern.
Check the fan bracket pulley on the GX470. Check turning smoothness at the fan pulley, and replace the bracket when the pulley fails to turn smoothly. A rough bracket bearing adds noise that owners chase as a pump or pulley fault, and it can wobble the fan. Spin the pulley by hand during any fan or pump work and listen for roughness.
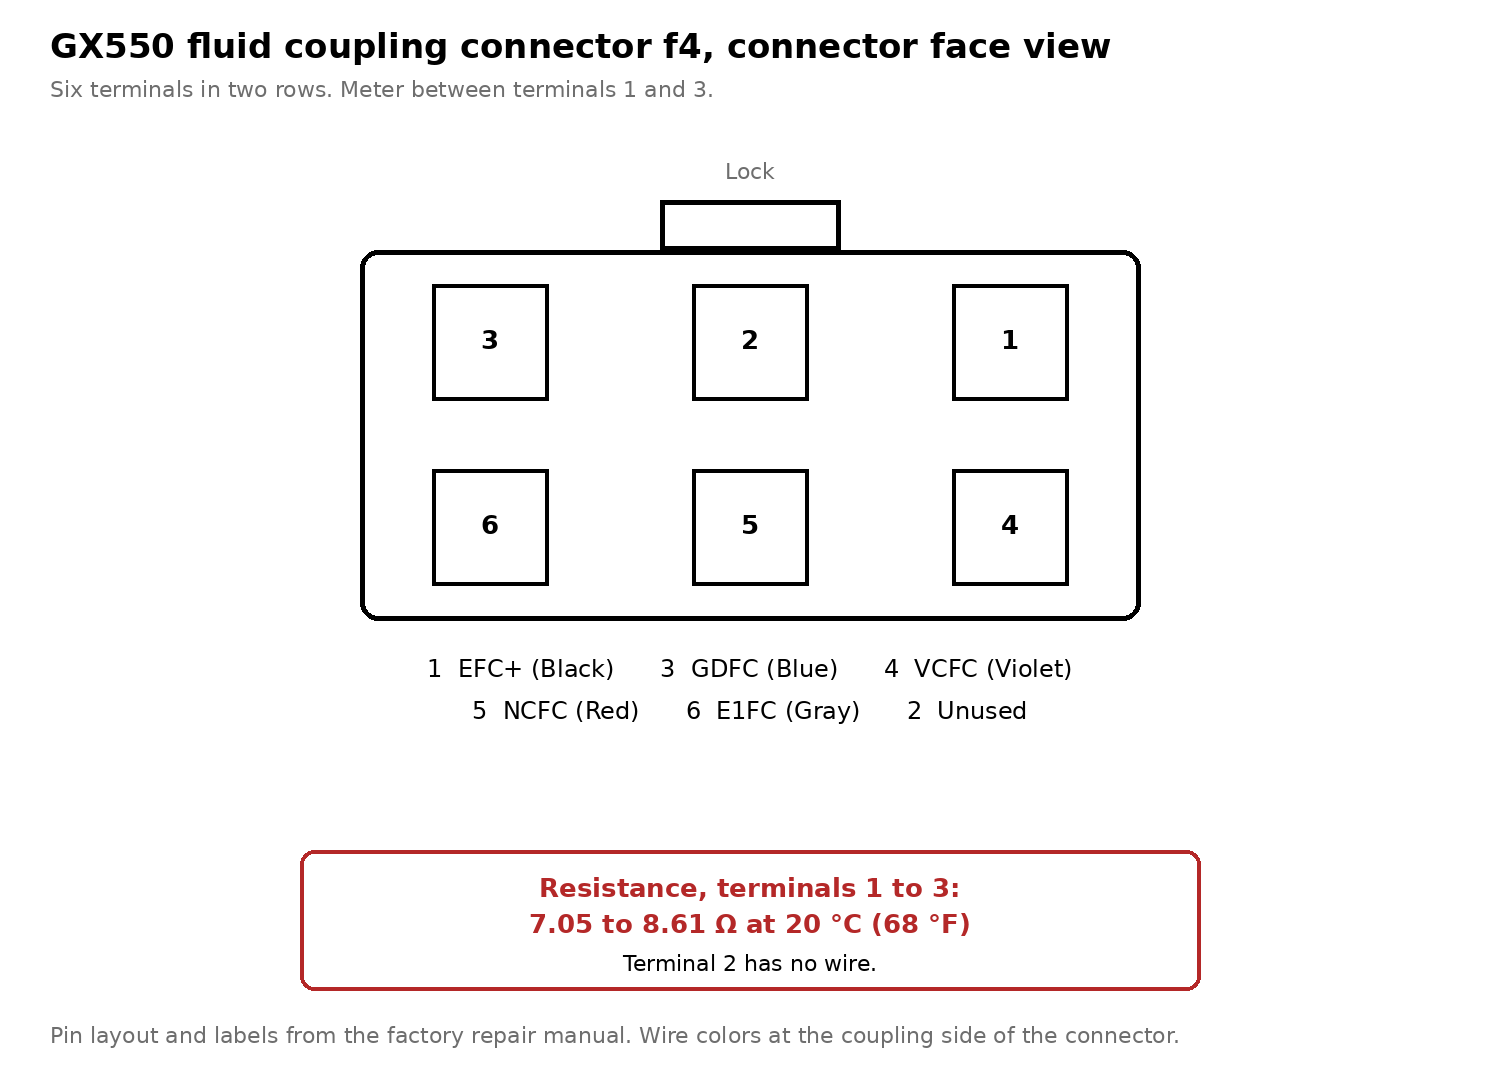
GX550 coupling checks add a resistance test and scan data. The GX550 drives its fan through an electronically controlled fluid coupling. The coupling carries an electrical connector, and the engine computer commands engagement instead of a bimetal spring. The damage check, the silicon oil leak check, and the turning smoothness check from the V8 inspection apply to the GX550 coupling as well. The coupling connector carries a resistance specification. Resistance between terminals f4-1 (EFC+) and f4-3 (GDFC) measures 7.05 to 8.61 Ω at 20 °C (68 °F). Terminal 1 carries a black wire and terminal 3 carries a blue wire. A coupling outside that range has an electrical fault in its control circuit. Scan data shows the commanded fan state against coolant temperature, so a hot truck at idle with a coupling that never receives or never follows an engagement command separates wiring and control faults from a coupling that has lost its fluid. A GX550 under warranty with a coupling fault belongs at the dealer with your pattern notes in hand.
GX550 Fluid Coupling Connector f4
Thermostat checks
The thermostat meters coolant flow from the engine to the radiator. Its failure modes produce opposite patterns, and the bench test below gives the opening temperature and the lift as numbers.
Stuck open gives a slow warm up. A thermostat that stays open lets coolant circulate from a cold start. The gauge rises slowly, cabin heat stays weak on a cold morning, and highway driving in cold weather can pull the gauge down. The engine control system watches for this fault. Code P0128 sets when actual coolant temperature stays below 75 °C (167 °F) after the point where warm up should have completed. A GX with P0128 and a slow gauge has a thermostat job at the top of its list.
Stuck closed or lazy gives a fast climb. A thermostat that stays closed blocks flow to the radiator. The gauge climbs quickly from a cold start, and it climbs in town and on the highway alike. The upper radiator hose stays cooler than the engine for longer than a normal warm up because hot coolant cannot reach it. A lazy thermostat opens late or opens partway. It produces a gauge that runs high under load and recovers at light load, and it passes a casual check because flow still occurs. The bench test below catches the lazy valve.
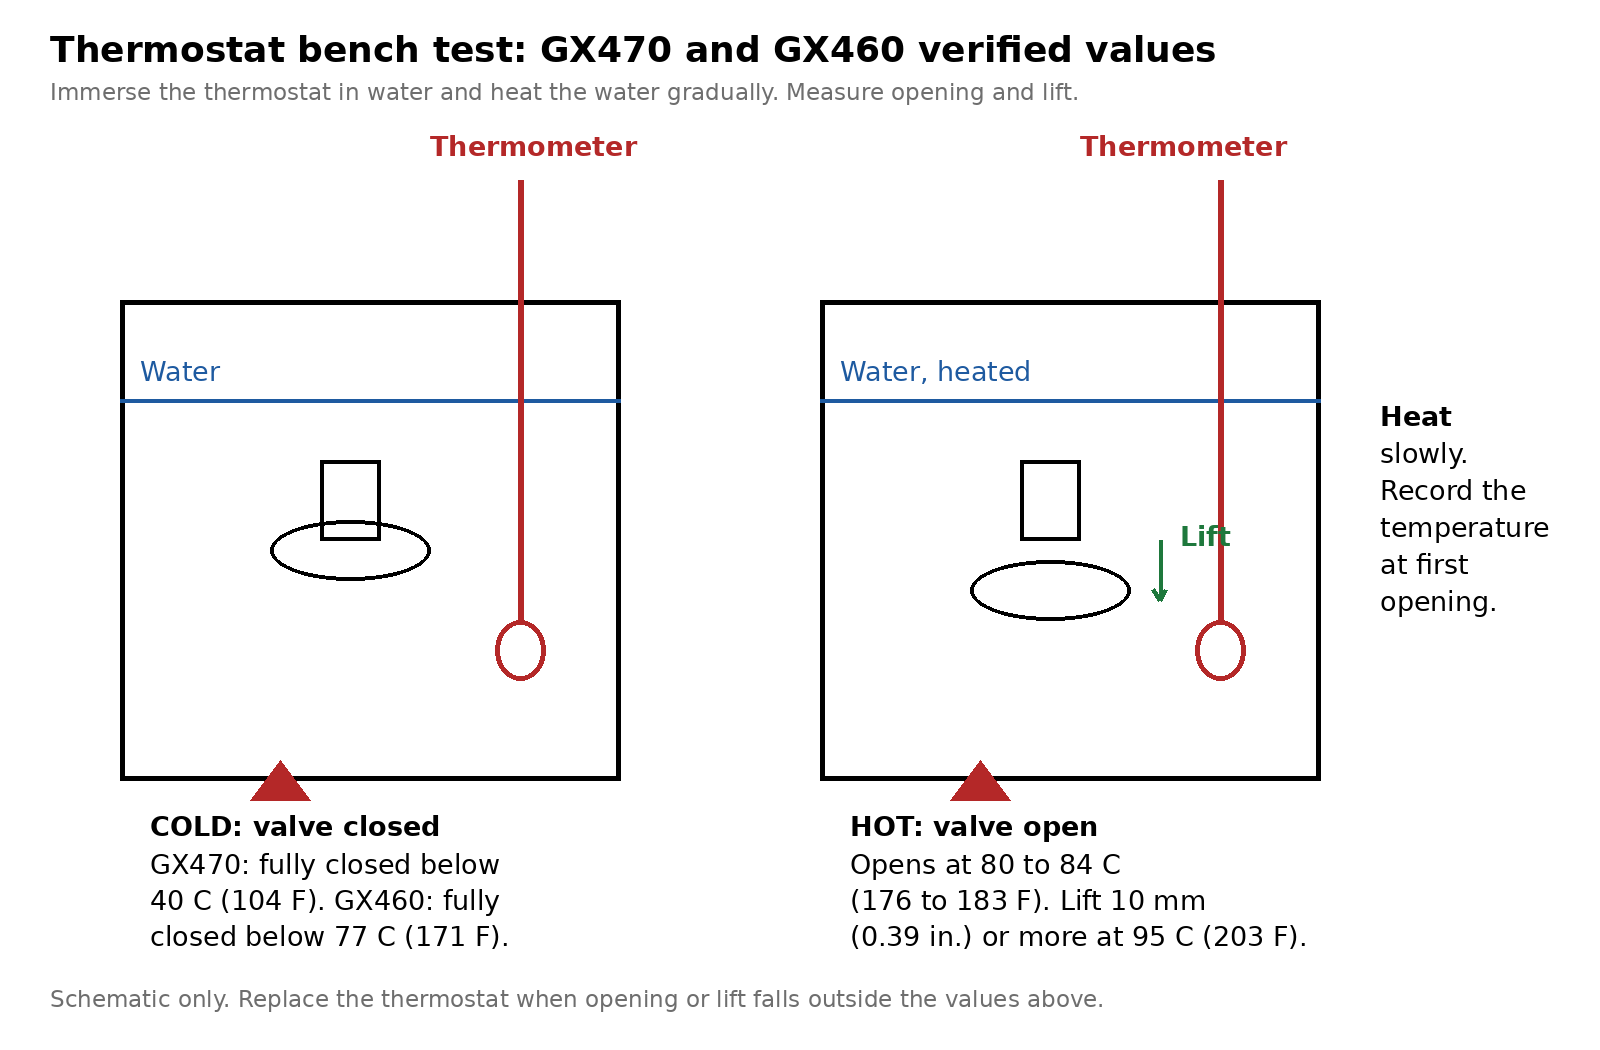
Bench test the thermostat out of the truck. Immerse the thermostat in water and heat the water gradually while you watch a thermometer in the same water. Record the temperature where the valve first opens and measure the lift at the full test temperature. The verified values for the GX470, the GX460, and the GX550 sit in the table below, and the diagram shows the setup for the two V8 generations. Replace a thermostat whose opening temperature or lift falls outside its table values. Replace a thermostat that fails to close fully at its closed check temperature.
Thermostat Bench Test
Thermostat bench test values
| Check | GX470 | GX460 | GX550 |
|---|---|---|---|
| Valve opening temperature | 80 to 84 °C (176 to 183 °F) | 80 to 84 °C (176 to 183 °F) | 80 to 84 °C (176 to 183 °F) |
| Valve lift at 95 °C (203 °F) | 10 mm (0.39 in.) or more | 10.0 mm (0.394 in.) or more | 8.0 mm (0.31 in.) or more |
| Valve fully closed below | 40 °C (104 °F) | 77 °C (171 °F) | 72 °C (162 °F) |
The opening temperature matches across all three generations. The lift value and the closed check temperature differ, so use the column for your truck when you judge the test.
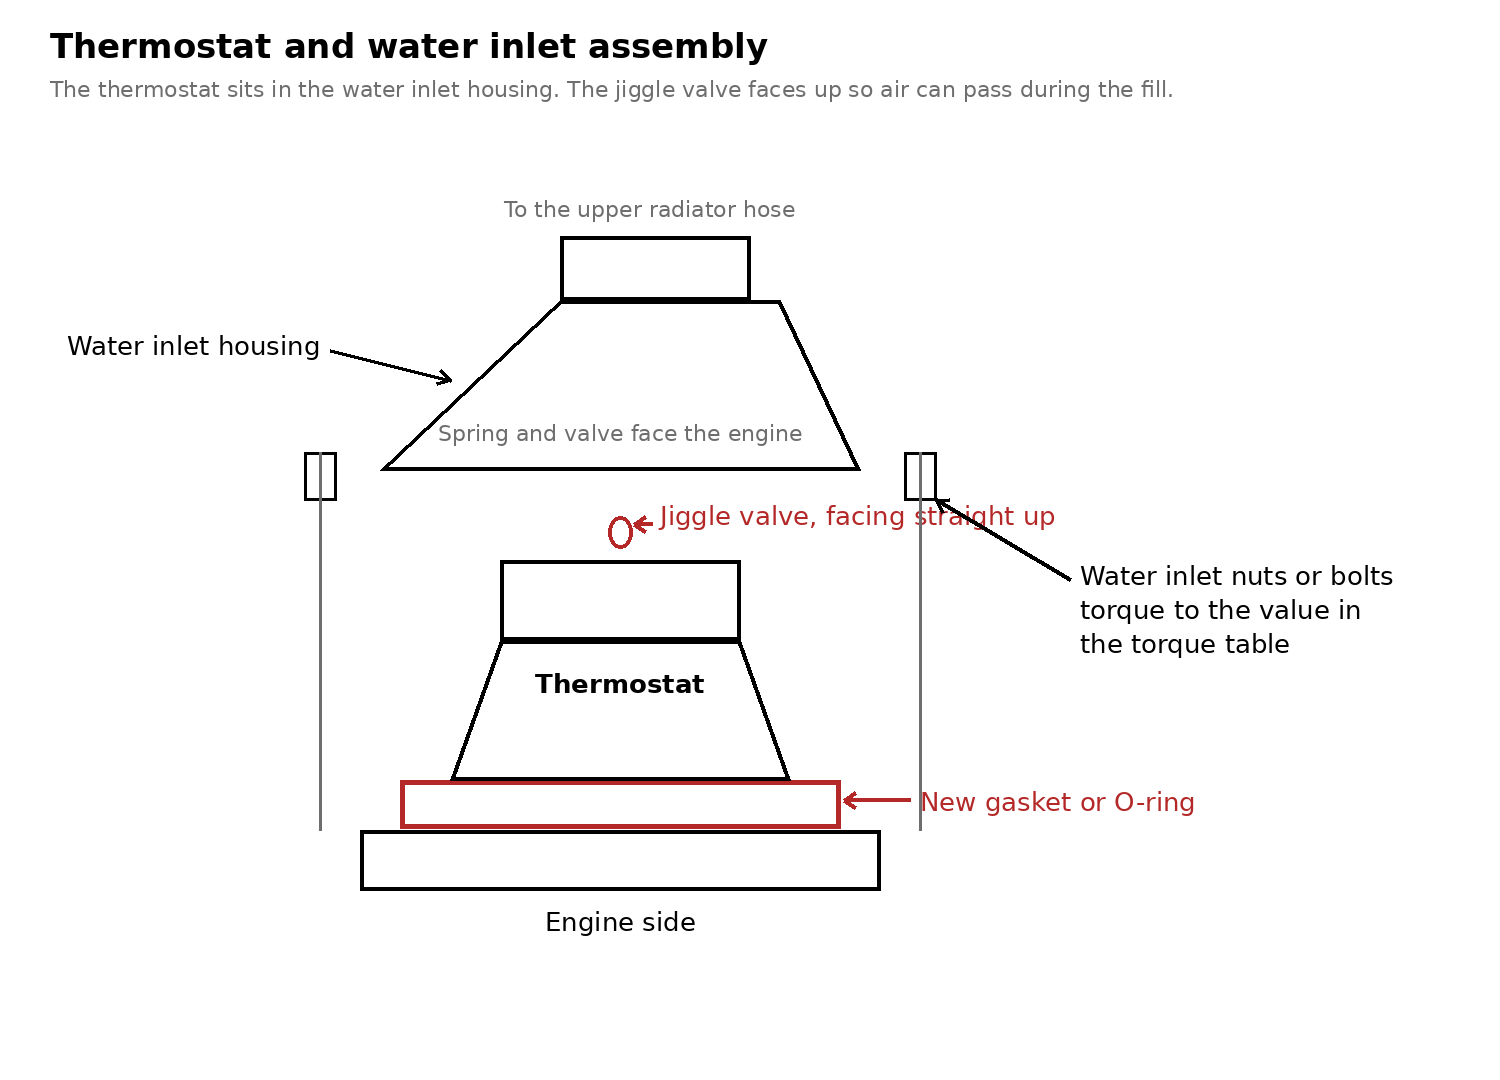
Install the new thermostat in the correct orientation. On the GX470, the jiggle valve faces straight up, within 30 degrees of that position. The jiggle valve passes air during the fill, and a valve installed at the bottom traps air at the top of the housing. Fit a new gasket with every thermostat. GX470 water inlet nuts torque to 14 ft·lbf (19 N·m), and the V-bank cover cap nuts torque to 66 in.·lbf (7.5 N·m). The GX460 thermostat comes as the water inlet sub-assembly with thermostat, and its opening temperature is stamped on the water inlet, so compare the stamp with the table values before the part goes on the truck. Its 3 nuts torque to 7 ft·lbf (10 N·m). The GX550 thermostat also comes as the water inlet sub-assembly with thermostat, and the assembly bolts to the engine water pump at 18 ft·lbf (25 N·m).
Thermostat and Water Inlet Assembly
Fill and bleed the air after any thermostat work. Air trapped in the system produces a gauge that swings and a heater that blows cold at idle on a truck with a good thermostat. The GX470 fill procedure runs with the heater valve open. Warm the engine at 2,000 to 2,500 rpm, let the truck cool down, and refill the reservoir to FULL. The GX460 procedure fills to the reservoir F line, runs the engine in short steps with cap checks while the engine is still cold, then warms the engine until the thermostat opens and confirms the level again after a full cool down. During that GX460 warm up, you can confirm the moment the thermostat opens by squeezing the No. 2 radiator hose by hand and feeling for the point where coolant begins to move inside the hose. A spill free funnel is the Home Mechanic tool for both procedures because it keeps a coolant head above the filler neck while air escapes.
Running without a thermostat on an engine that tends to overheat lowers cooling efficiency. A truck that overheats with a tested good thermostat has its fault in another part of this guide. Fit the correct thermostat and keep diagnosing.
Radiator checks
The radiator appears in both pattern families. External blockage belongs to the airflow family and the fin cleaning section above covers it. Internal blockage belongs to the coolant flow family, and it grows inside tubes that a wash cannot reach.
A radiator that spent years on old coolant, plain water top ups, or mixed coolant types carries scale and rust risk inside its tubes. The cold coolant check at the start of this guide supports that history when it shows rust, scale, or dirty coolant. A radiator with clean coolant and a documented service history moves down the suspect list.
Run the truck to full operating temperature, shut it off, and compare surface temperature across the core with an infrared thermometer. A Home Mechanic uses the thermometer as a comparison tool. Tubes that flow carry heat across the core in an even pattern. A section that stays far cooler than the sections beside it suggests tubes with little or no flow. This comparison has no pass value, so treat a clear cold section as supporting evidence with the history and the pattern. Keep hands off a hot core and use the thermometer from a short distance.
A truck that climbs at highway speed with a tested good thermostat, a full system, a holding pressure test, and a radiator with a neglected history and a cold section shows the complete pattern for internal blockage. An IH8MUD owner case followed that exact path. A fresh fan clutch left the overheating unchanged, and a replacement radiator fixed the truck, with internal plugging named as the cause. Replace parts in the order the evidence builds and one part at a time where the job allows it, so the fix teaches you the cause.
Replacement and brand choice live in the radiator guide. Our GX radiator replacement guide covers side tank leaks, repair and replacement choices, and OEM and aftermarket and all aluminum radiators in full. Use that guide when your diagnosis ends at the radiator. This guide stops at the diagnosis so the two guides stay in their own lanes. Two reinstall torques belong here for any radiator you refit during diagnosis. Radiator bolts torque to 13 ft·lbf (18 N·m) on the GX470 and the GX460, and to 18 ft·lbf (24 N·m) on the GX550. A removed radiator can take a bench leak test at 26 psi (177 kPa) on the GX470 before you decide its fate.
Water pump checks
The water pump moves every drop of coolant in the system. Pump faults divide into leaks at the seals, bearing wear, and flow loss. The first two show on inspection. Flow loss from a damaged impeller is rare on these trucks and it is a diagnosis of exclusion after the thermostat and radiator pass.
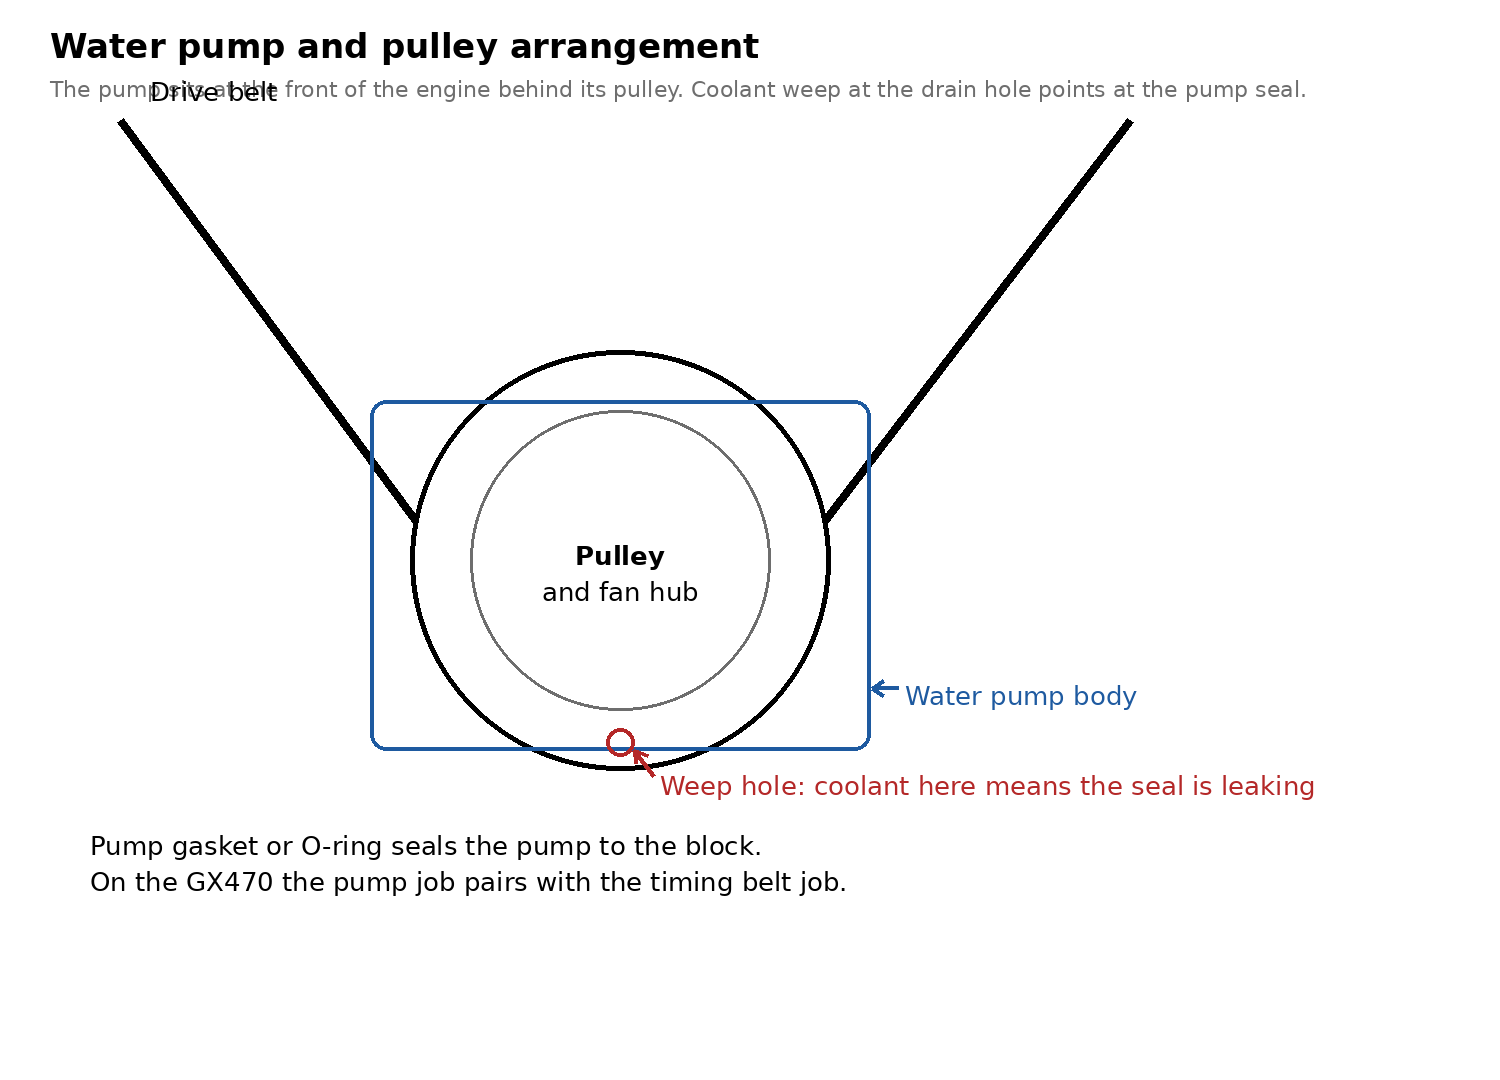
Water Pump and Pulley Arrangement
Inspect the pump holes and the bearing. Check the air hole and the water hole for coolant leakage. Turn the pulley by hand and confirm the bearing moves smoothly and quietly. A crust of dried coolant at a weep hole, a wet pump body, or a pulley that feels rough or sounds dry each name the pump. Check for shaft play with the belt off. Play at the pulley with a leak at the holes closes the case. GX470 water pump bolts torque to 16 ft·lbf (21 N·m) at reinstall, with the stud bolt and nut at 13 ft·lbf (18 N·m).
GX470 pump work pairs with the timing belt. The GX470 water pump mounts behind the timing belt drive. A leaking GX470 pump job replaces the water pump and the timing belt together, and the labor overlap makes the pairing the standard job. Our 2UZ-FE timing belt and water pump guide covers that service in full, including the parts that belong in the same labor window. A GX470 owner with a pump leak and an unknown belt age should price the combined job first.
GX460 pump work stands alone. The GX460 pump runs on the accessory drive with a timing chain engine behind it, so the pump is its own job with its own access path. Our GX460 water pump replacement guide covers that job. GX460 cooling torque values include fluid coupling to water pump nuts at 15 ft·lbf (21 N·m) for fan work in the same area.
Pump replacement belongs after the thermostat bench test and the radiator checks unless the inspection above found a leak or a bearing fault. A pump that leaks nothing and turns smoothly can still move coolant on a system with a lazy thermostat or a blocked radiator. Order matters because pump labor on the GX470 opens the timing belt job, and that job deserves evidence before it starts.
A/C warm at idle
The condenser and the radiator share one fan. Air that crosses the condenser then crosses the radiator. Heat rejected by the A/C adds to the air temperature that reaches the radiator. A marginal cooling system often announces itself through the A/C first because the condenser is first in the stack and its performance falls as soon as airflow falls.
A weak coupling shows at the vents before it shows at the gauge. In traffic on a hot day, vent temperature rises at idle and falls as soon as the truck rolls. The gauge may hold its normal position through the whole event. The IH8MUD clutch fan case followed that shape. The gauge stayed near center while the failed coupling let the engine run hot, and A/C cutouts at idle were among the early signs the owner noticed. Treat warm A/C at idle as a cooling diagnosis with the A/C symptom attached. Work the fin cleaning, shroud check, and coupling inspection in the airflow section before any refrigerant work.
The gauge understates early overheating. The dash gauge on these trucks moves slowly through its middle range by design. A truck can run meaningfully hot while the needle looks settled. Scan data for coolant temperature, or an infrared thermometer reading at the thermostat housing and the radiator tanks, gives a Home Mechanic a number the gauge withholds. Use a number when the pattern and the gauge disagree.
Refrigerant checks come after airflow checks pass. Low charge and other refrigerant faults also warm the vents, and those faults usually warm the vents at speed as well as at idle. Vent temperature that recovers fully with road speed points back at airflow. Vent temperature that stays warm at speed with clean fins and a strong fan sends the truck to a shop with A/C gauges. Gauge work also carries recovery and licensing rules that place it outside driveway scope in many areas.
Refrigerant charge and gauge pressures. The GX470 uses R-134a. The GX460 uses R-134a on trucks built before August 2020 and R-1234yf on trucks built from August 2020. The GX550 uses R-1234yf. The gauge values are for a normally functioning system at these test conditions: blower on high, doors fully open, engine at 1,500 rpm, and inlet air at 30 to 35 °C (86 to 95 °F). On the GX470, set the inlet air to RECIRC and the temperature control to COOL for 2003 to 2006, and set the temperature control to MAX COOL for 2007 to 2009. On the GX460, the gauge test conditions name no temperature control setting on trucks built before August 2020, and they set the temperature to maximum cold on trucks built from August 2020.
| Spec | GX470 | GX460 | GX550 |
|---|---|---|---|
| Refrigerant charge | Single A/C: 650 ±30 g (22.9 ±1.1 oz) for 2003 to 2006, 600 ±30 g (21.2 ±1.1 oz) for 2007 to 2009; Dual A/C: 800 ±30 g (28.2 ±1.1 oz) for 2003 to 2006, 720 ±30 g (25.4 ±1.1 oz) for 2007 to 2009 | HFC-134a (R134a), built before August 2020: 550 ±30 g (19.3 ±1.1 oz) without rear cooler; 810 ±30 g (28.6 ±1.1 oz) with rear cooler and without cool box; 860 ±30 g (30.3 ±1.1 oz) with rear cooler and with cool box. HFO-1234yf (R1234yf), built from August 2020: 520 to 580 g without rear cooler; 770 to 830 g with rear cooler and without cool box; 840 to 900 g with rear cooler and with cool box | 590 to 650 g without rear A/C and without cool box; 640 to 700 g without rear A/C and with cool box; 770 to 830 g with rear A/C and without cool box; 820 to 880 g with rear A/C and with cool box |
| Manifold gauge, low side | 150 to 250 kPa (22 to 36 psi) | 150 to 250 kPa (22 to 36 psi) for 2010 to 2013; 147 to 245 kPa (21 to 36 psi) for 2014 onward | 150 to 250 kPa (22 to 36 psi) |
| Manifold gauge, high side | 1,370 to 1,570 kPa (199 to 228 psi) | 1,370 to 1,570 kPa (199 to 228 psi) for 2010 to 2013; 1,373 to 1,569 kPa (199 to 228 psi) for 2014 onward | 1,370 to 1,570 kPa (199 to 228 psi) |
When to stop and get a combustion leak test or a shop diagnosis
Each result below means the next dollar belongs to a test or a shop visit, and continued parts replacement wastes money.
Coolant loss with a holding external check. Your pressure test drops, your leak hunt finds no external leak, and the reservoir keeps falling. The heater core, the block, and the head are the next checks in that case. A shop combustion leak test samples the air above the coolant for combustion gases. A positive result points at a head gasket path between a cylinder and the cooling system.
Bubbles and pressure that builds fast. A filler neck that bubbles steadily at idle on a warm truck, or a system that pressurizes hard within minutes of a cold start, suggests combustion pressure entering the coolant. Shut the truck down and book the combustion leak test.
Milky oil or oil in the coolant. Oil on the dipstick with a milky texture, or an oil film that returns in the coolant after a flush, means the two fluids are mixing. That finding needs a shop diagnosis before further driving.
White exhaust smoke that continues. A brief white puff at a cold start has common and minor causes, and our GX470 startup smoke guide covers the valve seal pattern that produces a puff after the truck sits. Coolant smoke behaves in a different pattern. It continues while driving, it often carries a sweet smell, and it pairs with a falling reservoir level. Continuing white smoke with coolant loss belongs in the combustion leak test group.
A gauge in the red with steam. Steam, a sudden loss of power, or a loud knocking sound with a hot gauge means the overheat already happened. Stop the engine, leave the hood closed while steam shows, and tow the truck. Diagnosis resumes on a cold engine with the cold checks, and a combustion leak test joins the list before any repair quote.
Parts and tools
Cold check tools. A cooling system pressure tester with the adapter for the GX filler neck is the central tool in this guide. Parts stores loan pressure testers through their tool programs, and the loaner route is the Home Mechanic choice for a tool you use once a year. Add a flashlight and an inspection mirror for the leak hunt at the rear of the engine.
Temperature tools. An infrared thermometer is the Home Mechanic alternative to shop temperature equipment for this diagnosis. It reads hose, housing, and radiator surface temperatures for comparison checks. A scan tool or a phone based OBD reader that displays live coolant temperature gives you the number the dash gauge smooths over. A kitchen thermometer that reads to boiling covers the thermostat bench test, with a pot reserved for shop use.
Airflow tools. A garden hose with a gentle nozzle, a soft brush, and a fin comb set handle condenser and radiator cleaning and straightening. Compressed air helps dry the cores after a wash. Work fins with patience because bent fins from a rushed wash trade one blockage for another.
Service tools. A spill free funnel supports the fill and bleed procedures on both V8 generations and on the GX550. A drain pan sized for the coolant volume, a flexible hose clamp pliers set, and basic sockets cover thermostat and hose work. Torque wrenches in the foot pound and inch pound ranges cover the water inlet, radiator, and shroud values in the tables. Keep new gaskets on hand for any housing you open.
Parts, bought after diagnosis. A radiator cap and a thermostat with its gasket are the low cost parts this diagnosis commonly ends with, and each should match your truck by year and VIN. A fluid coupling is a larger purchase and it belongs after the inspection and field checks in this guide point at the coupling. Toyota Super Long Life Coolant purchases should follow the type in our fluids guide, in the capacity amounts from the spec table below, with extra on hand for the bleed top ups. GX470 owners replacing cracked heater hose tees can use a brass 5/8 inch tee in place of the plastic part. Radiator and water pump purchases belong at the end of their sections, after the evidence for each part is written down.
Cooling parts by generation
| Part | GX470 | GX460 | GX550 |
|---|---|---|---|
| Thermostat | 90916-03100, with gasket 16346-50010 | Water inlet sub-assembly with thermostat 16031-0S010, supersedes 16031-38010; water inlet gasket 16325-38010 | Water inlet sub-assembly with thermostat 16031-70010 |
| Fluid coupling (fan clutch) | 16210-50102 for 2005 to 2009; 16210-50090 for 2003 to 2004 | 16210-38082 | Electronically controlled fluid coupling |
| Radiator cap | 16401-31650 | 16401-30020 | Reserve tank cap |
| Water pump | 16100-59275 | 16100-09525, with gasket 16271-0S010 | Engine water pump |
| Radiator | See the radiator replacement guide for choice and fitment | 16400-38253; see the radiator replacement guide for choice and fitment | 16400-70742 |
| Radiator hoses, upper and lower | See the radiator replacement guide | Upper 16571-38100, lower 16572-38151; see the radiator replacement guide | Upper 16571-70430, lower 16572-70360 |
Cooling specifications
Torque values lead with ft·lbf, with N·m in parentheses, except inch pound values, which lead with in.·lbf.
Thermostat, cap, and system test values
| Spec | GX470 | GX460 | GX550 |
|---|---|---|---|
| Thermostat opening temperature | 80 to 84 °C (176 to 183 °F) | 80 to 84 °C (176 to 183 °F) | 80 to 84 °C (176 to 183 °F) |
| Thermostat valve lift at 95 °C (203 °F) | 10 mm (0.39 in.) or more | 10.0 mm (0.394 in.) or more | 8.0 mm (0.31 in.) or more |
| Pressure test, check for drop | 17.1 psi (118 kPa) | 17 psi (118 kPa) | 18 psi (123 kPa) |
| Cap relief, standard | 13.5 to 17.8 psi (93 to 123 kPa) | 13.5 to 18 psi (93 to 123 kPa), new cap | 13.6 to 17 psi (94 to 122 kPa), new cap |
| Cap relief, minimum for a used cap | 11.4 psi (78 kPa) | 11.4 psi (79 kPa) | 11.5 psi (79 kPa) |
| Coolant capacity | 12.9 liters (13.6 US qt) | 13.7 liters (14.5 US qt) without rear heater, 15.4 liters (16.3 US qt) with rear heater | 13.2 liters (13.9 US qt) without rear A/C, 15.3 liters (16.2 US qt) with rear A/C |
Cooling torque values
| Joint | GX470 | GX460 | GX550 |
|---|---|---|---|
| Water inlet nuts, or water inlet with thermostat bolts | 14 ft·lbf (19 N·m) | 7 ft·lbf (10 N·m) | 18 ft·lbf (25 N·m) |
| Water inlet housing to water pump | 13 ft·lbf (18 N·m) | 15 ft·lbf (21 N·m) | One assembly with the water inlet; use the row above |
| Radiator bolts | 13 ft·lbf (18 N·m) | 13 ft·lbf (18 N·m) | 18 ft·lbf (24 N·m) |
| Fan shroud bolts | 44 in.·lbf (5 N·m) | 44 in.·lbf (5.0 N·m) | 44 in.·lbf (5.0 N·m) |
| Reserve tank bolts | 44 in.·lbf (5 N·m) | 44 in.·lbf (5.0 N·m) | 44 in.·lbf (5.0 N·m) |
| Fluid coupling to fan | Fan and coupling come off as one unit; mounting nuts are in the next row | 7 ft·lbf (10 N·m) | 7 ft·lbf (10 N·m) |
| Fan and coupling mounting nuts, or fluid coupling to water pump | 21 ft·lbf (29 N·m) | 15 ft·lbf (21 N·m) | 15 ft·lbf (21 N·m) |
| Cylinder block drain cock plug | 9 ft·lbf (13 N·m) | 9 ft·lbf (13 N·m) | 9 ft·lbf (12.7 N·m) |
| V-bank cover cap nuts | 66 in.·lbf (7.5 N·m) | No V-bank cover step in the GX460 thermostat job | No V-bank cover step in the GX550 thermostat job |
Model notes
GX470, 2003 to 2009. The generation pairs its water pump job with the timing belt job, and its heater hose tees add a leak point at the rear of the engine. Age puts most GX470 trucks deep into cap, thermostat, coupling, and radiator service life at the same time. Work the order in this guide and replace parts on evidence, because a GX470 with two cooling faults shows a mixed pattern that a single part rarely fixes.
GX460, 2010 to 2023. The diagnosis order matches the GX470. The GX460 thermostat opening and lift values match the GX470 values. The closed check temperature and the water inlet torque differ, and the capacity splits by rear heater fitment. The GX460 keeps the engine driven fan and fluid coupling, so airflow diagnosis carries over in full.
GX550, 2024 and newer. The pattern sort and the cold checks apply to the GX550. The thermostat, radiator, and pump logic applies in general form. The fan runs on an electronically controlled fluid coupling, so the coupling inspection carries over and the resistance test and scan data checks in the airflow section replace the bimetal spring field checks. The GX550 columns in the tables include the lower thermostat lift value and the reserve tank cap pressures. A GX550 under warranty with an overheat belongs at the dealer first, with the pattern, the cold check results, and the temperatures you recorded in hand.
Common mistakes
Ordering a fan clutch on the idle symptom alone. Dirty fins and a loose shroud produce the same idle pattern. Clean the stack and seal the shroud first, then judge the coupling with clean airflow.
Testing a thermostat in the truck by hose feel alone. Hose feel sorts a fully stuck valve and it misses a lazy valve that opens late. The bench test takes a pot of water and it gives you the opening temperature and the lift as numbers.
Skipping the cap test. A weak cap lowers the boiling point and produces an overheat that mimics a flow fault. The cap test rides on the same loaner tester as the pressure test and it takes two minutes.
Topping off and driving with no leak hunt. Coolant that left once will leave again, usually faster and farther from home. A falling level is a finding. The leak hunt is part of the repair.
Removing the thermostat to cure an overheat. Removal lowers cooling efficiency. A truck that overheats with the thermostat removed still holds its original fault, and it has lost the part that meters flow correctly at warm up.
Judging the whole diagnosis by the dash gauge alone. The gauge moves slowly in its middle range. Record scan data or thermometer readings during the road test so the pattern rests on numbers.
FAQ
How do I tell whether my fan clutch has failed?
Start with the coupling inspection on a cold, stopped engine. Look for silicon oil leaks at the coupling, look for damage, and feel the turning smoothness. Add the Home Mechanic field checks. A coupling that freewheels cold with little resistance, or a hot truck at idle with clean fins and no fan roar, points at a failed coupling. Weigh the inspection, the field checks, and the idle pattern together. On a GX550, add the coupling resistance test from the airflow section and read the commanded fan state in scan data.
How do I test a thermostat?
Remove it and bench test it in water. Heat the water gradually with a thermometer in the pot. A GX470 or GX460 thermostat should start opening at 80 to 84 °C (176 to 183 °F) and lift 10 mm (0.39 in.) or more at 95 °C (203 °F). A GX550 thermostat opens in the same temperature range and lifts 8.0 mm (0.31 in.) or more at 95 °C (203 °F). Replace a thermostat that opens outside that range, lifts short of that value, or fails to close fully at its closed check temperature.
Why does my A/C get warm at idle and cold when I drive?
The condenser needs airflow at idle, and the fan supplies that airflow when road speed is low. A weak fluid coupling, a blocked condenser, or a loose shroud cuts idle airflow, and the A/C fades first because the condenser is first in the stack. Clean the fins, confirm the shroud, and inspect the coupling before you schedule refrigerant work.
The gauge is climbing while I drive. What do I do?
Turn the A/C off and pull to a safe place as soon as you can do so safely. Shut the engine off when the gauge keeps climbing, when steam appears, or when power falls. Leave the cap closed on a hot system. Let the truck cool fully, check the reservoir level cold, and tow the truck when the level is low or the climb repeats on a short, gentle drive.
Will removing the thermostat help an overheating GX?
No. Thermostat removal lowers cooling efficiency on an engine that tends to overheat. Fit a tested thermostat and use the diagnosis order in this guide to find the fault that raised the temperature.
My GX overheats only while towing or on long grades. Where do I start?
Start with the coolant flow side after the cold checks pass. Load heat exposes marginal flow and marginal heat rejection first. Bench test the thermostat, read the radiator history and cold spot checks, and confirm the cap holds its minimum pressure. A fan coupling can add to a towing case when speeds drop on the grade, so include the coupling inspection when the climb continues at low speed.
Can a Home Mechanic do this diagnosis?
Yes, with the tools in the Parts and tools section. The cold checks, the pressure and cap tests on a loaner tester, the fin cleaning, the coupling inspection, and the thermostat bench test are driveway work. The combustion leak test and refrigerant gauge work are shop steps, and the stop section above marks the results that send the truck to a shop.
Sources
- GX470 factory manuals: Cooling System inspection, Thermostat inspection and installation, Radiator Cap inspection, Radiator inspection, Water Pump inspection, cooling torque and capacity data.
- GX460 factory manuals: Cooling Service Data, Cooling Torque Specifications, Thermostat Inspection, Cooling System On-Vehicle Inspection, Radiator On-Vehicle Inspection, coolant refill procedure and capacities.
- GX550 repair manuals: Cooling Service Data, Thermostat Inspection, Cooling Torque Specifications, electronically controlled fluid coupling data.
- Lexus parts and specification confirmation by VIN: parts.lexus.com
- IH8MUD, Fan clutch or thermostat: forum.ih8mud.com
- IH8MUD, Overheating is killing me: forum.ih8mud.com
- IH8MUD, Check your clutch fan: forum.ih8mud.com
- The Truck Garage, GX470 radiator preventative replacement: thetruckgarage.com
- The Truck Garage, GX fluids guide: thetruckgarage.com
- The Truck Garage, GX460 water pump replacement: thetruckgarage.com
- The Truck Garage, 2UZ-FE timing belt and water pump service: thetruckgarage.com
- The Truck Garage, Heater hose tees: thetruckgarage.com
- The Truck Garage, GX470 startup smoke diagnosis: thetruckgarage.com
Leave a Reply