Reading time: about 12 minutes. Difficulty: planning (install by a shop or experienced DIY). Applies to: GX470 (2003–2009), GX460 (2010–2023), GX550 (2024+).
Who This Guide Is For
If you are thinking about lifting your GX, whether it is a 2-inch level to clear bigger tires (see our GX tire size and fitment guide) or a full 3-inch setup for serious off-road work, this guide walks you through the suspension systems worth buying and the geometry changes that come with a lift, so your truck keeps driving straight and riding right after the install.
A note on model differences: the GX470 and GX460 share the 4Runner/Prado platform family, so most concepts and many parts cross over. The GX550 rides on the newer TNGA-F platform. Always confirm fitment for your exact year.
Parts and tools
For a typical 2 to 2.5 inch lift install in your driveway:
- Floor jack with real reach and a pair of 6-ton jack stands. The stock bottle jack was sized for a stock-height truck. On a lifted GX it may not reach the frame, and even when it does it is slow and tippy. Most owners doing this job use a 3-ton floor jack (eBay) and 6-ton stands. The 6-ton rating matters less than the height: they give roughly 4 to 5 inches more reach than 3-ton stands, which is what gets a lifted frame onto stands without maxing them out. Keep a short block of 4×4 or 2×4 handy. It buys height under the jack saddle and spreads the load on the stand. The GX is heavy. Never work under a truck supported only by the jack.
- Torque wrench and breaker bar, plus a metric socket set.
- Penetrating oil, applied to every suspension bolt the night before.
- Coil spring compressor, or buy the front struts pre-assembled and skip it.
- Ball joint separator or pickle fork, if you are swapping upper control arms.
- Blue thread locker (eBay) for the hardware you remove and reinstall.
- A shop appointment for the alignment and zero-point calibration after the install.
Shadetree alternative: most auto parts stores rent spring compressors free with a deposit. If you would rather not fight a compressor in your driveway, buy pre-assembled front coilovers or pay a shop to assemble your struts. Either way, the alignment and calibration still go to a shop.
Jacking a lifted truck: lift from the front crossmember or the rear differential housing, then set the stands under the frame rails. If your stands cannot reach the frame at a safe mid-range setting, get taller stands. Do not max out short stands under a 5,000 lb truck. On the trail, owners carry a Hi-Lift on rock sliders or a bottle jack with a wood base for soft ground.
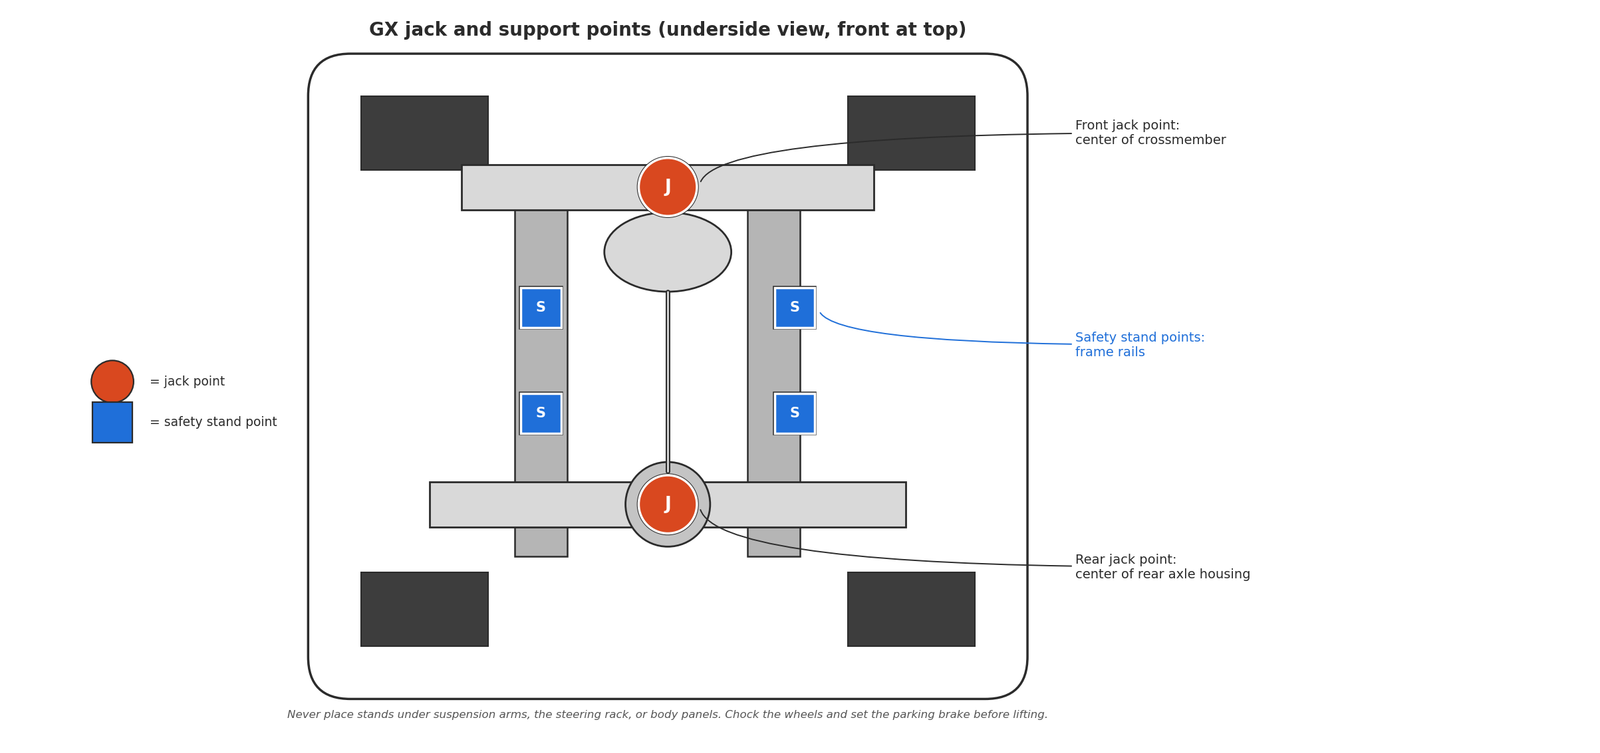
The factory jack points are the center of the front crossmember and the center of the rear axle housing, with safety stands on the frame rails. Do not lift with extra weight in the truck.
How a GX Lift Actually Works
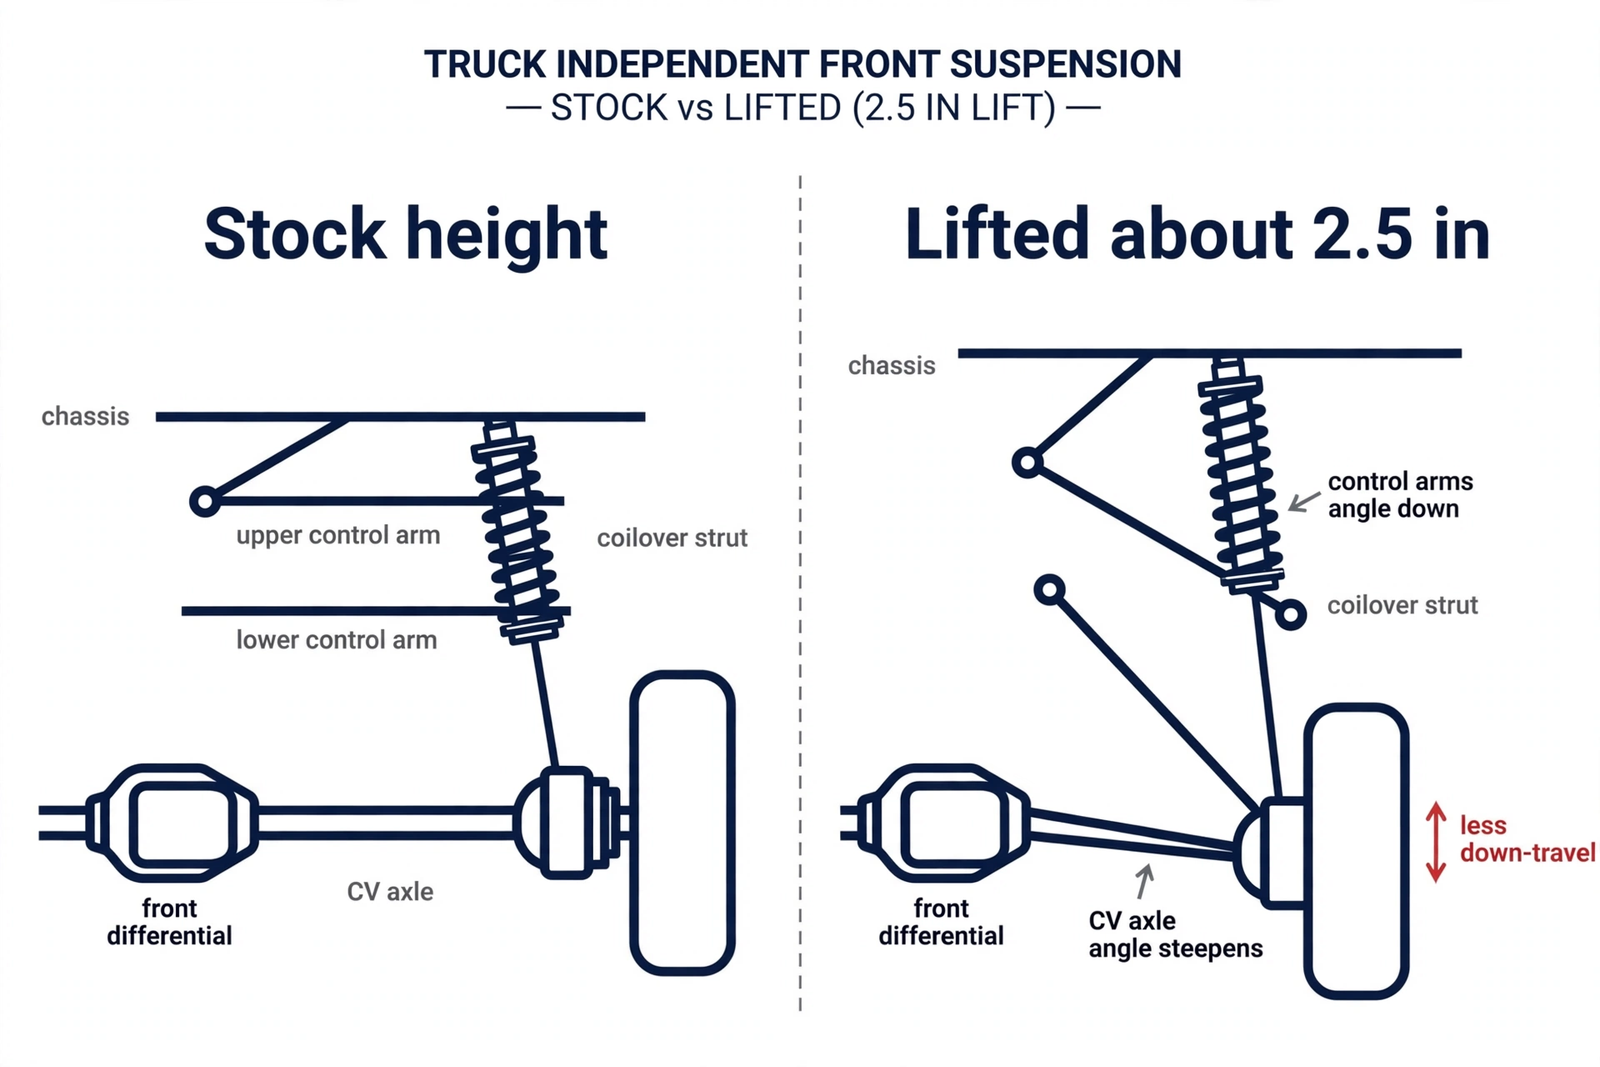
A lift on a GX is almost always done through the suspension itself: taller or preloaded front coilovers, taller rear coil springs (or a coil conversion replacing air bags), and shocks with the right travel to match. On the GX’s independent front suspension, front lift comes from three methods, alone or combined: a spacer on top of the strut mount, which moves the whole strut down without touching the spring; a preload spacer or raised spring perch, which compresses the stock spring to raise ride height; or a taller coil spring.
None of these methods adds suspension travel. Total front travel is fixed by the control arms, ball joints, CV axles, and bump stops, so every inch of lift is an inch of droop traded away: the truck sits closer to full extension at rest, and the wheel runs out of downward travel sooner on uneven ground. The methods differ in side effects, not in that basic trade. A top spacer is the cheapest way up and keeps the factory spring rate and damping, but a thick one pushes the suspension near full droop at rest, which can bind the upper ball joint, over-angle the CVs, and make the shock top out harshly. Do not stack a top spacer on a preload lift. The problems compound. Preload itself does not stiffen the spring; the harshness people blame on preload spacers comes from the lost droop and the shock topping out.

Every inch you add changes the angles of your control arms, CV axles, sway bar links, and rear panhard bar. That is why this guide spends as much time on supporting mods as on shocks.
The Big Four Compared by Budget Tier
Budget tier: Bilstein 5100
I recommend the Bilstein 5100 as the default first lift for GX owners on a budget. It is a 46 mm monotube shock with digressive valving[1]. That means quick-reacting on small bumps and firm on big hits. Up front, the 5100 is ride-height adjustable via multiple spring perch positions, adding 0 to 2.5 inches of front lift with your stock springs[1]. Paired with Old Man Emu lift springs (an extremely common combo), it becomes a complete lift.
What it feels like: firm. Great for handling and towing, less plush than stock on broken pavement. Expect it to feel noticeably harsh with heavy all-terrain tires. With lighter tires or matched aftermarket springs, much more livable. The classic 5100 mistake is cranking the perch high while keeping the stock spring, which gives a sketchy, underdamped ride. Match the spring to the perch setting.
Best for: Daily drivers and light trail use who want an affordable, durable lift; owners who tow.
Mid tier: Bilstein 6112/5160, Old Man Emu Nitrocharger, Ironman Foam Cell Pro
Bilstein 6112 (front) / 5160 (rear): The 6112 is a 60 mm monotube coilover[2]. The much larger shock body than the 5100 means substantially more oil capacity and better heat management on long rough-road stretches. It ships with its own matched springs and multiple snap-ring perch positions, allowing up to 2.75 inches of front lift depending on application[2]. The 5160 is its remote-reservoir rear companion. Owners praise the controlled, composed feel both on-road and on trails. A meaningful step up from the 5100 in comfort and fade resistance.
Old Man Emu (OME): Two paths. The Nitrocharger line is a twin-tube, heavy-duty shock known for durability and a firm, controlled ride. Be warned it can feel quite stiff on a GX without significant added weight (steel bumpers, winch). OME’s strength is its wide spring catalog with rates matched to your actual vehicle weight. Buy the spring rate your truck’s load demands. The BP-51 is OME’s premium internal-bypass shock with remote reservoirs and adjustable compression and rebound. It is built for serious off-road use, priced accordingly.
Ironman Foam Cell Pro: Instead of pressurized nitrogen, these twin-tube shocks use high-density foam to prevent cavitation. That gives fade resistance in a simple, sealed package. Ask Ironman directly to confirm the current warranty terms before you buy. Kits come with springs matched to your load, and owners consistently praise near-factory comfort. A strong choice if your GX is primarily a daily driver that goes off-road on weekends.
Best for: In our experience, the mid tier is the sweet spot for most GX owners: 6112 for balanced performance, Foam Cell Pro for comfort and simplicity, OME for load-matched durability. I recommend the BP-51 only if you’re genuinely hammering the truck off-road.
Premium tier: Dobinsons IMS / MRR
Dobinsons IMS: A height-adjustable monotube with an internal floating-piston reservoir. That is remote-reservoir technology in a self-contained body, with a threaded body for fine height adjustment. Dobinsons sells an enormous catalog of Australian-made coil springs in different heights and spring rates, so you can match springs precisely to your truck’s weight (bumpers, sliders, roof rack, drawers). Owners frequently describe the IMS as exceptionally well dialed in. Comfortable yet controlled, and a favorite for long-distance overland travel.
Dobinsons MRR (also sold as MRA): The same shock body with a remote reservoir and three adjustment knobs (high- and low-speed compression plus rebound)[3]. It is the “set it for the trip” system. Soften it for daily driving, firm it up when loaded or towing. The tradeoff is cost and complexity. Plan on periodic attention for adjustable shocks (e.g., reservoir pressure checks), and expect them to tempt constant fiddling. A popular compromise: IMS up front, MRR in the rear, so you can tune for varying rear loads.
Best for: Overlanders who carry real weight and want spring rates matched to their build, or drivers who value adjustability. IMS if you want set-and-forget; MRR if your loads change often.
Quick decision table (relative pricing)
| Budget | Firmness | Comfort focus | Performance focus |
|---|---|---|---|
| Budget | Bilstein 5100 + OME springs | Bilstein 5100 (taller spring, lower perch) | Bilstein 5100 |
| Mid | Ironman Foam Cell Pro | Ironman Foam Cell Pro / 6112 | Bilstein 6112 + 5160 |
| Mid+ | OME Nitrocharger (load-matched) | Dobinsons IMS | OME Nitrocharger |
| Premium | OME BP-51 | Dobinsons IMS | Dobinsons MRR |
KDSS Considerations (some GX470, GX460)
KDSS (Kinetic Dynamic Suspension System) is the hydraulic sway-bar system on some GX470 Sports[5] and many GX460s[4]. It gives great articulation off-road and flat cornering on-road. But it complicates lifts.
KDSS lean: After a lift, many KDSS trucks develop a side-to-side lean (often the driver’s side lower), because the hydraulic cylinder on one side and the rigid link on the other no longer sit at their designed angles. Fixes, in order of escalation:
- KDSS system balance. Open the accumulator valves on level ground, let pressures equalize, close them. This classic first step cures mild lean for many trucks. (Follow the factory service procedure for your year. Torque and sequence matter.)
- KDSS spacer kits. Small spacers that restore sway-bar link angles to near-stock geometry (e.g., the Treaty Oak spacer kit). Cheap, simple, popular.
- Trim spacers on one corner. With Dobinsons spring setups, a small passenger-side spacer is routinely recommended for KDSS trucks lifted about 1.5 inches or more.
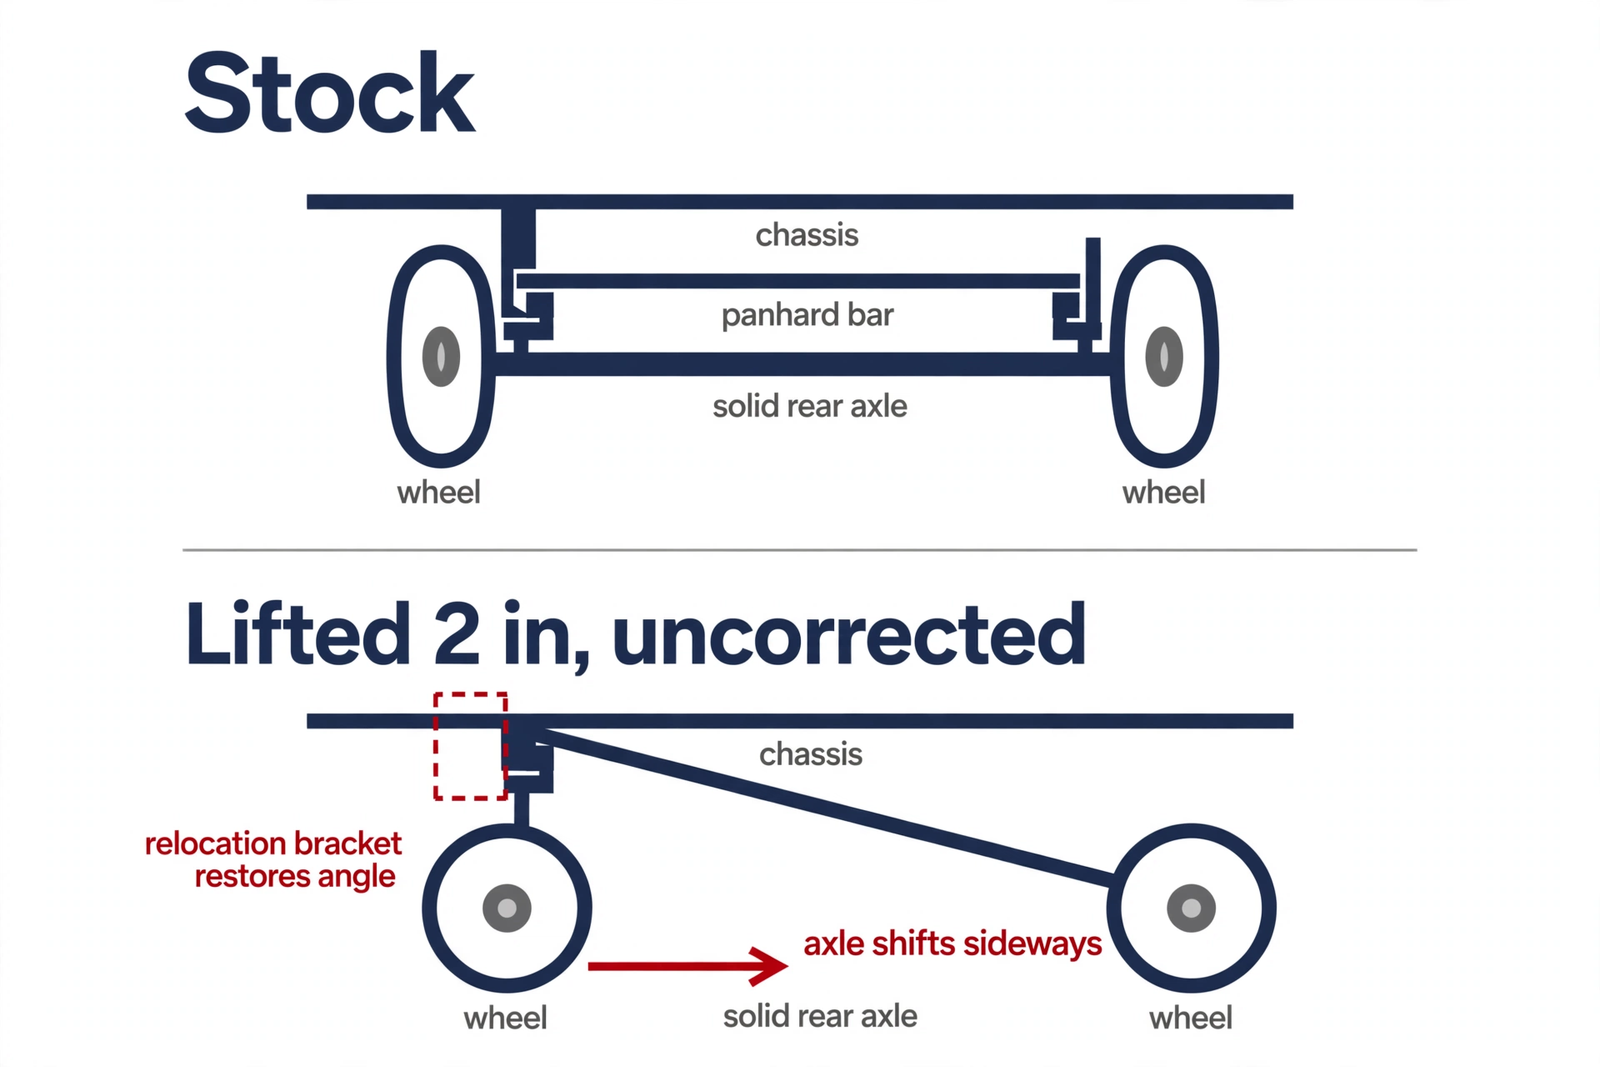
Panhard bar correction: Lift the rear and the panhard (track) bar sits at a steeper angle, pushing the axle sideways and making it swing laterally instead of cycling vertically. At 2 or more inches of lift, we strongly recommend correction: a weld-on relocation bracket (e.g., the Eimkeith design), a bolt-on bracket (e.g., DrKDSS BOTCK), or a KDSS-compatible adjustable panhard bar. Owners who skip this often report an odd shimmy over mid-corner bumps and vague rear-end handling.
After any lift: get a zero-point calibration. The GX’s stability and KDSS systems reference the truck’s attitude. An alignment shop familiar with Toyota/Lexus should reset the zero point after your lift and alignment.
KDSS delete vs. disable. Some owners go further than spacers. A full delete removes the hydraulic cylinders, accumulator, and lines, then converts to conventional sway bars or runs sway-bar-less. Deletes show up on long-travel builds for both the GX470 and the GX460: Apache Offroad’s rear long-travel kit, for example, requires deleting KDSS on the GX460. The front conversion is straightforward (the frame already has one sway bar mount hole; the other gets drilled with nutserts, using a 4Runner front sway bar), but the rear needs weld-on brackets, sold by Apache Offroad through Exit Offroad, plus a same-year 4Runner rear sway bar. The cheaper half step is a disable: DrKDSS and Blackgate Customs sell control harnesses that let you open and close the KDSS valves on demand, holding the soft mode off-road and re-engaging it on pavement. The factory system only opens the valves at low speed, so a harness changes on-road behavior if you forget to re-engage it. Dash lights after a delete are inconsistent: some owners report a persistent KDSS warning they never cleared, others report no light at all. Effects on body roll and resale could not be verified from owner reports, so treat claims on those with care.
Upper Control Arms: When Stock Runs Out
The stock GX upper control arms can only correct so much caster and camber. Lift the front and the wheels tilt, caster drops. Below a point the alignment shop simply cannot bring the truck back into spec. The classic symptom is vague, darting steering that never quite tracks straight after an otherwise good alignment.
Rule of thumb: up to about 2 inches of front lift, stock UCAs usually align fine. At 2.5 inches or more, budget for aftermarket UCAs. Many shops recommend them at any lift height for a proper alignment.
What to look for:
- Added caster. Quality aftermarket arms (typically +2.5 to +3.5 degrees of built-in caster[6], an aftermarket spec) are designed to restore factory alignment specs on a lifted truck. In our experience, this is the single most important spec on the box. For reference, the factory alignment targets are: GX470, caster 3°17′ ± 45′, camber 0°01′ ± 45′, toe-in 0°05′ ± 0°10′ total; GX460, caster roughly 3°19′ to 3°32′ ± 30′, camber roughly 0°1′ to 0°3′ ± 30′, toe-in roughly 0°2′ to 0°4′ ± 0°9′, varying slightly by seating configuration. Hand these numbers to your alignment tech.
- Ball joint vs. uniball. Adjustable ball-joint arms (e.g., SPC) give the alignment tech the most flexibility and tend to be quieter on daily drivers. Uniball arms (e.g., Total Chaos, Dirt King, Elevate) are stronger, allow more droop travel with extended-travel coilovers, but can be noisier and need periodic greasing.
- Tire clearance. Some arms are shaped to maximize clearance between the tire and the arm at full lock; if you’re running wide tires, this matters.
- Fixed-offset arms (e.g., SuperPro) exist as a middle option: caster correction with a heavy-duty ball joint, less adjustability, no maintenance headaches.
When buying: confirm the arm is specifically listed for your GX generation, and if you’re running a tall tire (33″+), check that the arm’s caster geometry won’t push the tire into the body mount. Some owners need a body-mount chop with aggressive tires regardless of UCA brand. See our GX tire size and fitment guide for when a chop is actually needed.
Front Differential Drop: Lowering the Diff to Save the CVs
Lift the front of an IFS truck and the CV axles run at a steeper angle. A differential drop kit is a set of spacers, usually 1 inch thick machined aluminum, plus longer bolts. It goes between the front differential mounts and the frame, rotating the front of the carrier downward while the rear mount stays put and acts as a pivot. The install is simple: remove the front skid plate, swap the two front diff bolts for the spacers and longer bolts, then reinstall the skid plate with the supplied spacers. The Dobinsons DD59-527K is the commonly listed kit for the GX470 and GX460.
When you need one: vendors draw the line around 2 to 2.5 inches of front lift. Dobinsons says the kit allows lifts over 2.0 inches and complements their 3-inch lifts, and their dealer guidance recommends it with 3 inches of lift to reduce CV angles and wear. It is also recommended with extended-travel front struts, which can bind the CV joints at full droop. The owner symptom check is the inner CV boots: if the bellows fins touch each other, the angle is too steep. Some owners use the credit card test. If you can slide a card between the boot fins without contact, you are fine.
The honest tradeoffs: because the diff pivots on the rear mount, a 1-inch spacer only moves the CV joint position about a quarter inch, roughly 3 degrees. Several experienced installers say it barely changes the angle on the 120 platform and skip it. The lowered diff also sits closer to the skid plate and can become the lowest point under the truck, giving back some of the clearance the lift just bought. Confirm your skid plate still fits before ordering. Some aftermarket and TRD Pro plates need different bolts or modifications.
Bottom line: install one if you are lifting over 2.5 to 3 inches or running extended-travel struts. Skip it at 2 inches or under.
High-angle CV options
If you want more CV angle than stock rather than just restoring it, the honest answer is that nobody sells a true high-angle joint for a bolt-on GX lift. Here is what actually exists.
Stronger axles, not higher-angle axles. RCV Performance and Trail-Gear Longfield sell complete upgraded IFS axle sets for the GX470 and GX460. They are built for strength (chromoly shafts, bigger joints) and come in stock and extended lengths for long-travel kits. RCV makes no higher-angle claim on the Toyota set, and one owner measured the RCV inner joint at about 22.3 degrees against about 21 stock. Total Chaos sells extended-length shafts that reuse your factory CV joints, which corrects length on long-travel kits but keeps the stock angle limit.
High-angle boots. CVJ Axles sells remanufactured OEM axles with a red silicone higher-angle inner boot, confirmed fitted on a GX470 by an owner. CVJ rates the boot for moderate lifts only, not over 3.5 inches, and warranties nothing on lifted or off-road use. All-Pro sells high-angle outer boot kits, but owners warn that 930-style round boots on the Toyota triangular flange have a long history of fit problems.
930/934 conversions. JD Fabrication sells a 934 CV upgrade for the 4th/5th gen 4Runner and FJ with 28 degrees of movement against 21 stock, achieved with a shorter 934 body and longer 300M shafts. It requires a small frame notch, costs around $2,089 a pair after core, and is effectively a long-travel product. No vendor sells a GX-specific 934 conversion. The 4Runner kit is the closest match but GX fitment is not vendor-stated.
Bottom line: for a 2 to 3 inch bolt-on lift, a diff drop and stock-style axles remain the answer. High-angle hardware only makes sense once you are into long-travel territory.
Limit Straps and Bump Stop Extensions
Limit straps are short nylon straps bolted between the frame and a suspension component to cap droop travel. A basic lift on standard-travel shocks does not need them. Mid-travel coilovers from the major brands are designed to act as their own extension stop. Straps matter in two cases. One: long-travel kits, where the extra droop can exceed what the CV joints, ball joints, or the shock itself can survive. Two: when the shock itself is what stops the droop, which comes up with spacer lifts, where the UCA can also contact the coil at full droop. Without a strap there, repeated topping out hammers the shock seals and the shock fails early.
Bump stop extensions are the compression-side counterpart and the more universal upgrade with a lift. Longer shocks usually have a longer collapsed length too, so without extended bump stops the shock bottoms out before the suspension stops moving. That is what cracks mounts and kills shocks.
Sizing: jack the truck to full droop and see what actually limits travel first: the shock, the control arms, or the CV angle. Set the strap to stop travel about a half inch short of that point.
What to buy. DuroBumps makes application-specific progressive bump stops for the GX470 and GX460: the DBF212 front needs no lift, the DBR425 rear is 2 inches taller than stock for 2+ inch lifts, and the DBR525LT is 3 inches taller for long-travel kits. Wheeler’s Superbumps are progressive microcellular replacements for the factory stops, with optional spacer shims for fine-tuning. Dobinsons sells a nitrogen-charged hydraulic rear bump stop kit with threaded height adjustment, in 0-2.5 and 3+ inch lift versions, for coil-spring rears only. Timbren makes two different products: the SES TORSEQ kit is a hollow rubber spring for load support and towing (one dealer notes it is not for lifted vehicles), while the Active Off-Road ABSTORSEQ is a progressive bump stop tuned for off-road bottom-outs. Energy Suspension bump stops are universal polyurethane pieces, not application-specific for this platform. Taller stops pair with longer-travel rear shocks: the stop must engage before the longer shock bottoms out.
Rear Air-to-Coil Conversions (GX470 / GX460)
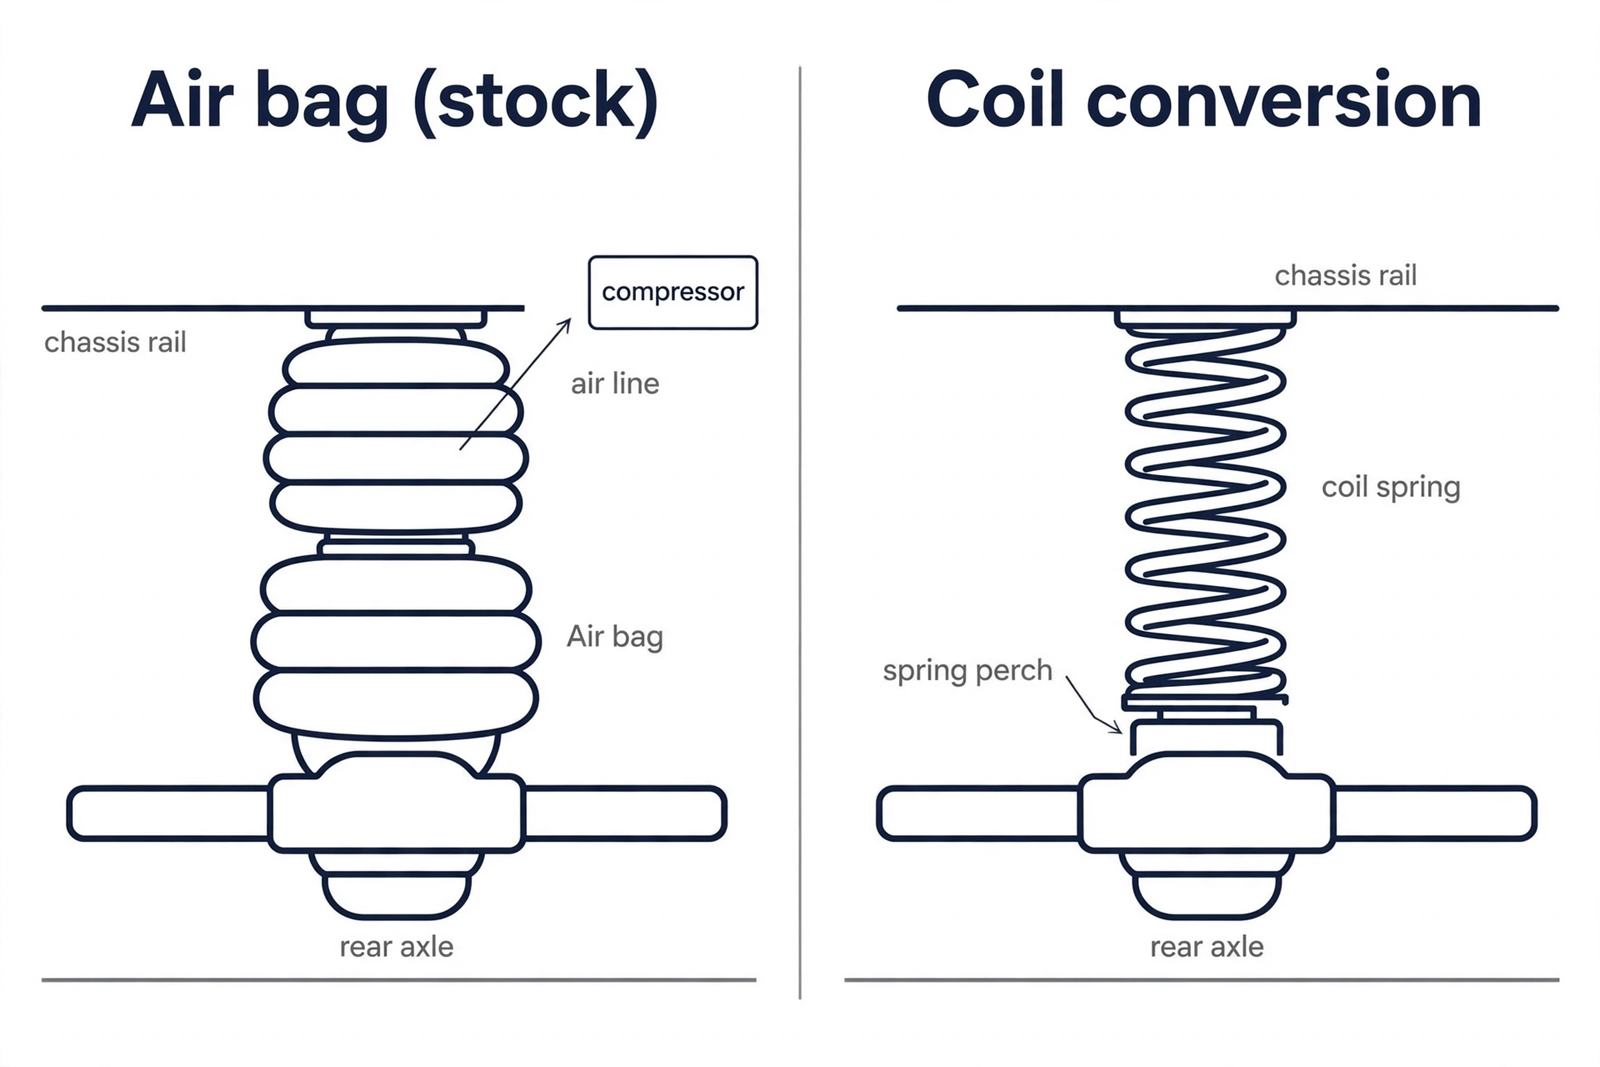
Many GX470s and some GX460 trims came with rear air suspension (air bags) instead of coil springs. Air bags ride beautifully and self-level for towing, but at 15+ years old they leak, and replacement compressors and sensors are expensive. When lifting, most owners convert to coils.
Your options:
- Keep the air bags. If your air suspension is healthy, you don’t have to convert. You can lift with front coilovers and use the air system’s adjustability to match the rear height. This preserves the best ride quality and self-leveling. But aging air components remain a future repair bill.
- Full conversion to coils. Conversion kits (from Dobinsons, Metal Tech, and others) add a proper spring seat/perch and locate a coil spring in place of the air bag. Pair them with matching rear lift springs and longer shocks. This is the most common path on a lift: simpler, more durable, no compressor to maintain, with springs available in rates matched to your load.
- Replace with fresh air components (e.g., Arnott replacement air springs) and keep the system. Sensible if you love the ride and the compressor is healthy.
The upper cone spring mount. A coil-spring 4Runner or GX locates the top of each rear coil in a cone-shaped rubber mount bolted to the frame. Toyota calls them secondary springs; parts counters list them as upper coil isolators (OE part 48302-35050). Your airbag truck does not have them. The airbag bolts to a flat plate with no coil perch at all, so the conversion has to add the upper seat. Good kits include them: Dobinsons ships OE-type rubber upper isolators with built-in bump stops, and Metal Tech’s Stage 3 kit includes their Key Cone dual-rate polyurethane upper springs. If your kit does not include them, buy them separately before you start. The top pigtail of the coil seats into the cone, which centers the spring and isolates it from the frame. Without it the spring has nothing to locate into and will shift and clunk.
After converting, you’ll have a dash warning to address. Most conversion kits include or specify a resistor/bypass to keep the air-suspension light off. Check the kit instructions.
Raising the rear without converting: the washer trick
If you keep the airbags and lift the front, the rear still targets the factory ride height, so the truck sits nose-high. The fix is to fool the rear height sensors into thinking the rear sits lower than it does, so the system pumps the bags up to a new, taller target.
Each rear side has a height sensor mounted to the frame with a linkage arm to the lower control arm. The washer trick stacks washers under the sensor mounting bracket, between the bracket and the frame, on the sensor’s 12 mm mounting bolt, using a longer bolt to match. Moving the sensor body up changes the linkage arm angle, and the ECU reads that as the truck sitting low. GX470 owners report gaining roughly 1.25 to 1.5 inches of rear ride height this way. Start with about a half to three-quarter inch stack, keep both sides equal, and adjust in small steps until the stance is right. A cleaner alternative to a tall washer stack is a section of steel tube or unthreaded spacers. Some owners skip the washers entirely and just slide the sensor body up in its slotted bracket. Aim to have the sensor arm sitting level at the new ride height.
Expect a firmer ride. The stiffness comes from the bags running at higher pressure, and it will not ride as soft as stock. The compressor also works harder holding the taller target, so do not ask for more height than you need. On the GX470, if the compressor runs continuously for about 100 seconds trying to reach the target, the ECU sets a fault and suspends height control. Inspect the sensor linkages for corrosion before relying on them. They are a known GX470 failure point. One bonus: the rear height sensors also feed the headlight auto-leveling, so this keeps your headlights aimed correctly on a lifted truck. On a bag-deleted GX460, one owner found about 1 cm of washers on the 12 mm sensor bolt was enough to clear the dash warning.
Dash Lights After a Lift
Lifting can light up the dash, especially when height sensors and adjustable shocks get disconnected. Here is what shows up and how to handle each one.
“Check Air Suspension System” with the orange triangle. On the GX470, a full coil conversion triggers this unless you pull the suspension fuse and relay in the engine bay plus the TEMS fuse in the dash, per Metal Tech’s instructions. The GX460 is the opposite case after an airbag delete: the community rule is simple. Do not remove any suspension fuses or relays, do not disconnect the suspension ECU or the air compressor, and do not remove the rear height sensors. Owners who pulled only the air lines to the bags reported no codes, while pulling fuses or unplugging the ECU left the message on. Keep the sensors mounted, connected, and positioned sanely, adjusted with washers so the arm sits level at the new ride height.
Where those fuses live (GX470). In the engine bay, the Engine Room Relay Block at the rear of the compartment near the cowl holds fuse 3 “AIR SUS” 50A (compressor power) and fuse 19 “AIR SUS No.2” 10A (suspension ECU constant power). The AIR SUS relay sits in slot A of the small two-slot Engine Room Relay Block No.2 next to it. One factory illustration labels that box “No.3”, but the box in the truck is the No.2. Under the driver side of the dash, the Instrument Panel Junction Block (also called the Driver Side J/B) holds fuse 7 “TEMS” 20A, which feeds the suspension ECU ignition circuit. Ignition OFF before pulling any of them. On the GX460, the factory parts location puts the AIR SUS relay, the AIR SUS fuse, and the AIR SUS No.2 fuse in the engine room relay block, and the AVS fuse in the driver side junction block under the dash. Exact slot positions and amperages are in the wiring diagram manual rather than the repair manual, so confirm against your truck’s fuse box lid before pulling anything.

AFS (adaptive front lighting) light. The rear height sensors double as the headlight leveling input, so removing or misadjusting them can trigger an AFS error. Fix the sensor position and it clears.
VSC TRAC and VSC OFF lights. Common after suspension work. The yaw rate and deceleration sensors lose their zero-point calibration during the work or a battery disconnect, and even a steering wheel that is not centered with the wheels straight can set them. The fix is a zero-point calibration of the yaw rate and steering angle sensors, done with Toyota Techstream or the paperclip method (jumping DLC3 terminals Ts and CG, steering straight, on level ground). A Lexus service bulletin formalizes this: after wheel alignment or chassis component work, disconnect the battery for over two seconds, then perform the zero-point calibration with Techstream. Generic OBD readers cannot read these chassis codes.
AVS shock codes. On GX460s with adjustable AVS shocks, removing the shocks sets actuator codes that show on a scan tool. Owners report these are unavoidable when the AVS shocks come out.
Prevention: disconnect the wheel speed sensor (ABS) wires before swinging the suspension down. Stretching that harness during a lift trips VSC lights, and most people end up replacing the harness.
Rake Correction and Matching Front/Rear Heights
From the factory, a GX sits nose-down with roughly an inch of “rake” (the rear higher than the front) so the truck levels out under load. Lifts are usually specified to either remove most of the rake for looks or preserve a touch of it for towing:
- Leveled look: ~2.5″ front / ~2″ rear is a common target that nets an almost-level stance and clears 33″ tires. See our tire fitment guide for what 33s need on each generation.
- Keep some rake: ~2″ front / ~2″ rear (or a taller rear spring) leaves the truck slightly nose-down, which is nicer if you tow.
- Expect settle: new springs sag slightly over the first few hundred miles. Don’t chase exact numbers on day one. Measure at all four corners and verify against the factory manual for your year’s ride-height procedure.
Also remember: lift height claims assume stock weight. A heavy front bumper and winch will eat front lift; a drawer system, fridge, and rear bumper will eat rear lift. That’s exactly why load-rated springs (Dobinsons’ and OME’s numbered spring catalogs) exist. Pick the spring for the weight you’ll actually carry.
While You’re In There
The suspension is apart, the truck is on jack stands, and you are paying for an alignment anyway. This is the time to deal with worn parts.
Front. Check the lower control arm bushings before you finalize the budget. The youngest GX470 is over 15 years old and the bushings are often dry and cracking by 175k to 200k miles. Factory arms are considered the best replacement and commonly last about 200k. Plan for seized alignment cam bolts, especially in rust states. Have spare cam bolts, sleeves, and nuts on hand and be ready to cut the old ones out. At 200k, the community recommendation is lower ball joints, LCA bushings, tie rod ends as needed, and sway bar bushings in one pass. That said, some trucks run original tie rods, racks, and CV axles past 300k, so inspect rather than blindly replace. Worn steering rack bushings cause highway wandering and are much easier to reach with the suspension out. Inspect the CV boots and replace any torn boot before grit kills the joint, and check the wheel bearings for hum or play.
Rear. The panhard (track bar) bushings are the classic rear-end clunk item. A lift shifts the axle sideways and forces the bushings to work at new angles, and the factory bolt shoulder is undersized for the bushing insert, so the threads dig grooves and create slop. New bushings plus a corrected axle position is the real fix. Inspect the rear upper and lower control arm bushings too. A clunk on takeoff points at slop in the rear upper arms. Worn rear sway bar links clunk over bumps, and the link bolt can fuse to its sleeve with corrosion. If you are doing an air-to-coil conversion, fit new upper spring isolators so the spring does not sit metal on metal. Rear wheel bearings are the exception. Failure back there is rare on the GX470 and GX460, so leave them alone unless you have a confirmed hum or play.
Procedural. Torque all control arm bushing bolts at ride height with the truck on the ground, then retorque every fastener after 100 miles. Brakes, fluid flushes, and differential and transfer case fluid are worth doing on schedule but are not tied to having the suspension apart.
Factory Torque Specs for the Install
Values below are from the factory service manuals for the GX470 and the GX460. Several fasteners differ between generations, so use your generation’s column. Do not assume GX470 values fit a GX460. GX460 stabilizer values are from the KDSS procedure. Torque control arm bushing bolts at ride height with the truck on the ground. GX550 owners: verify against the manual for your exact year.
On wheel nuts, the manual prints 112 N·m as 82 or 83 ft·lbf in different sections. 112 N·m converts to 82.6, so 83 is the correct rounding.
Front:
| Fastener | GX470 | GX460 |
|---|---|---|
| Lug nuts | 83 ft·lbf (112 N·m) | 83 ft·lbf (112 N·m) |
| Strut top nuts, 3 per side | 47 ft·lbf (64 N·m) | 47 ft·lbf (64 N·m) 2013-15; 52 ft·lbf (71 N·m) 2016-21 |
| Strut shaft center nut | 18 ft·lbf (25 N·m) | 18 ft·lbf (25 N·m) |
| Front shock lower bolt | 100 ft·lbf (135 N·m) | 70 ft·lbf (95 N·m) |
| Lower control arm to frame (cam bolts) | 100 ft·lbf (135 N·m) | 129 ft·lbf (175 N·m) |
| Lower ball joint attachment | 103 ft·lbf (140 N·m) nut; 166 ft·lbf (225 N·m), 2 bolts | 103 ft·lbf (140 N·m) arm side; 118 ft·lbf (160 N·m) knuckle side |
| Upper control arm to frame | 85 ft·lbf (115 N·m) | 85 ft·lbf (115 N·m) |
| Upper ball joint to knuckle | 81 ft·lbf (110 N·m) | 82 ft·lbf (110 N·m) |
| Front sway bar link | 52 ft·lbf (70 N·m) | 103 ft·lbf (140 N·m), KDSS procedure |
| Front sway bar bushing brackets | 30 ft·lbf (40 N·m) | 30 ft·lbf (40 N·m) |
| Tie rod end to knuckle | 67 ft·lbf (91 N·m) | 67 ft·lbf (91 N·m) |
| Tie rod end lock nut | 65 ft·lbf (88 N·m) | 65 ft·lbf (88 N·m) |
Rear:
| Fastener | GX470 | GX460 |
|---|---|---|
| Rear shock upper, to body | 18 ft·lbf (25 N·m) | 18 ft·lbf (25 N·m) |
| Rear shock lower, to axle housing | 72 ft·lbf (98 N·m) | 72 ft·lbf (98 N·m) |
| Rear upper control arm, both ends | 59 ft·lbf (80 N·m) | 59 ft·lbf (80 N·m) |
| Rear lower control arm, both ends | 96 ft·lbf (130 N·m) | 96 ft·lbf (130 N·m) |
| Panhard bar, both ends | 96 ft·lbf (130 N·m) | 96 ft·lbf (130 N·m) |
| Rear sway bar link | 52 ft·lbf (70 N·m) | 74 ft·lbf (100 N·m), KDSS procedure |
| Rear sway bar mounts | 22 ft·lbf (30 N·m) to axle housing; 11 ft·lbf (15 N·m) link to frame | 81 ft·lbf (110 N·m) bar; 33 ft·lbf (45 N·m) lower bracket, KDSS procedure |
Common Mistakes
- Lifting too much. Beyond about 3 inches, CV axle angles, steering geometry, and KDSS behavior all get unhappy fast. In our experience, 2 to 2.5 inches is the proven sweet spot for a daily-driven GX.
- Cranking a 5100 perch with the stock spring. The 5100’s adjustability is not free lift. Maxing the perch on a stock-rate spring creates a harsh, underdamped front end. Match spring rate to height.
- Skipping the alignment and zero-point calibration. Every lift needs a proper alignment immediately, and every GX needs its zero point reset so stability and KDSS systems read correctly. A “squirrely” feeling after a lift is often just a skipped calibration.
- No panhard correction. A lifted solid-rear axle on a steep panhard bar shifts the axle off-center and wobbles over bumps. At 2 or more inches of lift, correct it.
- Ignoring KDSS after a lift. Lean, binding, and limited droop are all solvable (spacers, balance procedure, end-link brackets). But only if you address them. KDSS trucks also can’t use long-travel rear shocks without supporting mods. Verify compatibility.
- Buying springs for the wrong weight. Heavy-duty springs on a stock-weight GX ride hard and can net more lift than advertised. Be honest about your load.
- Forgetting brake lines and bump stops on tall lifts. At 3 or more inches of rear lift (especially long-travel), stock brake lines stretch to their limit and stock bump stops let shocks bottom out. I recommend extended brake lines and bump-stop extensions as cheap insurance.
- Reusing worn front-end parts. Control-arm bushings, ball joints, and tie-rod ends at 150k+ miles deserve replacement while the suspension is apart. Expect to pay for the alignment twice if they fail six months later. The rear end needs the same look: panhard bushings, rear control-arm bushings, and sway bar links wear out back there too. See “While You’re In There” above.
FAQ
Do I need upper control arms for a 2″ lift?
Usually not. Most GXs align within spec at about 2 inches. But some trucks run out of caster adjustment sooner. At 2.5 inches or more, plan on them. If your truck wanders after a good alignment, UCAs are the fix.
Will a lift void my warranty?
In the U.S., the Magnuson-Moss Warranty Act means a dealer must show the modification caused the failure to deny a claim. That said, suspension, steering, and drivetrain claims on a lifted truck will get extra scrutiny.
Can I keep my KDSS?
Yes. Most lifted GX470s and GX460s keep KDSS. Just account for it: balance the system, consider spacer kits for lean, and run KDSS-compatible shocks and panhard solutions.
How big a tire can I fit?
With a 2 to 2.5 inch lift and the right wheel offset, most GX470/460 owners clear 33″ all-terrains with minor trimming (fender liners, sometimes a body-mount chop). Offset matters as much as tire size. Full details in our GX tire size and fitment guide.
How long do aftermarket shocks last?
I recommend rebuildable shocks (Dobinsons IMS/MRR, OME BP-51, premium coilovers) if you want a shock that can be serviced indefinitely. That serviceability is part of their premium price. Sealed shocks (Bilstein 5100/6112, Foam Cell Pro) are replace-when-worn, though in our experience they typically last many years of normal use. Heavy off-road use shortens any shock’s life.
GX550: does all this apply?
The concepts (geometry, UCAs, panhard correction, spring-rate matching) all apply to the GX550. But it rides on the newer TNGA-F platform with different suspension hardware, so do not assume 460-generation parts fit. Buy kits listed specifically for the GX550 and check vendor fitment guides.
Sources
- SpringRates: Bilstein B8 5100 ride-height-adjustable front shock for the GX460, 0–2.5″ front lift, 46 mm monotube. https://www.springrates.com/products/bilstein-b8-5100-ride-height-adjustable-suspension-shock-absorber-for-2010-2023-lexus-gx460 ↑
- SuspensionLifts: Bilstein 6112 assembled coilovers for the GX470, 0–2.75″ front lift, 60 mm body. https://www.suspensionlifts.com/shop/lexus/gx470/bilstein-6112-assembled-1-7-3-2-coilovers-and-b8-5100-0-2-rear-lift-shocks-for-2003-2009-lexus-gx470-4wd-150-200-lbs/ ↑
- Exit Offroad: Treaty Oak Offroad KDSS spacer kit for GX460 / 5th-gen 4Runner, corrects KDSS lean on lifted trucks. https://exitoffroad.com/product/kdss-spacer-kit-lexus-gx460-5th-gen-4runner-by-treaty-oak-offroad/
- DrKDSS: B.O.T.C.K. bolt-on track bar correction kits for GX470/GX460/GX550 and related trucks. https://drkdss.com/collections/b-o-t-c-k-trackbar-correction-kits
- KP Offroad: Eimkeith panhard correction kit (weld-on) for 4th/5th-gen 4Runner, GX470/460, FJ. https://kpoffroad.com/product/panhard-correction-kits-pck
- Mill Creek Overland: Dobinsons IMS lift kit for GX460 2010–2021, 1.5–3.5″, rebuildable monotube. https://millcreekoverland.com/products/dobinsons-1-5-to-3-5-ims-lift-kit-for-gx460-2010-2021-dsskitims001
- Rogue Offroad: Dobinsons MRR 3-way adjustable lift kit for GX460 2010–2022. https://ROGUE-OFFROAD.COM/DOBINSONS-1-TO-35-MRR-3-WAY-ADJUSTABLE-LIFT-KIT-LEXUS-GX460-2010-2022-KDSS_p_21313.html ↑
- Rogue Offroad: Ironman 4×4 Foam Cell Pro suspension lift kit for GX460 with KDSS, 2–3″ estimated lift. https://ROGUE-OFFROAD.COM/IRONMAN-4X4-FOAM-CELL-PRO-SUSPENSION-LIFT-KIT-SUITED-FOR-LEXUS-GX460-WITH-KDSS–STAGE-3_p_21321.html
- Mudify: OME BP-51 2–3″ lift kit for GX470 2003–2009. https://mudify.com/products/ome-bp-51-2-3-inch-lift-kit-for-lexus-gx470-03-09
- Mudify: OME upper control arms, +2.5 to +3.5 degrees caster correction for ~2″ lifts. https://mudify.com/products/ome-bp-51-2-inch-leveling-kit-for-lexus-gx470-03-09 ↑
- IH8MUD: GX470 wheel/tire/lift picture combination thread, owner lift setups and ride reports. https://forum.ih8mud.com/threads/gx470-wheel-tire-lift-picture-combination-thread.970666/page-10
- IH8MUD: GX lift advice thread, OME/Bilstein combos and air-to-coil conversion discussion. https://forum.ih8mud.com/threads/another-help-with-gx-lift-thread.988314/
- IH8MUD: OME BP-51 owner discussion. https://forum.ih8mud.com/threads/ome-bp51.868206/
- IH8MUD: Panhard rod correction discussion. https://forum.ih8mud.com/threads/panhard-rod-correction.1335046/
- IH8MUD: “If I were to start all over again with a stock GX470”, shop advice on checking lower control arms and seized cam bolts before a lift. https://forum.ih8mud.com/threads/if-i-were-to-start-all-over-again-with-a-stock-gx470-i-would.1066210/page-3
- IH8MUD: GX470 lower control arm thread, bushing wear and ball joint options. https://forum.ih8mud.com/threads/lower-control-arms.1330584/
- IH8MUD: GX470 lower control arm removal thread, ABS wire caution and torque at ride height. https://forum.ih8mud.com/threads/gx470-lower-control-arm-does-not-drop-further-down.1318334/
- IH8MUD: Official Dobinsons GX470 thread, diff drop kit and UCA part numbers and guidance. https://forum.ih8mud.com/threads/official-dobinsons-lexus-gx470-thread-all-parts-specs-and-options.1266355/
- Shock Surplus: Dobinsons DD59-527K front diff drop kit for GX470 2003-2009, for lifts over 2.0 inches. https://www.shocksurplus.com/products/dobinsons-front-ifs-diff-drop-kit-for-2003-2009-lexus-gx470-awd
- Shock Surplus: Dobinsons DD59-527K front diff drop kit for GX460 2010-2023. https://www.shocksurplus.com/products/dobinsons-front-ifs-diff-drop-kit-for-2010-2023-lexus-gx460-awd
- Metal Tech 4×4: GX470/GX460/4Runner rear coil conversion kit instructions (PDF), fuse and relay removal procedure. https://www.suspensionlifts.com/wp-content/uploads/2020/08/GX470-GX460-4Runner-Rear-Coil-Conversion-Kit.pdf
- Metal Tech 4×4: GX470 rear coil conversion Stage 3, suspension fuse and relay removal procedure. https://www.metaltech4x4.com/products/metal-tech-4×4-gx470-rear-coil-conversion-stage-3-stock-height-w-key-cones
- Overland Expedition Outfitters: Apache Offroad GX470/GX460 coil conversion kit. https://overlandexpeditionoutfitters.com/products/apache-offroad-coil-conversion-kit-lexus-gx470-gx460-made-in-the-usa
- IH8MUD: GX460 airbag delete error thread, GXOR washer trick guidance and sensor arm leveling. https://forum.ih8mud.com/threads/2010-gx-460-airbag-delete-error.1101964/
- IH8MUD: Lift with rear airbags kept, washer trick height gains and ride reports. https://forum.ih8mud.com/threads/lift-with-airbags.1210175/
- IH8MUD: Height sensor adjustment trick, sliding the sensor in its bracket. https://forum.ih8mud.com/threads/ahc-adjustable-height-control-adjust-trick.1109263/
- IH8MUD: VSC and traction control lights after a lift, zero-point calibration. https://forum.ih8mud.com/threads/vsc-and-traction-control-light-on-after-lift.1071877/
- IH8MUD: VSC TRAC and VSC OFF lights on the GX470, paperclip zero-point calibration. https://forum.ih8mud.com/threads/vsc-trac-vsc-off-lights-2003-gx470.1265318/
- Tundras.com: DLC3 terminals Ts and CG paperclip zero-point calibration procedure. https://www.tundras.com/threads/help-i-got-the-dash-lights.40770/
- ClubLexus: Lexus TSB 2575, zero-point calibration after alignment or chassis work. https://www.clublexus.com/forums/attachments/suspension-and-brakes-185/vsc-reprogam-554580/tsb2575-200571d1298419322dl
- YouTube, Mr. Garage: “SIMPLE LEXUS GX470 / GX460 / 03-09 4RUNNER LIFT. AIRBAG TRICK – BILSTEIN 5100 – DIFF DROP”, budget lift with the rear airbag washer trick. https://www.youtube.com/watch?v=z1NJzxT2KtY
- YouTube: “GX470 Rear Lift Kit with Coil Conversion – Part 1”, Dobinsons rear springs, Metal Tech conversion, Eimkeith panhard correction. https://www.youtube.com/watch?v=MavdJjOetXk
- YouTube, NK Autos: “Lexus GX470: Rear Lift, Coils, Conversion Kit, & Shocks”, rear lift install step by step. https://www.youtube.com/watch?v=gHJ_b_qKzbs
- YouTube, Cody Crafted: “This Lexus GX460 gets a suspension upgrade!”, GX460 Stage 1 build. https://www.youtube.com/watch?v=lb1SooXnkNE
- YouTube, 88RotorsOffroad: “Lexus GX460 Bilstein Lift with Fifteen52 Traverse Wheels” (Short). https://www.youtube.com/shorts/dOu-riTcWdM
- YouTube, Tinkerer’s Adventure: “4 Common Myths About IFS Lifts | Everything About Toyota IFS Part 2”, how top spacers, preload, and taller springs actually work on Toyota IFS and why every inch of lift costs an inch of droop. https://www.youtube.com/watch?v=l1tTelhdEiM
- YouTube, Tinkerer’s Adventure: “Everything About Toyota IFS | Suspension Construction and Limits | Part 1”, IFS construction, measured travel, and what happens when you lift it (aimed at FJ Cruiser, 4Runner, Tacoma, Prado, GX470, GX460). https://www.youtube.com/watch?v=_68Hc8GtLko
- YouTube, Tyler Mayer: “Lifting my GX470 3inch lift and 35’s!!”, 3-inch lift on 35s. https://www.youtube.com/watch?v=TPl8bqmMLU4
- YouTube, Jacob Cole: “I Bought a 220,000 Mile GX470 and Built It Into This”, 270k-mile overland build. https://www.youtube.com/watch?v=QHJo0Nhxm5A
- GXOR (Lexus GX Off-Road Facebook group): owner threads on Ironman Foam Cell Pro vs Dobinsons vs OME lift value and rear air-to-coil conversion kit selection. Closed group, no public link.
- GX M&M (Lexus GX Facebook group): recurring budget lift question threads. Closed group, no public link.
- Exit Offroad: Apache Offroad rear KDSS delete sway bar conversion brackets for GX470/GX460. https://exitoffroad.com/product/apache-offroad-rear-kdss-delete-sway-bar-conversion-brackets/
- DrKDSS: KDSS control harness kit, on-demand KDSS disable for GX460. https://drkdss.com/collections/kdss/products/kdss-control-harness
- Blackgate Customs: KDSS control harness, on-demand KDSS disable. https://blackgatecustoms.com/products/kdss-control-harness
- Apache Offroad: Dobinsons 3-inch rear long-travel conversion kit, KDSS delete required on GX460. https://apacheoffroad.com/product/dobinsons-3-rear-long-travel-conversion-kit-2007-2014-toyota-fj-cruiser-03-4runner-03-09-lexus-gx470-non-kdss/
- IH8MUD: KDSS delete discussion, dash light reports. https://forum.ih8mud.com/threads/kdss-delete.1270301/
- Exit Offroad: RCV Performance Ultimate IFS CV axle set for GX470/GX460. https://exitoffroad.com/product/rcv-ultimate-ifs-cv-axle-set-tacoma-4runner-fj-cruiser-gx470-gx460/
- Exit Offroad: Trail-Gear Longfield IFS CV axle set for GX470/GX460. https://exitoffroad.com/product/longfield-ifs-2-75-cv-axle-set-tacoma-4runner-fj-cruiser-gx470-gx460/
- 4Runner Lifestyle: Total Chaos extended 4WD axles for long-travel kits. https://www.4runnerlifestyle.com/products/total-chaos-fabrication-4wd-extended-axles-for-3-5-inch-long-travel-kit-for-4runner-2003-2024
- CVJ Axles: 9808R remanufactured axle with high-angle silicone inner boot. https://www.cvjreman.com/product/9808r/
- Exit Offroad: All-Pro high-angle outer CV boot kit for GX460. https://exitoffroad.com/product/high-angle-outer-cv-boot-kit-05-23-tacoma-10-24-4runner-gx460-fj-cruiser/
- JD Fabrication: 934 CV upgrade for 4th/5th gen 4Runner, 28 degrees of movement. https://jdfabrication.com/collections/4th-generation-4runner/products/tacoma-05-934-cv-upgrade-copy
- DuroBumps: DBR425 rear extended bump stops for 2+ inch lifts. https://durobumps.com/pages/dbr425-toyota-fj-cruiser-rear
- Mudify: DuroBumps DBR425 rear bump stops, GX470/GX460 fitment. https://mudify.com/products/durobumps-2-inch-extended-bump-stops-dbr425-for-toyota-4runner-03-23-fj-cruiser-07-14-lexus-gx460-gx470-2-inch-plus-lift-required
- Wheeler’s Off-Road: Superbumps for GX470. https://wheelersoffroad.com/shop-by-category/superbumps/4runner/gx470-2003-2009.html
- Exit Offroad: Timbren TORSEQ SES kit for Toyota and Lexus SUVs. https://exitoffroad.com/product/timbren-torseq-ses-suspension-enhancement-system-toyota-and-lexus-suvs/
- GBP Performance: Timbren Active Off-Road bump stops ABSTORSEQ. https://gbpperformance.ca/en/bushings-mounts/2019120-timbren-active-off-road-bump-stops-for-toyota-4runner-fj-cruiser-landcruiser-100-series-rear-kit-lexus-toyota-2000-20.html
- Exit Offroad: Dobinsons rear adjustable hydro bump stop kit. https://exitoffroad.com/product/dobinsons-rear-adjustable-hydro-bump-stop-kit-for-toyota-and-lexus-suvs/
- Metal Tech 4×4: Key Cone dual-rate polyurethane upper spring cones. https://www.metaltech4x4.com/products/key-cone-rear-spring-upper-isolators-metal-tech-4×4-exclusive-sold-in-pairs
- Metal Tech 4×4: GX470 rear coil conversion Stage 3 kit. https://www.metaltech4x4.com/products/metal-tech-4×4-gx470-rear-coil-conversion-stage-3-stock-height-w-key-cones
- Yota Mafia: Dobinsons rear airbag to coil conversion kit WA59-561K. https://yotamafia.com/product/sso-air-to-coil-spring-conversion-kit-with-upper-isolators/
- Exit Offroad: Apache Offroad rear upper coil isolator cones. https://exitoffroad.com/product/apache-offroad-rear-upper-coil-isolators-4runner-fj-cruiser-gx470-gx460/
- IH8MUD: jack stand recommendations for the GX. https://forum.ih8mud.com/threads/jackstand-recommendations-other-tools.1268575/
- 4Runners.com: floor jack recommendations for a lifted 4Runner. https://www.4runners.com/threads/floor-jack-recommendations-lifted-4r.43063/
- TacomaWorld: jack for lifted trucks thread. https://www.tacomaworld.com/threads/jack-for-lifted-trucks.741337/page-2
- IH8MUD: CVJ axle install on a GX470. https://forum.ih8mud.com/threads/cv-axle-replacement-how-to-diy-tips-gx470.1185107/
- Lexus Press Room, official GX460 releases and press kits 2010 through 2023: KDSS listed as standard every year and trim. 2010 introduction, 2010 pricing, 2011 technology summary, 2012, 2013, 2014 pricing, 2015, 2016, 2017, 2018, 2019 press kit, 2020, 2021, 2022 Black Line, 2023 brochure PDF ↑
- IH8MUD, What is in the Sport package: KDSS availability on GX470 Sport models. https://forum.ih8mud.com/threads/whats-in-the-sport-package-confused.1203790/ ↑
- TacomaWorld: CV boot and axle discussion, 930-style boot fit warnings. https://www.tacomaworld.com/threads/best-cv-boots-axles.509098/
Specs and fitment change. Always verify lift heights, spring rates, and torque values against the factory service manual for your model year and the manufacturer’s current product pages before ordering.
Leave a Reply