Quick answer
Most of the time, yes. On a high mileage GX470 or GX460, a burning oil smell with a wisp of smoke from the engine bay and a dry garage floor is the classic valve cover leak pattern. Oil seeps past a hardened perimeter gasket, runs down the side of the head, and lands on the hot exhaust manifold. It burns off there. That is why you smell it and see faint smoke but find no puddle.
The second leak path hides inside the cover. Each spark plug sits in a tube, and a small seal keeps oil out of the tube. When those seals harden, oil pools around the plug and coil boot. You find it at a plug change, or later as a misfire.
Do not order parts on smell alone. Four other leaks imitate this one, and one of them on the GX460 is a much bigger job. Clean the engine, find the highest wet point, and match it to the map below before you wrench. The full check takes an afternoon and a can of degreaser.
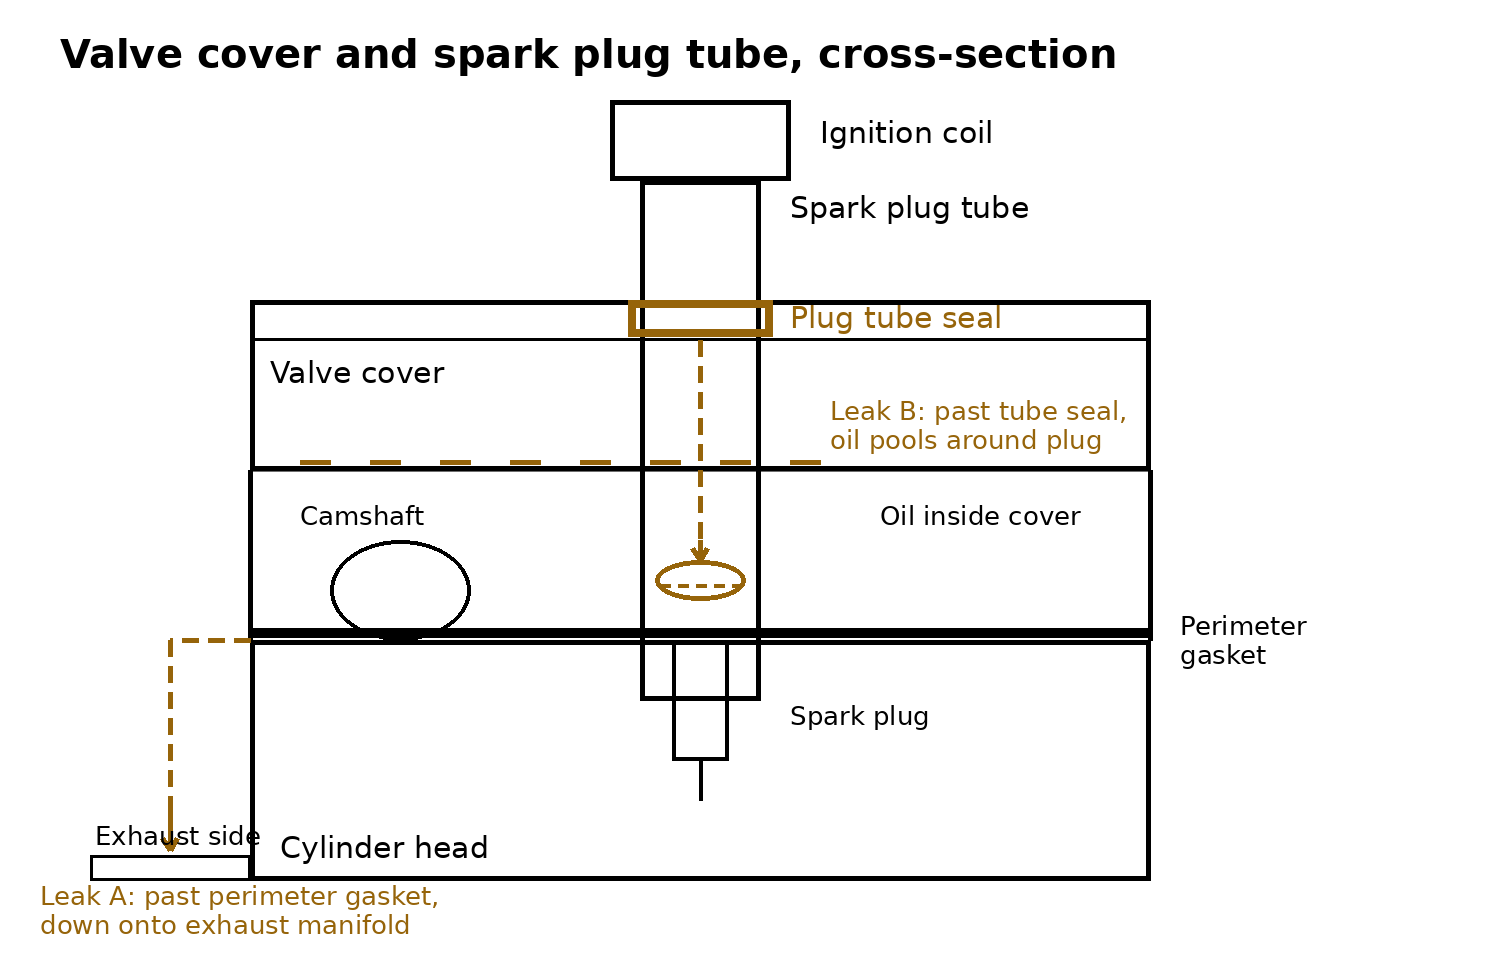
Symptoms that point at the valve covers
- Burning oil smell after a drive, strongest at a stop with the fan running.
- Faint smoke or haze rising from one side of the engine bay, usually near the firewall end of a cover.
- No drips on the ground, or at most an occasional drop. Cover leaks burn or spread thin before they can drip.
- Oil film and baked residue along the lower edge of one or both covers, and on the exhaust manifold heat shield below it.
- Oil pooled in one or more spark plug tubes when you pull the coils.
- Oil level dropping slowly between changes with no external puddle to explain it.
Years of heat cycles next to the exhaust side of the head harden the rubber gasket and tube seals. Owners on IH8MUD and ClubLexus report the same sequence on both V8s: first a smell, then visible seepage at the back corners of the covers, then oil in the tubes. Rear corners weep first on many trucks because oil pools at the back of the head when parked and the gasket there stays hot longest. Treat that as an owner pattern. Check the whole perimeter.
One related smell check. Blue smoke from the tailpipe on a cold start is a different problem with a different cause. That pattern points at valve stem seals, and our startup smoke guide covers it. This guide covers smoke and smell in the engine bay.
Valve cover leak or something else
Oil and coolant both travel. A leak at the top of the engine can drip off the bellhousing and look like a rear main seal. A coolant leak in the center valley can run down the back of the block and look like an oil leak from underneath. Work from the top down and identify the fluid first. Engine oil is brown to black and slick. Toyota coolant dries to a pink or reddish crust and smells sweet when hot.
| Suspect | Fluid | Where the wet spot starts | Tell that separates it |
|---|---|---|---|
| Valve cover gasket | Oil | Top edge of the engine, at the cover seam | Wet seam at the cover, oil on the exhaust shield below it, oil in plug tubes |
| Cam tower seam, GX460 | Oil | One seam below the valve cover | Cover gasket line stays dry while the seam under it weeps. See the cam tower section |
| Valley plate, GX460 | Coolant | Center valley under the intake manifold | Pink crust, low coolant, sweet smell, leak appears at the back of the engine or the bellhousing |
| Timing cover | Oil, sometimes coolant | Front of the engine | Wet front seam behind the pulleys, often with a front crank seal weep |
| Oil pan | Oil | Bottom of the engine | Top of the engine stays dry. Pan rail and drain area are wet from below |
| Rear main seal | Oil | Back of the engine, inside the bellhousing joint | Oil at the bellhousing bottom with a dry top end. Cover leaks run down the outside of the bellhousing instead |
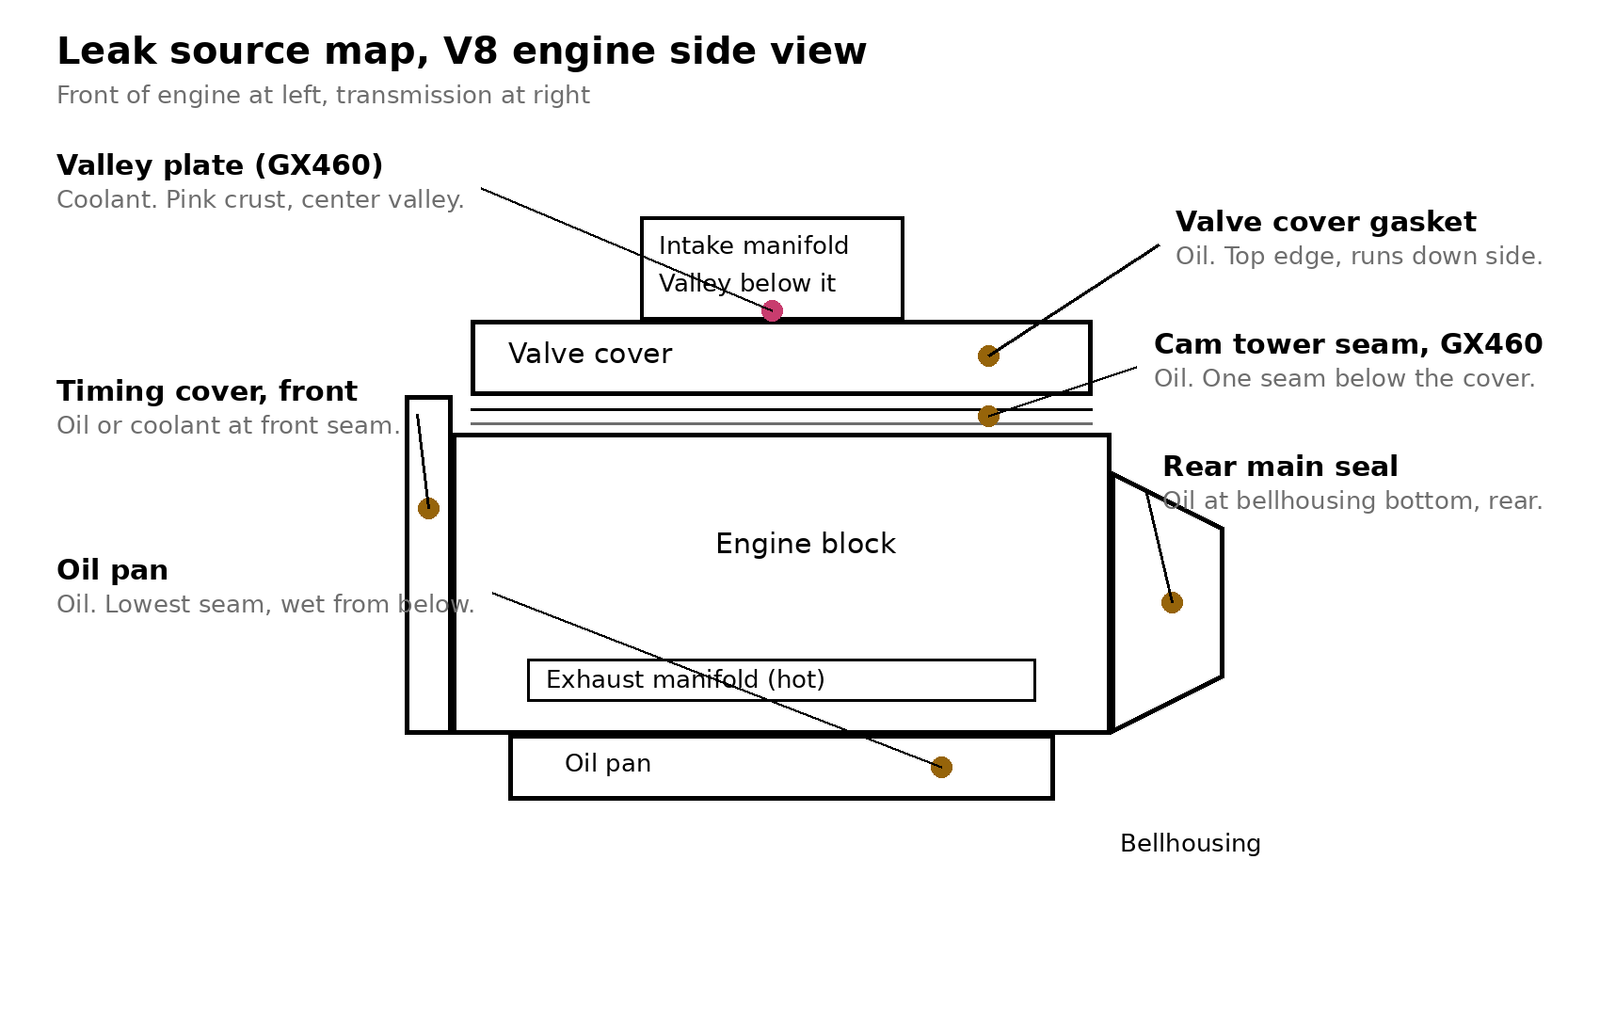
The GX460 cam tower seep is a different job
Read this before you order GX460 gaskets. The 1UR-FE stacks three layers on each bank: the cylinder head, a camshaft housing on top of it (owners call it the cam tower), then the valve cover. The factory manual reflects the stack. The valve cover bolts to the camshaft housing, not directly to the head.[1] The housing itself is sealed to the head with seal packing. There is no rubber gasket at that lower seam to replace.
That gives you two oil seams close together. The top seam is the valve cover gasket. It is the job in this guide. The lower seam is the cam tower seal. Resealing it means the timing chain cover and the camshaft housings come off for a top end teardown. Owners and techs in the IH8MUD and Tundras discussions make the same point from the photo side: the layers stack, so a leak can start at either interface, and gravity collects oil at the back corner either way. One ClubLexus owner replaced GX460 valve cover gaskets and plug seals for a small passenger side leak, then found the source was the cam saddle seam below. The leak stayed.
How to separate them in the driveway:
- Degrease the side of the engine until both seams are clean and dry.
- Drive the truck through several full heat cycles over a few days.
- Inspect with a mirror and a bright light. Find the highest point with fresh, wet oil.
- Fresh oil at or above the cover gasket line, with a dry seam below it, is a cover leak. Fresh oil that starts at the lower seam while the cover line stays dry points at the cam tower.
If it is the cam tower, get a quote and a second opinion before authorizing work, and read the monitor section below. Many cam tower seeps stay seeps for years. Do not let a shop sell you a valve cover job as the fix for a cam tower leak, and do not let anyone merge the two into one vague top end leak quote. They are separate jobs with separate scopes.
The GX460 valley plate leaks coolant
The GX460 valley plate sits in the V between the banks, under the intake manifold, and seals a coolant passage. When its seal fails, coolant collects in the valley, cooks down to pink crust, and eventually runs down the back of the engine. From under the truck it can drip near the bellhousing and get misread as a rear main oil leak.
Separating it takes three checks. The fluid is coolant, pink when wet and crusty when dry. The coolant reservoir level drops over time. The top seams of both valve covers stay dry while the wettest point hides at the back of the valley. The valley means something different on the GX470, where the part buried under the intake is the starter. Our starter replacement guide covers that job. Confirming it usually means looking into the valley with a light and mirror, or a borescope, past the intake. The repair is an intake off reseal. It shares no steps with the valve cover job, so keep the diagnoses separate. If you are chasing a GX460 coolant loss with a dry engine top, start with the valley plate.
Rear main and oil pan leaks start low
A rear main seal leak wets the bottom of the bellhousing joint and the inspection area at the back of the oil pan. The top of the engine stays dry. A valve cover leak at the back of a head can run down the outside of the bellhousing and imitate it, which is why the clean first rule matters. On IH8MUD, a GX470 owner chased a leak that appeared to start high at the back of the engine and end at the bellhousing. Posters split between valve cover and rear main, and one suggested the cheap check first: the dipstick tube O-ring, a small part that can weep in the same neighborhood. Rule the cheap and high leaks out before anyone sells you a transmission out seal job.
An oil pan leak is the easiest to separate. The pan rail, drain plug area, and the underside are wet, and everything above the pan line is dry. Oil that starts at a valve cover will coat the side of the block on its way down. Oil that starts at the pan does not climb.
Inspection: clean it, then watch it
Guessing at a dirty engine wastes money. Do this first, on either V8.
- With the engine cool, spray the sides of both heads, the backs of both covers, and the exhaust shields with engine degreaser. Agitate baked areas with a soft brush. Rinse gently. Keep direct spray off coil connectors and the alternator.
- Dry the engine and drive it for a day or two of normal use.
- Inspect with a telescoping mirror and a bright light. Work top down: cover seam first, then the seam below it on the GX460, then the front timing cover seam, then underneath.
- Pull the ignition coils and look down every plug tube with the light. Any oil pooled around a plug means tube seals go on the parts list, even if the perimeter gasket looks like the main leak.
- Note the highest wet point on each side and take a photo. That photo is your before picture and your proof if the first repair does not cure it.
- If two seams are close and the source is still unclear, use UV dye in the engine oil and a UV light after a few drives. Dye separates a cover leak from a cam tower seep better than eyes alone on the GX460.
Home mechanic notes. No telescoping mirror? A phone camera on a selfie stick, or a phone propped with the flash on, reads the back of the covers well enough. No UV kit? The clean and watch method above still works. It just takes more heat cycles. Brake cleaner flashes residue off a small test area fast, but keep it off rubber seals and painted surfaces. Degreaser is the safer full engine choice.
Check the PCV valve before you order parts. A stuck crankcase ventilation valve raises pressure inside the covers and pushes oil past weak gaskets. On the GX470 the ventilation valve lives in the left cover, and the factory test is a simple blow test. A new valve costs little. Replacing a gasket and leaving a stuck PCV in place can restart the leak.
2003 to 2009 GX470: replacing the cover gaskets and tube seals on the 2UZ-FE
Each cover comes off on its own. The timing belt does not come off for this job. If your belt service is due soon, our timing belt and water pump guide covers that separate job, and it is worth inspecting the cover gaskets while the front of the engine is apart for it. Plan on both covers, both perimeter gaskets, all eight plug tube seals, and new bolt seal washers in one session. Doing one side and leaving hardened seals on the other side usually means a second session within the year.
- Work cold. Disconnect the battery negative cable. Remove the V-bank cover, the air cleaner hose, and the engine room side covers for access.
- Unplug the ignition coils. Remove the coil bolts and lift the coils straight out. Note any tube with oil in it as you go.
- Disconnect the PCV hose on the left cover and move the harness brackets off both covers. Label anything you unplug.
- Remove the 9 bolts and 9 seal washers from one cover. Lift the cover and its gasket off. Repeat on the other side.[2]
- Clean the sealing surface on the head. Remove every trace of old seal packing at the front joints. Wipe the surface oil free.
- Service the plug tube seals while the cover is on the bench. The factory method: bend the four ventilation baffle plate claws up, pry the old tube gasket out with a taped screwdriver tip so the cover is not gouged, then drive the new gasket in until its face sits flush with the top edge of the cover. Put a light coat of multipurpose grease on the new seal lip and fold the claws back down.[3]
- Check the semicircular plugs at the ends of the heads. Owners call them half moons. If one weeps, clean it and reseal it with the same seal packing used at the front joints.
- Apply fresh seal packing at the points shown in the factory illustration, where the cover joint steps at the front of the head by the timing cover joint. Use the specified product or its equivalent.[4] Keep the dabs small. Excess squeeze out helps nothing.
- Seat the new perimeter gasket in the cover groove. Fit new seal washers to the bolts. Set the cover straight down without dragging it across the plug tubes. Owners who nicked a fresh gasket on a tube during install report an immediate re-leak on that side.
- Tighten the 9 bolts uniformly in several light steps, working a crisscross pattern from the middle outward. Final torque is very light. Use an inch pound wrench.[2]
- Refit the coils and torque their bolts. If you removed spark plugs for inspection, torque them to spec on reinstall.[5]
- Reconnect the hoses, harness, and battery. Degrease the exhaust shields if you have not already. Old oil on the manifold will keep smelling for several drives even with the leak fixed.
- After a week of driving, recheck both cover seams and all eight tubes with the mirror. A dry seam and dry tubes close the job.
Torque summary for the GX470 job:
- Cylinder head cover bolts: 53 in·lbf (6.0 N·m), tightened uniformly in several steps[2]
- Ignition coil bolts: 66 in·lbf (7.5 N·m)[5]
- Spark plugs, if removed: 13 ft·lbf (18 N·m)[5]
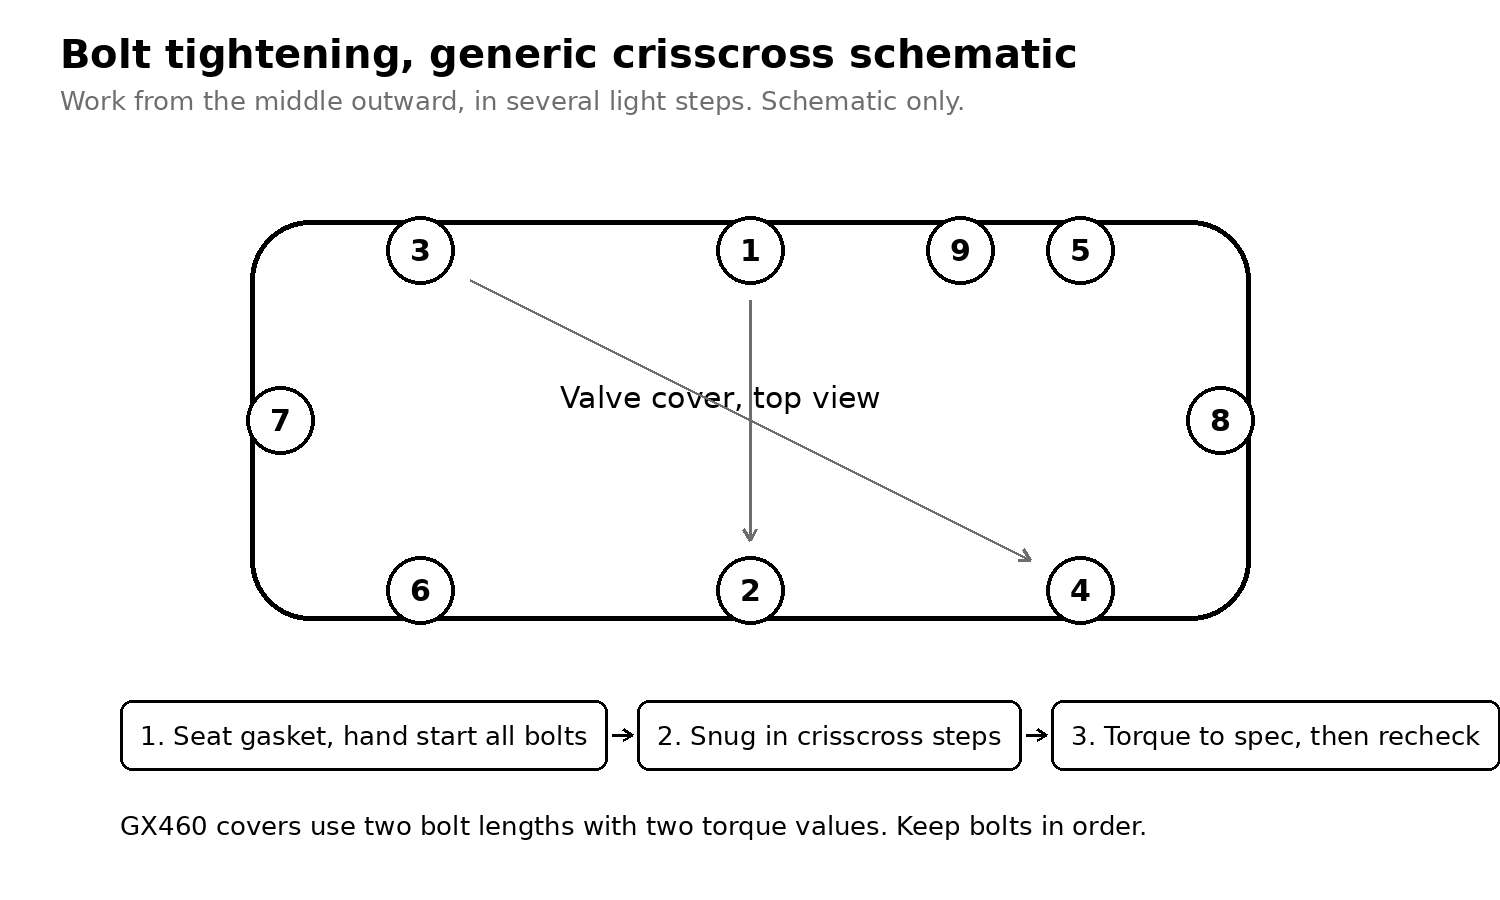
Several owners report that simply bringing loose cover bolts back to spec slowed or stopped a minor seep, because the rubber seal washers relax over time. It is a fair first test on a seep with no other symptoms. It is not a repair for a hardened, cracked gasket, and the spec is in inch pounds. Overtightening crushes the seal washers, can distort the gasket, and turns a cheap job into a broken bolt job. If the gasket is hard enough to crack when flexed, replace it.
2010 to 2023 GX460: replacing the cover gaskets and tube seals on the 1UR-FE
The outline matches the GX470 job with four differences: more bolts in two lengths, small gaskets on the camshaft bearing caps, a different seal packing with a working time limit, and a cure wait before starting the engine. Confirm you do not have a cam tower seep first, using the separation steps above. A cover job will not fix a lower seam leak.
- Work cold. Disconnect the battery negative cable and remove the engine cover and intake ducting for access.
- Unplug and unbolt the ignition coils. Lift them out and check every plug tube for oil, same as the GX470.
- Move the air tubes and harness brackets off both covers. The secondary air tubes mount at the covers, so expect extra brackets and small gaskets on this engine.
- Remove the 14 bolts and seal washers from one cover, keeping the bolts in removal order. Two bolt lengths are used and they do not interchange. Lift the cover and gasket off. Repeat on the other side.[1]
- Remove the 5 small gaskets from the camshaft bearing caps on each side and plan to replace them. They seal around the front of the cover area and get reused by mistake.
- Clean the sealing surfaces oil free and remove old seal packing at the front joints.
- Service the plug tube seals on the bench if any tube held oil. The method matches the GX470: bend the baffle claws up, pry the old gasket out with a taped tool, tap the new gasket in until it seats, grease the lip lightly, and fold the claws back. The GX460 manual uses the removed gasket as the driver for the new one, a detail worth copying.
- Apply the specified seal packing at the points shown in the factory illustration, at the front joints of the cover. Work promptly after applying it. The manual sets a short window to set the cover and finish tightening, and a longer wait before the engine runs again.[6]
- Seat the new cover gasket, fit new seal washers, and set the cover down straight. Temporarily install all 14 bolts, then tighten uniformly in several steps to the two torque values below. Long bolts and short bolts take different torques.[1]
- Refit the coils and torque their bolts.[7] Reconnect the air tubes with new gaskets where you disturbed them, plus the harness and hoses.
- Respect the cure wait before starting the engine.[6] Then heat cycle the truck and recheck both seams, the lower cam tower seams, and all plug tubes with a mirror after a week.
Torque summary for the GX460 job:
- Cylinder head cover bolts, long bolt A: 15 ft·lbf (21 N·m)[1]
- Cylinder head cover bolts, short bolt B: 9 ft·lbf (12 N·m)[1]
- Ignition coil bolts: 7 ft·lbf (10 N·m)[7]
Home mechanic notes for both V8s. No inch pound torque wrench? A quarter inch drive ratchet and a light hand gets you close for a snug test, but borrow or buy the wrench for final torque. These bolts bottom out fast and snap when rushed. No seal driver? The removed tube gasket, or a socket that matches the seal outside diameter, drives the new seal evenly. Never drive on the seal lip. Working space is tight at the firewall end of the driver side cover on both trucks. A wobble extension and patience beat force. Bag and label bolts by side. On the GX460, bolt order is part of the job.
GX550: what is known and what is not
The GX550 runs the V35A-FTS twin turbo V6, a different engine family from both V8s in this guide. The diagnosis carries over in full. A burning oil smell with a dry floor still means find the highest wet point after a degrease, and oil in a plug tube still means a tube seal.
The 2024 GX550 factory repair manual covers the cover job. Each cylinder head cover is held by 15 bolts in two lengths, tightened uniformly in several steps to 7 ft·lbf (10 N·m), with seal packing black at the timing chain cover joints and the plug tube gaskets serviced with the cover off. The engine is not to be started for at least 2 hours after installation.[9] Most GX550s are new enough that a confirmed cover leak is a warranty conversation first and a DIY job second. If your truck is out of warranty, use the GX550 procedure and numbers. GX470 and GX460 numbers do not carry over.
2003 to 2009 4Runner, 2005 to 2015 Tacoma, and 2007 to 2009 FJ Cruiser: the 1GR-FE V6
The 1GR-FE 4.0 V6 in the 4Runner, Tacoma, and FJ Cruiser leaks from the same two paths as the V8s. The perimeter gasket hardens and seeps onto the exhaust side of the head, and oil pools in the spark plug tubes. The diagnosis in this guide applies in full: clean the engine, find the highest wet point, and check every plug tube before ordering parts.
One design difference changes the parts list. On the V6, the plug tube seals are molded into the cover gasket itself, three rings joined to the perimeter rail. There is no separate tube gasket to pry out and drive in. A new cover gasket renews the tube seals with it, and a torn ring means a new gasket, so handle the gasket by its rail and keep the rings round while you seat it.
The job outline matches the V8 jobs with three differences of its own. The intake air surge tank sits over the left cover and comes off for access to that side. Each cover mixes bolts and nuts, and three of the bolts carry seal washers. The seal packing carries the black Three Bond 1207B specification with a working window, the same product the GX460 uses.
- Work cold. Disconnect the battery negative cable. Remove the V-bank cover, the air cleaner assembly, and the intake air surge tank. The surge tank gaskets are single use. Plan on a new set. [10]
- Unplug the ignition coils. Remove the coil bolts and lift the coils out. Check every plug tube for oil as you go.
- Move the harness brackets and hoses off both covers. Disconnect the ventilation hose from the left cover.
- Remove the 10 bolts and 2 nuts from one cover, keeping the 3 seal washers with their center bolts. Lift the cover and gasket off. Repeat on the other side. [10]
- Clean the sealing surfaces on the head and timing chain cover. Remove every trace of old seal packing at the front joints and wipe the surfaces oil free.
- Apply a continuous bead of seal packing, 2 to 3 mm across, at the front joints where the timing chain cover meets the head, as shown in the factory illustration. Set the cover within 3 minutes of applying it and finish tightening within 15 minutes. [10]
- Seat the new gasket in the cover groove and fit the seal washers to the 3 center bolts. Set the cover straight down.
- Tighten the bolts and nuts uniformly in several steps. The perimeter bolts, the center bolts, and the nuts take different torques. [10]
- Refit the coils and torque their bolts. If you removed spark plugs for inspection, torque them to spec on reinstall. [10]
- Refit the surge tank with new gaskets and torque its bolts. Reconnect the hoses, harness, and battery. [10]
- Heat cycle the truck and recheck both cover seams and all six plug tubes with a mirror after a week of driving.
Torque summary for the 1GR-FE job:
- Cylinder head cover perimeter bolts: 7 ft·lbf (10 N·m) [10]
- Cylinder head cover center bolts, with seal washers: 80 in·lbf (9.0 N·m) [10]
- Cylinder head cover nuts: 80 in·lbf (9.0 N·m) [10]
- Ignition coil bolts: 7 ft·lbf (10 N·m) [10]
- Spark plugs, if removed: 15 ft·lbf (20 N·m) [10]
- Intake air surge tank bolts: 15 ft·lbf (21 N·m) [10]
The ventilation valve threads into the left cover and takes thread adhesive and 20 ft·lbf (27 N·m) if you remove it. [10] It does the PCV job described earlier in this guide, and it is worth the same blow test while the cover is off.
The dual VVT-i version of the 1GR-FE, fitted to the 4Runner and FJ Cruiser from 2010, runs a different top end with different covers. This section covers the single VVT-i engine only.
When to just monitor a seep
Monitor when all of these hold:
- The seam shows a dry dust film or light dampness, with no wet oil and no drip.
- There is no burning smell and no smoke.
- The plug tubes are dry.
- The oil level does not drop measurably between changes.
- A cleaned seam stays mostly clean for weeks.
Clean the area, take a dated photo, and recheck at every oil change. A seep that is unchanged across two oil changes is a watch item. This applies to a GX460 cam tower seep too, with one addition: photograph the seam from the same angle each time, because that repair is expensive enough that you want trend data before deciding.
Fix it now when any of these show up: burning smell or visible smoke, oil in a plug tube, a wet seam that reappears within days of cleaning, oil reaching a belt or rubber hose, or a measurable drop in oil level. Oil in a tube deserves priority. It soaks the coil boot, and a cheap gasket job becomes a gasket job plus coils and plugs if it is left to cook.
Parts and tools
| Part | Details | Price |
|---|---|---|
| Valve cover gasket set, genuine Toyota, GX470 | Cover gaskets 11213-50031 and 11214-50011 with 8 plug tube gaskets 11193-50010 | $66.99 |
| Bolt seal washers 90210-07001, GX470 | Genuine Toyota, sold each, 18 required | $9.49 each |
| Valve cover gasket set, Fel-Pro VS 50583 R, GX470 | Amazon | $34.99 |
| Valve cover gasket and plug seal set, genuine Lexus, GX460 | Bell Lexus North Scottsdale | $85.94 plus $6.75 delivery |
| Valve cover gasket set, Fel-Pro VS 50742 R, GX460 | Amazon | $24.18 |
| Camshaft bearing cap gaskets 11159-0S010, GX460 | Genuine Toyota, sold each, 10 required | $4.00 each plus delivery |
| Seal packing 00295-00103, GX470, GX460, and 1GR-FE V6 | Genuine Toyota, the current tube for the 08826-00080 and Three Bond 1207B specifications | $12.95 plus $3.99 delivery |
| PCV valve 12204-50020, GX470 | Daytona Toyota | $15.00 |
| PCV valve grommet 90480-18001, GX470 | Daytona Toyota | $15.00 |
| Spark plugs, GX470, Denso SK20R11 (Toyota 90919-01210) | 8 pack, Amazon | $68.53 |
| Spark plugs, GX460, Denso SK20HR11 (Toyota 90919-01191) | 4 pack, Amazon, two packs per engine | $39.30 per pack |
| Air tube gaskets, GX460 | For any secondary air tube you remove | — |
| Valve cover gaskets, genuine Toyota, 1GR-FE V6 | Cover gaskets 11213-31030 and 11214-31010, Manhattan Beach Toyota | $65.24 plus $12.82 delivery |
| Valve cover gasket set, Fel-Pro VS 50634 R, 1GR-FE V6 | Amazon | $28.78 |
| Spark plugs, genuine Toyota 90919-01235 (Denso K20HR-U11), 1GR-FE V6 | Set of 6, Bell Lexus North Scottsdale | $28.41 plus $5.50 delivery |
| Intake surge tank gasket 17176-0P010, 1GR-FE V6 | Genuine Toyota | $30.71 |
| Intake plenum gasket set, Fel-Pro MS 96641, 1GR-FE V6 | eBay | $9.99 |
| Bolt seal washers 90210-06013, 1GR-FE V6 | Genuine Toyota, sold each, 6 required | — |
Tools:
- TEKTON TRQ50402 torque wrench, 1/4 inch drive, 20 to 200 in·lbf, $85.00. That range covers the cover, coil, and plug torques in this guide, from 53 in·lbf (6.0 N·m) to 15 ft·lbf (21 N·m).
- GEARWRENCH 84000H pick and hook set, 7 piece, $24.99, for prying out old tube seals.
- Ullman HTC-2 telescoping inspection mirror, $17.20.
- wokelux WL03 rechargeable LED work light bar, $27.65.
- Mastercool 53351 UV leak detection kit, $73.24, optional, for separating close seams on the GX460.
- Gunk FEB1 Foamy Engine Brite degreaser, 17 oz, $14.01.
- FOSHIO plastic razor scraper set, $9.89, for old seal packing.
- Scott Shop Towels, 55 per roll, $4.98.
- Socket set with wobble extensions, quarter inch and three eighths drive.
- Flat screwdriver with a taped tip, for tube seals.
- Large socket or the removed seal, used as a seal driver.
- Soft brush for agitating degreaser.
Home mechanic alternatives. A parts store loaner torque wrench covers the inch pound range if you do not own one. A phone camera substitutes for the mirror at the back of the covers. Foaming engine degreaser from any parts store does the clean and watch step as well as shop chemicals. What has no substitute is the torque wrench at final tightening and new seal washers. Reused crushed washers are a common reason a fresh gasket seeps again within months.
FAQ
My GX smells like burning oil but the floor is dry. Is it safe to drive?
Usually, yes, while you diagnose it. A cover leak burns oil on the exhaust instead of dripping it, so the floor stays dry. Check the oil level now and weekly until it is fixed. Get it looked at promptly if the smoke gets heavy, the smell turns acrid and constant, or the oil level drops fast. Oil on a hot manifold is a smell at seep level and a fire risk at pouring level. Most cover leaks are far closer to the first.
Will tightening the valve cover bolts fix the leak?
Sometimes, briefly. The seal washers relax with age, and owners report that bringing bolts back to spec stopped a minor seep. Use an inch pound wrench and the spec in this guide. These are light torque fasteners. If the gasket itself is hard and cracked, snugging will not restore it, and overtightening can snap a bolt or crush a washer and make the leak worse.
I found oil on one spark plug. Do I need a full gasket set?
You need that tube seal at minimum, and the practical answer is the full set. The cover has to come off to change tube seals, and the perimeter gasket and bolt washers are the same age and the same rubber. Kits bundle them for this reason. Replace the oil soaked plug if its boot is soft or swollen, and check the coil boot on that cylinder.
How do I know my GX460 leak is the cam tower and not the valve cover?
Clean both seams, drive several heat cycles, and find the highest fresh wet point with a mirror. Oil starting at the cover gasket line is a cover leak. Oil starting one seam lower, with the cover line dry, points at the cam tower. UV dye helps when the seams are close. The distinction matters because the cam tower reseal is a teardown job and a valve cover gasket will not fix it.
Is the valley plate leak an oil leak?
No. On the GX460 the valley plate seals coolant under the intake manifold. It leaves pink crust, a dropping coolant level, and a sweet smell. It can drip at the back of the engine and imitate an oil leak from below, which is why identifying the fluid comes before ordering any gasket.
Can a valve cover leak cause a misfire?
Yes, through the tube seals. Oil pooled in a plug tube soaks the coil boot and can short the spark to the tube wall. If your truck develops a misfire and a burning smell together, pull the coils and look in the tubes before you buy coils.
Should I replace spark plugs during this job?
If they are due, yes. The coils are already off and access is never better. If a plug came out oil soaked, replace it regardless of mileage and inspect its coil boot.
Does the GX550 have the same valve cover problem?
No leak pattern is established yet in the sources used here. The engine is a newer twin turbo V6 and the trucks are new enough that most are still under warranty. The diagnosis method in this guide applies in full, and the 2024 GX550 factory repair manual gives the cover procedure and torque values for a truck out of warranty.
Sources
- GX470 factory service manual, cylinder head cover specifications and procedures, and spark plug tube gasket service.
- GX460 factory service manual, cylinder head cover and timing chain cover procedures.
- GX550 factory repair manual, cylinder head cover installation.
- 4Runner factory service manual (1GR-FE), cylinder head cover components, installation, and torque specifications.
- IH8MUD: puzzled by the engine oil leak, did anyone experience this?
- IH8MUD: is this a valve cover or cam tower oil leak?
- IH8MUD: valve cover gasket leak
- IH8MUD: replaced valve cover gaskets, still seeing smoke, need some suggestions
- IH8MUD: 02 LX470 valve cover gasket replacement questions
- Tundras.com: is this cam tower leak or valve cover gasket?
- Tundras.com: valve cover gaskets, 4.6L discussion
- ClubLexus: valley leak question
- ClubLexus: timing cover oil leak
- TacomaWorld: valve cover gasket replacement on the 4.0 V6
- TorqueNews: GX460 valley plate leak explainer
- The Truck Garage: 2UZ-FE timing belt and water pump guide
- The Truck Garage: 2UZ-FE starter replacement guide
Footnotes
[1] GX460 factory service manual: the cylinder head cover bolts to the camshaft housing. Each cover uses 14 bolts in two lengths. The long bolt takes 15 ft·lbf (21 N·m) and the short bolt takes 9 ft·lbf (12 N·m), tightened uniformly in several steps with a new seal washer.
[2] GX470 factory service manual: each cylinder head cover uses 9 bolts and 9 seal washers. Cover bolt torque is 53 in·lbf (6.0 N·m), tightened uniformly in several steps.
[3] GX470 and GX460 factory service manuals: the spark plug tube gasket is serviced from the cover by bending the ventilation baffle plate claws, prying the old gasket out with a taped screwdriver tip, and tapping the new gasket in flush, with a light coat of multipurpose grease on the lip. The GX460 procedure uses the removed gasket as the driver.
[4] GX470 factory service manual: seal packing part number 08826-00080 or equivalent, applied to the cylinder head at the points shown in the manual illustration after removing old packing material.
[5] GX470 factory service manual: ignition coil bolt torque is 66 in·lbf (7.5 N·m). Spark plug torque in the installation procedure is 13 ft·lbf (18 N·m).
[6] GX460 factory service manual: seal packing is Toyota Genuine Seal Packing Black, Three Bond 1207B or equivalent. The cover is to be installed within 3 minutes of applying it and the bolts tightened within 15 minutes, and the engine is not to be started for at least 2 hours after installation.
[7] GX460 factory service manual: ignition coil bolt torque is 7 ft·lbf (10 N·m).
[8] 2UZ-FE valve cover part numbers: cover gaskets 11213-50031 and 11214-50011, spark plug tube gaskets 11193-50010 (8 required), bolt seal washers 90210-07001 (18 required), seal packing 08826-00080.
[9] GX550 factory repair manual: each cylinder head cover is installed with 15 bolts in two lengths (23.5 mm and 30 mm), tightened uniformly in several steps to 7 ft·lbf (10 N·m), with seal packing black at the timing chain cover joints, and the engine is not to be started for at least 2 hours after installation.
[10] 4Runner factory service manual (1GR-FE): each cylinder head cover is installed with 10 bolts and 2 nuts, with seal washers on the 3 center bolts. The perimeter bolts torque to 7 ft·lbf (10 N·m), and the center bolts and nuts torque to 80 in·lbf (9.0 N·m), tightened uniformly in several steps. Seal packing is Toyota Genuine Seal Packing Black, Three Bond 1207B or equivalent, applied in a 2 to 3 mm bead at the timing chain cover joints, with the cover installed within 3 minutes and tightening finished within 15 minutes. Ignition coil bolts torque to 7 ft·lbf (10 N·m), spark plugs to 15 ft·lbf (20 N·m), intake air surge tank bolts to 15 ft·lbf (21 N·m), and the ventilation valve to 20 ft·lbf (27 N·m) with thread adhesive on its threads.
Leave a Reply