You converted the rear air suspension to coil springs. The factory compressor behind the left rear wheel is still bolted to the frame. Using it to air up tires is possible. It takes real wiring and plumbing work, and the pump’s limits make the project a hard sell for most owners. This guide walks through how the OEM pump works, what a repurpose takes, and the honest comparison to a portable compressor.
How the factory compressor works in the height-control system
The GX470 rear air suspension is a closed loop. Two rubber air springs (the factory manual calls them pneumatic cylinders) carry the rear. One height sensor per side, mounted at the rear suspension with a small linkage arm, tells the suspension control ECU the actual ride height. The ECU trims pressure through a valve block that holds the leveling, gate, and tank solenoids, plus an exhaust solenoid that vents air outside when the truck lowers.
The compressor sits behind the left rear wheel, bolted to the frame rail under a cover, with a dryer assembly that strips moisture from the discharge air. It is a small piston compressor with a two-terminal connector: pin 1 is power, pin 2 is ground. Apply battery voltage across those pins and it runs. That simplicity is what makes a repurpose conceivable.[1] The factory compressor assembly carries Lexus part number 48910-60020, with 48910-60021 in later interchange listings.
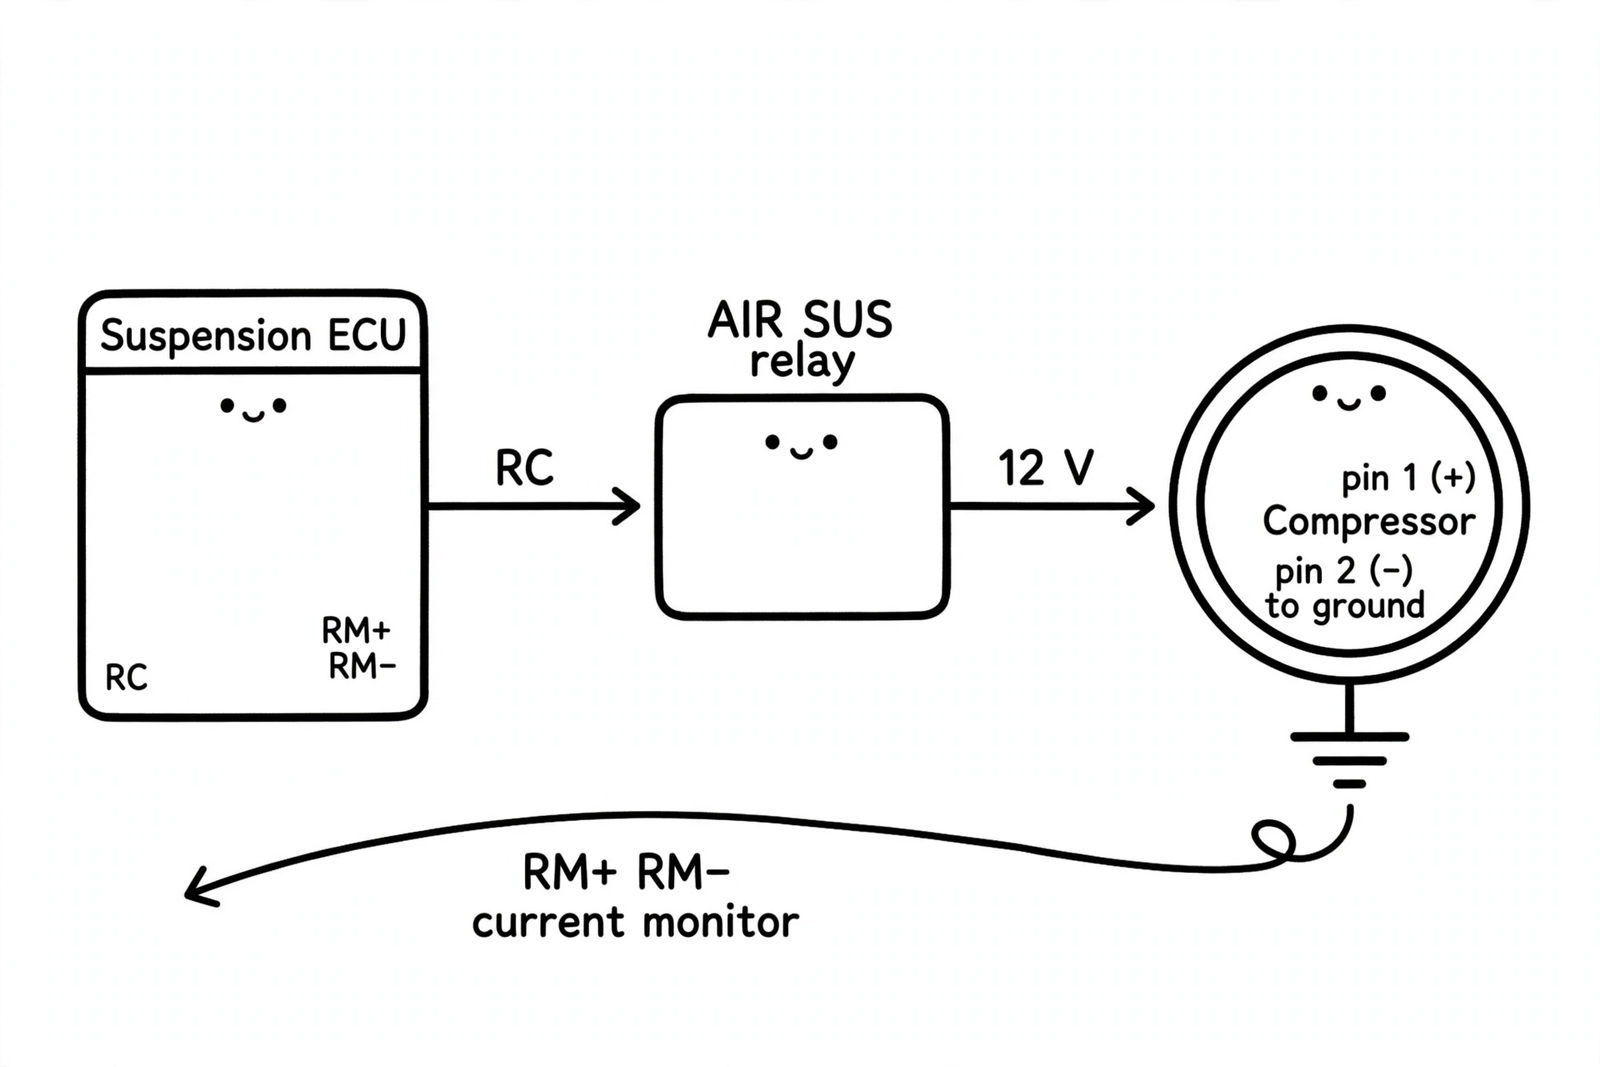
Control lives entirely in the suspension ECU. When you press the height switch to HI, the ECU sends a signal from terminal RC that switches the AIR SUS relay ON. That relay sits in the engine room relay block, and its contacts feed battery power to the compressor motor. At the same time, the ECU watches the motor’s current draw through terminals RM+ and RM-, and it flags a fault (code C1742/42) if the motor locks, opens, or shorts for four seconds or more.[2]
Two more numbers matter for any repurpose. The system vents at 980 kPa (142 psi) through a relief valve, so the pump and dryer are built to survive pressure in that neighborhood.[3] And the manual warns during the compressor bench test: do not run the pump 90 seconds or more at a time, and stop immediately if it does not rotate, because a locked or shorted motor draws enormous current.[4] That 90-second notice comes from the bench test, and it tells you the pump is not built for long continuous runs.
What changes after a coil conversion
After a coil conversion, steel springs carry the rear and the ECU has nothing left to level. The standard conversion step is to unplug the system or pull the fuses, which means the pump never runs again. The compressor’s AIR SUS fuse is 50 A in the engine room relay block. The ECU draws its battery feed through the 10 A AIR SUS No.2 fuse in the same block, and its ignition feed through the 20 A TEMS fuse in the driver side junction block.[11] The height sensors may still be bolted up, and the ECU may store codes, but nothing commands the pump.
If you want the pump to run, you have to bypass the ECU. No ECU input runs it as a tire pump. The repurpose is a manual-switch-and-relay retrofit that treats the compressor as a simple 12 V motor.
One proven middle path exists and deserves its own mention: a few owners have kept the OEM compressor system alive after a coil conversion to run AirLift 1000 helper bags (Air Lift kit 60809, the 4Runner fitment, works in the GX470 rear springs) instead of the factory air springs. One owner on IH8MUD reports the truck levels exactly as before with minimal sensor adjustment, and HI mode still works.[5] If you want the pump to keep earning its place without a full onboard-air project, helper bags are the best-documented reuse. They keep the ECU, the relay, the pressure logic, and the dryer all doing their original jobs.
Wiring the pump to a manual switch
The wiring concept is simple and borrowed from standard onboard-air practice. Never run the compressor’s full current through a dash switch. Put a relay in between: the dash switch handles only the tiny coil current, and the relay’s contacts handle the pump.
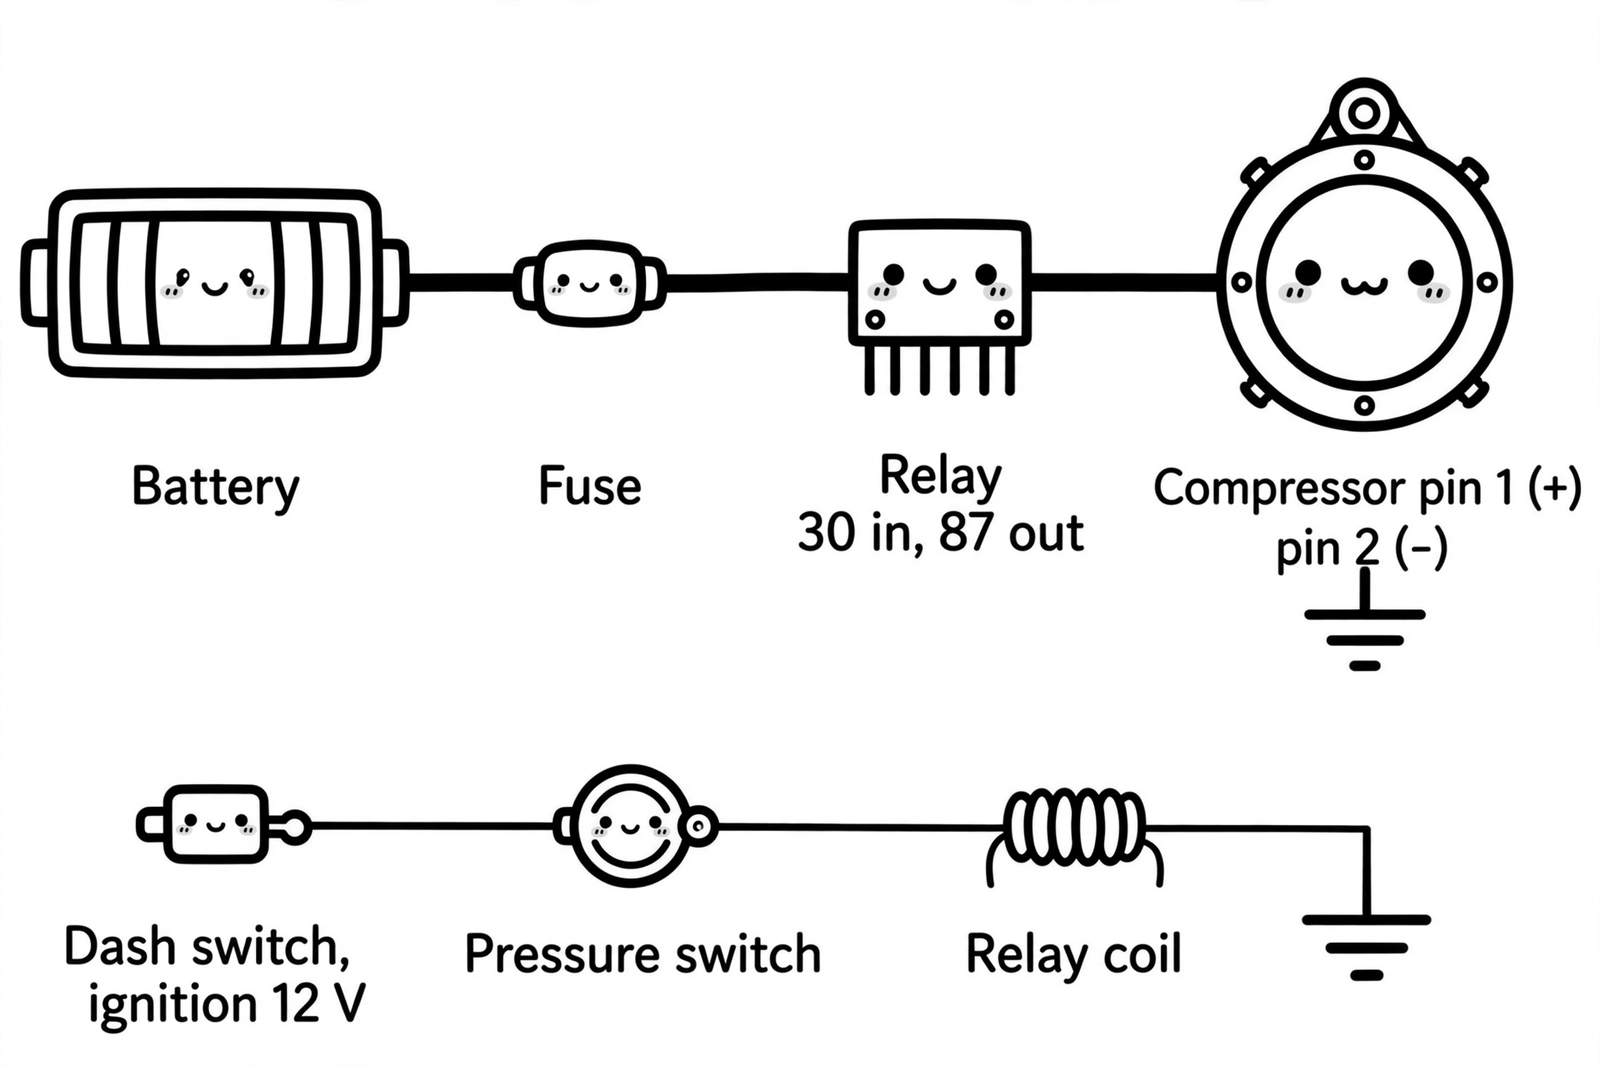
- Feed: fused 12 V from the battery, fused near the battery. The factory compressor circuit is already fused at 50 A by the AIR SUS fuse and runs through its own relay under the hood, and one IH8MUD owner planned to reuse that wiring with a dash switch.[6] If your harness is intact, that factory relay and wiring are the natural starting point. If the wiring was cut during the conversion, run new 12 V and ground leads sized for the compressor’s draw.
- Relay: a 30 A minimum automotive relay (the factory AIR SUS relay works if you kept it). Pin 30 takes the fused 12 V, pin 87 feeds the compressor.
- Compressor: the height-control compressor connector is pin 1 (+) and pin 2 (-). Run pin 1 from relay pin 87, and run pin 2 to a clean chassis ground.
- Dash switch: feed the switch from an ignition-switched 12 V source so the pump cannot run with the key off. The switch feeds the relay coil.
- Pressure cutoff: this is the part the ECU used to do for you. Tee a pressure switch into the air line so it opens the coil circuit at cut-out and closes again as pressure drops. The VIAIR 90113 pressure switch with relay is built for exactly this window: on at 90 psi, off at 120 psi. Without a cutoff switch, you are the pressure switch.
If you unbolt and remount the compressor while doing this work, the factory torque values are 21 ft·lbf (29 N·m) for the bracket-to-frame bolts, 52 in·lbf (5.9 N·m) for the compressor-to-bracket bolts, and 57 in·lbf (6.4 N·m) for the dryer hardware. The compressor cover is held by three clips and carries no torque spec.[7]
Shadetree alternative: skip the pressure switch and watch a gauge while you fill, shutting the dash switch off by hand. The compressor’s relief vents near 142 psi. Treat the relief as a safety valve and control the pressure yourself. Never leave the pump running unattended.
Plumbing: tee an air chuck into the discharge line
The pump’s discharge runs compressor to dryer to valve block. For tire air, tee off downstream of the dryer so the air reaching your tires has passed through it, and cap or remove the old air-spring lines left over from the conversion.
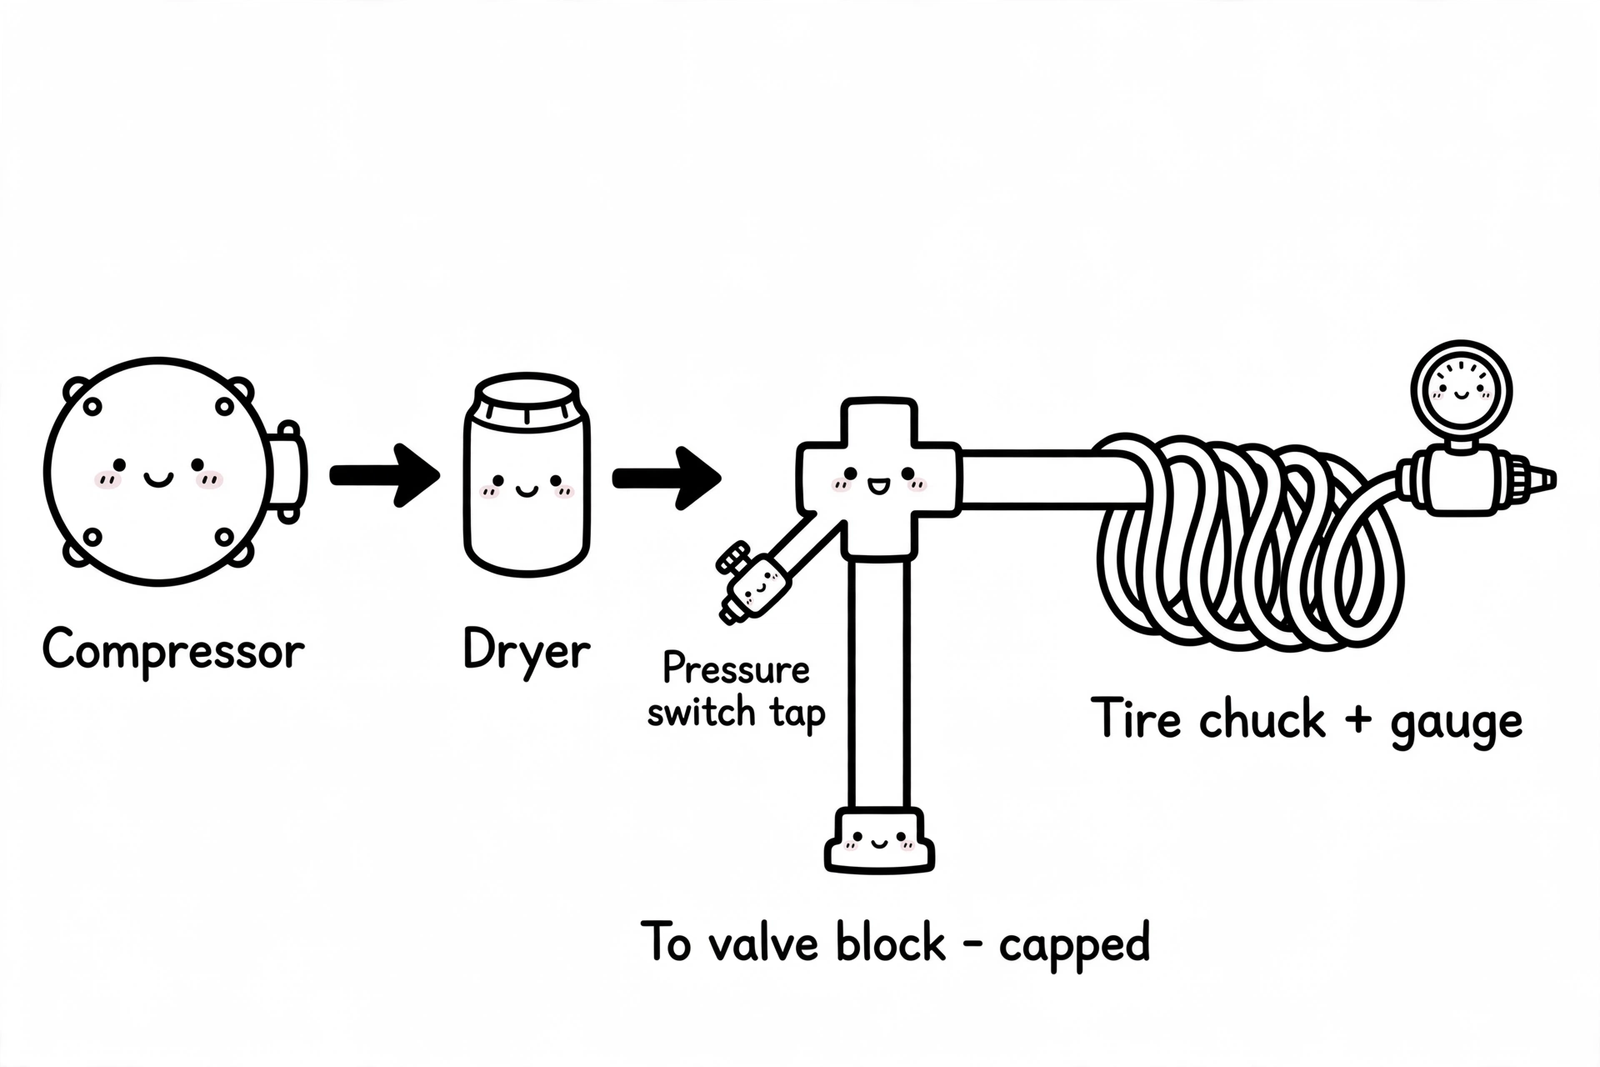
- Tee location: between the dryer and the old valve block feed. The new branch goes to your tire chuck; the old branch (to the removed air springs) gets capped.
- Chuck and gauge: a quick-connect air chuck on a coil hose, plus an in-line pressure gauge, is the minimum usable setup. Store the hose in the cargo area since the pump lives under the truck.
- Pressure switch tap: if you fit the pressure cutoff, tee its sensing port into the same line so it sees real line pressure.
- Vent: the exhaust solenoid vents outside in the stock system. With no ECU commanding it, leave the vent open and routed downward rather than capping it airtight.
- Moisture: the dryer catches compressor discharge moisture, but water still collects in low spots. Crack the lowest fitting now and then and drain it. If the desiccant dryer is saturated from years of service, replace it. The dryer assembly is replaceable separately, though no compressor rebuild kits have surfaced in owner discussions.[10]
The manual does not publish the discharge line size or the fitting thread specs, so measure the line and the dryer ports before ordering the tee and fittings.
Realistic limits: output, duty cycle, no tank
Set expectations before buying parts.
Output. Lexus never published the compressor’s CFM. It is a small piston pump built to trim two rear air springs over a few inches of height. Seating beads and running air tools are beyond it. Expect it to top up tires slowly. One experienced IH8MUD owner puts it bluntly: the compressor is “junk and heavy” and “not powerful enough or reliable enough to use for anything else.”[8] That is a single owner’s verdict, but it matches the pump’s design.
Duty cycle. The only hard number from the manual is the bench-test caution: do not run it 90 seconds or more at a stretch. In stock form, the ECU also suspends height control if the pump runs about 100 seconds without bringing the truck to standard height (code C1751/51).[3] Treat any repurposed pump as short-burst only, with real rest periods between runs. Airing up four large tires in one session without rests is asking for a cooked motor.
No tank. There is no air reservoir in the stock system, so there is nothing to bank pressure in. Every fill starts from zero, which makes the already-slow output feel slower. Adding a tank helps, but at that point you are building a full onboard-air system around the weakest component in it.
Pressure. Tires need roughly 30 to 40 psi. The pump comfortably reaches that range. Speed and heat are the limits. The pump reaches tire pressure without trouble.
Factory pump vs a portable vs a dedicated onboard-air setup
The honest comparison looks like this:
| Factory GX470 pump | Portable 12 V compressor | Dedicated OBA (tank + pressure switch) | |
|---|---|---|---|
| Output | Low, small piston | Low to medium | Medium to high |
| Duty cycle | Very short | Short to medium | Long |
| Air tank | None | None | Yes |
| Pressure cutoff | Was ECU controlled; you add one | Manual on/off | Built-in |
| Cost | Free, already on the truck | $50 to $150 | $$$ |
| Best use | Emergency top-ups | Occasional top-ups | Daily tire duty |
Owners who went the dedicated route report that a mid-range setup like a hard-wired Smittybilt 2781 can move four 32-inch tires from 18 to 32 psi in a little over five minutes, and that a VIAIR portable is a decent cheap entry.[9] The manufacturer numbers back the gap. Smittybilt rates the 2781 at 5.65 CFM, with cycle times up to 40 minutes at 40 psi, and it sells for about $181. The VIAIR 88P is the cheap entry owners mean: 1.47 CFM free flow, 120 psi maximum working pressure, and a duty limit VIAIR writes as 25 minutes at 30 psi, for about $85. The factory pump will not touch either pace. If you air down regularly, buy a real compressor. The repurpose project is for the owner who likes free, does it once, and accepts the limits.
Parts and tools
For the manual-switch repurpose:
- Relay, socket, fuse holder, and dash switch in one box: the Nilight NI-WA 06 wiring harness kit bundles a 40 A relay, a socket harness, a rocker switch, and a blade fuse holder. Run the compressor feed itself in wire sized for the pump’s draw; harness wire bundled for light bars is sized for lights.
- Heavy-gauge wire and ring terminals for the compressor feed, ground, and coil circuit
- VIAIR 90113 pressure switch with relay (90 psi on, 120 psi off)
- Tee fitting sized to the dryer discharge line (measure before ordering)
- Quick-connect coil hose: the Hromee 1/4 in x 25 ft recoil air hose with universal coupler and plug kit, about $19
- Tire inflator with gauge: the JACO FlowPro digital tire inflator with Lightning chuck
- Pipe thread sealant rated for compressed air: Permatex 54540 Pneumatic/Hydraulic Sealant, 36 ml
Shadetree alternatives: reuse the entire factory compressor feed wiring and relay if they survived the conversion (the factory circuit already handles the pump’s current). Use a spare toggle switch instead of a proper dash switch, mounted where it cannot be bumped. If you skip the pressure cutoff switch, an in-line gauge and a watchful eye cover the job.
For the helper-bag alternative instead of onboard air:
- Air Lift 1000 kit 60809, the 4Runner fitment, per the owner reports[5]
- The stock compressor, dryer, lines, and ECU stay exactly as they are
Safety notes
- Fuse the battery feed near the battery. Unfused runs from the battery to the rear of the truck are a fire waiting for a chafed wire.
- Never leave the pump running unattended, especially without a pressure cutoff. The relief vents near 142 psi, but relying on it is abuse.
- Respect the short duty cycle. Ninety seconds on, then rest. A locked motor draws enormous current, per the manual’s warning.[4]
- Ground pin 2 to a clean, bare chassis point. The ECU used to monitor this circuit for faults; your relay circuit has no such watchdog.
- Do not breathe from this air or run air tools rated above the pump’s capability. It is a tire top-up device.
- Vent the exhaust side downward and keep it clear of mud and water.
Verdict
Yes, you can repurpose the factory compressor as onboard air after a coil conversion. Wire it through a relay and fused circuit with a dash switch and a pressure cutoff, tee a chuck into the dryer discharge line, and respect the short duty cycle.
Should you? For most owners, no. The pump is slow, heat-limited, tankless, and at 15 plus years old it may already be tired. A portable 12 V compressor costs $50 to $150, needs no wiring, and will air you up faster. Keep the factory pump only if you love a free project, or better yet, keep it working in its original job by feeding AirLift helper bags instead of the factory air springs.
Related guides: GX rear air suspension: diagnosis, repair, and coil conversion, Lift kits and suspension for the Lexus GX: a practical guide, GX tire size and fitment guide.
FAQ
Can the GX470 factory air compressor fill tires? Yes, with limits. Wire it through a relay and fused circuit on a manual switch, tee a chuck into the dryer discharge line, and it will top up tires. Expect slow fills and short run times, and treat it as an emergency top-up device.
Will the pump run on its own after a coil conversion? The pump runs only when the suspension ECU commands it, and a conversion normally unplugs the system or pulls its fuses, so on its own it never runs. If the sensors and ECU remain connected, behavior varies by setup. To run the pump on demand you need the manual-switch retrofit in this guide.
Can I keep the compressor for AirLift helper bags instead? Yes, and this is the best-documented reuse. Owners report running AirLift 1000 bags (Air Lift kit 60809, the 4Runner fitment) off the intact OEM compressor system after a coil conversion, with the truck leveling itself as before.
What pressure can the factory compressor make? The system relief vents near 980 kPa (142 psi), so the pump is built for pressure in that neighborhood. Tire fills in the 30 to 40 psi range are not a pressure problem. The real limits are output speed and duty cycle.
Is the GX460 setup the same? The concept is the same, but the wiring details in this guide are verified only for the GX470. GX460 connector pins, wire colors, and fuse locations differ. Check the GX460 factory manual before touching its harness.
Sources
- Lexus GX470 factory service manual, height control compressor circuit, compressor inspection procedure, power source, and suspension component sections.
- Air Lift, Air Lift 1000 kit 60809 installation guide MN-639, and retailer fitment data for the 2003-2011 4Runner application.
- VIAIR, 88P portable compressor and 90113 pressure switch product data, viaircorp.com.
- Smittybilt, 2781 air compressor instruction sheet, smittybilt.com.
- IH8MUD, “Ahoy! New GX owner with a few questions” thread (compressor reuse advice, factory circuit reuse idea). https://forum.ih8mud.com/threads/ahoy-new-gx-owner-with-a-few-questions.991025/
- IH8MUD, “GX470 Suspension suggestions and overall height question” thread (AirLift 1000 helper bags on OEM compressor after coil conversion). https://forum.ih8mud.com/threads/gx470-suspension-suggestions-and-overall-height-question.840377/page-2
- IH8MUD, “Air suspension pump location GX470” thread (pump behind driver side rear wheel well, frame rail). https://forum.ih8mud.com/threads/air-suspension-pump-location-gx470.1231842/
- IH8MUD, “Onboard air compressor recommendations” thread (owner benchmarks for portable and dedicated compressors). https://forum.ih8mud.com/threads/onboard-air-compressor-recommendations.1309167/
- IH8MUD, “Mountable air compressor options for GX470?” thread (VIAIR install and wiring discussion). https://forum.ih8mud.com/threads/mountable-air-compressor-options-for-gx470.1233524/
Footnotes
[1] Lexus GX470 factory service manual, diagnostics: compressor inspection procedure. Connector terminal 1 is (+), terminal 2 is (-); the standard check applies battery voltage across the terminals and the motor operates.
[2] Lexus GX470 factory service manual, diagnostics: DTC C1742/42 height control compressor circuit. Terminal RC of the suspension control ECU switches the AIR SUS relay ON; the ECU monitors compressor motor current via terminals RM+ and RM-. A lock, open, or short detected for 4 seconds or more sets the code.
[3] Lexus GX470 factory service manual, diagnostics DTC C1751/51 and system chart notes: the relief pressure of the compressed air is 980 kPa (10 kgf/cm2, 142 psi). The code sets and height control suspends when the truck fails to reach standard height after about 100 seconds of compressor operation with the relay activated.
[4] Lexus GX470 factory service manual, compressor inspection procedure notice: do not operate the height control compressor assembly 90 seconds or more; stop immediately if it does not rotate, since a short or lock inside causes enormous current to flow.
[5] IH8MUD, “GX470 Suspension suggestions and overall height question,” page 2. https://forum.ih8mud.com/threads/gx470-suspension-suggestions-and-overall-height-question.840377/page-2
[6] IH8MUD, “Ahoy! New GX owner with a few questions.” https://forum.ih8mud.com/threads/ahoy-new-gx-owner-with-a-few-questions.991025/
[7] Lexus GX470 factory service manual, suspension torque table and compressor replacement section: compressor bracket to frame 29 N·m (300 kgf·cm, 21 ft·lbf), compressor assembly to bracket 5.9 N·m (60 kgf·cm, 52 in·lbf), height control dryer 6.4 N·m (65 kgf·cm, 57 in·lbf). The compressor cover is retained by 3 clips.
[8] IH8MUD, “Ahoy! New GX owner with a few questions.” https://forum.ih8mud.com/threads/ahoy-new-gx-owner-with-a-few-questions.991025/
[9] IH8MUD, “Onboard air compressor recommendations.” https://forum.ih8mud.com/threads/onboard-air-compressor-recommendations.1309167/
[10] The Truck Garage, rear air suspension guide, cross-checked against owner discussions: no compressor rebuild kits have surfaced, and the dryer assembly is replaceable separately. https://thetruckgarage.com/rear-air-suspension-diagnose-and-coil-conversion-for-the-lexus-gx/
[11] Lexus GX470 factory service manual, power source section and height control diagnostics: AIR SUS fuse 50 A and AIR SUS No.2 fuse 10 A in the engine room relay block; TEMS fuse 20 A in the driver side junction block is the suspension ECU ignition feed.
Leave a Reply