Every GX ever sold in the US runs full-time four-wheel drive. There is no 2WD mode and no way to turn the 4WD off. The hardware that makes this livable on pavement is the center differential, a Torsen limited-slip unit inside the transfer case that lets the front and rear axles turn at different speeds while still sending torque to both. The center diff lock is the button that overrides it.
This guide answers the three questions GX owners ask most, in order: what the lock does and when to use it, what to do when you are stuck in 4LO or the light keeps blinking, and whether a blinking 4WD light means the actuator is dead. It also compares the GX system to the 4Runner, Tacoma, Tundra, Sequoia, and Land Cruiser, and shows how to pull codes with a paperclip when no scanner is handy.
What the center diff lock actually does
In normal driving the Torsen center diff does two jobs at once. It sends drive torque to the front and rear axles, and it absorbs the speed difference between them when you steer. Without that speed absorption, the front and rear tires would fight each other in every turn. That fighting is called driveline bind, and it is why part-time 4WD trucks warn you to stay out of 4HI on dry pavement. A GX does not have that problem in its normal mode, because the center diff is doing the absorbing.
Locking the center differential removes that absorption. The front and rear driveshafts are forced to turn together, so torque goes to both axles no matter what. That is the whole point of the button: maximum traction when one axle has nothing to grip.

Use the lock when your wheels are stuck in a ditch, or when you are driving on a slippery or bumpy surface. Snow, ice, sand, mud, and loose rocky climbs are the classic cases. Unlock it as soon as the wheels are free or you are back on a flat, non-slippery surface. Driving on dry pavement with the center diff locked brings back the bind the diff was built to prevent. You will feel it as tire scrub and heavy steering in tight turns, and over time it stresses the drivetrain.
Low range (L4) is a separate choice from the lock. The lock decides whether the front and rear axles can turn at different speeds. Low range multiplies torque through a lower transfer gear for climbing, descending steep hills, and hard pulling. You can run low range with the center diff free (L4F) or locked (L4L). Use L4F when you want big torque and engine braking but still need the axles to differentiate in turns. Use L4L when the situation is bad enough that you want everything locked together, like getting unstuck from deep mud.
One more thing that surprises new owners: locking the center diff turns the vehicle stability control off automatically. You will see the center diff lock indicator and the VSC OFF light come on together. That is by design. Stability control fights the exact wheel behavior you want when you are trying to claw out of something, so the truck disables it while the diff is locked.
The controls on each generation
The hardware is the same idea across all three generations: a transfer range control (high/low) plus a center diff lock switch. The knobs changed.
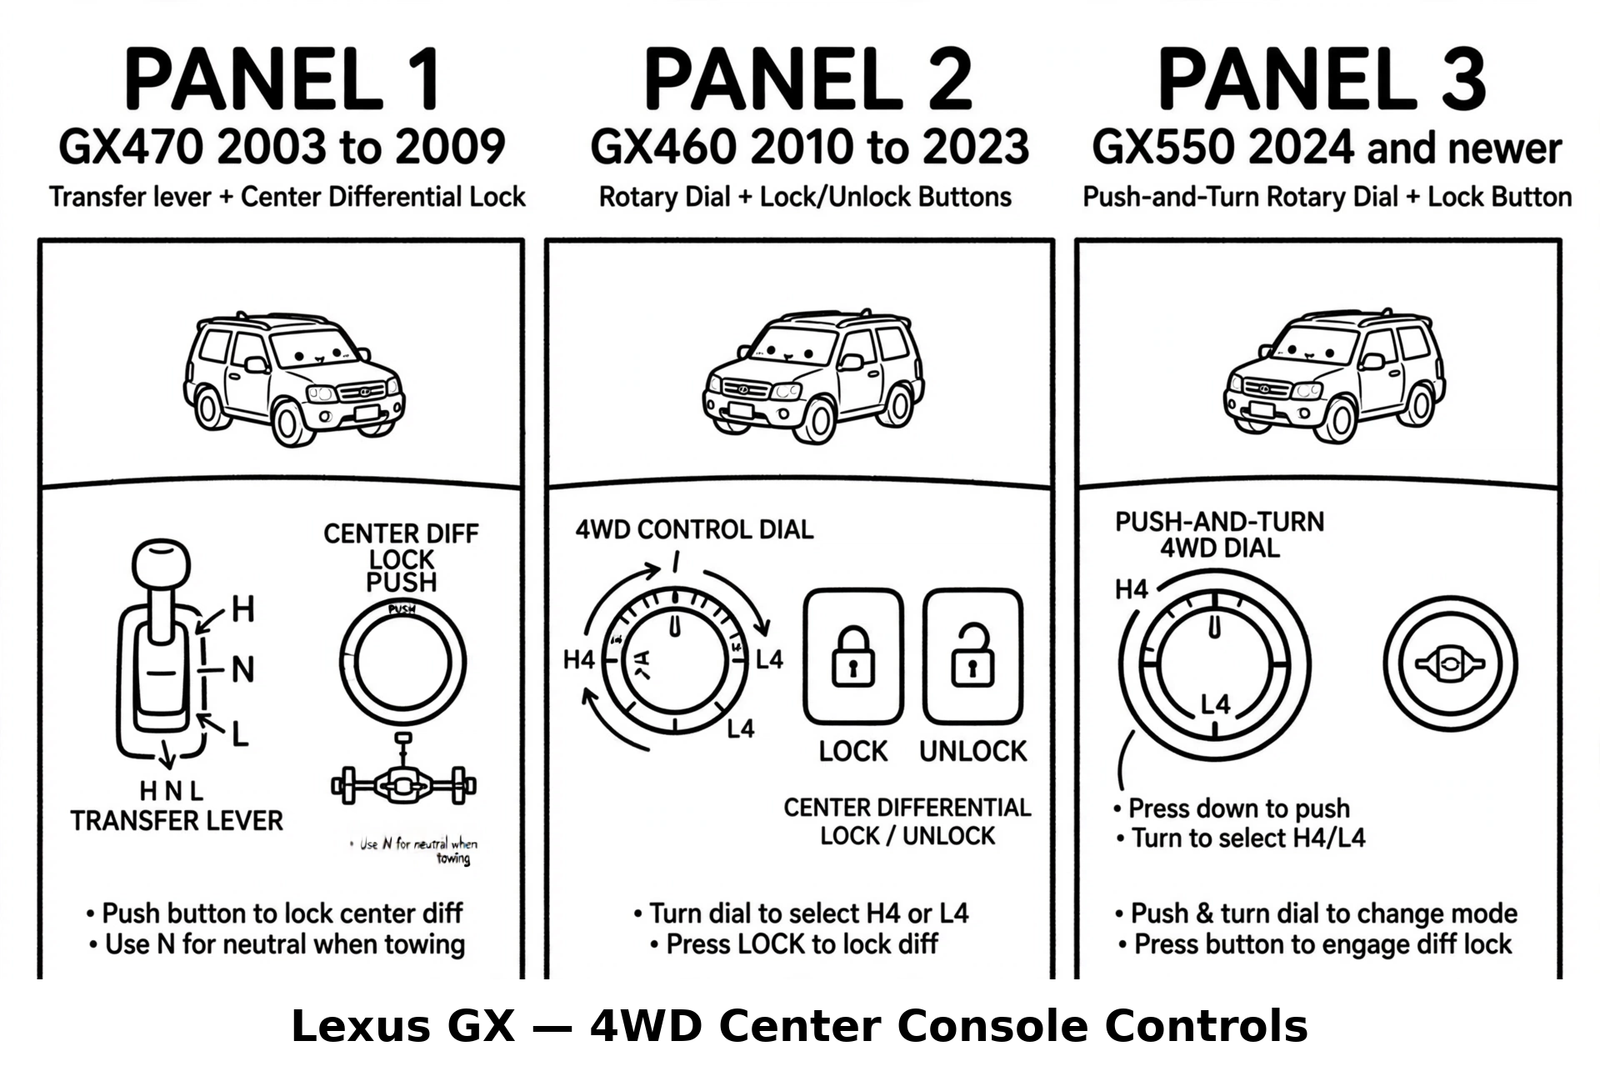
GX470 (2003-2009). A transfer lever on the console with H (high), N (neutral), and L (low) positions, plus a separate center diff lock push button. Push the button to lock or unlock the center diff in either H or L. To move the lever between H and L, stop the vehicle completely, put the transmission in N, then move the lever.[1] The N position delivers no power to the wheels at all, so do not leave the lever sitting between positions.
GX460 (2010-2023). A four-wheel drive control switch (rotary dial) for H4 and L4, plus a center diff lock/unlock switch. The transfer is the full-time 2-speed VF4BM unit. The 4WD control ECU drives two shift motors in the transfer shift actuator assembly to change the gear ratio and the center diff state.[2] The four combinations are H4F (high, diff free) for normal driving, H4L (high, diff locked) for snow, ice, sand, and rough roads, L4F (low, diff free) for big torque with steering freedom, and L4L (low, diff locked) for maximum traction when stuck. High range is 1.000 and low range is 2.566.[3]
GX550 (2024 and newer). Every trim, from Premium to Overtrail, ships with full-time 4WD and a Torsen limited-slip center differential with a locking feature. There is no part-time 4WD GX550. The Overtrail and Overtrail+ add an electronically controlled locking rear differential on top.[4] The H4/L4 control is a push-and-turn dial. To go from H4 to L4: stop the vehicle completely, shift to N, then push and turn the dial counterclockwise and hold until the low speed 4WD indicator turns on. To go back: stop, shift to N, push and turn clockwise until the indicator turns off.[5] The center diff lock switch works with the engine on and vehicle speed under 62 mph (100 km/h).[5]
How the GX stacks up against the other Toyota and Lexus 4WD trucks
Every Toyota and Lexus body-on-frame truck with independent front suspension falls into one of two camps. The GX lives in the full-time camp: all four wheels driven all the time, no 2WD mode, no way to switch it off.
Full-time, no 2WD mode. The GX470, GX460, and GX550 share this camp with the Land Cruiser family. The LX470 and 100-series Land Cruiser run full-time 4WD with a lockable center differential, the older open-diff recipe before Torsen took over. The LX570 and 200-series, the LX600 and 300-series, and the new Land Cruiser 250 all run full-time with a Torsen limited-slip locking center diff, the same idea as the GX. The oddball is the FJ Cruiser: the manual-transmission FJ is full-time Torsen with no 2WD mode, while the automatic FJ is a part-time 2WD/4H/4L truck. Same truck, two personalities, depending on the gearbox.
Part-time or multi-mode, with a 2WD mode. The Tacoma and Tundra are part-time only: 2H, 4H, 4L, no center differential at all. In 4H and 4L the front and rear driveshafts are locked together 50/50, which is exactly why the manual warns against dry pavement. No center diff means nothing absorbs the speed difference in turns.
The 4Runner is the interesting one. The 4th-gen V6 4WD runs a multi-mode transfer case: a real 2WD mode for daily driving, plus a Torsen center differential with a lock for full-time 4WD, the same basic hardware as the GX. The 4th-gen V8 went full-time with no 2WD, just like the GX. On the 5th gen, the SR5 and TRD trucks are part-time 2H/4H/4L with no center diff, while the Limited keeps the full-time Torsen setup with no 2WD mode. The Sequoia followed a similar script: the 2nd gen runs a multi-mode case with 2HI, 4HI with the Torsen free, 4HI locked, and 4LO locked.
The short version for the GX owner who wishes for a 2WD button: a multi-mode 4Runner is the Toyota that gives you both worlds, the same Torsen hardware plus 2WD for the commute. Everything else with a Torsen is full-time like the GX, and everything part-time asks you to do the thinking about when 4WD is appropriate.
When to lock it, and when to leave it alone
Lock the center differential when you are stuck or when the surface under you is slippery or bumpy enough that one axle might lose grip. That covers snow, ice, sand, mud, and rocky trails. Low range joins the party when you need maximum pulling power or engine braking: steep climbs, steep descents, and hard pulling in sand or mud.
Leave the center diff unlocked for normal driving on all types of roads, and specifically for dry pavement. Unlock it the moment you are back on a flat, grippy surface. Two more rules straight from the owner’s manuals: do not push the lock switch while the vehicle is turning or while the wheels are spinning freely off the ground, and never operate the range switch after the wheels have already lost traction.[5]
Tires matter more than most owners expect on a full-time 4WD truck. The center diff spends its life absorbing small speed differences, and four matched tires of the same size, brand, and tread depth keep that job easy. A badly mismatched set makes the diff work overtime every mile. If you are shopping for rubber, the all-terrain tire guide for the GX is a good starting point: https://thetruckgarage.com/best-all-terrain-tires-daily-driven-gx/
Stuck in 4LO or the light keeps blinking: the fix sequence
A blinking 4LO or center diff light means one thing: the truck started a shift and never finished it. The position switches never confirmed the new state. Work this sequence in order. Do not skip to parts replacement.

Step 1. Stop and do the shift properly. Pull onto level ground. Foot on the brake. Transmission in N. Then select H4 (GX470: move the transfer lever to H; GX460 and GX550: turn the dial to H4). Wait. A healthy shift takes a few seconds and ends with a solid light, not a blinking one.
Step 2. Unload the drivetrain. If the light keeps blinking, the gears are probably loaded up and cannot slide. Drive straight ahead slowly, gently accelerate and decelerate, or reverse a few feet, then try the shift again. For a center diff lock that will not unlock, the manuals give the same advice: drive straight ahead while accelerating or decelerating, or drive in reverse.[1][5] Owners also report that slow figure-8s on a loose surface can free a stubborn one. Keep it slow and keep it off dry pavement.
Step 3. Check the easy electrical suspects. A weak battery causes phantom 4WD codes and failed shifts on these trucks. If the battery is old or the truck cranks slowly, charge or replace it before condemning anything. Check the fuse labeled 4WD. A blown fuse kills the whole actuator circuit.
Step 4. Read the whole dashboard. If the check engine light is on together with TRAC OFF and a blinking 4LO, the 4WD system is very often an innocent bystander. On Toyota and Lexus trucks, many engine faults automatically inhibit 4WD shifts and light up the 4WD indicators. Scan for codes and fix the engine fault first. Owners have watched the 4LO and TRAC OFF lights clear on their own once the underlying code (often emissions related) was resolved.
Step 5. Exercise the system. Actuators that sit unused for years seize. That is the single most common root cause behind a first-time failure on a truck that has never left pavement. On a loose surface like dirt or gravel, shift into 4LO, lock the center diff, drive a bit, then shift everything back out. Repeat until engagement is quick. Owners who do this every month or two rarely see the blinking light return.
Step 6. Tap and clean. With a helper operating the switch, listen at the transfer case for the actuator motor. If it sounds weak or silent, a light tap on the actuator housing with a rubber mallet while the switch is operated can break a stuck motor free. Unplug the actuator connector, inspect for corrosion, clean the pins, and apply dielectric grease before reconnecting. Owners report this fixing trucks that sat through salty winters.
Step 7. Know when you are done. If the low speed 4WD indicator still blinks after the proper procedure, the manuals say the same thing: there may be a malfunction in the engine, brake, or 4WD system, and the truck needs inspection.[5] One safety note for the GX550: a transfer caught between modes can disengage both driveshafts, letting the vehicle roll even with the transmission in P. You will hear a buzzer. Complete the shift before you park on any grade.[5]
Read the codes without a scanner
A blinking 4LO light with no scanner in the glovebox is not the end of the road. Toyota built a back door into the diagnostic connector for exactly this situation, and it works with a paperclip.
Under the dash, the 16-pin OBD-II connector is called the DLC3. Two of its terminals matter here: TC on pin 13 and CG on pin 4. With the ignition ON and the engine OFF, short those two terminals together. The factory tool for this is Toyota SST 09843-18040, which is a fancy name for a jumper wire. A straightened paperclip does the same job. Do not poke anything else in there.[7]

The warning lights on the dash then blink out any stored codes as two-digit numbers. Count the flashes: the first group is the tens digit, then a pause of about a second and a half, then the ones digit. After two and a half seconds the next code starts, and codes repeat in order from lowest to highest. If the light just blinks steadily, about twice a second with no pauses, there are no codes stored.[7]
On the GX470 this jumper is documented in the factory repair manual for the ABS and VSC systems, so the codes blink out on the ABS and VSC TRAC lights. The same jumper also pulls engine codes on the check engine light, SRS codes on the airbag light, cruise control codes on the cruise light, and transmission codes on the O/D OFF light. Those transmission codes are worth a look on a 4WD complaint, since the transmission and transfer ECUs talk to each other.[7]
One honest caveat: the manuals on file do not document the 4WD ECU’s own codes blinking out on the 4LO indicator. Try the jumper and watch the 4LO light, but if it gives you nothing, the 4WD codes may need a Toyota-capable scanner. The jumper is still worth doing, because a chassis code from the ABS or VSC side can explain a 4WD system that refuses to shift.
To clear codes after the repair, leave the jumper in, ignition ON, and press the brake pedal eight or more times within three to five seconds. The light should switch to the steady no-codes blink. Write the codes down before you clear them. Clearing first and asking questions later is how a real fault becomes a mystery fault.[8]
The 4WD light blinks and will not engage. Is it the actuator?
Maybe, but the actuator is only one suspect on a list. A blinking light means an incomplete shift, and an incomplete shift has several possible causes. Run them in this order before buying parts.
First, rule out procedure. The truck must be stopped with the transmission in N for a range change. Doing it in D or while rolling is the most common reason a shift never completes.
Second, rule out the inhibit case. A check engine light with TRAC OFF and a blinking 4LO usually points at an engine or ABS fault, not the actuator. Scan the codes. Generic OBD2 readers catch engine codes; chassis and 4WD codes need a scanner that reads manufacturer codes. No scanner handy? The paperclip method in the section above reads the chassis codes too.
Third, rule out power and signal. Weak battery, blown 4WD fuse, corroded actuator connector, damaged wiring. These are cheap and common, especially on trucks from the rust belt or near the ocean.
Fourth, test the actuator itself. Have a helper work the switch while you listen at the transfer case. A healthy actuator makes a clear motor whir for a second or two. Silence with good power points at the motor or the 4WD ECU. A whir with no completion points at a seized mechanism, bad timing, or a failed position switch.
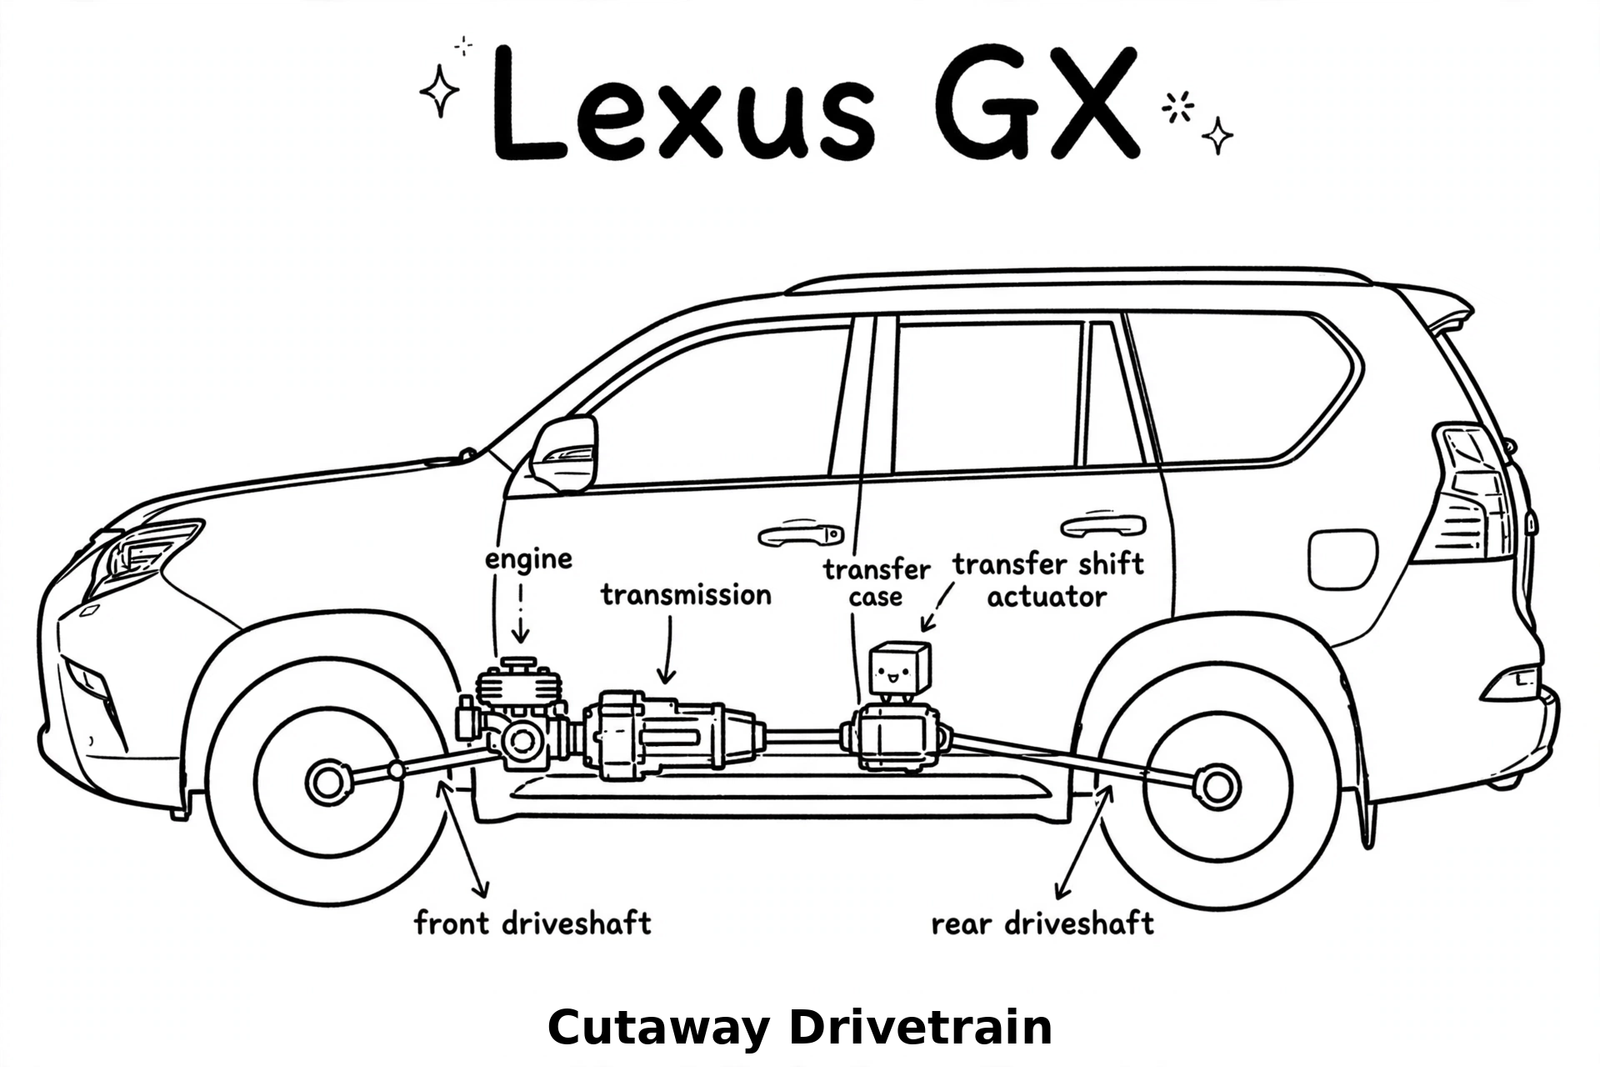
Fifth, decide between rebuild and replace. The GX470 center diff actuator is a known rebuild candidate. Owners pull it, clean out the old grease, reseal it, re-grease, and reinstall it with careful attention to the gear timing marks, and the blinking light goes away. That is the shadetree path and it costs a seal kit and an afternoon. Replacement with a new actuator is the shop path. If you go in, the bolt torques from the factory manual are 18 ft lb (24 N.m) for the lock fork to the actuator and 15 ft lb (20 N.m) for the actuator to the transfer case.[6] Mark every gear position before disassembly. Getting the timing wrong by even a little leaves the light blinking with a brand-new part.
Parts and tools
You do not need much to diagnose a blinking 4WD light. You need more if you open the actuator.
| Item | Notes |
|---|---|
| OBDLink MX+ OBD2 scan tool | Reads manufacturer codes, not just engine codes. Engine codes inhibit 4WD shifts, and a basic reader misses the chassis codes behind a blinking 4LO light. |
| NOCO Boost GB40 jump pack | Weak batteries cause failed shifts and phantom codes. |
| Goldblatt 16 oz rubber mallet | For the actuator tap test. Soft face, no damage to the housing. |
| Permatex dielectric grease | For the actuator connector after cleaning corrosion. |
| Transfer gear oil, GX470 | API GL-5, SAE 75W-90, 1.4 L (1.5 US qt).[6] Any quality GL-5 75W-90 works; Red Line 75W90 GL-5 is a proven pick. Buy two quarts, the case takes 1.4 L. |
| Transfer gear oil, GX460 | Toyota Genuine Transfer Gear Oil LF or equivalent, SAE 75W, 1.4 L (1.5 US qt).[2] Sold in 1 L cans, so buy two. |
| Transfer gear oil, GX550 | See the owner’s manual for your model year. |
| EPAuto 1/2 in click torque wrench, 10-150 ft lb | For actuator bolts and the filler plug. |
| Center diff / transfer shift actuator | Verify by VIN. Rebuild (clean, reseal, re-grease) is the shadetree alternative on the GX470; the GX470 actuator seal kit is built around the OEM O-ring 90301-56009 and runs about $9. |
The transfer filler plug torque on the GX470 is 27 ft lb (37 N.m) with a new gasket.[6]
FAQ
What does the center diff lock actually do? It forces the front and rear driveshafts to turn together so torque goes to both axles no matter what. In normal driving the Torsen center diff lets the axles turn at different speeds in turns while biasing torque. The lock trades that flexibility for maximum traction.
When should I use the center diff lock? When you are stuck, or on slippery or bumpy surfaces: snow, ice, sand, mud, loose rocky trails. Unlock it as soon as you are free or back on flat, grippy pavement. Never lock it for dry-pavement driving.
Can I drive on the highway with the center diff locked? Only if the surface justifies it, like a snow-covered highway. On dry pavement the locked diff causes tire scrub and driveline bind in turns and stresses the drivetrain.
I am stuck in 4LO and the light keeps blinking. What do I do? Stop on level ground, transmission in N, select H4, and wait for a solid light. If it keeps blinking, drive straight slowly with gentle acceleration and deceleration, or reverse a few feet, then try again. Check the battery and the 4WD fuse. If the check engine light is also on, scan and fix that fault first, because it can inhibit the shift.
Does a blinking 4WD light mean the actuator is bad? Not necessarily. A blinking light means the shift never completed. Wrong procedure, a weak battery, a blown fuse, a corroded connector, a check-engine inhibit, or a seized-from-disuse actuator are all more common than a dead motor. Listen for the actuator motor while a helper works the switch, and work the cheap causes first.
How do I keep this from happening again? Exercise the system. Every month or two, on a loose surface, shift into 4LO, lock the center diff, drive a bit, and shift back out. Actuators that move stay working. Actuators that sit for years seize.
Does the GX550 have part-time 4WD on some trims? No. Every GX550 trim runs full-time 4WD with a Torsen limited-slip locking center differential. The Overtrail trims add an electronic locking rear differential.[4]
Why did my VSC OFF light come on with the diff lock? Locking the center differential turns vehicle stability control off automatically. The two lights coming on together is normal.[1][5]
Why does a 4Runner have a 2WD mode but my GX does not? The GX is full-time 4WD by design, with a Torsen center differential that makes full-time livable on pavement. No GX ever sold has a 2WD mode. A 4th-gen V6 4WD with the multi-mode transfer case is the closest Toyota equivalent: the same Torsen hardware plus a 2WD mode for daily driving.
Can I read 4WD codes without an OBD2 scanner? Yes, with a paperclip. Short terminals TC (pin 13) and CG (pin 4) on the under-dash OBD-II connector, ignition ON, engine OFF, and count the dash light flashes as two-digit codes. The ABS and VSC codes are documented to work this way on the GX470. The 4WD ECU’s own codes are not documented to blink out on the 4LO light, so a stubborn 4LO blink may still need a Toyota-capable scanner.[7]
Sources
- 2005 Lexus GX470 factory repair manual (PDF on file): transfer oil specification, filler plug torque, transfer shift actuator bolt torques, full-time 4WD service notes.
- 2006 GX470 owner’s manual, lexusgxor.com: https://lexusgxor.com/_media/general:2006_gx470_owner_s_manual.pdf
- 2003 GX470 owner’s manual, lexusgxor.com: https://lexusgxor.com/_media/general:2003_gx_470_owners_manual_1_of_2.pdf
- Factory Four Wheel Drive Control System overview for the GX460 VF4BM transfer, ClubLexus: https://www.clublexus.com/forums/attachments/gx-2nd-gen-2010-2023-219/torsen-diff-vf4bm-technical-overview-diagnostics-troubleshooting-919479/vf4bm-specificationsfeatures-478084d1558966223dl?s=07fdbd77e0434e2ed2ff596da9d38c46
- 2011 GX460 product information, lexusgxor.com: https://lexusgxor.com/_media/general:2011_gx_460_product_info.pdf
- 2024 Lexus GX owner’s manual, manuals.plus: https://manuals.plus/lexus/2024-sophisticated-utility-vehicle-manual
- CarBuzz 2024 Lexus GX550 first drive review: https://carbuzz.com/reviews/2024-lexus-gx-first-drive-review-truly-worth-the-long-wait/
- IH8MUD forum thread “Stuck in L4”: https://forum.ih8mud.com/threads/stuck-in-l4.1334155/
- IH8MUD forum thread “Center diff lock not working – GX470”: https://forum.ih8mud.com/threads/center-diff-lock-not-working-gx470.1331410/
- IH8MUD forum thread “Gx 470 CDL stuck locked”: https://forum.ih8mud.com/threads/gx-470-cdl-stuck-locked.1245342/
- IH8MUD forum thread “Flashing check engine and traction and 4LO lights fix?”: https://forum.ih8mud.com/threads/flashing-check-engine-and-traction-and-4lo-lights-fix.1357101/
- 2007 GX470 factory spec sheet (full-time 4WD, locking limited-slip center differential), via yumpu.com document archive
- 2004 Toyota 4Runner factory spec sheet (multi-mode 4WD with 2WD mode, Torsen center differential), via toyota-4runner.org forum attachment
- 2008 Land Cruiser 200 brochure (full-time 4WD, Torsen center differential), via scribd.com document archive
- Factory DLC3 wiring diagrams (TC pin 13, CG pin 4): https://toyotamanuals.gitlab.io/
- Owner-community 4WD system references: tundras.com, 4runners.com, toyota-4runner.org, tacomaworld.com, forum.ih8mud.com
Footnotes
[1] GX470 owner’s manual (2006): transfer lever H/N/L positions, center diff lock switch operation, shift procedure (stop, transmission in N, move lever), and unlock recovery (drive straight accelerating or decelerating, or reverse). 2003 owner’s manual confirms the same layout.
[2] Factory Four Wheel Drive Control System overview for the GX460 VF4BM transfer: full-time 2-speed transfer, 4WD ECU controlling two shift motors, transfer oil 1.4 L Toyota Genuine Transfer Gear Oil LF SAE 75W.
[3] 2011 GX460 product information: transfer gear ratio high 1.000 / low 2.566, Torsen limited-slip center differential with electronic locking feature. The factory 4WD control system document lists the same ratios.
[4] CarBuzz 2024 GX550 first drive review and the 2024 GX owner’s manual: standard full-time 4WD with Torsen limited-slip locking center differential on all trims, electronic locking rear differential on Overtrail grades.
[5] 2024 GX550 owner’s manual: H4/L4 push-and-turn shift procedure (stop, N, turn dial), center diff lock switch operation (engine ON, under 62 mph / 100 km/h), blinking-indicator recovery steps, VSC auto-off when locked in L4, and the between-modes roll warning.
[6] 2005 GX470 factory repair manual: transfer oil GL-5 SAE 75W-90, capacity 1.4 L (1.5 US qt), filler plug torque 37 N.m; transfer shift actuator bolt torques 24 N.m (fork to actuator) and 20 N.m (actuator to rear case).
[7] 2005 GX470 factory repair manual, ABS/VSC DTC check: connect terminals TC and CG of the DLC3, read codes from the ABS and VSC TRAC warning lights (blink chart shows codes 11 and 21). 2006 Tacoma factory manual confirms the TC/CG DLC3 circuit. Factory DLC3 wiring diagrams place TC on pin 13 and CG on pin 4. The same jumper reads engine, SRS, cruise, and transmission codes on their own dash lights. Best documented on roughly 1996-2009 models.
[8] Code clearing with the jumper in place: press the brake pedal 8 or more times within 3 to 5 seconds with the ignition ON. Documented in the Toyota DTC guide and the 2001 4Runner factory manual.
Leave a Reply