Quick answer
A blinking 4WD or 4LO light means one thing: the shift you asked for has not finished. The light blinks while the system is working. It keeps blinking when the system gives up. Most of the time the actuator is not dead. The shift was attempted under load, the truck sat for months without the system being exercised, the battery is weak, or a connector under the truck is corroded.
Work in this order and stop at the step that fixes it:
- Repeat the shift with the correct procedure. Stopped fully, brake held, transmission in N.
- Unload the driveline. Roll slowly, turn gently, back up, warm the truck up.
- Listen for the actuator motor while a helper works the switch.
- Check battery voltage, fuses, and the actuator connector.
- Scan every module for codes before you buy any part.
- Only then condemn the actuator, and decide rebuild versus replace.
This guide is diagnosis only. If you need to know what the center diff lock does and when to use it, read our center diff lock and 4WD guide first, then come back here when yours will not engage, will not release, or will not stop blinking.
Know which system your truck has before you diagnose it
The complaint sounds the same on all three generations. The hardware behind it is not the same, and the first suspect changes with the truck.
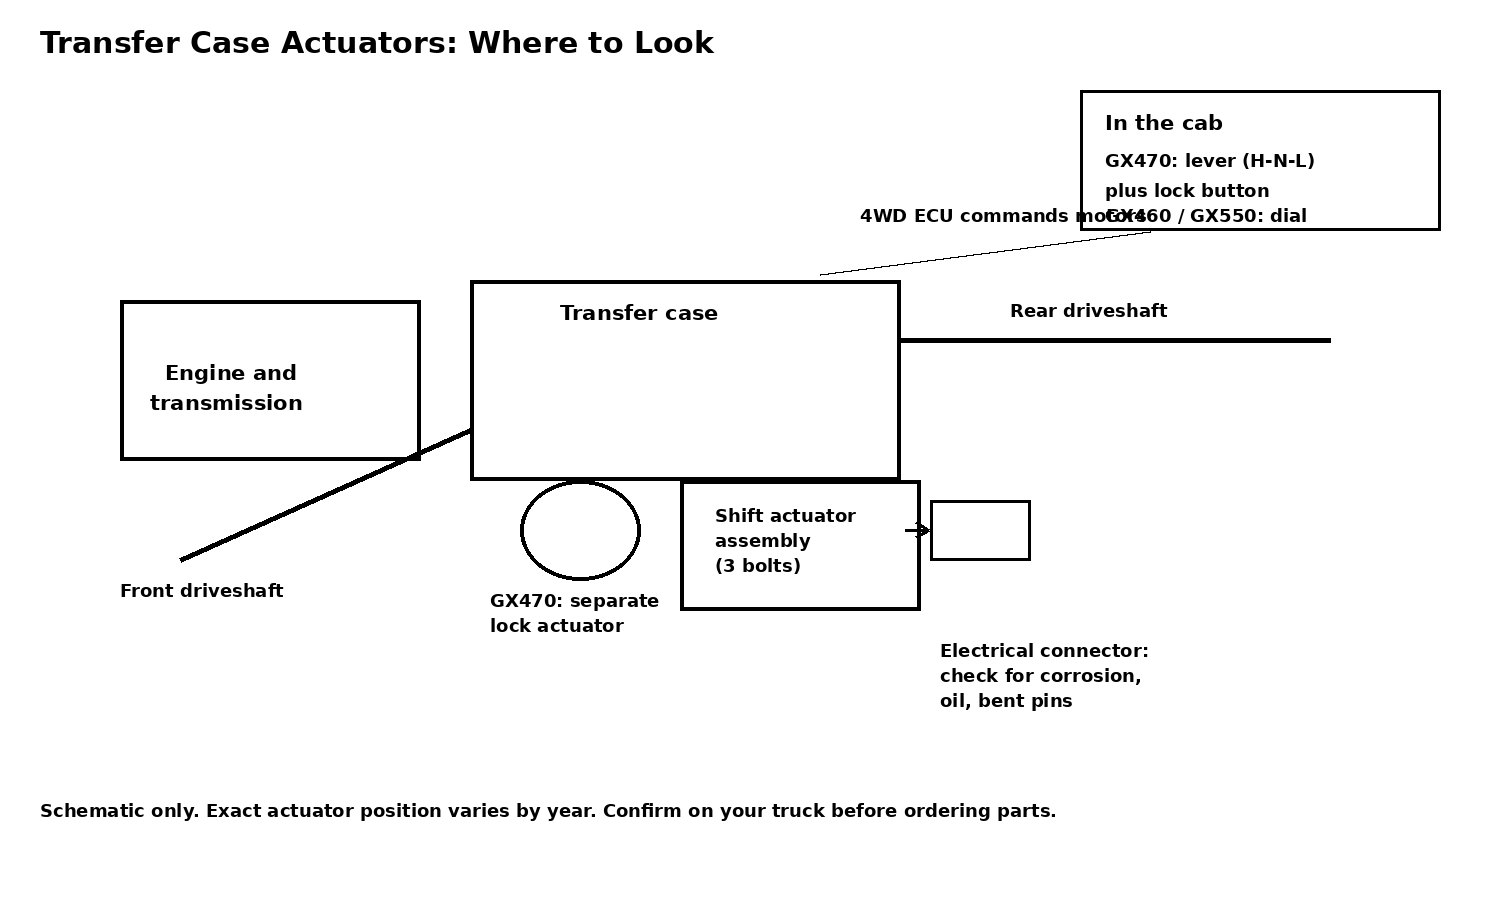
GX470, 2003 to 2009: a lever on the console selects H, N, and L on the transfer case. Your hand moves the high-low shift through a linkage. The center diff lock is the electric part, driven by its own actuator when you press the lock switch. So on a GX470, stuck in 4LO points first at bind, linkage feel, and whether the lever is fully seated in its gate. A center diff lock light that blinks forever points at the lock actuator.
GX460, 2010 to 2023: there is no lever. A switch sends a request to the four wheel drive control ECU, and one transfer shift actuator assembly on the back of the transfer case does both jobs with two motors inside it. One motor shifts high-low. The other, called the multi mode actuator in the factory manual, locks and unlocks the center diff. A GX460 that will not finish either shift has one assembly and one connector to test for both complaints.
GX550, 2024 and newer: a push and turn switch, electronic control, same idea as the GX460 with newer parts. The owners manual recovery steps in this guide apply. Actuator parts and torques do not, because no GX550 service manual is on file here. A GX550 under warranty with a persistent blink is a dealer visit, not a parts order.
Transfer Case Actuators: Where to Look
Read the blink before you touch a wrench
The pattern tells you where to start.
Blinks for a few seconds, then goes solid or out: normal. That was a shift in progress. If it took longer than you remember, exercise the system and watch it over the next few shifts.
Blinks only while you are doing something wrong: the truck is moving, the transmission is in D or P instead of N, or you moved the lever or switch back before the shift finished. If the indicator keeps blinking, stop the vehicle completely, put the shift lever securely in N, and operate the switch again. Moving the transmission lever before the indicator finishes can leave the transfer half shifted, with the front and rear driveshafts disengaged from the powertrain. That half shift state feels like a broken truck and is usually just an interrupted shift.
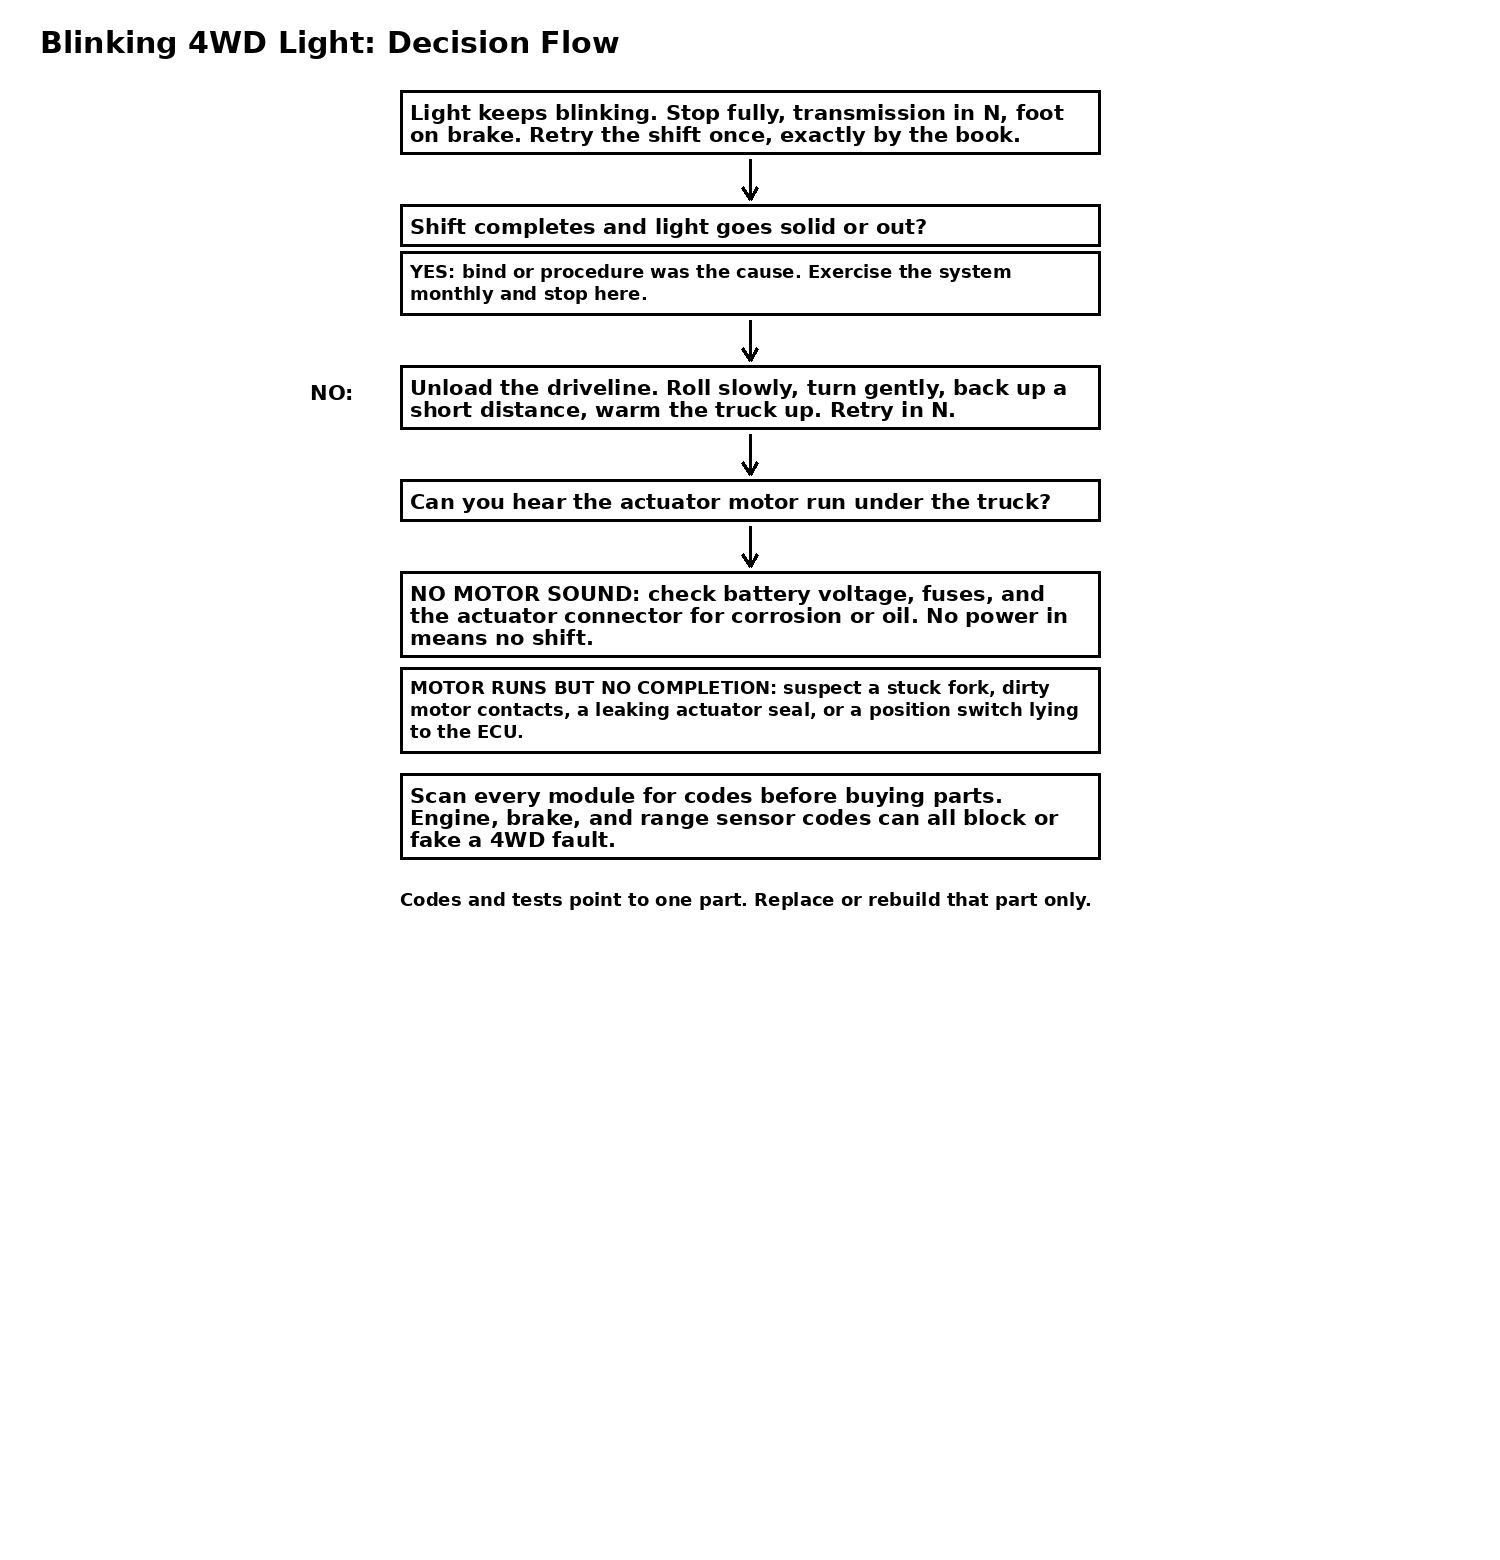
Blinks forever after a correct, patient retry: a real fault. Work the flowchart below.
Blinks at startup, with the check engine light and the slip light also on, on a truck you never shifted: suspect the rest of the truck first. Owner cases make this point twice. On IH8MUD, a GX460 with a blinking 4LO light traced back to a brake switch code, P0504. Clearing the code stopped the blink, and tripping the code again restarted it. On ClubLexus, a 2010 GX460 presented with blinking 4LO, check engine, and slip lights and a P0304 cylinder misfire code, on a truck that had not been out of high range in years. The 4LO light was a passenger in that fault, not the cause. Scan first. Fix the code you find. Then judge the transfer case.
Blinks on cold mornings and clears after a warm restart: owners of several Toyota trucks report this pattern, and the working theory in those threads is dirty contacts inside the actuator motor reading out of range when cold. Warm the truck for 5 to 10 minutes, restart, and see if the light clears and the shift works. If yes, your actuator is telling you it is tired. Plan the connector clean and inspection below instead of waiting for a hard failure on a trail.
Blinking Light Decision Flow
Step 1: the correct shift procedure, done slowly
Half of all blinking light complaints end here. Do it exactly, once, with no shortcuts.
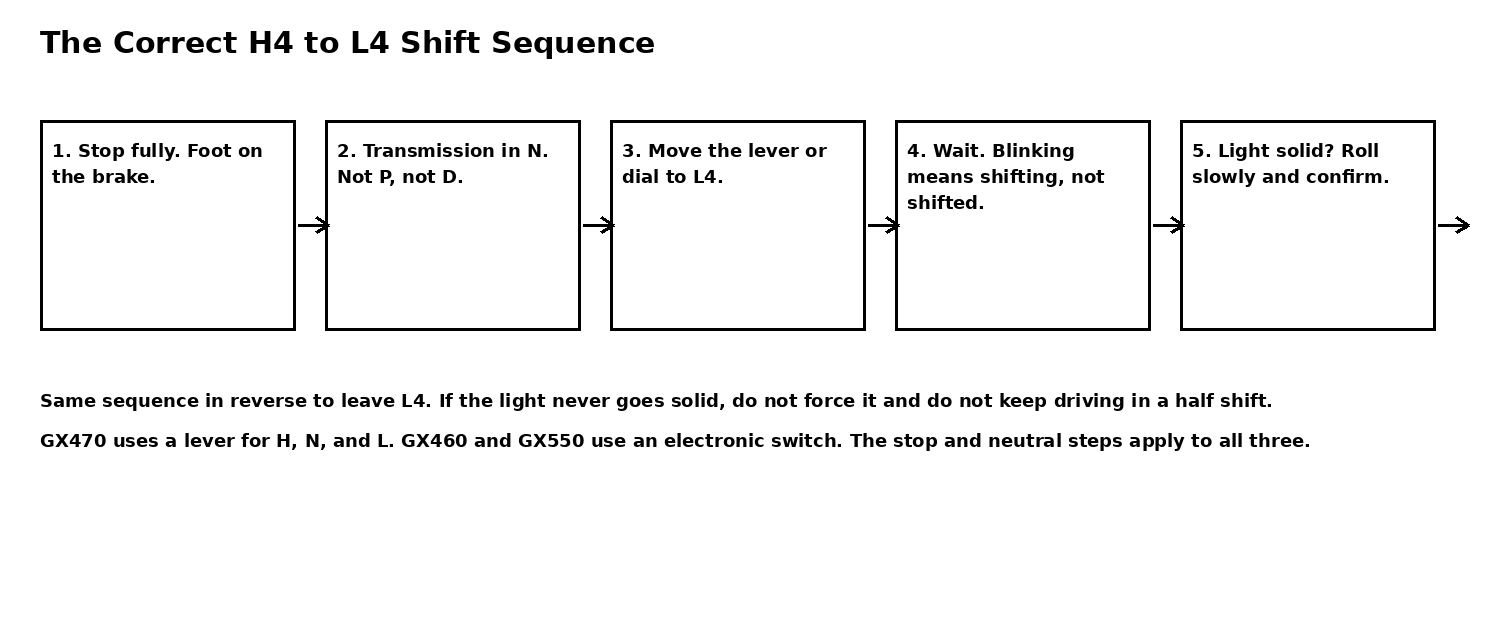
- Stop the vehicle completely. Foot on the brake.
- Put the transmission in N. Not P. Not D. The system needs N to unload the gears.
- Move the control. GX470: move the transfer lever fully into the range you want. GX460: push and turn the four wheel drive control switch to H4 or L4. GX550: push and turn the switch the same way.
- Wait. Hold the condition until the indicator turns on or off. Blinking during this wait is the system working, not failing.
- Only when the light is solid or out, shift back to D and roll slowly.
For the center diff lock switch, the conditions are looser. The GX550 owners manual states the lock switch can be operated with the engine switch ON and the vehicle speed under 62 mph, and the indicator blinks while locking and unlocking is in progress.[1] Even so, slow and straight is the easy way to help it finish.
The Correct Shift Sequence
Step 2: unload the driveline
A transfer case under bind cannot finish a shift. The gears and dog teeth are loaded against each other, and a small electric motor, or your hand on a GX470 lever, is not strong enough to force them. Release the load before you blame the motor.
Do these in a parking lot or on a quiet street, at walking speed:
- Drive slowly and turn gently from side to side. Small speed differences between the front and rear axles let the teeth line up.
- Back up a short distance, then try the shift again in N. The GX550 owners manual gives the same advice for a center diff lock that will not release: drive straight while accelerating or decelerating, or drive in reverse.
- Coast to a stop in N and try the shift while the truck is still rolling at a crawl, where your year and model allows it.
- Warm everything up. A cold, stiff transfer case with old fluid is the worst case for a marginal actuator. Ten minutes of driving has freed more than one stuck shift in owner reports, including trucks stuck in L4 in snow.
- Avoid dry pavement lock cycling. Test the center diff lock on gravel, dirt, or grass where the tires can slip a little. Repeated locked turns on dry asphalt are bind you are creating yourself.
GX470 lever note: if the lever moves but feels vague, or will not stay in the L gate, suspect the linkage and its bushings before the case internals. If the lever is solidly in the gate and the truck is still geared low, the shift fork inside has not moved, and that is a different job than an actuator.
Step 3: listen for the motor, then look at the connector
You need a helper for this test. Park on a quiet surface, windows down. Helper in the driver seat does the correct N procedure. You stand beside the truck and listen at the transfer case, roughly under the front seats.
A short whir or buzz, then a clunk: the motor ran. If the light still blinks, the motor is working against something stuck, or the position switch is not reporting the completed shift to the ECU. Go to the scan step, and read the repair decision section.
Silence: the motor never got power, or the motor is dead. Silence is good news for diagnosis, because the electrical checks are cheap and conclusive.
Clicking or repeated short attempts: the ECU is retrying. Weak battery voltage does this. So does a corroded connector dropping voltage under load.
Now get under the truck with a light. Find the actuator on the rear of the transfer case and its connector. Check for:
- Green or white corrosion in the connector, or pins pushed back.
- Oil on the connector or weeping from the actuator housing. On the GX470 center diff lock actuator this is the classic failure. The shaft seals age, transfer oil migrates into the motor, and the motor dies wet. A dry actuator with a dead motor is a different repair than an oil soaked one.
- A cracked housing, trail damage, or a harness rubbed through where it crosses the case.
- Fluid level in the transfer case itself. A case run low is hard on every part inside it. If you open the filler plug, it torques to 27 ft·lbf (37 N·m) on both the GX470 and the GX460.[2]
Unplug the connector. While it is apart, spray both halves with electrical contact cleaner and let them dry. Cleaning works while the connector is open, and the parts list below names a cleaner for the job. Then plug it in, unplug it, and plug it in again, so the pins wipe their contact surfaces twice. Owners report that reseating alone restored a faulting center diff signal more than once, which tells you the contact surfaces were the fault. Finish with a small amount of dielectric grease on the connector seal, not packed into the pins.
Shadetree tap test: with the helper working the switch, tap the actuator housing firmly with a rubber mallet. A motor with dirty or stuck brushes sometimes wakes up for one shift. If the tap test works, you have your answer and your warning. The actuator is on borrowed time. Do not celebrate and forget it. Plan the rebuild or replacement while the truck still shifts.
Step 4: power, ground, and fuses
Follow the order the factory manual uses for the GX460, because it is the right order for any of these trucks. Indicator lights first. Then ECU power supply and ground. Then the switch circuits. Then the actuator circuits. The ECU is condemned last, after everything it depends on tests good.
- Battery first. Test it or charge it. Low system voltage causes failed shifts, retry clicking, and codes in unrelated systems. If the truck sat for months, this step is not optional.
- Fuses next. Check the fuses for the four wheel drive control system listed in your owners manual and on the fuse box lid. Fuse names and positions differ by year, so this guide prints none. A blown fuse here means find the short before you replace the fuse a second time.
- ECU ground. The GX460 manual specifies the four wheel drive control ECU ground should measure below 1 ohm to body ground, and ECU power should read battery voltage with the ignition on. Any multimeter handles both checks.
- Position switches. On the GX460, the stability control system stores C1268 when it receives an abnormal L4 status signal, and C1282 for the center differential lock position switch.[3] A switch that lies makes a healthy actuator look broken, because the ECU stops the shift when the reported position makes no sense. Test the switch before you pay for a motor.
Step 5: scan every module, not just the engine
A basic code reader that only reads engine codes is not enough for this job. You need a tool that reads chassis codes and the four wheel drive system, or a shop scan. Read everything, write the codes down, then clear and retry the shift and see what returns.
What you are hunting for:
- Transfer position and center diff lock position switch codes, like the GX460 C1268 and C1282 above. These point at switches and their wiring.
- Range sensor and park neutral faults. One GX460 case on IH8MUD resolved to a park neutral switch fault, code P0705. If the truck cannot prove it is in N, the shift you are requesting may never be allowed to start.
- Engine and brake codes that arrived with the 4LO blink, like the P0504 brake switch and P0304 misfire cases above. Fix those first. The transfer complaint may leave with them.
- No codes at all, a motor that runs, and a shift that never completes. That pattern points back under the truck: stuck fork, worn motor contacts, oil in the actuator, or a mechanical bind inside the case.
No scanner that reads chassis codes? On the GX470 and GX460 you can blink-read the skid control codes at the DLC3 port under the driver side dash. The transfer position switch codes in this guide (C1268 and C1282 on the GX460) are stored by the stability control system, so they read out the same way. Jumper pin 13 (TC) to pin 4 (CG) with a short piece of wire, turn the ignition ON with the engine off, and count the warning light blinks: the first digit blinks, a 1.5 second pause, then the second digit. A steady fast blink, 0.25 seconds on and 0.25 off, is the normal pattern with no faults stored. Our KDSS guide documents this same check wire method end to end, including how the code cycle repeats and how to clear codes with the brake pedal. Engine codes are the exception. A jumper cannot read P codes on these trucks, so engine faults still need a scanner.

DLC3 Port: Jumper Pins 13 (TC) and 4 (CG) to Read Codes
Stuck in 4LO: the recovery sequence
You are geared low, the light may be solid or blinking, and you need high range back. Work down this list in order.
- Stop fully. Brake held. Transmission in N. Ask for H4 again, patiently. Wait a full 10 seconds.
- Roll the truck. Drive forward slowly in a gentle S turn for 30 to 50 feet, stop in N, retry. Then back up the same distance, stop in N, retry.
- Warm it up. If the truck is cold, drive in low range at low speed until everything is at full operating temperature, then retry. Snow and slush packed around the case and linkage have caused this exact complaint.
- Cycle the center diff lock. Lock it, roll slowly, unlock it, roll slowly, then retry the range shift. Moving the other fork sometimes frees the loaded one.
- GX470 only: work the lever with steady pressure, not force. If it will not move, unload more. A lever you have to force is a lever about to bend linkage.
- Last resort before a tow: disconnect the battery for 10 minutes to reset the control ECU, reconnect, start, and immediately request high range. Owners report this working on stuck trucks. Read and record your codes first, because the disconnect erases your evidence, and expect the truck to run oddly for a few minutes while it relearns idle.
- Still stuck: drive home in low range only if it is close, slow, and on surface streets. Low range at highway speed overspeeds the drivetrain. If home is far, tow it. A tow costs less than a transfer case.
Once it releases, do not just move on. Exercise the full sequence, high to low, lock and unlock, several times in one session. Then put the truck on a monthly exercise habit. Owners who use the system monthly report it staying free. Owners who discover low range for the first time in five years, usually on a boat ramp or in snow, are the ones writing the stuck threads.
Repair decisions: clean, rebuild, or replace
By now the tests should point at one part. Here is how to choose the repair.
Clean and exercise, cost near zero: the motor ran after a connector reseat, a tap, or a warm up, and there is no oil at the actuator. Clean the connector, change the transfer fluid if it is old or unknown, and exercise the system weekly for a month. GX470 fluid is API GL-5 SAE 75W-90, 1.4 L. GX460 fluid is Toyota Genuine Transfer Gear Oil LF SAE 75W, 1.4 L.[4] Fluid plugs on both trucks torque to 27 ft·lbf (37 N·m).[2] Owners report fresh fluid freeing a sticky actuator. An oil soaked or electrically dead motor is beyond a fluid change, so move on to the rebuild and replacement options.
Rebuild the GX470 center diff lock actuator: this is the well documented shadetree repair. The failure is usually the seals, not the motor windings. A seal kit with new shaft seals and the housing O-ring, OEM O-ring part number 90301-56009, costs a fraction of a new actuator.[5] Open the housing, clean the oil out, inspect the brushes and commutator, fit new seals, and regrease. Mark the housing and gear positions before you separate anything, and photograph every step. Timing matters on reassembly, in the next paragraph.
Replace the actuator assembly: choose this when the motor is burned, the housing is cracked, the gear teeth are damaged, or a rebuild failed. On both the GX470 and the GX460 manuals on file, the transfer shift actuator assembly mounts to the rear case with 3 bolts torqued to 15 ft·lbf (20 N·m), and the shift forks bolt to the actuator at 18 ft·lbf (24 N·m).[6][7] Fit a new O-ring on installation. Order by VIN. Actuator assemblies look alike across years and are not interchangeable by eye.
Timing warning, all trucks: the actuator gear, the shift forks, and the dash switch position must agree when you bolt it together. An owner in the Stuck in L4 thread pulled his transfer case motor, cleaned it, reassembled it misaligned, and had to do the whole job again. Before removal, set the system to a known state, high range and unlocked, mark the shaft and housing, and follow the manual for your exact year on installation. If the dash light and the actual range disagree after your install, you have a timing problem, not another bad part.
Replace a position switch: choose this when the truck mechanically shifts, you can hear and feel it, but the light never confirms it and the code names the switch circuit. Confirm with the multimeter tests in the manual before ordering. Switches are cheaper than actuators and are the part most often skipped in a parts cannon diagnosis.
The ECU is last: replace the four wheel drive control ECU only after power, ground, switches, wiring, and the actuator all test good, which is exactly where the factory inspection sequence puts it.
Keep it from happening again
- Exercise the system. Once a month, on a loose surface or a straight quiet street, shift high to low and back, and lock and unlock the center diff. Owner consensus, not a factory interval, and it is the single habit every stuck thread wishes the previous owner had kept.
- Service the transfer fluid on schedule, and after any deep water crossing.
- Keep the battery healthy. A truck that sits needs a maintainer, or it needs to be driven.
- After underbody work, a lift install, or suspension work, test the full 4WD sequence in your driveway. Owner threads include center diff lights that started right after a front shock install, traced to a strained ABS sensor wire. New lights after work are about the work until proven otherwise.
Parts and tools
For diagnosis:
- Scan tool that reads chassis and manufacturer codes, not engine codes only: the LAUNCH CRP919X reads all systems on these trucks
- Klein MM720 multimeter
- Battery charger or maintainer (NOCO GENIUS10), and a jump pack if the truck sits
- Rubber mallet, for the tap test
- CRC QD contact cleaner and Permatex dielectric grease
- Flashlight or work light for the under truck connector inspection
- Owners manual, for your year specific fuse list and shift procedure
For actuator service, after diagnosis points there:
- Socket set, ratchet, and extensions to reach the rear of the transfer case
- Torque wrench covering 15 ft·lbf (20 N·m) to 27 ft·lbf (37 N·m)
- New actuator O-ring (genuine Toyota 90301-56009), and a GX470 actuator seal kit if you are rebuilding
- Transfer gear oil from the table below, and new filler and drain plug gaskets
- Drain pan, fluid pump for quart bottles, shop towels, and brake cleaner
- Marker and phone camera, for timing marks and reassembly photos
Transfer gear oil, by generation:[8]
| Generation | Transfer gear oil | Capacity (drain and refill) |
|---|---|---|
| GX470 (2003-2009) | API GL-5 SAE 75W-90 | 1.4 L (1.5 US qts) |
| GX460 (2010-2023) | Toyota Genuine Transfer Gear Oil LF, SAE 75W (US part 08885-81080) | 1.4 L (1.5 US qts) |
| GX550 (2024 and up) | Toyota Genuine Transfer Gear Oil LF, SAE 75W | 1.78 L (1.88 US qts) |
Shadetree alternatives. No chassis capable scan tool? Many parts stores will read codes free, but ask specifically whether their tool reads chassis codes, because a basic engine only read will miss the position switch codes that matter here. No torque wrench? Borrow one or use a parts store loaner. The actuator bolts are small and the case is aluminum. Guessing tight is how threads get pulled. No helper for the listen test? A phone recording video under the truck, pointed at the transfer case while you work the switch from the seat, captures the motor sound well enough to judge.
FAQ
The 4LO light blinks but the truck drives fine. Can I keep driving?
If the truck is confirmed in high range, yes, drive it and diagnose it soon. Confirm high range by gearing feel at speed, not by the light. If the truck is actually stuck in low range, keep speeds low and distances short. A blinking light with a check engine or slip light is a code in another system until a scan proves otherwise.
Is a blinking light always the actuator?
No. The common causes in order are procedure, driveline bind, a system that sat unexercised, weak battery voltage, a corroded or oil soaked connector, a position switch lying to the ECU, and only then a failed actuator motor. Owner cases include a brake switch code and a misfire code presenting as a blinking 4LO light.
How do I know if the actuator motor is even trying?
The listen test. Helper in the seat, transmission in N, you beside the transfer case. A whir and a clunk means the motor ran. Silence means power, ground, fuse, connector, or a dead motor. Repeated clicking usually means low voltage or a retry against a stuck shift.
My GX470 lever will not come out of L. Is that electrical?
Usually not. The GX470 high-low shift is moved by your hand through a linkage. Start with unloading the driveline, warming the truck, and checking lever and linkage feel. The electric actuator on a GX470 runs the center diff lock, which is a separate complaint with a separate light.
The light only blinks on cold mornings. Should I worry?
Treat it as an early warning. Warm up and restart clearing the light matches the dirty actuator contact pattern owners report. Do the connector inspection and clean, change neglected transfer fluid, and exercise the system. A truck that does this monthly is telling you the actuator service is coming.
Can I rebuild the actuator instead of replacing it?
On the GX470 center diff lock actuator, yes, and it is the standard shadetree repair when oil has leaked past the shaft seals into the motor. The seal kit is cheap. The job fails on reassembly timing, not on the seals, so mark positions and photograph everything. On a GX460, weigh your time against a replacement assembly, and confirm serviceability for your exact year before opening it.
What does an actuator replacement cost at a shop?
This guide prints no price, because quotes in owner threads vary widely by region and by whether the quote is for the part alone or a full dealer transfer case job. Get the diagnosis in writing, with the code or test that condemned the actuator, before approving any quote. A quote with no test behind it is a guess you are paying for.
Sources
- GX470 factory service manual, transfer torque specifications and transfer assembly procedure.
- GX460 factory service manual, VF4BM transfer torque specifications, four wheel drive control system inspection, and vehicle stability control DTCs C1268 and C1282.
- GX550 owners manual, four wheel drive control switch and center differential lock operation.
- GX460 owners manual, shifting between H4 and L4 and blinking indicator recovery: https://lexusgxor.com/_media/general:2016_gx_460_owners_manual_canada.pdf
- IH8MUD, Stuck in L4: https://forum.ih8mud.com/threads/stuck-in-l4.1334155/
- IH8MUD, Center diff lock not working, GX470: https://forum.ih8mud.com/threads/center-diff-lock-not-working-gx470.1331410/
- IH8MUD, GX 470 CDL stuck locked: https://forum.ih8mud.com/threads/gx-470-cdl-stuck-locked.1245342/
- IH8MUD, 4Lo blinking, unrelated DTC (P0504): https://forum.ih8mud.com/threads/4lo-blinking-unrelated-dtc-p0504.1333485/
- IH8MUD, What causes the diff lock light and the 4LO light on the dash flashing?: https://forum.ih8mud.com/threads/what-causes-the-diff-lock-light-and-the-4lo-light-on-the-dash-flashing.1246126/
- IH8MUD, 2010 GX460 blinking 4LO, check engine and slip lights: https://forum.ih8mud.com/threads/2010-gx460-blinking-4lo-check-engine-and-slip-lights.1313681/
- ClubLexus, 2010 GX460 blinking 4LO plus check engine plus slip with P0304: https://www.clublexus.com/forums/gx-2nd-gen-2010-2023/1004609-2010-gx460-blinking-4lo-check-engine-slip-w-p0304.html
- The Truck Garage, GX Center Diff Lock and 4WD Explained: https://thetruckgarage.com/gx-center-diff-lock-4wd-guide/
Footnotes
[1] GX550 owners manual claim: the center differential lock switch can be operated when the engine switch is ON and the vehicle speed is less than 62 mph (100 km/h), and the indicator blinks while locking or unlocking.
[2] GX470 and GX460 factory service manuals, transfer torque specifications: filler plug and drain plug to transfer case, 27 ft·lbf (37 N·m) on both trucks.
[3] GX460 factory service manual, vehicle stability control system: DTC C1268, Transfer L4 Position Switch Circuit, and DTC C1282, Center Differential Lock Position Switch.
[4] Transfer gear oil specifications from the factory manuals on file: GX470, API GL-5 SAE 75W-90, capacity 1.4 L. GX460, Toyota Genuine Transfer Gear Oil LF SAE 75W, capacity 1.4 L.
[5] GX470 center diff lock actuator housing O-ring, OEM part number 90301-56009, as used in the actuator seal kit verified during the October 11, 2026 center diff guide research.
[6] GX470 factory service manual, transfer torque specifications: transfer shift actuator assembly to rear case, 15 ft·lbf (20 N·m). Center differential lock fork to transfer shift actuator assembly, 18 ft·lbf (24 N·m).
[7] GX460 factory service manual, VF4BM transfer torque specifications: transfer shift actuator assembly to rear transfer case, 15 ft·lbf (20 N·m). No. 2 transfer gear shift fork and center differential lock fork to transfer shift actuator assembly, 18 ft·lbf (24 N·m).
[8] GX550 transfer oil from the GX550 owners manual specifications: Toyota Genuine Transfer Gear Oil LF, SAE 75W, capacity 1.88 qt (1.78 L). GX470 and GX460 oil and capacity per footnote 4.
Leave a Reply