Related guides: GX dash warning lights guide. GX460 KDSS guide. GX transmission cooling guide.
Parts and tools
A short jumper wire or a paperclip. A level surface: a flat driveway or garage floor, not a sloped street. No scanner needed. Toyota’s official jumper is SST 09843-18040, but a paperclip does the same job.
What zero point calibration is
The yaw rate sensor and the deceleration sensor sit under the center console. They tell the skid control computer which way the truck is turning and how hard it is braking. Zero point calibration teaches the computer what “straight ahead on level ground” reads as on your sensors. Without a stored zero point, the VSC system cannot trust its own readings, so it turns VSC and TRAC off and lights the VSC OFF and VSC TRAC lamps.
When you need it
Do this procedure after a suspension lift, an alignment, replacing the yaw rate or deceleration sensor, steering angle sensor work, or a battery disconnect that wiped the stored data. The classic symptom is VSC OFF and VSC TRAC lights with no check engine light, especially right after suspension or alignment work. If a scan shows codes indicating the yaw rate or deceleration sensor zero point is undone, this is the fix.
This only applies to an actual VSC system fault. If the check engine light is on too, read the engine codes first. A C1201 follower pattern means the engine set a code and the VSC lights are following it. Calibration will not fix that. See the dash warning lights guide for the full diagnostic sequence.
Before you start
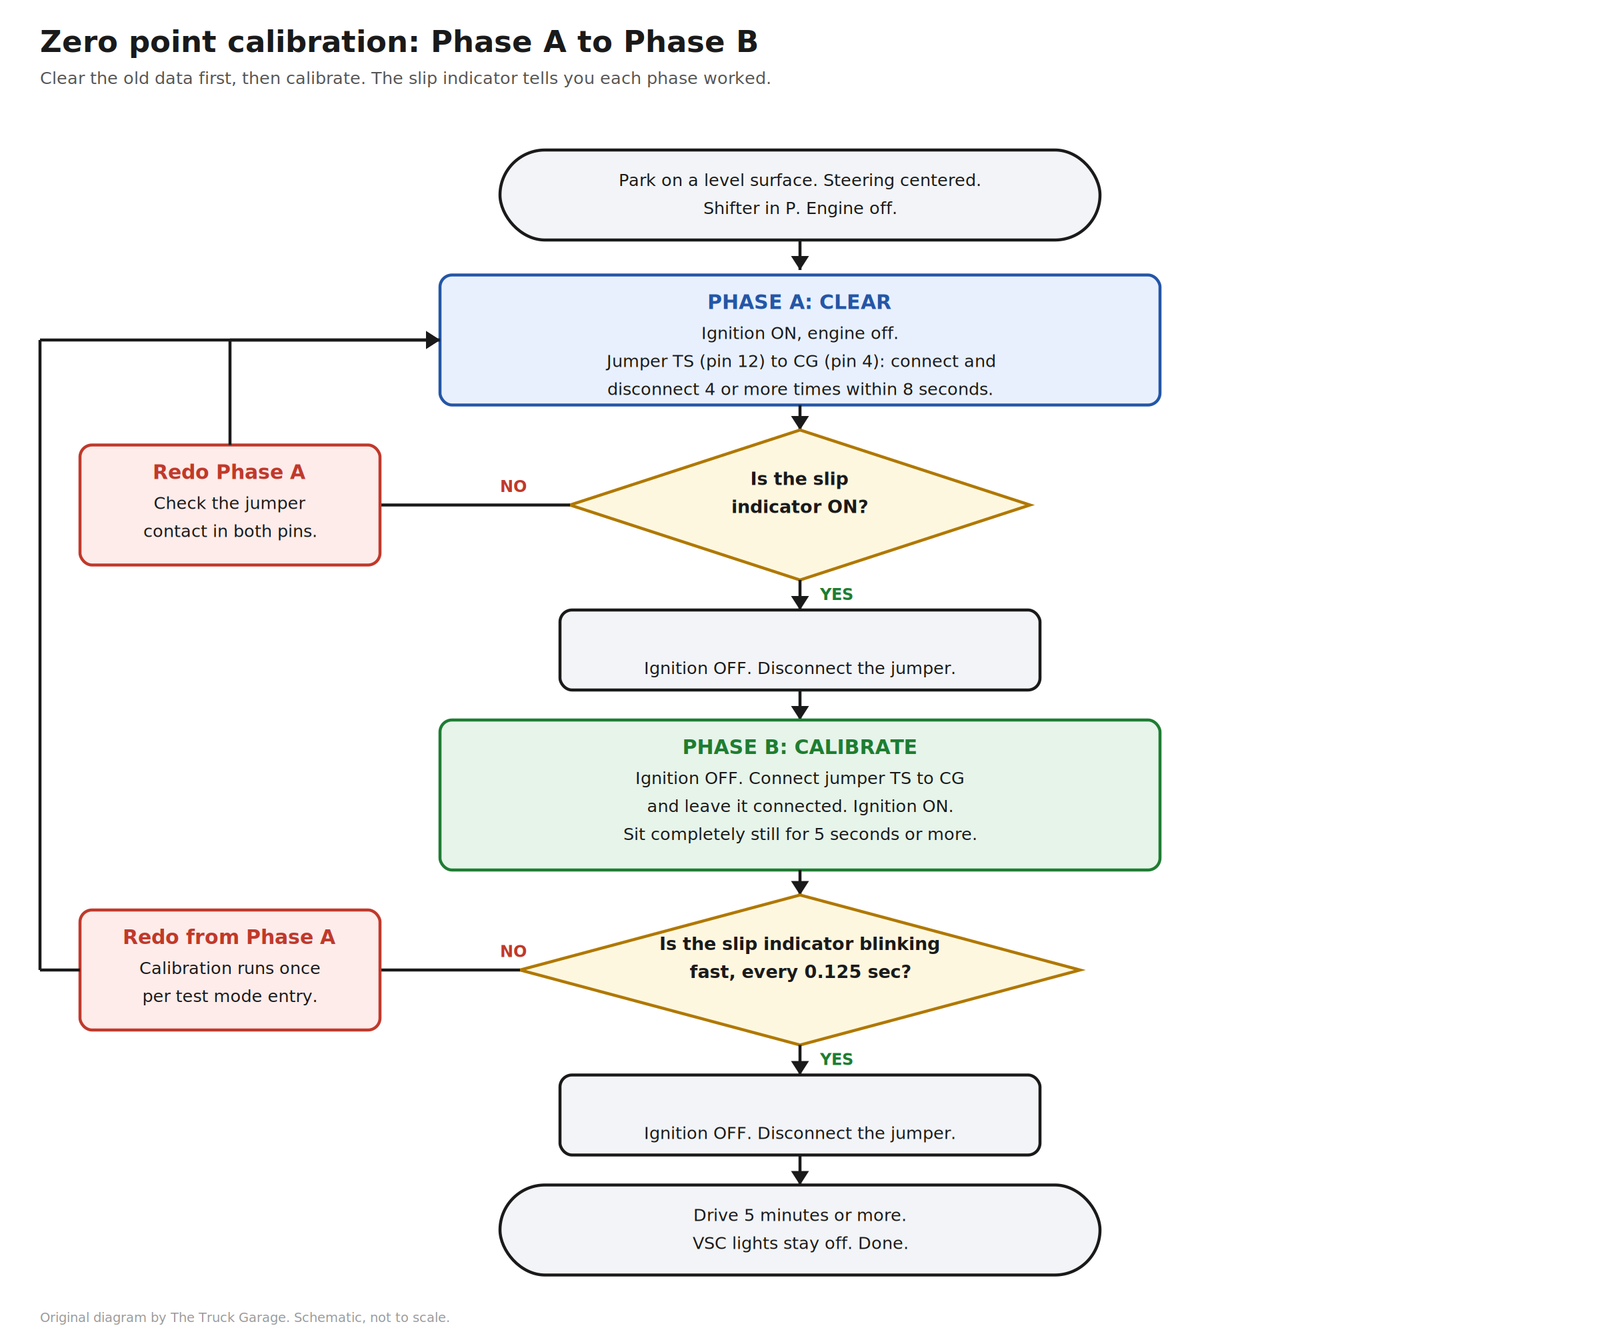
Park on a level surface, under 1 degree of slope. A flat garage floor works. A sloped driveway does not. Center the steering wheel. Put the shifter in P. Engine off. Nobody should rock the truck during the procedure.
Phase A: clear the old data
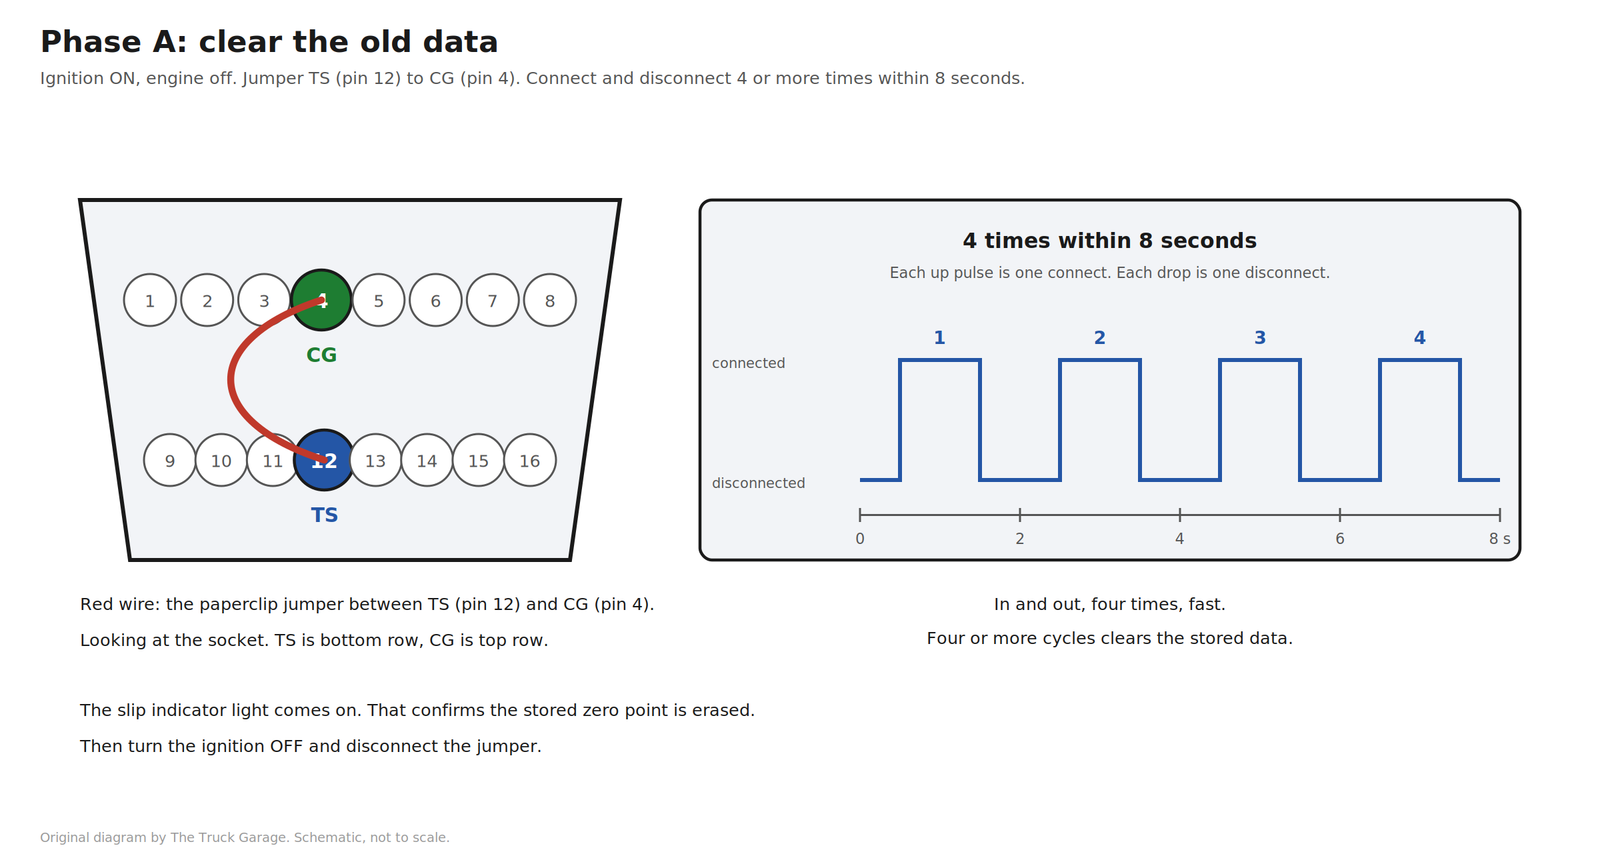
- Turn the ignition ON with the engine off.
- Connect and disconnect a jumper between TS (pin 12) and CG (pin 4) of the DLC3 port, 4 or more times within 8 seconds. In and out, four times, fast.
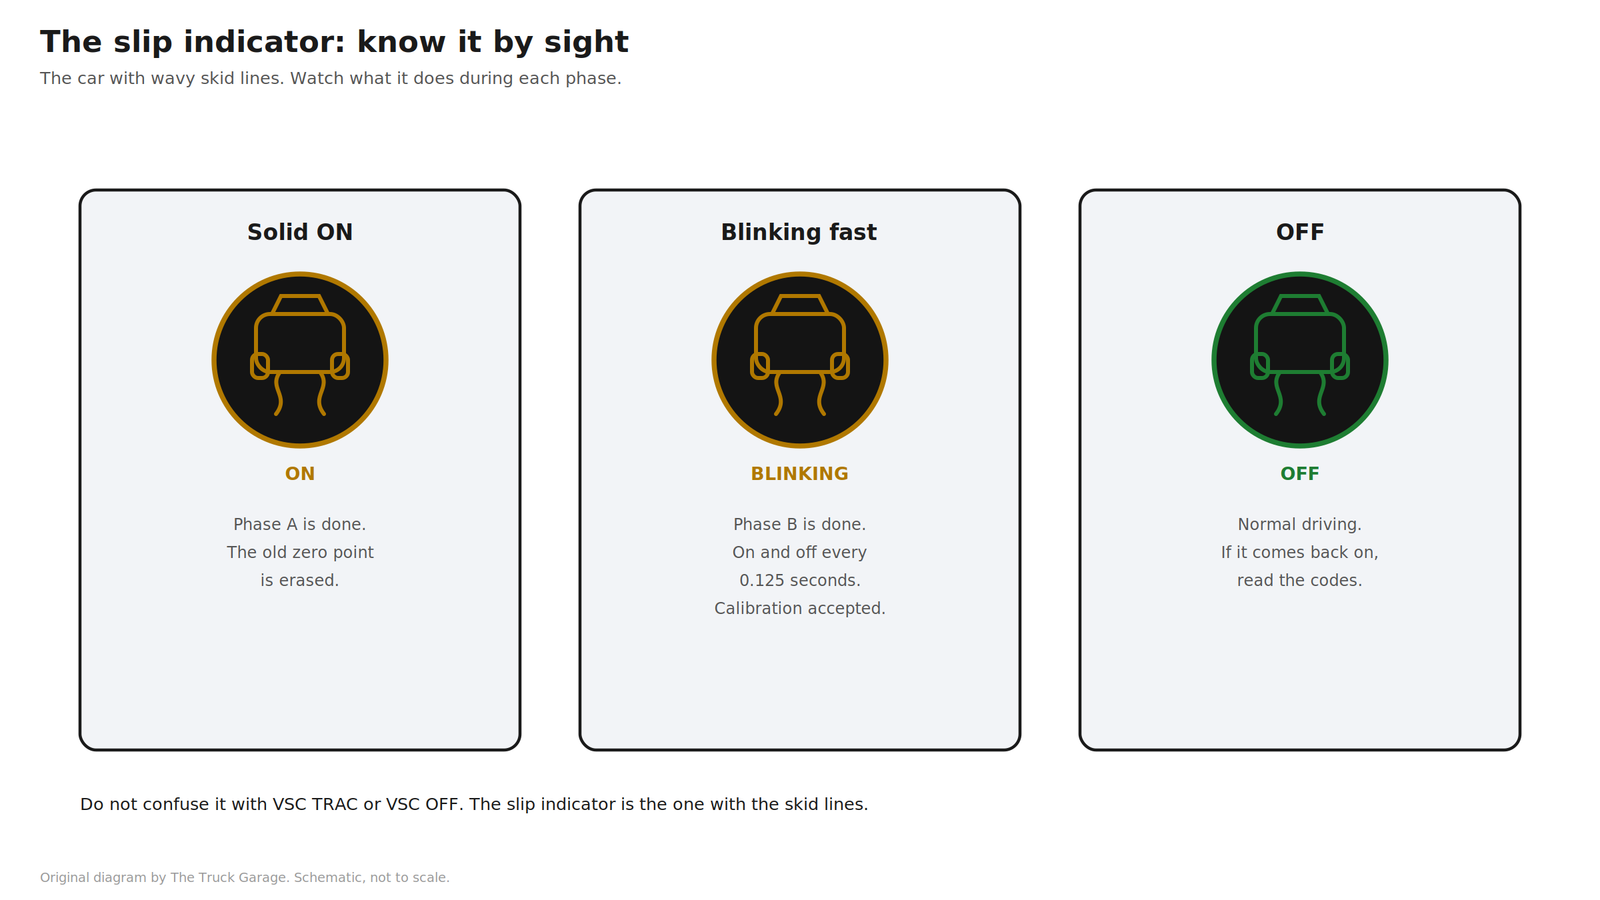
- The slip indicator light comes on. That confirms the stored zero point is erased.
- Turn the ignition OFF and disconnect the jumper.
On the GX460, the multi-information display shows “DIAG VSC OK” after the clear. An older Toyota service bulletin adds a confirmation step: turn the ignition ON with no jumper connected and verify the VSC warning light goes off about 15 seconds after turning the key on.
Phase B: calibrate
- Ignition OFF. Connect the jumper between TS (pin 12) and CG (pin 4) and keep it connected.
- Turn the ignition ON with the engine off.
- Keep the truck completely stationary on the level surface for 5 seconds or more. On the GX470 the manual specifies 5 seconds or more. GX460-era documentation specifies 2 seconds or more. Either way, sit still and wait.
- The slip indicator light comes on for several seconds, then starts blinking in the test mode pattern: on and off every 0.125 seconds. That blink pattern is your confirmation.
- If the slip indicator does not blink, the calibration did not take. Redo the procedure from Phase A.
- Turn the ignition OFF and disconnect the jumper.
One important detail: calibration happens only once per test mode entry. If you need to repeat the procedure, clear the data again first with Phase A.
On the GX460, the multi-information display shows “VSC TEST MODE” during calibration.
Confirm it worked
Drive the truck for at least 5 minutes. GX470 procedures call for driving straight at 25 mph or more for 10 seconds as part of the confirmation. The VSC lights should stay off. If they come back, read the codes. A returning yaw or deceleration sensor code means the sensor itself may be faulty, not just uncalibrated.
If it does not work
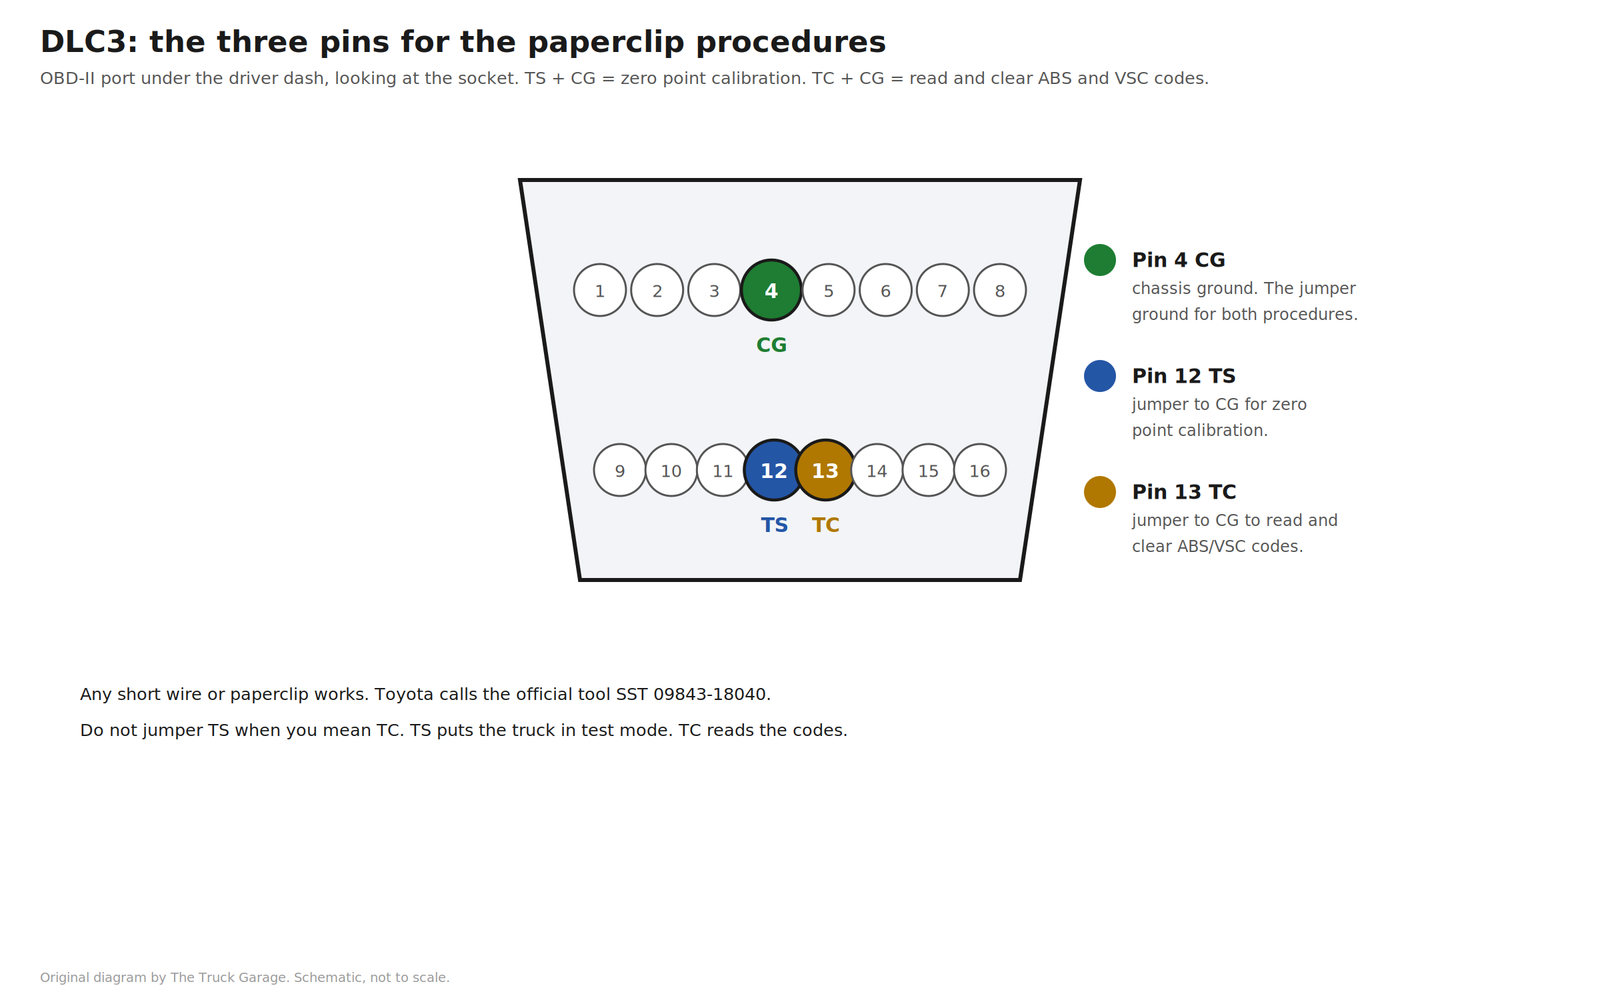
Check the basics first. The surface must be level. The steering wheel must be centered. The jumper must be making contact in both pins. TS is pin 12 and CG is pin 4. Do not confuse TS with TC (pin 13). TC reads codes. TS is the test mode terminal for this procedure.
If the lights return with wheel speed sensor codes, the problem is a sensor or its wiring, not the zero point. If the check engine light is on, fix the engine fault first. A scanner with chassis functions or Toyota Techstream can also perform this calibration if the paperclip method is not cooperating.
Sources
- GX470 factory VSC zero point procedure, clear and calibrate (manual mirror): http://zatonevkredit.ru/repair_manuals/raw_content/AWHi_0ZTBFyj9RK3duM7
- GX470 VSC calibration test mode variant (manual mirror): http://zatonevkredit.ru/repair_manuals/raw_content/GvvT2GQBBfN0Dix8YVeO
- GX460 and Prado era yaw rate and G sensor calibration document: https://gershon.ucoz.com/TOYOTA/PRADO/LAND_CRUISER_YAW_RATE_SENSOR_CALIBRATION.pdf
- Toyota zero point calibration service bulletin extract via ClubLexus: https://www.clublexus.com/forums/attachments/sc430-2nd-gen-2001-2010-63/02-sc430-vsc-on-and-off-lights-no-code-506581/zero-point-calibration-1–482867d1637984344dl?s=e8172660cd952c38557069886d935445
- GX470 owner confirming pins 4 and 12: https://forum.ih8mud.com/threads/2005-gx-470-obd-ii-pinout.1022140/
Leave a Reply